
Home>Create & Decorate>DIY & Crafts>Pallet Fence: A DIY Guide To Creating A Rustic And Budget-Friendly Barrier
DIY & Crafts
Pallet Fence: A DIY Guide To Creating A Rustic And Budget-Friendly Barrier
Published: May 31, 2024

Senior Editor in Create & Decorate, Kathryn combines traditional craftsmanship with contemporary trends. Her background in textile design and commitment to sustainable crafts inspire both content and community.
Learn how to build a rustic and budget-friendly pallet fence with our DIY guide. Perfect for DIY & Crafts enthusiasts looking for a unique barrier solution.
(Many of the links in this article redirect to a specific reviewed product. Your purchase of these products through affiliate links helps to generate commission for Twigandthistle.com, at no extra cost. Learn more)
Introduction
Are you looking to add a touch of rustic charm to your property while staying within a budget? A pallet fence might just be the perfect solution for you. This DIY guide will walk you through the process of creating a unique and cost-effective barrier using pallets. Whether you're a seasoned DIY enthusiast or a newcomer to the world of home improvement, building a pallet fence can be a rewarding and achievable project. Let's dive into the benefits of using pallets for fencing and explore the step-by-step process of bringing this rustic vision to life.
Benefits of Using Pallets for Fencing
-
Cost-Effective: Pallets are often readily available for little to no cost, making them an affordable option for creating a fence. This can be especially advantageous for those looking to fence a large area without breaking the bank.
-
Environmentally Friendly: By repurposing pallets for fencing, you are contributing to sustainable practices by giving new life to materials that might otherwise go to waste. This eco-friendly approach adds a unique touch to your property while reducing environmental impact.
-
Customizable Design: Pallets offer a versatile canvas for creativity. You can choose to leave them in their natural state for a more rustic look, or paint and stain them to match your desired aesthetic. The ability to customize the appearance of your fence allows for a personalized touch to your outdoor space.
-
Quick and Easy Installation: Compared to traditional fencing materials, pallets can be relatively easy to work with. Their uniform size and shape make assembly straightforward, potentially saving you time and effort during the installation process.
-
Durable and Sturdy: When properly maintained, pallets can provide a durable fencing solution. Their robust construction can withstand outdoor elements, offering a long-lasting barrier for your property.
-
Versatile Functionality: In addition to serving as a boundary, pallets can be repurposed for various DIY projects. This versatility means that any leftover pallets from your fencing project can be used for future home improvement endeavors.
By considering these benefits, you can see why using pallets for fencing is an attractive option for homeowners seeking a budget-friendly, sustainable, and visually appealing barrier for their property. Now, let's move on to the tools and materials needed for this project.
Tools and Materials Needed
Before diving into the construction of your pallet fence, it's essential to gather the necessary tools and materials to ensure a smooth and efficient building process. Here's a comprehensive list of what you'll need:
Tools:
- Measuring Tape: Essential for accurately determining the dimensions of your fence and ensuring uniformity during construction.
- Circular Saw or Reciprocating Saw: Used for cutting the pallets to the desired size and shape, allowing for customization based on your fencing design.
- Hammer or Nail Gun: Required for securing the pallets together and attaching them to supporting posts.
- Level: Ensures that the fence is straight and properly aligned during installation, contributing to its overall stability and visual appeal.
- Work Gloves and Safety Goggles: Protect your hands and eyes from potential splinters and debris while handling the pallets and using power tools.
Materials:
- Pallets: The primary building blocks of your fence. Depending on the size of your project, you'll need an ample supply of pallets to complete the barrier.
- Supporting Posts: These can be wooden or metal posts that will provide structural stability for the fence. The number of posts required will depend on the length and height of your fence.
- Nails or Screws: Used to secure the pallets to the supporting posts and to attach individual pallets together, ensuring a sturdy and cohesive construction.
- Concrete Mix: If using wooden supporting posts, concrete will be needed to secure them firmly into the ground, preventing shifting or leaning over time.
- Paint or Stain (Optional): If you choose to customize the appearance of your pallet fence, paint or stain can be used to achieve your desired aesthetic.
By having these tools and materials at your disposal, you'll be well-equipped to embark on the construction of your pallet fence. With everything in place, the next step is to prepare the pallets for assembly.
Preparing the Pallets
-
Inspect and Clean: Before using the pallets for your fence, carefully inspect each one for any damage, such as rot, splinters, or protruding nails. Remove any nails or staples that may pose a hazard during handling. Additionally, give the pallets a thorough cleaning to remove dirt, debris, and any potential contaminants. This step ensures that the pallets are safe to handle and provides a clean surface for any desired painting or staining.
-
Trim and Customize: Depending on your design preferences, you may need to trim the pallets to achieve the desired height and shape for your fence. Use a circular saw or reciprocating saw to carefully cut the pallets to the appropriate size, ensuring uniformity across the entire fence. This step allows for customization, enabling you to create a visually appealing and functional barrier that suits your specific needs.
-
Sand and Smooth: After trimming the pallets, it's essential to sand down any rough edges or surfaces. This not only enhances the overall appearance of the fence but also reduces the risk of splinters and ensures a safe environment, especially if children or pets will be around the fenced area. Pay close attention to areas where cuts were made, as they may require additional smoothing to achieve a consistent texture.
-
Apply Protective Finish (Optional): If you've chosen to paint or stain your pallet fence, this is the stage to apply the protective finish. Select a high-quality outdoor paint or stain that is suitable for the type of wood used in the pallets. Ensure that the finish is weather-resistant and provides long-term protection against the elements. Applying a protective finish not only enhances the visual appeal of the fence but also extends its lifespan by shielding the wood from moisture and UV exposure.
-
Arrange for Assembly: Once the pallets are inspected, cleaned, trimmed, and optionally finished, arrange them in the order in which they will be installed. This step allows you to visualize the layout of the fence and make any final adjustments before proceeding with the assembly process. By preparing the pallets in advance, you can streamline the construction phase and address any potential issues proactively.
By meticulously preparing the pallets for your fence, you set the stage for a successful and visually striking installation. With the pallets ready for assembly, you can now move on to the exciting phase of building your rustic and budget-friendly barrier.
Building the Fence
Now that the pallets are prepped and ready, it's time to embark on the construction phase of your pallet fence. Follow these step-by-step instructions to bring your rustic vision to life:
-
Setting the Supporting Posts: Begin by determining the placement of your supporting posts. Using a post hole digger or auger, dig holes at regular intervals along the intended fence line. The spacing will depend on the size and stability required for your specific project. Once the holes are dug, insert the supporting posts and ensure they are level and securely positioned.
-
Securing the Posts: If using wooden supporting posts, fill the holes with concrete mix to firmly anchor the posts in place. This step is crucial for providing stability and preventing the fence from leaning or shifting over time. Allow the concrete to set according to the manufacturer's instructions before proceeding.
-
Attaching the Pallets: With the supporting posts in place, it's time to attach the pallets to create the fence panels. Using a hammer or nail gun, secure the pallets to the supporting posts, ensuring they are evenly spaced and aligned. Depending on your design, you may choose to attach the pallets horizontally or vertically, creating a unique visual appeal.
-
Connecting the Pallets: As you progress along the fence line, connect the individual pallets to each other using nails or screws. This step enhances the structural integrity of the fence and creates a cohesive barrier. Pay attention to the alignment and spacing of the pallets to achieve a professional and polished finish.
-
Adding Gate and Finishing Touches: If your design includes a gate, construct it using trimmed pallets and hinges for functionality. Once the main structure is in place, consider adding finishing touches such as decorative elements, planters, or outdoor lighting to further enhance the aesthetic appeal of your pallet fence.
-
Ensuring Stability and Alignment: Throughout the construction process, regularly check the stability and alignment of the fence. Use a level to ensure that the panels are straight and evenly positioned, making any necessary adjustments as you progress. This attention to detail contributes to the overall quality and longevity of your pallet fence.
By following these steps, you can successfully build a sturdy and visually captivating pallet fence that adds character and charm to your property. With the fence in place, it's important to consider the maintenance and care required to preserve its appeal and functionality over time. Let's explore some essential tips for maintaining your pallet fence.
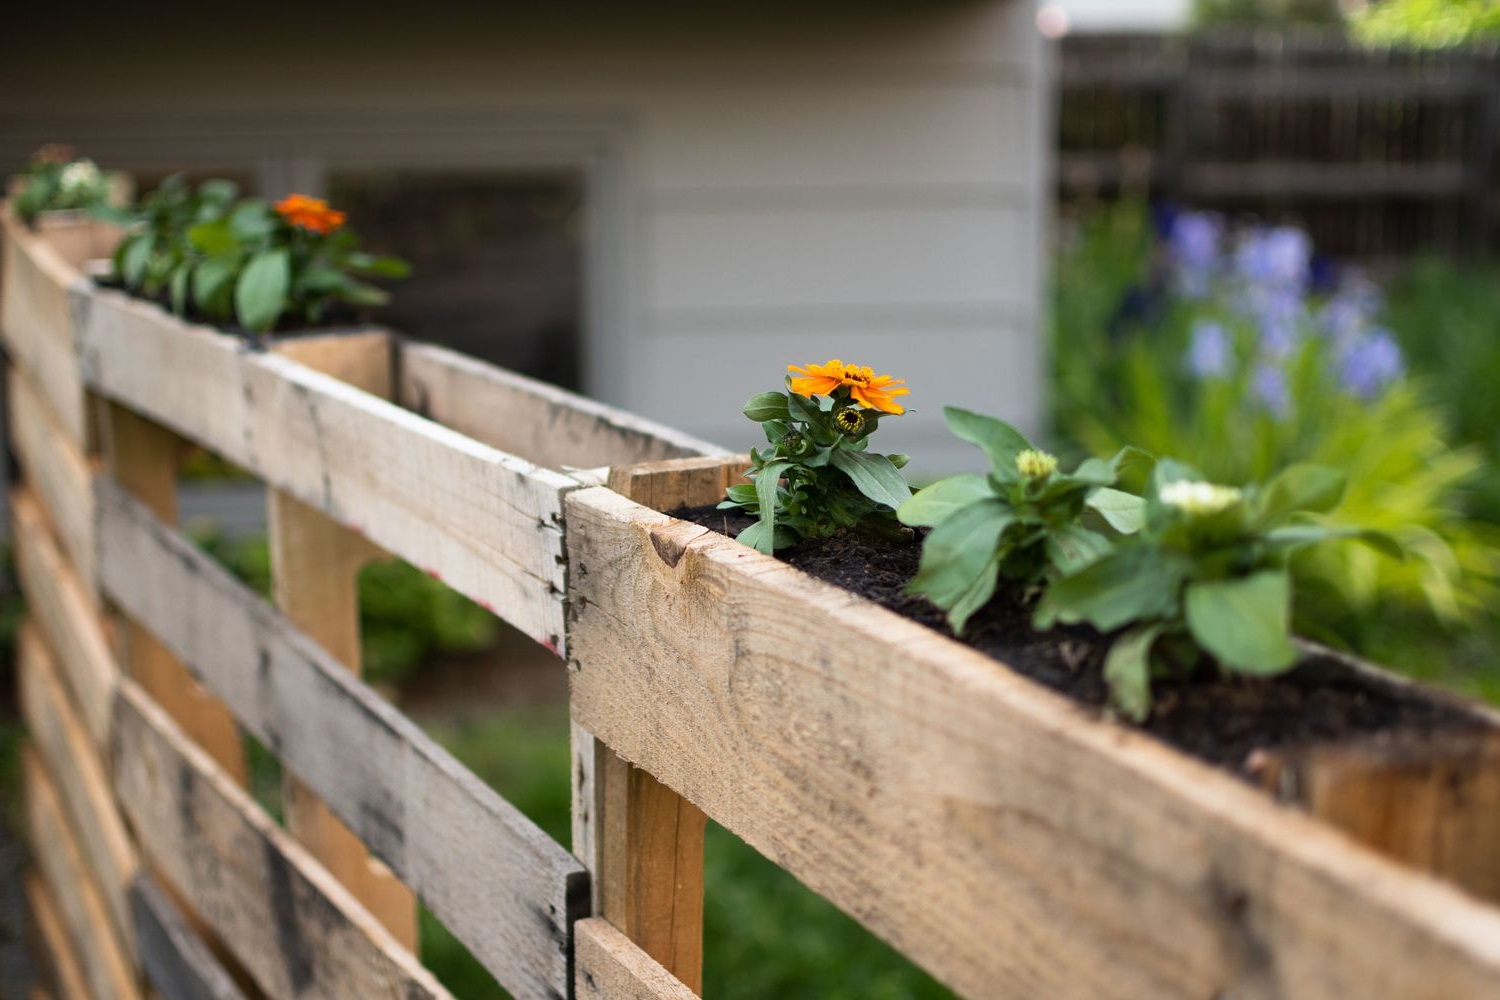
Adding Finishing Touches
Once the main structure of your pallet fence is in place, it's time to add those final touches that will elevate its visual appeal and functionality. Here are some creative ideas for putting the finishing touches on your rustic and budget-friendly barrier:
-
Decorative Elements: Incorporate decorative elements such as ornamental metalwork, wooden accents, or artistic embellishments to infuse personality into your fence. These additions can serve as focal points and contribute to the overall aesthetic of your outdoor space.
-
Planters and Greenery: Integrate planters or hanging baskets directly onto the fence to introduce greenery and floral displays. This not only softens the appearance of the fence but also adds a touch of natural beauty to your property.
-
Outdoor Lighting: Install solar-powered or low-voltage lighting along the top or at strategic intervals of the fence. This not only enhances the ambiance of your outdoor area but also provides illumination for evening gatherings and enhances security.
-
Functional Gate Design: If your fence includes a gate, consider incorporating a unique and functional design that complements the overall style of the fence. Whether it's a traditional hinged gate or a creatively repurposed pallet door, the gate can serve as a focal point while providing practical access to your enclosed space.
-
Staining or Painting: If you haven't already applied a protective finish to the pallets, consider staining or painting the fence to enhance its visual appeal and longevity. Choose a color that harmonizes with your outdoor surroundings and complements the overall aesthetic of your property.
-
Custom Signage: Personalize your fence with custom signage, house numbers, or inspirational quotes. This adds a charming and welcoming touch to your outdoor space while allowing for creative expression.
By incorporating these finishing touches, you can transform your pallet fence into a captivating and functional feature of your property. These details not only enhance the visual appeal of the fence but also contribute to the overall ambiance of your outdoor living space. With the finishing touches in place, your pallet fence will stand as a testament to your creativity and resourcefulness in DIY home improvement.
Maintenance and Care Tips
Once your pallet fence is in place, it's essential to implement a regular maintenance routine to ensure its longevity and continued visual appeal. Here are some crucial maintenance and care tips to keep your rustic and budget-friendly barrier in top condition:
-
Inspect for Damage: Regularly inspect the entire fence for any signs of damage, such as loose or broken pallets, protruding nails, or areas of wear and tear. Addressing these issues promptly can prevent further deterioration and maintain the structural integrity of the fence.
-
Repair and Replace: If any pallets are damaged or compromised, make necessary repairs or replacements as soon as possible. Secure loose pallets, replace broken ones, and reinforce any weak areas to prevent potential safety hazards and preserve the overall stability of the fence.
-
Protective Coating Maintenance: If you've applied a protective finish such as paint or stain, periodically assess the condition of the coating. Touch up any areas where the finish has worn away to safeguard the wood from moisture, UV exposure, and other environmental factors that could lead to deterioration.
-
Weed and Debris Control: Keep the area around the fence clear of weeds, overgrown vegetation, and debris. This not only enhances the visual appeal of the fence but also prevents organic matter from accumulating against the wood, which can lead to moisture retention and potential decay.
-
Regular Cleaning: Periodically clean the surface of the pallets to remove dirt, grime, and environmental buildup. Use a mild detergent and water to gently scrub the wood, followed by thorough rinsing. Avoid using harsh chemicals that could damage the wood or compromise any protective finishes.
-
Inspect Supporting Posts: Check the condition of the supporting posts to ensure they remain stable and securely anchored. Address any signs of shifting, leaning, or deterioration promptly to maintain the overall structural integrity of the fence.
-
Seasonal Maintenance: Consider seasonal maintenance tasks, such as applying a fresh coat of protective finish before harsh weather sets in. Additionally, inspect the fence after severe weather events to identify and address any damage promptly.
-
Pest Control: Implement measures to deter pests that may be attracted to the wood, such as termites or wood-boring insects. Consider using environmentally friendly pest control methods to protect the integrity of the fence without harming the surrounding ecosystem.
By incorporating these maintenance and care tips into your routine, you can ensure that your pallet fence remains a durable, visually appealing, and functional addition to your property for years to come. Regular attention to maintenance not only preserves the aesthetic appeal of the fence but also contributes to its overall longevity and performance.
Conclusion
In conclusion, building a pallet fence offers a myriad of benefits, including cost-effectiveness, environmental sustainability, and customizable design options. By repurposing pallets and following the step-by-step guide provided, homeowners can create a rustic and budget-friendly barrier that adds character and charm to their outdoor space. From preparing the pallets to adding finishing touches and implementing maintenance and care practices, this DIY project allows for creative expression while contributing to a sustainable approach to home improvement. With the right tools, materials, and attention to detail, a pallet fence can become a standout feature of any property, showcasing the resourcefulness and creativity of the homeowner. Whether used for boundary definition, privacy, or decorative purposes, a well-constructed pallet fence stands as a testament to the potential of DIY home improvement projects.