
Home>Create & Decorate>DIY & Crafts>How To Build A Faux Fireplace
DIY & Crafts
How To Build A Faux Fireplace
Published: May 24, 2024

Content Creator specializing in woodworking and interior transformations. Caegan's guides motivate readers to undertake their own projects, while his custom furniture adds a personal touch.
Learn how to create a stunning faux fireplace with our easy DIY & Crafts tutorial. Transform your space with this budget-friendly project today!
(Many of the links in this article redirect to a specific reviewed product. Your purchase of these products through affiliate links helps to generate commission for Twigandthistle.com, at no extra cost. Learn more)
Introduction
So, you want to add a cozy focal point to your living room without the hassle of a real fireplace? Building a faux fireplace might just be the perfect solution for you. Not only does it add a touch of warmth and charm to your space, but it also provides a great opportunity to showcase your DIY skills. In this article, we'll guide you through the step-by-step process of creating your very own faux fireplace. Whether you're a seasoned DIY enthusiast or a beginner looking for a fun project, building a faux fireplace can be a rewarding and enjoyable endeavor. Let's get started!
Choosing the Right Location
When it comes to building a faux fireplace, choosing the right location is crucial. Here are a few things to consider when selecting the perfect spot for your faux fireplace:
-
Room Layout: Take a good look at the layout of the room where you plan to install the faux fireplace. Consider the available wall space and the overall flow of the room. You'll want to choose a location that allows the faux fireplace to become a natural focal point without disrupting the room's functionality.
-
Safety: Keep in mind that even though a faux fireplace doesn't produce real flames, it's essential to place it away from any potential fire hazards such as curtains, furniture, or other flammable materials. Safety should always be a top priority when choosing the location for your faux fireplace.
-
Aesthetics: Think about the visual impact of the faux fireplace in the room. Consider how it will complement the existing decor and furniture. The location should allow the faux fireplace to enhance the overall aesthetic appeal of the space.
-
Accessibility: If you plan to use the faux fireplace for decorative purposes only, accessibility may not be a significant concern. However, if you intend to use it as a functional piece, consider its proximity to electrical outlets if you plan to incorporate lighting or other features.
-
Ventilation: While a faux fireplace doesn't require ventilation like a real one, it's still essential to ensure that the location allows for proper airflow around the faux fireplace. This will prevent the space from feeling cramped and ensure that the faux fireplace looks and feels like a natural part of the room.
By carefully considering these factors, you can select the ideal location for your faux fireplace, ensuring that it not only looks great but also fits seamlessly into your living space.
Gathering Materials and Tools
Before diving into the construction of your faux fireplace, it's essential to gather all the necessary materials and tools. Here's a comprehensive list to help you get started:
Materials:
- MDF or Plywood: This will be used for constructing the frame and the mantel of the faux fireplace.
- Faux Brick or Stone Panels: Depending on the look you want to achieve, you can choose between faux brick or stone panels to create the facade of the fireplace.
- Construction Adhesive: To secure the faux brick or stone panels to the frame.
- Wood Screws: These will be used to assemble the frame and secure the panels.
- Sandpaper and Wood Filler: For smoothing out any rough edges and filling in any gaps in the frame.
- Primer and Paint: To add a finishing touch to the frame and mantel.
- Decorative Elements: Such as a decorative fire screen, candles, or logs to enhance the visual appeal of the faux fireplace.
Tools:
- Measuring Tape and Level: For accurate measurements and ensuring everything is straight and aligned.
- Circular Saw or Jigsaw: To cut the MDF or plywood to the desired dimensions.
- Drill and Drill Bits: For creating pilot holes and driving screws into the materials.
- Paintbrushes and Rollers: For applying primer and paint to the frame and mantel.
- Safety Gear: Including goggles, gloves, and a dust mask to protect yourself during the construction process.
- Carpenter's Square: For ensuring that corners are perfectly square during the assembly of the frame.
- Caulk Gun: To apply construction adhesive and seal any gaps between the panels and the frame.
By ensuring that you have all the necessary materials and tools at your disposal, you can streamline the construction process and avoid any unnecessary delays or interruptions. With everything in hand, you'll be well-prepared to bring your faux fireplace to life.
Building the Frame
Building the frame is a crucial step in creating a sturdy foundation for your faux fireplace. Here's a detailed guide to help you construct the frame with precision and accuracy:
-
Measure and Cut the Materials: Begin by measuring and cutting the MDF or plywood to the required dimensions for the frame. Use a measuring tape and a circular saw or jigsaw to ensure precise cuts. The dimensions will depend on the size and design of the faux fireplace you envision.
-
Assemble the Sides and Top: Using wood screws and a drill, assemble the sides and top of the frame. A carpenter's square can be handy for ensuring that the corners are perfectly square. This step forms the basic structure of the faux fireplace.
-
Create the Hearth: If you want to include a hearth as part of your faux fireplace design, cut an additional piece of MDF or plywood to serve as the hearth. This can be attached to the bottom of the frame using wood screws.
-
Reinforce the Frame: To add stability and strength to the frame, consider adding support braces or additional cross beams as needed. This will ensure that the frame can support the weight of the faux brick or stone panels.
-
Sand and Fill: Once the frame is assembled, use sandpaper to smooth out any rough edges. Apply wood filler to any gaps or imperfections in the frame, and sand again once the filler is dry. This will create a seamless and polished surface for the next steps in the construction process.
By following these steps, you can build a solid and well-structured frame for your faux fireplace. This foundation will serve as the basis for the next phases of the construction, bringing you one step closer to completing your DIY faux fireplace project.
Adding the Faux Brick or Stone
Once the frame of your faux fireplace is in place, it's time to add the faux brick or stone panels to create the captivating facade of a real fireplace. Here's a step-by-step guide to help you achieve a realistic and visually appealing finish:
-
Measure and Cut: Begin by measuring the dimensions of the areas where you plan to install the faux brick or stone panels. Use a measuring tape to ensure accurate measurements. Then, use a circular saw or jigsaw to cut the panels to fit the specific areas of the frame.
-
Apply Construction Adhesive: Using a caulk gun, apply construction adhesive to the back of the faux brick or stone panels. This will ensure a secure and long-lasting bond with the frame. Be generous with the adhesive, but be careful to avoid excess seepage when pressing the panels onto the frame.
-
Secure the Panels: Carefully press the faux brick or stone panels onto the frame, starting from the bottom and working your way up. Ensure that the panels are aligned and level as you go. Use gentle pressure to firmly secure the panels in place.
-
Fill in Gaps: If there are any gaps between the panels or between the panels and the frame, use additional construction adhesive to fill them in. This will create a seamless and cohesive appearance, mimicking the look of real mortar.
-
Allow for Drying Time: Once the panels are in place, allow sufficient time for the construction adhesive to dry and set. Follow the manufacturer's recommendations for drying time to ensure that the panels are firmly bonded to the frame.
-
Touch-Up and Finishing: After the adhesive has fully dried, inspect the panels for any areas that may require touch-up. Use paint or touch-up materials to blend any visible seams or imperfections, ensuring a polished and authentic appearance.
By following these steps, you can effectively add the faux brick or stone panels to your faux fireplace, transforming it into a stunning focal point for your living space. The realistic texture and visual appeal of the panels will bring your DIY faux fireplace project one step closer to completion.
Creating the Mantel
The mantel is a defining feature of any fireplace, and creating a mantel for your faux fireplace is a crucial step in achieving an authentic and polished look. Here's a detailed guide to help you craft a mantel that complements the overall design of your faux fireplace:
-
Design Considerations: Begin by deciding on the design and dimensions of the mantel. Consider the style of your existing decor and the overall aesthetic of the room. Whether you prefer a sleek and modern mantel or a more traditional and ornate design, it's essential to choose a style that harmonizes with the rest of the space.
-
Select the Material: Choose the material for the mantel based on your design preferences and the overall look you want to achieve. Common options include MDF, solid wood, or reclaimed wood for a rustic touch. Ensure that the material you select is sturdy and suitable for supporting decorative items and accessories.
-
Measure and Cut: Use a measuring tape and a saw to measure and cut the chosen material to the desired dimensions for the mantel. Take precise measurements to ensure that the mantel fits perfectly on top of the faux fireplace frame.
-
Add Decorative Elements: Consider incorporating decorative elements such as corbels, trim, or molding to enhance the visual appeal of the mantel. These details can add character and charm to the mantel, elevating its overall aesthetic impact.
-
Assemble and Install: Once the individual components of the mantel are prepared, assemble them according to your design plan. Use wood glue and screws to secure the pieces together, ensuring a strong and durable construction. Once assembled, position the mantel on top of the faux fireplace frame and secure it in place using wood screws.
-
Finishing Touches: Sand the mantel to smooth out any rough edges and surfaces. Apply wood filler to any gaps or imperfections, and sand again once the filler is dry. This will create a seamless and polished surface for the next steps in the construction process.
-
Prime and Paint: Apply a coat of primer to the mantel to prepare it for painting. Once the primer is dry, choose a paint color that complements the overall color scheme of the room. Whether you opt for a classic white finish, a bold accent color, or a stained wood look, the paint will add the final touch to the mantel, completing the overall look of your faux fireplace.
By following these steps, you can create a stunning mantel that adds character and elegance to your faux fireplace, enhancing its visual impact and creating a focal point that exudes warmth and charm.
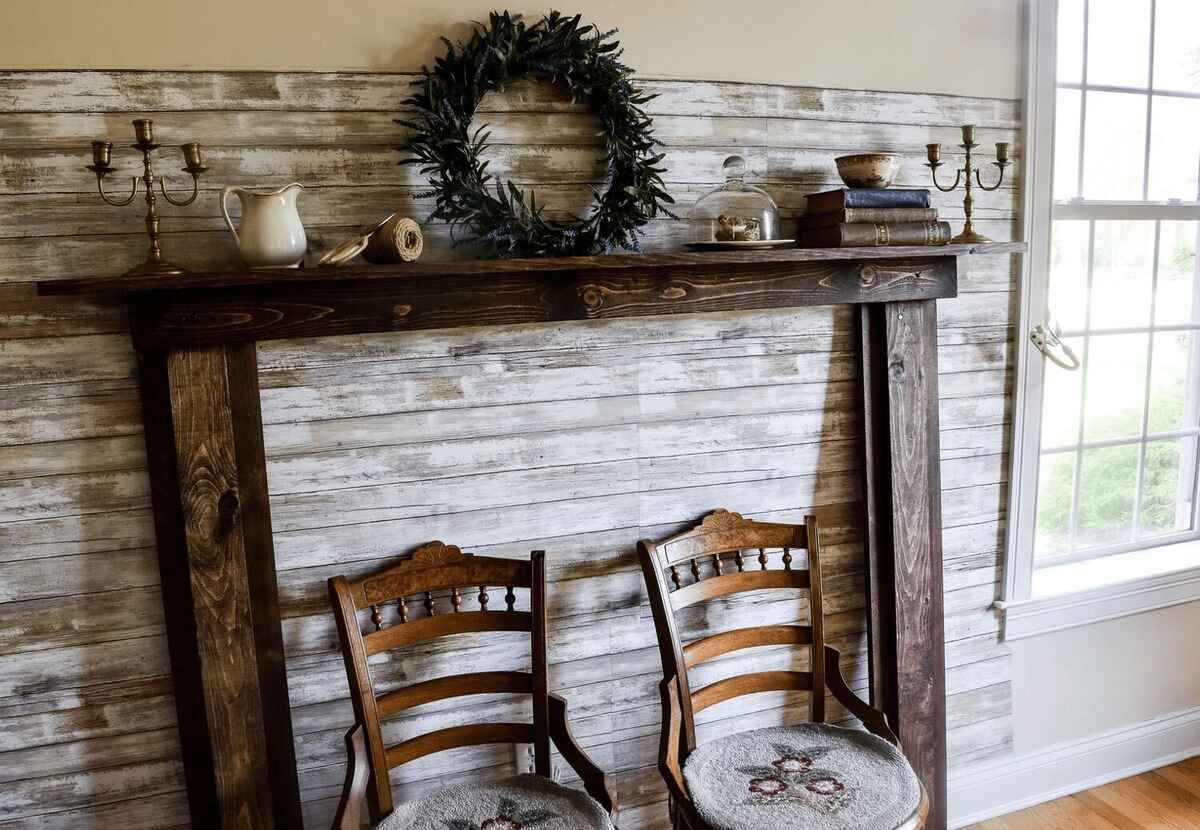
Finishing Touches and Decoration
After completing the construction of your faux fireplace, it's time to add the finishing touches and decorative elements that will bring the entire project to life. Here's a detailed guide to help you add those final flourishes to your faux fireplace:
-
Decorative Accessories: Consider adding decorative accessories to the mantel and hearth to enhance the visual appeal of your faux fireplace. Items such as candles, vases, picture frames, or seasonal decor can add a personal touch and create a cozy ambiance.
-
Fireplace Screen: If you want to create the illusion of a traditional fireplace, consider adding a decorative fireplace screen. Whether you opt for a classic wrought iron design or a more contemporary style, a fireplace screen can add a touch of authenticity to your faux fireplace.
-
Artwork or Mirror: Hanging a piece of artwork or a mirror above the mantel can further elevate the visual impact of your faux fireplace. Choose a piece that complements the style and color scheme of the room, adding depth and interest to the space.
-
Mantel Decor: The mantel itself provides an excellent opportunity to showcase decorative items such as family photos, artwork, or seasonal decorations. Consider layering different elements to create a visually appealing display that reflects your personal style.
-
Lighting: Incorporating lighting elements such as sconces or LED candles can add warmth and ambiance to your faux fireplace. These subtle lighting additions can create a soft, inviting glow, especially in the evening or during gatherings.
-
Accessorize the Hearth: If your faux fireplace includes a hearth, consider adding decorative elements such as a log basket, decorative logs, or a cozy rug to enhance the overall charm of the space.
-
Personal Touches: Finally, don't forget to infuse your personality into the decorative elements. Whether it's a collection of cherished items, a piece of artwork you love, or a unique find, incorporating personal touches will make your faux fireplace feel like a true reflection of your style and taste.
By adding these finishing touches and decorative elements, you can transform your faux fireplace into a captivating focal point that exudes warmth, charm, and personality. Whether you prefer a minimalist, modern look or a more traditional, cozy ambiance, these final touches will complete the overall aesthetic of your DIY faux fireplace project.
Conclusion
Congratulations on completing your DIY faux fireplace! By following the step-by-step guide provided in this article, you've successfully created a stunning focal point for your living space. Your faux fireplace not only adds warmth and charm to the room but also showcases your creativity and DIY skills. Whether you've chosen a classic, traditional design or a modern, sleek aesthetic, your faux fireplace is a testament to your ability to transform a simple idea into a beautiful and functional feature.
As you admire your handiwork, take pride in the fact that you've not only built a visually appealing faux fireplace but also created a cozy atmosphere that will be enjoyed for years to come. Whether you're curling up with a good book, entertaining guests, or simply unwinding after a long day, your faux fireplace will undoubtedly become a beloved centerpiece in your home.
Now that your faux fireplace project is complete, take a moment to bask in the satisfaction of a job well done. Your attention to detail, craftsmanship, and dedication have resulted in a stunning addition to your living space. As you enjoy the warmth and ambiance of your faux fireplace, take pride in the fact that you've brought your vision to life and created a space that reflects your unique style and personality.
With your faux fireplace serving as a focal point, you've not only added value to your home but also created a welcoming and inviting atmosphere for yourself and your loved ones. Whether it's the crackling glow of decorative logs, the soft flicker of candlelight, or the curated display of artwork and personal mementos, your faux fireplace is a reflection of your creativity and ingenuity.
As you continue to enjoy the comfort and beauty of your faux fireplace, remember that the possibilities for personalization and enhancement are endless. Whether you choose to change up the decor with the seasons, experiment with different lighting elements, or add new decorative touches, your faux fireplace will continue to evolve and adapt to your preferences.
Thank you for embarking on this DIY journey with us, and we hope that your faux fireplace brings you joy, warmth, and inspiration for many years to come. Happy decorating!