
Home>Create & Decorate>DIY & Crafts>DIY CNC Machine: Building Your Own Computer Numerical Control System
DIY & Crafts
DIY CNC Machine: Building Your Own Computer Numerical Control System
Published: June 12, 2024

Senior Editor in Create & Decorate, Kathryn combines traditional craftsmanship with contemporary trends. Her background in textile design and commitment to sustainable crafts inspire both content and community.
Discover how to build your own DIY CNC machine and take your crafting to the next level with this comprehensive guide to computer numerical control systems. Unlock the potential of DIY & Crafts with your custom CNC machine.
(Many of the links in this article redirect to a specific reviewed product. Your purchase of these products through affiliate links helps to generate commission for Twigandthistle.com, at no extra cost. Learn more)
Introduction
Are you a DIY enthusiast looking to take your home workshop to the next level? Have you ever considered building your own CNC machine? If so, you're in the right place! In this article, we'll guide you through the process of creating your very own Computer Numerical Control (CNC) system. Whether you're a hobbyist, a small business owner, or simply someone who loves to tinker and create, building your own CNC machine can be a rewarding and cost-effective endeavor. So, roll up your sleeves and get ready to dive into the exciting world of DIY CNC machines!
Understanding CNC Machines
A CNC machine is a computer-controlled manufacturing tool that can precisely cut, carve, mill, and drill various materials such as wood, plastic, and metal. Unlike traditional manual machines, CNC machines operate based on numerical codes and are capable of producing highly accurate and intricate designs. The key components of a CNC system include the computer-aided design (CAD) software, the control software, the motors and actuators, and the cutting tool. By understanding the fundamental principles of CNC machines, you can grasp the potential and versatility they offer for a wide range of DIY and home improvement projects.
- CNC machines are widely used in industries such as manufacturing, woodworking, metalworking, and prototyping due to their ability to automate and streamline the production process.
- The precision and repeatability of CNC machines make them ideal for creating complex and intricate designs that would be challenging to achieve manually.
- Understanding the basic operation of a CNC machine involves familiarizing yourself with concepts such as coordinate systems, toolpaths, and the G-code programming language.
Choosing the Right Components
When embarking on the journey of building your DIY CNC machine, selecting the right components is crucial to the success of your project. Here are the key components you'll need to consider:
1. Motors and Actuators
The heart of any CNC system, the motors and actuators, are responsible for moving the cutting tool along the desired axes. When choosing these components, factors such as torque, speed, and precision must be taken into account to ensure smooth and accurate operation.
2. Control Board
The control board serves as the brain of the CNC machine, interpreting the commands from the control software and translating them into precise movements. Look for a control board that is compatible with your chosen motors and offers the necessary features for your specific application.
3. Linear Guides and Bearings
To ensure stability and precision in the movement of the cutting tool, high-quality linear guides and bearings are essential. These components facilitate smooth motion along the axes and help minimize vibration and deflection during operation.
4. Power Supply
Selecting the right power supply is critical to providing the necessary electrical energy for the motors and control board. Ensure that the power supply can deliver the required voltage and current while maintaining stability and reliability.
5. Cutting Tool
The choice of cutting tool, such as a router or spindle, depends on the materials you intend to work with and the level of precision required. Consider factors such as speed, power, and compatibility with your chosen control system when selecting the cutting tool for your DIY CNC machine.
By carefully considering and selecting the right components for your DIY CNC machine, you can lay a solid foundation for a reliable and efficient system that meets your specific needs and project requirements.
Building the Frame
Building a sturdy and rigid frame is essential for the structural integrity and stability of your DIY CNC machine. The frame serves as the foundation upon which all other components will be mounted, and it plays a crucial role in ensuring precise and accurate operation. Here's how to tackle the task of constructing the frame for your CNC machine:
-
Selecting Materials: Choose materials that strike a balance between strength, weight, and cost. Aluminum extrusions, steel tubing, or even high-quality plywood can be viable options for constructing the frame. Consider the overall size of your CNC machine and the intended application when selecting the materials.
-
Design and Planning: Before cutting any materials, it's essential to have a well-thought-out design and a clear plan for the frame. Consider factors such as the layout of the axes, the mounting points for the motors and linear guides, and the overall stability of the structure. Utilize CAD software to create a detailed design that aligns with your specific requirements.
-
Cutting and Assembly: Once you have the necessary materials and a detailed design, it's time to cut the components to size and assemble the frame. Precision is key during this phase, as any inaccuracies in the frame's construction can lead to alignment issues and compromised performance. Utilize accurate measuring tools and cutting equipment to ensure the components are cut to the correct dimensions.
-
Joining Methods: Depending on the chosen materials, consider the most suitable methods for joining the frame components. Techniques such as welding, bolting, or using specialized connectors can be employed to create strong and rigid joints. Pay close attention to the squareness and alignment of the frame during assembly to maintain overall accuracy.
-
Integration of Components: As the frame takes shape, consider the integration of other components such as linear guides, bearings, and mounting brackets. Ensure that the frame provides secure and precise mounting points for these components, as their alignment and stability are crucial for the overall performance of the CNC machine.
By meticulously approaching the construction of the frame, you can lay the groundwork for a robust and reliable DIY CNC machine. A well-built frame not only provides the necessary support for the mechanical and electronic components but also contributes to the overall accuracy and repeatability of the CNC system.
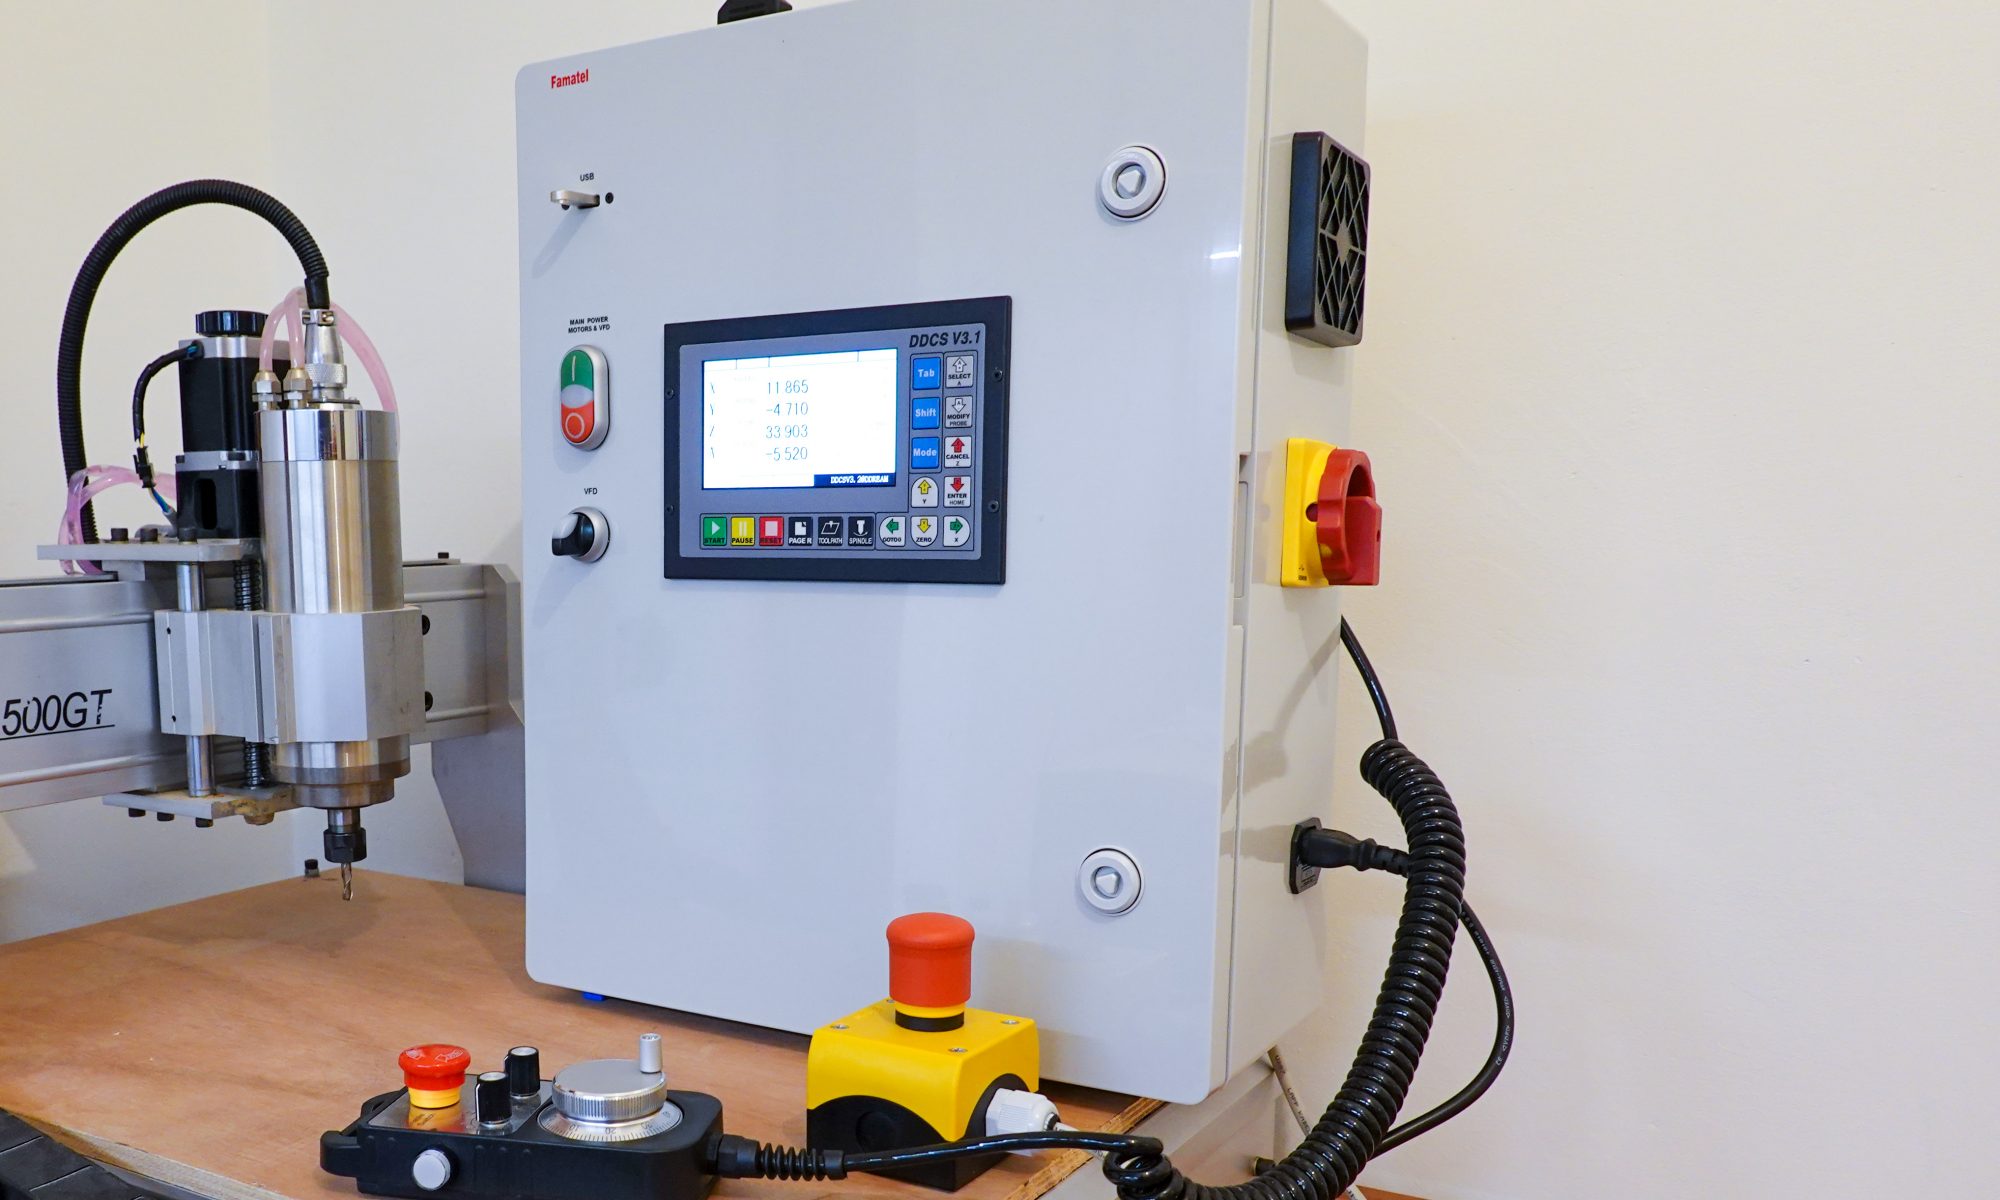
Assembling the Electronics
Assembling the electronics is a critical phase in the construction of your DIY CNC machine, as it involves integrating the control board, motors, power supply, and other electronic components to bring the system to life. Here's a detailed guide on how to tackle the assembly of the electronics for your CNC machine:
-
Organizing the Components: Before diving into the assembly process, ensure that you have all the necessary electronic components at hand. This includes the control board, stepper motors, motor drivers, power supply, wiring harnesses, limit switches, and any additional peripherals required for your specific CNC setup.
-
Mounting the Control Board: Begin by mounting the control board in a secure and accessible location within the CNC machine's frame. Ensure that the board is positioned to allow easy access for wiring and future maintenance. Utilize appropriate mounting hardware to secure the board in place, taking care to avoid any potential electrical interference or mechanical stress on the board.
-
Connecting the Motors and Drivers: Next, connect the stepper motors to their respective motor drivers, following the manufacturer's specifications and wiring diagrams. Pay close attention to the correct wiring sequence and polarity to prevent damage to the motors or drivers. Securely fasten the motor drivers to the frame or designated mounting points, ensuring adequate heat dissipation and electrical insulation.
-
Power Supply Integration: Install and connect the power supply unit, ensuring that it meets the voltage and current requirements of the motors and control board. Take necessary precautions to prevent electrical hazards, such as proper grounding and insulation of high-voltage components. Carefully route and secure the wiring to minimize the risk of interference or accidental damage.
-
Wiring and Cable Management: With the major components in place, proceed to wire the control board, motors, limit switches, and any additional peripherals according to the recommended wiring diagrams. Employ cable management techniques such as cable trays, conduits, and cable ties to organize and secure the wiring, minimizing the risk of tangling, strain, or electrical interference.
-
Testing and Verification: Once the electronics are assembled and wired, perform a thorough inspection to verify the correctness of the connections, the absence of any short circuits, and the proper insulation of exposed conductors. Prior to powering up the CNC machine, double-check the wiring and connections to ensure safety and proper functionality.
-
Initial Power-Up and Diagnostics: Gradually power up the CNC machine and the control board, monitoring for any abnormal sounds, vibrations, or indications of electrical issues. Use diagnostic tools such as multimeters and oscilloscopes to validate the proper operation of the motors, drivers, and control signals. Address any anomalies or malfunctions promptly to prevent potential damage to the electronics.
By methodically assembling the electronics of your DIY CNC machine, you can ensure the reliable and safe operation of the system while laying the groundwork for the subsequent installation of the control software and the testing and calibration of the CNC machine. Paying attention to detail and following best practices in electronic assembly can contribute to the overall performance and longevity of your homemade CNC system.
Installing the Control Software
Installing the control software is a crucial step in bringing your DIY CNC machine to life, as it enables the communication between the computer and the CNC system, allowing you to create, edit, and execute the machining operations. Here's a detailed guide on how to install and set up the control software for your CNC machine:
-
Software Selection: Begin by selecting the appropriate control software for your CNC system. There are various options available, ranging from open-source solutions such as GRBL and LinuxCNC to commercial software like Mach3 and Mach4. Consider factors such as compatibility with your control board, ease of use, available features, and community support when choosing the software that best suits your needs.
-
Driver Installation: If your chosen control software requires specific drivers for the control board or interface, ensure that you install these drivers on your computer. Follow the manufacturer's instructions and recommendations for driver installation to ensure seamless communication between the computer and the CNC system.
-
Configuration and Setup: Once the control software and drivers are installed, proceed to configure the software to match the specifications of your CNC machine. This includes setting parameters such as the axis direction, steps per unit, maximum travel limits, and motor control settings. Refer to the documentation provided with the control software and consult online resources or user forums for guidance on the optimal configuration for your specific setup.
-
Connection and Communication: Establish a reliable connection between your computer and the CNC system, typically through a USB or parallel port connection. Ensure that the communication settings, such as baud rate and port configuration, are correctly configured within the control software to enable seamless data transfer and real-time control of the CNC machine.
-
Toolpath Generation: Familiarize yourself with the toolpath generation capabilities of the control software, as this is where you'll create and edit the machining operations. Utilize the software's interface to import design files, define cutting paths, set tool parameters, and simulate the machining process to ensure the desired results.
-
Testing and Dry Runs: Before executing any actual machining operations, perform testing and dry runs within the control software to verify the accuracy and safety of the toolpaths. Use the software's simulation and visualization tools to preview the tool's movements and detect any potential collisions or errors in the machining process.
-
Fine-Tuning and Optimization: Take advantage of the control software's features for fine-tuning and optimizing the machining operations. This may include adjusting feed rates, spindle speeds, tool changes, and toolpath strategies to achieve the desired surface finish, accuracy, and efficiency in your CNC projects.
By following these steps and guidelines for installing the control software, you can harness the full potential of your DIY CNC machine, enabling precise and controlled machining operations while unlocking the versatility and creativity of computer-aided manufacturing in your home workshop or small business.
Testing and Calibration
Testing and calibration are essential phases in the development of a DIY CNC machine, ensuring that the system operates with precision, accuracy, and reliability. Here's a comprehensive guide on how to approach the testing and calibration of your homemade CNC system:
-
Initial Power-Up and System Check: Upon completing the assembly and installation of the control software, perform an initial power-up of the CNC machine. Verify that all electronic components, including the motors, control board, and power supply, are functioning as expected. Listen for any abnormal sounds, check for proper motor movement, and ensure that the control software communicates with the CNC system without errors.
-
Axis Movement and Homing: Test the movement of each axis of the CNC machine to ensure smooth and accurate motion. Use the control software to command the machine to move along each axis, verifying that the motion matches the intended direction and distance. Implement homing routines to establish consistent reference positions for the axes, allowing the CNC system to accurately locate its starting point for machining operations.
-
Accuracy and Repeatability Checks: Utilize precision measuring tools such as dial indicators, calipers, or laser alignment devices to assess the accuracy and repeatability of the CNC machine's movements. Perform test cuts or drilling operations on a sacrificial workpiece and measure the resulting dimensions to validate the system's ability to produce accurate and consistent outputs.
-
Backlash Compensation and Error Correction: Identify any instances of backlash or mechanical play in the motion transmission components of the CNC machine. Implement compensation techniques within the control software to minimize the effects of backlash and ensure that the system can accurately position the cutting tool without introducing errors or dimensional inaccuracies.
-
Spindle or Router Calibration: If your CNC machine is equipped with a spindle or router for cutting operations, calibrate the speed and performance of the cutting tool. Verify that the spindle operates at the specified speeds, and assess its ability to maintain consistent cutting forces and tool engagement during machining operations.
-
Feed Rate and Acceleration Optimization: Fine-tune the feed rates and acceleration settings within the control software to optimize the performance of the CNC machine. Balancing rapid motion with precise positioning, adjust the machine's acceleration and deceleration profiles to achieve efficient and smooth tool movements while minimizing the risk of mechanical stress or vibration.
-
Surface Finish and Quality Assessment: Execute test machining operations on various materials to evaluate the surface finish and overall quality of the machined parts. Inspect the edges, contours, and dimensional accuracy of the produced components, making adjustments to the cutting parameters and toolpath strategies as necessary to achieve the desired surface finish and part quality.
-
Dynamic and Real-Time Testing: Engage the CNC machine in dynamic and real-time testing scenarios, simulating complex tool movements, rapid direction changes, and intricate cutting patterns. Monitor the system's response to dynamic commands, ensuring that the CNC machine maintains stability, accuracy, and reliability under varying operating conditions.
By meticulously conducting testing and calibration procedures, you can fine-tune the performance of your DIY CNC machine, rectify any operational discrepancies, and ensure that the system meets the required standards for precision and reliability. These steps are crucial in unleashing the full potential of your homemade CNC system for a wide range of creative and practical applications.
Conclusion
In conclusion, embarking on the journey of building your own DIY CNC machine opens up a world of possibilities for creative expression, precision manufacturing, and innovative prototyping. By understanding the fundamental principles of CNC machines, carefully selecting the right components, and meticulously constructing and assembling the system, you can create a reliable and versatile tool that empowers you to bring your design ideas to life. The installation of control software, coupled with thorough testing and calibration, ensures that your homemade CNC machine operates with the precision, accuracy, and repeatability required for a wide range of DIY and home improvement projects. Whether you're a hobbyist, a small business owner, or an enthusiast looking to expand your capabilities, the journey of building your own CNC machine is a rewarding and empowering endeavor that unlocks the potential for limitless creativity and innovation in your workshop.