
Home>Outdoors & Camping>Landscaping>How To Build Steps Into A Hill
Landscaping
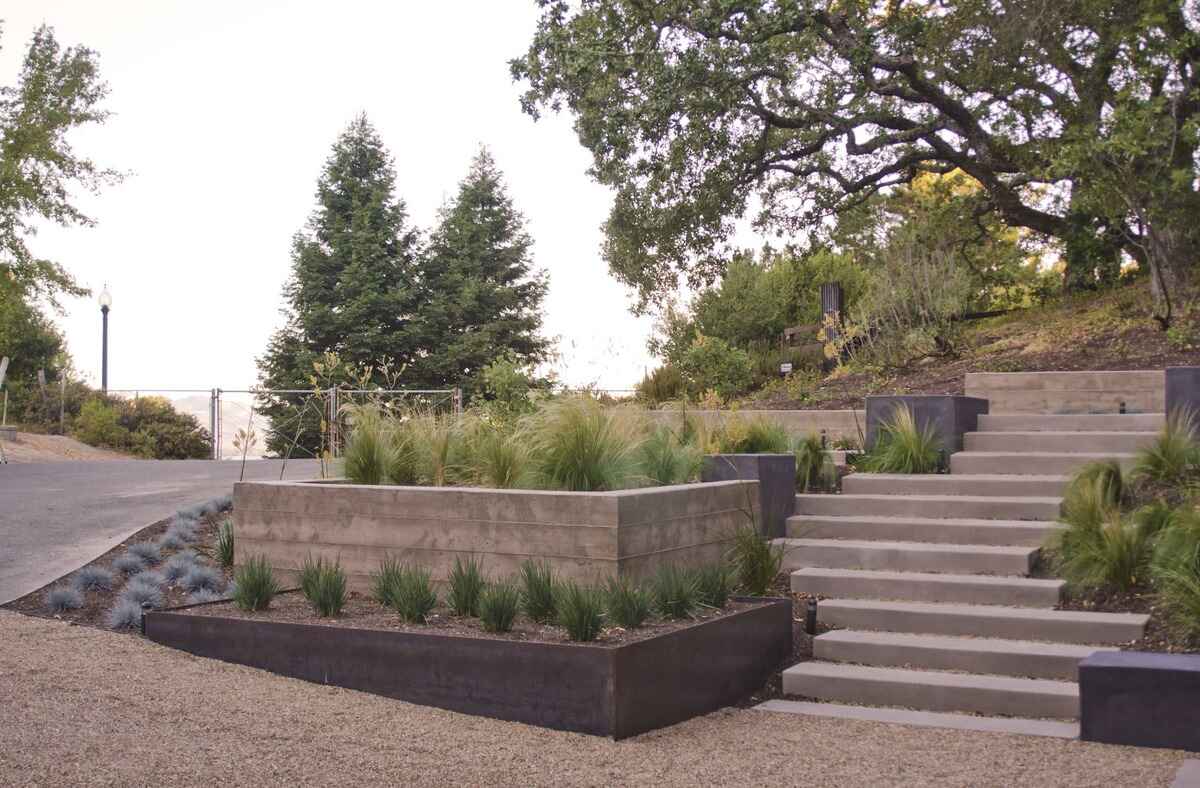
How To Build Steps Into A Hill
Published: March 7, 2024

Content Creator for Outdoors & Camping, Sophie turns any yard into a sustainable paradise. Her dedication to DIY outdoor projects and volunteer work in community gardens shares joy and knowledge.
Learn how to build steps into a hill with our expert landscaping guide. Create a beautiful and functional outdoor space with these step-by-step instructions.
(Many of the links in this article redirect to a specific reviewed product. Your purchase of these products through affiliate links helps to generate commission for Twigandthistle.com, at no extra cost. Learn more)
Planning the Layout
Before you start building steps into a hill, it's crucial to plan the layout carefully. Here's how to do it:
-
Measure the Slope: Begin by measuring the slope of the hill where you want to build the steps. This will help you determine the number of steps needed and the height of each step.
-
Choose the Materials: Decide on the materials you want to use for the steps. Options include natural stone, concrete pavers, or timber. Consider the aesthetic appeal, durability, and cost of each material.
-
Design the Steps: Sketch out a rough design of how you want the steps to look. Consider the width and depth of each step, as well as the overall placement and alignment.
-
Consider Drainage: Take into account the natural drainage patterns of the hill. Ensure that the steps are designed to prevent water from accumulating and causing erosion.
-
Check Local Regulations: Before proceeding, check with your local building authorities to ensure that your planned steps comply with any relevant regulations or permits.
By carefully planning the layout of your hillside steps, you'll set the stage for a successful and visually appealing construction project.
Excavating the Hillside
Excavating the hillside is a crucial step in the process of building steps into a hill. Here's how to tackle this important phase:
-
Mark the Area: Begin by marking the area where the steps will be located. Use stakes and string to outline the boundaries of the steps, providing a clear visual guide for the excavation process.
-
Start Digging: Using a shovel or a small excavator, start digging into the hillside to create the space for the steps. Begin at the bottom of the hill and work your way up, digging out the soil to the depth of each step.
-
Create Level Treads: As you excavate, focus on creating level treads for each step. This will involve digging into the hillside at the depth of each step and ensuring that the treads are flat and even.
-
Check for Stability: Throughout the excavation process, check the stability of the hillside. Look out for any signs of instability or loose soil that could affect the integrity of the steps.
-
Consider Drainage: Pay attention to drainage as you excavate. Ensure that the area behind and beneath each step is properly graded to allow for water drainage, preventing erosion and water buildup.
-
Remove Debris: Once the excavation is complete, remove any debris or loose soil from the area. This will provide a clean foundation for the next phase of the construction process.
By following these steps, you'll effectively excavate the hillside to prepare for the construction of sturdy and well-structured steps.
Creating a Solid Foundation
Creating a solid foundation is essential for the stability and longevity of the steps built into a hill. Here's how to establish a strong base for your hillside steps:
-
Lay a Base of Gravel: Begin by spreading a layer of gravel at the bottom of each step's tread. This will provide a stable base and aid in water drainage, preventing the accumulation of moisture that could compromise the steps' integrity.
-
Compact the Gravel: Use a hand tamper or a mechanical compactor to firmly compact the gravel base. This will ensure that the foundation is solid and resistant to shifting or settling over time.
-
Install Retaining Walls: If the hillside is particularly steep, consider installing retaining walls to support the steps and prevent soil erosion. Retaining walls can be constructed from various materials, such as concrete blocks, natural stone, or timber.
-
Use Concrete Footings: For added stability, consider pouring concrete footings at the base of each step. These footings will anchor the steps securely into the hillside and provide a strong foundation for the entire structure.
-
Level the Treads: As you establish the foundation for each step, ensure that the treads are level and properly aligned. Use a spirit level to check the horizontal orientation of each step, making adjustments as needed to achieve a uniform and stable surface.
-
Consider Drainage: Throughout the foundation-building process, pay close attention to drainage. Ensure that the gravel base and any retaining walls are designed to facilitate proper water runoff, preventing erosion and water damage to the steps.
By creating a solid foundation using these techniques, you'll ensure that your hillside steps are structurally sound and capable of withstanding the natural forces of the hillside environment.
Building the Steps
Building the steps is the pivotal phase in the process of constructing steps into a hill. Here's a detailed guide on how to effectively build the steps:
-
Choose the Right Material: Select the material for the steps based on your design and the surrounding environment. Natural stone provides a rustic and durable option, while concrete pavers offer a more uniform and modern look. Timber steps can complement a natural setting and are relatively easy to work with.
-
Lay the First Step: Start by placing the first step at the bottom of the hill. Ensure that it is securely positioned on the prepared foundation, with the front edge protruding slightly to create a nosing.
-
Level and Align: Use a spirit level to ensure that the step is perfectly level from front to back and side to side. Make any necessary adjustments to achieve a stable and even surface.
-
Add Subsequent Steps: Continue adding the remaining steps, ensuring that each one is level and securely positioned. Maintain consistent spacing between the steps to provide a comfortable and safe ascent.
-
Secure with Adhesive: Depending on the chosen material, use appropriate adhesive to secure the steps in place. This is particularly important for natural stone and concrete pavers, ensuring that they remain stable and resistant to shifting.
-
Consider the Risers: If your design includes risers between the steps, carefully measure and cut the riser material to fit snugly between each step. This will provide a cohesive and visually appealing finish to the steps.
-
Create a Transition: If the hillside steps connect to a flat surface at the top, consider creating a transition using a landing or a gradual slope. This will provide a smooth and safe continuation of the pathway beyond the steps.
-
Check for Stability: Throughout the construction process, regularly check the stability and alignment of the steps. Make any necessary adjustments to ensure that the entire structure is solid and safe for use.
By following these detailed steps, you'll effectively build sturdy and visually appealing steps into the hill, creating a functional and aesthetically pleasing pathway.
Adding Finishing Touches
Adding the finishing touches to the steps is the final step in the process of building steps into a hill. This phase focuses on enhancing the visual appeal and functionality of the completed steps. Here's a detailed guide on how to add the perfect finishing touches:
-
Grouting and Sealing: If you've used natural stone or concrete pavers for the steps, consider grouting the joints between the stones or pavers. This not only enhances the appearance but also provides stability and prevents weed growth. Additionally, sealing the surface of the steps can protect them from stains and weathering, prolonging their lifespan.
-
Landscaping: Surrounding the steps with carefully chosen landscaping can elevate the overall look of the hillside. Consider planting low-maintenance ground cover, such as creeping thyme or moss, between the steps to soften the edges and integrate the steps with the natural environment.
-
Lighting: Installing low-voltage lighting along the steps can enhance safety and create a captivating ambiance, especially during the evening hours. Choose fixtures that illuminate the steps and provide adequate visibility without causing glare or harsh shadows.
-
Handrails: Depending on the height and design of the steps, adding handrails can provide essential support and safety, especially for individuals with mobility challenges. Handrails can be constructed from various materials, including wood, metal, or composite, and should complement the overall aesthetic of the steps.
-
Staining or Painting: If you've opted for timber steps, staining or painting them can add a pop of color and protect the wood from the elements. Choose a stain or paint that complements the surrounding landscape and architectural elements, ensuring a cohesive and harmonious look.
-
Signage: Consider adding subtle signage to indicate the presence of steps, especially if the hillside is part of a larger property or public space. Clear and unobtrusive signage can prevent accidents and guide individuals safely along the steps.
-
Maintenance Plan: Develop a maintenance plan to keep the steps in optimal condition. This may include regular cleaning, weed removal, and inspection for any signs of wear or damage. By staying proactive with maintenance, you can ensure that the steps remain safe and attractive for years to come.
By adding these finishing touches, you'll not only enhance the aesthetic appeal of the hillside steps but also ensure that they are safe, functional, and well-integrated with the surrounding landscape.