
Home>Organize & Storage>Kitchen Organization>DIY Pantry Shelves: Organize Your Kitchen With These Simple Steps
Kitchen Organization
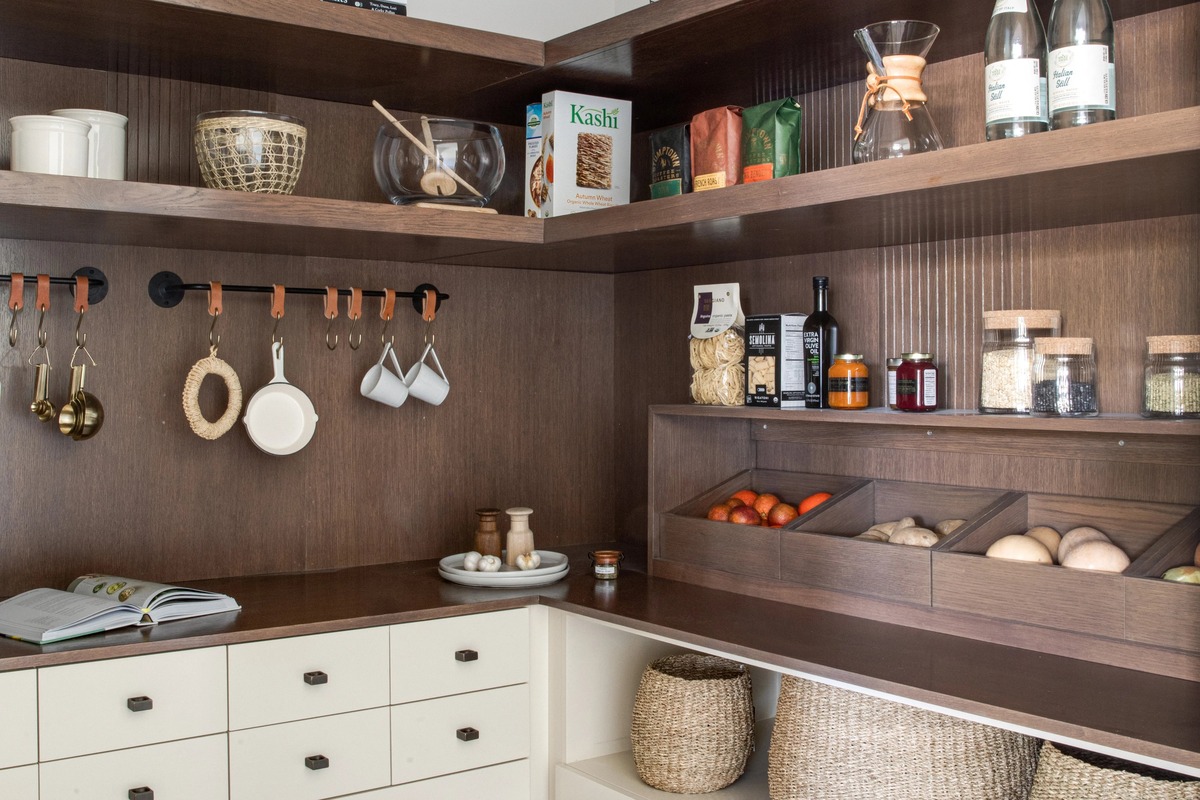
DIY Pantry Shelves: Organize Your Kitchen With These Simple Steps
Published: March 6, 2024

Senior Editor for Organize & Storage, Jeff transforms spaces with his DIY decor and organizational prowess. His design sensibility and engagement in the art community bring functional beauty to our pages.
Transform your kitchen with DIY pantry shelves! Learn how to declutter and organize your space with these simple steps for effective kitchen organization.
(Many of the links in this article redirect to a specific reviewed product. Your purchase of these products through affiliate links helps to generate commission for Twigandthistle.com, at no extra cost. Learn more)
Introduction
Are you tired of rummaging through your pantry to find the ingredients you need? DIY pantry shelves are the perfect solution to bring order to your kitchen chaos. By following these simple steps, you can create custom pantry shelves that will maximize your storage space and make it easier to keep your kitchen organized. Whether you're a seasoned DIY enthusiast or a beginner looking for a rewarding project, building your own pantry shelves can be a fun and practical way to enhance your home. Let's dive into the steps to transform your pantry into an organized and efficient space.
Step 1: Assessing Your Pantry Space
Before diving into building your DIY pantry shelves, it's crucial to assess your pantry space thoroughly. Take a look at the layout and dimensions of your pantry. Consider the height, width, and depth of the shelves you currently have, and think about how you can optimize the space. Take note of any obstructions such as light fixtures, outlets, or vents that may affect the placement of your new shelves. Additionally, assess the items you plan to store on the shelves. This will help you determine the depth and spacing needed between each shelf to accommodate items of various sizes. By carefully evaluating your pantry space, you can tailor your DIY shelves to fit your specific needs and make the most of the available space.
- Measure the dimensions of your pantry, including the height, width, and depth.
- Take note of any obstacles or obstructions that may impact shelf placement.
- Consider the types of items you will be storing to determine the appropriate shelf spacing and depth.
- Evaluate the current storage solutions in your pantry and identify any pain points that you want to address with your DIY shelves.
Step 2: Measuring and Planning Your Shelves
Once you've assessed your pantry space, it's time to dive into the nitty-gritty of measuring and planning your DIY pantry shelves. Start by taking precise measurements of the height, width, and depth of your pantry. Use a reliable tape measure to ensure accuracy. With these measurements in hand, you can now plan the layout of your shelves. Consider the items you identified in the previous step and determine the appropriate spacing between shelves to accommodate your storage needs. Sketch out a rough plan, indicating the placement of each shelf and the dimensions you'll be working with. This visual guide will serve as a roadmap for the construction phase, helping you stay organized and on track. Remember, careful planning at this stage will contribute to the success of your DIY pantry shelves.
- Use a tape measure to accurately measure the dimensions of your pantry.
- Plan the layout of your shelves, considering the spacing needed for the items you'll be storing.
- Create a rough sketch or diagram to visualize the placement and dimensions of each shelf.
- Double-check your measurements and plans to ensure they align with your storage requirements.
Step 3: Gathering Materials and Tools
Gathering the right materials and tools is essential for the successful construction of your DIY pantry shelves. Here's a list of items you'll need to bring your project to life:
Materials:
- Wood: Select high-quality plywood or MDF (medium-density fiberboard) for the shelves. Consider the weight of the items you'll be storing and choose a sturdy, warp-resistant material.
- Shelf Brackets: Opt for durable and appropriately sized shelf brackets to support the weight of your shelves and the items they'll hold.
- Screws and Nails: Ensure you have a variety of screws and nails in different sizes to secure the brackets and shelves in place.
- Wood Glue: Invest in a reliable wood glue to reinforce the joints and enhance the overall stability of your shelves.
- Paint or Stain (Optional): If you want to add a personal touch to your shelves, consider purchasing paint or stain to match your kitchen's aesthetic.
Tools:
- Tape Measure: A precise tape measure is crucial for accurate measurements during the construction phase.
- Saw: Depending on your preference, you may need a circular saw, jigsaw, or handsaw to cut the wood to the desired dimensions.
- Drill and Bits: A power drill and a selection of drill bits will be necessary for creating pilot holes and securing screws.
- Level: To ensure your shelves are installed evenly, a level is indispensable for maintaining straight lines.
- Sandpaper: Smooth out rough edges and surfaces with sandpaper for a polished final result.
- Safety Gear: Don't forget to prioritize safety by wearing protective gear such as goggles and gloves when working with tools and materials.
By gathering these materials and tools, you'll be well-prepared to embark on the construction phase of your DIY pantry shelves. Remember to double-check your shopping list and ensure you have everything you need before diving into the next steps.
Step 4: Building Your DIY Pantry Shelves
With your materials and tools at the ready, it's time to roll up your sleeves and start building your DIY pantry shelves. Follow these steps to bring your vision to life:
-
Cutting the Shelves: Using your measurements and plans as a guide, carefully cut the wood to create the individual shelves. Double-check the dimensions before making any cuts to ensure precision.
-
Attaching the Brackets: Position the shelf brackets at the predetermined locations on the pantry walls. Use a level to ensure they are straight and mark the spots for drilling pilot holes. Secure the brackets in place with screws, ensuring they can support the weight of the shelves.
-
Assembling the Shelves: If you're creating multiple shelves, assemble them by attaching the cut pieces of wood to the brackets. Apply wood glue to reinforce the joints and ensure stability. Allow the glue to dry according to the manufacturer's instructions.
-
Finishing Touches: Sand the edges and surfaces of the shelves to create a smooth finish. If desired, apply paint or stain to enhance the appearance of the shelves and complement your kitchen decor.
-
Installing the Shelves: With the shelves assembled and finished, carefully place them on the installed brackets. Double-check that they are level and securely positioned.
By following these steps, you can build sturdy and functional DIY pantry shelves that cater to your specific storage needs. Remember to work methodically and prioritize safety throughout the construction process.
Step 5: Installing and Organizing Your Shelves
Now that your DIY pantry shelves are built, it's time to install them and organize your pantry for maximum efficiency.
Installing the Shelves
- Positioning: Carefully place each shelf on the installed brackets, ensuring they are level and securely positioned. Use a spirit level to guarantee that the shelves are straight and evenly aligned.
- Securing: Once the shelves are in place, secure them by adding additional screws through the brackets into the shelves for added stability. This step is crucial, especially if you plan to store heavy items on the shelves.
Organizing Your Pantry
- Categorize Items: Sort your pantry items into categories such as canned goods, spices, baking supplies, and snacks. This will help you determine the best placement for each item on the shelves.
- Utilize Storage Containers: Consider using clear storage containers or baskets to keep smaller items organized and easily accessible. Label the containers for quick identification.
- Adjust Shelf Heights: If necessary, adjust the shelf heights to accommodate the different sizes of items you plan to store. This flexibility will ensure that no space is wasted, and everything has its designated spot.
- Maximize Space: Make use of the pantry door by adding an over-the-door organizer for additional storage. This can be a great place to store spices, small jars, or kitchen tools.
By following these steps, you can transform your pantry into a well-organized space that not only looks tidy but also makes it easier to find and access the items you need. Regularly revisit and adjust the organization of your pantry as needed to maintain its efficiency.
Conclusion
Congratulations on completing the journey to transform your pantry with DIY shelves! By following the steps outlined in this guide, you've taken a significant step toward creating a more organized and efficient kitchen space. Your newly constructed pantry shelves are not only a testament to your DIY skills but also a practical solution for keeping your kitchen essentials in order. As you stand back and admire your handiwork, take pride in knowing that you've customized your pantry to suit your specific storage needs. With your pantry now neatly organized, you can look forward to a more streamlined cooking and meal preparation experience. Remember, the key to maintaining an organized pantry is to regularly assess and adjust the layout as your needs evolve. Embrace the satisfaction of a well-organized kitchen and enjoy the fruits of your DIY labor!