
Home>Organize & Storage>Closet Organization>DIY Closet System Ideas
Closet Organization
DIY Closet System Ideas
Published: September 3, 2024
Discover innovative DIY closet system ideas to maximize your storage space. Transform your closet with these easy, budget-friendly solutions for a clutter-free home.
(Many of the links in this article redirect to a specific reviewed product. Your purchase of these products through affiliate links helps to generate commission for Twigandthistle.com, at no extra cost. Learn more)
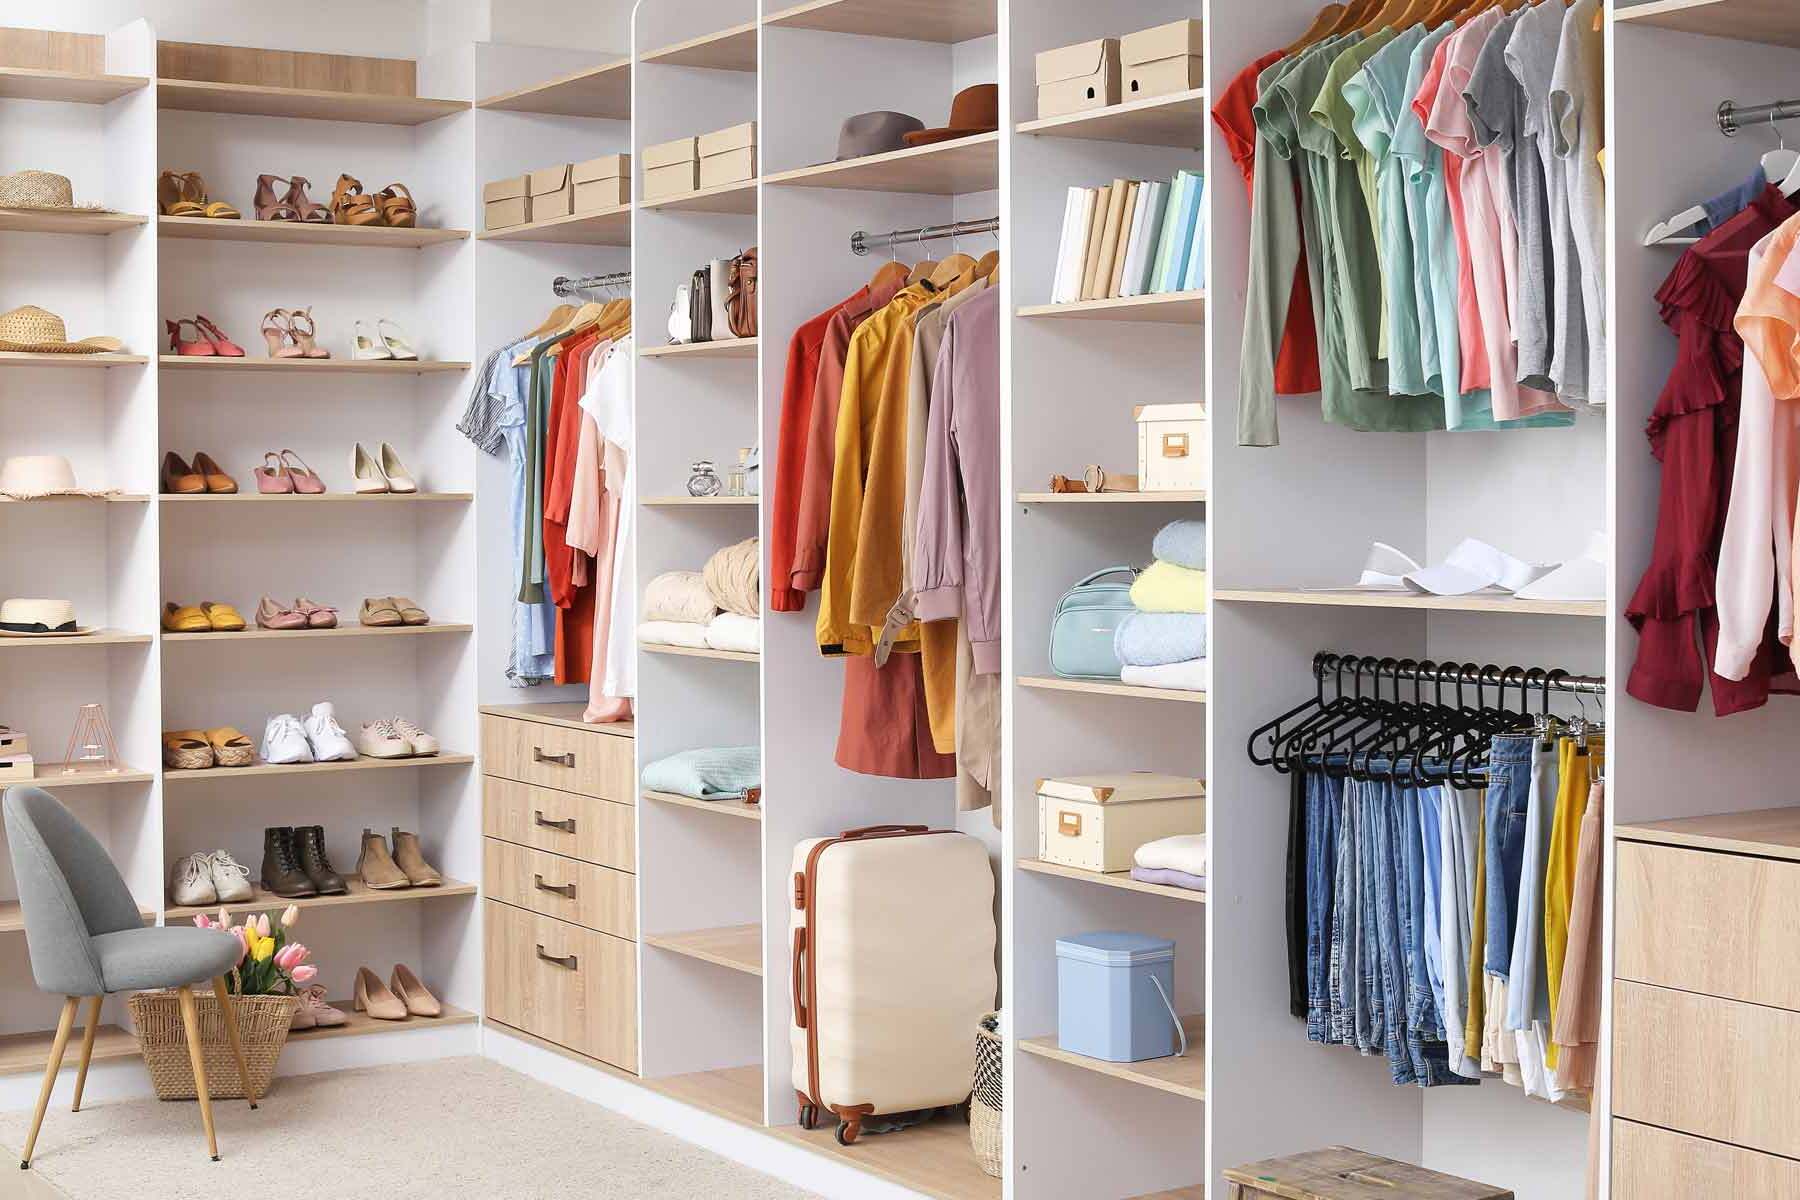
Feeling cramped and disorganized? Transform your cluttered closet into a tidy and functional space with a DIY closet system! Whether you have a small reach-in or a spacious walk-in, creating a customized storage solution doesn't need to be complicated or expensive. From adjustable shelving to creative use of bins and baskets, there are plenty of ideas to suit any style or budget. With a bit of time, creativity, and elbow grease, you can maximize your closet's potential and make getting dressed a breeze. Ready to dive into some inspiring DIY closet system ideas? Let's get started!
Getting Ready for Your DIY Project
Measure Your Space: Use a tape measure to get the height, width, and depth of your closet. Write down these measurements.
Plan Your Design: Sketch a layout of your closet. Decide where shelves, rods, and drawers will go. Consider your storage needs.
Gather Tools and Materials: Collect tools like a drill, screwdriver, level, and saw. Buy materials such as wood, brackets, screws, and closet rods.
Clear the Closet: Remove everything from the closet. Take out old shelves or rods if needed.
Safety Gear: Wear safety glasses and gloves. Keep a first aid kit nearby.
Prepare the Workspace: Lay down a drop cloth to protect the floor. Set up a workbench or table for cutting and assembling materials.
Mark Studs: Use a stud finder to locate wall studs. Mark them with a pencil. This ensures shelves and rods are securely attached.
Cut Materials: Measure and cut wood or other materials to the sizes needed for your design.
Pre-Drill Holes: Pre-drill holes in wood pieces to prevent splitting when you screw them together.
Assemble Components: Put together shelves, rods, and other parts according to your design.
Install in Closet: Attach shelves and rods to the wall, making sure they are level and secure.
Organize Your Items: Once installed, arrange your clothes, shoes, and accessories in your new closet system.
What You'll Need: Materials and Tools
- Measuring Tape: Essential for accurate measurements of your closet space.
- Level: Ensures shelves and rods are installed straight.
- Stud Finder: Helps locate wall studs for secure mounting.
- Drill: Necessary for making holes and driving screws.
- Screws and Anchors: Secure shelves and brackets to the wall.
- Saw: Used to cut shelves and rods to the desired length.
- Screwdriver: Tightens screws and bolts.
- Pencil: Marks measurements and placement points.
- Shelf Brackets: Supports for shelves.
- Closet Rods: For hanging clothes.
- Shelving Boards: Provides storage surfaces.
- Sandpaper: Smooths rough edges on cut boards.
- Paint or Stain: Finishes shelves and rods for a polished look.
- Safety Gear: Includes gloves and goggles for protection.
Each tool and material plays a crucial role in creating a functional, sturdy closet system.
Skill Level and Time Commitment
Skill Level: Intermediate
Time Required: 1-2 days
- Planning and Measuring: 2-3 hours
- Purchasing Materials: 1-2 hours
- Cutting and Preparing Materials: 3-4 hours
- Assembling the System: 4-6 hours
- Finishing Touches: 1-2 hours
How to Build: Step-by-Step Guide
Measure Your Closet Space
- Use a tape measure to find the height, width, and depth.
- Write down the measurements.
Plan Your Layout
- Sketch a rough layout on paper.
- Decide where you want shelves, rods, and drawers.
Gather Materials
- Purchase wood, brackets, screws, and rods.
- Get tools like a saw, drill, level, and screwdriver.
Cut Wood to Size
- Use a saw to cut shelves and supports to the needed lengths.
- Sand edges to smooth them out.
Install Shelf Supports
- Mark where the supports will go on the wall.
- Use a level to ensure they are straight.
- Drill holes and attach supports with screws.
Attach Shelves
- Place shelves on the supports.
- Secure shelves with screws from underneath.
Install Closet Rods
- Measure and mark where rods will go.
- Attach rod brackets to the wall.
- Insert rods into brackets.
Add Drawers (Optional)
- Assemble drawer units according to instructions.
- Place them in the desired location within the closet.
Organize Your Closet
- Hang clothes on rods.
- Place folded items on shelves.
- Store smaller items in drawers.
Helpful Tips and Tricks
Measure Twice, Cut Once: Always double-check measurements before cutting materials. Mistakes here can waste time and money.
Use Adjustable Shelving: Install adjustable shelves to customize storage space as needs change. This adds flexibility without major renovations.
Maximize Vertical Space: Use the full height of your closet. Install shelves or hanging rods higher up to store less-used items.
Incorporate Baskets and Bins: Use baskets or bins for smaller items. This keeps things organized and easy to find.
Install a Second Rod: Adding a second hanging rod doubles hanging space for shirts, pants, or skirts.
Lighting: Good lighting makes a big difference. Consider battery-operated LED lights if wiring is an issue.
Label Everything: Label bins and shelves to keep everything in its place. This helps maintain organization over time.
Common Mistakes to Avoid:
Overloading Shelves: Avoid putting too much weight on shelves. This can cause them to sag or break.
Ignoring Wall Studs: Always anchor heavy items to wall studs. This ensures stability and safety.
Skipping the Plan: Don’t start without a clear plan. Sketch out your closet design to avoid costly mistakes.
Alternatives for Materials or Methods:
Wire Shelving: Use wire shelving instead of wood for a budget-friendly option. It’s easy to install and adjustable.
Tension Rods: For renters, tension rods can create extra hanging space without drilling holes.
Pegboards: Use pegboards for versatile storage. Hooks and baskets can be easily rearranged.
Repurpose Furniture: Old bookshelves or dressers can be repurposed for closet storage. This saves money and adds unique character.
Estimating the Cost
Materials:
- Plywood: $50-$100 per sheet (4x8 feet)
- Closet Rods: $10-$20 each
- Brackets: $5-$10 each
- Screws: $5-$10 per box
- Paint or Stain: $20-$40 per gallon
- Shelf Supports: $5-$15 each
- Drawer Slides: $10-$25 per pair
Tools:
- Drill: $50-$100
- Saw: $50-$150
- Measuring Tape: $10-$20
- Level: $10-$30
- Screwdriver Set: $10-$30
- Paintbrushes: $5-$15
Total Cost Estimate: $250-$600
Budget-Friendly Alternatives:
- Use MDF instead of plywood: $30-$50 per sheet
- Repurpose old furniture for shelves and drawers
- Buy second-hand tools from thrift stores or online marketplaces
- Skip paint or stain and use natural wood finish
Different Ways to Customize
Shelving Materials: Use wood, metal, or plastic shelves. Wood gives a classic look, metal offers a modern feel, and plastic is budget-friendly.
Colors: Paint shelves and rods in neutral colors like white, gray, or beige for a clean look. For a bold statement, choose bright colors like red, blue, or green.
Rod Types: Install wooden rods for a traditional style, metal rods for a sleek look, or plastic rods for a lightweight option.
Storage Bins: Use woven baskets for a rustic touch, clear plastic bins for easy visibility, or fabric bins for a soft, cozy feel.
Drawer Units: Add wooden drawers for a sturdy option, metal drawers for industrial style, or plastic drawers for a lightweight, easy-to-clean choice.
Lighting: Install LED strip lights for a modern touch, battery-operated puck lights for convenience, or motion-sensor lights for energy efficiency.
Hooks and Hangers: Use metal hooks for durability, plastic hooks for a budget-friendly option, or wooden hooks for a natural look.
Back Panels: Add mirrored panels for a spacious feel, fabric panels for a soft touch, or painted panels for a pop of color.
Door Options: Install sliding doors for space-saving, bi-fold doors for easy access, or curtains for a casual, flexible option.
Flooring: Use carpet tiles for comfort, vinyl flooring for easy cleaning, or wooden planks for a classic look.
Eco-Friendly Tips
Reclaimed Wood: Use old wood from pallets or barns. Sand it down, give it a fresh coat of eco-friendly paint, and you have sturdy shelves.
Bamboo: This fast-growing plant is a great alternative to traditional wood. It’s strong, lightweight, and sustainable.
Recycled Metal: Old pipes or metal rods can be repurposed into hanging rods or brackets. They add an industrial look and reduce waste.
Fabric Bins: Instead of plastic, use fabric bins made from organic cotton or recycled materials. They are durable and washable.
Natural Finishes: Use non-toxic, water-based stains and paints. They are better for the environment and your health.
Cork: Cork is renewable and can be used for drawer liners or bulletin boards inside the closet.
Recycled Plastic: Some companies make closet organizers from recycled plastic. These can be a good option if you need something lightweight and durable.
Upcycled Furniture: Turn an old dresser into a shoe rack or a bookshelf into a storage unit. This reduces waste and gives new life to old items.
LED Lighting: If you need lighting in your closet, choose LED bulbs. They use less energy and last longer than traditional bulbs.
Natural Fiber Rugs: Use rugs made from jute, sisal, or other natural fibers. They are biodegradable and add a cozy touch.
Your Closet, Your Way
Creating a DIY closet system isn't just about organization; it's about personalization. You've got the tools and ideas to transform any space into a functional and stylish area. Whether you choose shelves, rods, or drawers, each element can be tailored to fit your needs. Don't be afraid to mix and match different materials and designs. Remember, the goal is to make your closet work for you. So, grab those tools, get creative, and start building. Your dream closet is just a few steps away. Happy DIY-ing!
How do I start planning a DIY closet system?
Begin by measuring your closet space. Note the height, width, and depth. Sketch a rough layout, marking where you want shelves, rods, and drawers. Think about what you need to store and how much space each item requires.
What materials should I use for my DIY closet system?
Plywood, MDF, and solid wood are popular choices. Plywood is sturdy and affordable, MDF is smooth and easy to paint, and solid wood is durable but pricier. Choose based on your budget and desired look.
Can I install a DIY closet system by myself?
Absolutely! With basic tools like a drill, level, and saw, you can install it yourself. Just follow your plan, measure twice, and take your time. If you're unsure, there are plenty of online tutorials to guide you.
How much does a DIY closet system cost?
Costs vary based on materials and complexity. A simple system might cost around $100, while a more elaborate one with custom features could run several hundred dollars. Shop around for deals on materials to save money.
What are some space-saving tips for small closets?
Use vertical space with tall shelves, add hooks on doors for accessories, and consider pull-out baskets or bins. Double up on hanging rods to maximize hanging space for shirts and pants.
How can I make my DIY closet system look professional?
Paint or stain the wood for a polished finish, use matching hardware, and ensure all shelves and rods are level. Adding trim or molding can also give it a custom, built-in look.
Are there any common mistakes to avoid when building a DIY closet system?
Avoid skimping on measurements, using flimsy materials, or overcrowding the space. Make sure to anchor shelves and rods securely to studs for stability. Plan for future storage needs to keep it functional long-term.