
Home>Create & Decorate>DIY & Crafts>Budget-Friendly DIY Underground Bunker
DIY & Crafts
Budget-Friendly DIY Underground Bunker
Published: May 22, 2024

Senior Editor in Create & Decorate, Kathryn combines traditional craftsmanship with contemporary trends. Her background in textile design and commitment to sustainable crafts inspire both content and community.
Discover budget-friendly DIY underground bunker ideas and projects for your safety and security. Explore creative DIY & Crafts solutions for building your own bunker.
(Many of the links in this article redirect to a specific reviewed product. Your purchase of these products through affiliate links helps to generate commission for Twigandthistle.com, at no extra cost. Learn more)
Introduction
So, you've been thinking about building your own underground bunker but you're worried about the cost? Well, fear not! In this article, we'll explore the ins and outs of creating a budget-friendly DIY underground bunker. Whether you're preparing for a potential disaster or simply want to have a secure space for storage, this guide will help you get started on the right foot. Let's dive in and discover how you can build your own underground sanctuary without breaking the bank.
Choosing the Right Location
-
Accessibility: When choosing the location for your DIY underground bunker, accessibility is key. You'll want to pick a spot that is easily accessible from your home but also discreet enough to avoid drawing attention.
-
Soil Type: The type of soil in your chosen location is crucial. Opt for well-draining soil to prevent water from seeping into your bunker. Clay soils, for example, can retain water and may not be the best choice for your underground structure.
-
Distance from Hazards: Consider the proximity of potential hazards such as flood zones, fault lines, or areas prone to natural disasters. It's important to choose a location that minimizes the risk of being affected by external dangers.
-
Legal Regulations: Check local building codes and regulations before settling on a location. Some areas may have restrictions on building underground structures, so it's essential to ensure that your chosen location complies with legal requirements.
-
Privacy and Security: Look for a location that offers privacy and security. You'll want to keep your bunker hidden from prying eyes and secure from unauthorized access.
By considering these factors, you can select the ideal location for your DIY underground bunker, ensuring that it is both practical and safe for you and your family.
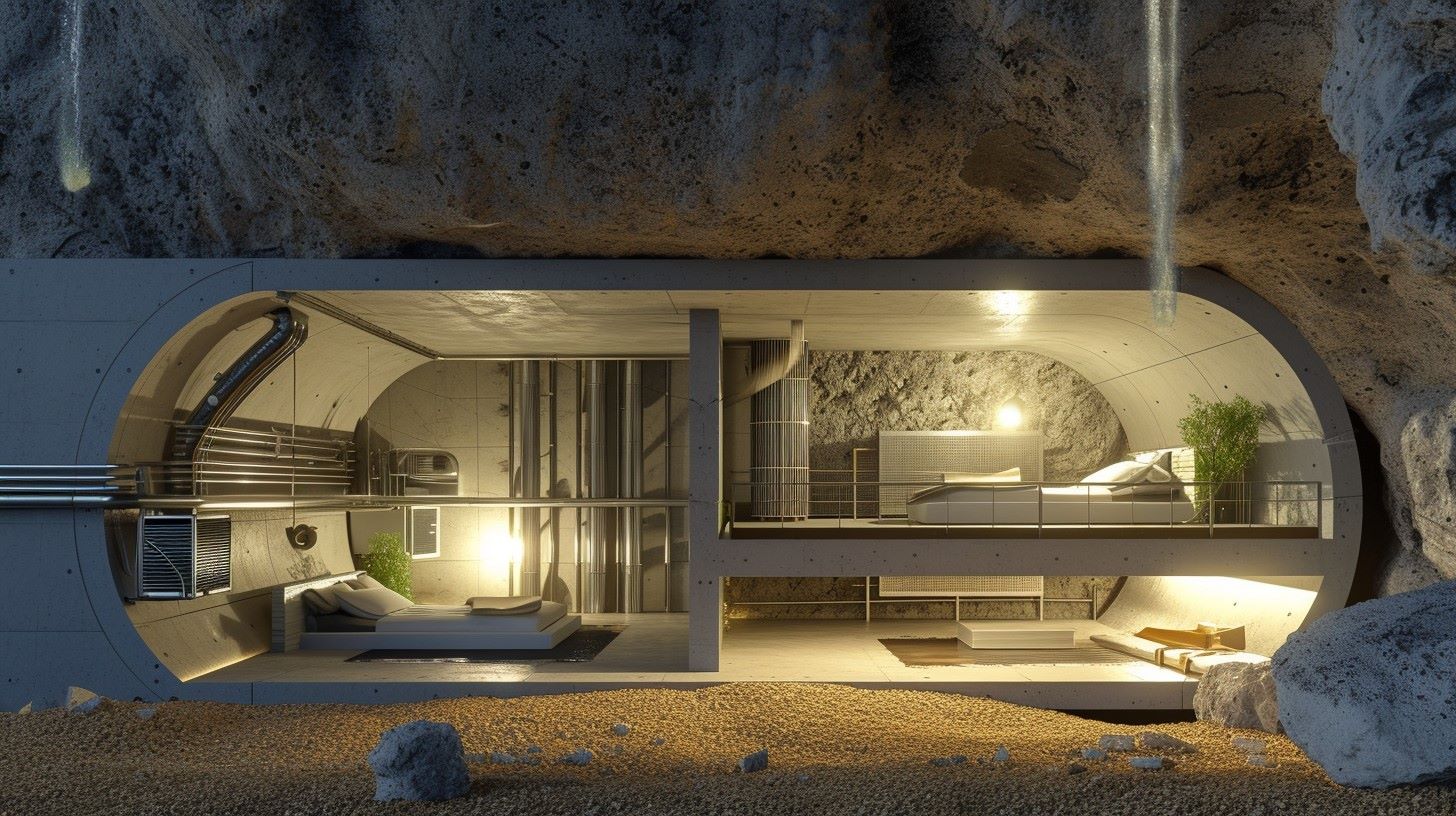
Designing the Layout
Designing the layout of your DIY underground bunker is a crucial step in the construction process. Here are some key considerations to keep in mind:
-
Space Allocation: Determine how much space you will need for your bunker based on its intended use. Whether it's for emergency shelter, storage, or a multi-purpose space, allocating the right amount of space for each function is essential.
-
Room Division: Plan the layout of the rooms within your bunker. Consider including separate areas for sleeping, storage, and a living space. If you're incorporating a bathroom or kitchen, ensure that these areas are strategically placed for convenience.
-
Ventilation and Air Circulation: Adequate ventilation is vital for an underground space. Plan for ventilation shafts and air circulation systems to maintain air quality within the bunker.
-
Lighting: Natural light may be limited in an underground bunker, so carefully plan the placement of artificial lighting. Consider energy-efficient lighting options to minimize power consumption.
-
Storage Solutions: Efficient storage is essential for maximizing the use of space. Incorporate built-in shelving, cabinets, and storage units to keep the bunker organized and clutter-free.
-
Emergency Exits: Safety should be a top priority when designing the layout. Include multiple emergency exits and ensure that they are easily accessible from each area of the bunker.
By carefully designing the layout of your underground bunker, you can create a functional and comfortable space that meets your specific needs while maximizing the use of the available area.
Selecting Materials and Supplies
When it comes to building a budget-friendly DIY underground bunker, selecting the right materials and supplies is essential for both cost-effectiveness and structural integrity. Here's a detailed look at the key considerations for choosing the materials and supplies for your underground shelter:
Structural Materials
-
Reinforced Concrete: Reinforced concrete is a popular choice for the construction of underground bunkers due to its strength and durability. It provides excellent protection against external forces and can withstand the pressure of the surrounding soil.
-
Steel Beams and Supports: Incorporating steel beams and supports into the bunker's structure adds an extra layer of reinforcement. These materials help distribute the weight of the soil and provide additional stability.
-
Waterproofing Membrane: To prevent water infiltration, a high-quality waterproofing membrane is essential. Look for materials specifically designed for underground applications to ensure long-term protection against moisture.
Ventilation and Air Filtration
-
PVC Piping: PVC piping is commonly used for ventilation systems in underground structures. It is lightweight, cost-effective, and resistant to corrosion, making it an ideal choice for directing airflow within the bunker.
-
Air Filtration Systems: Selecting reliable air filtration systems is crucial for maintaining air quality within the underground space. Look for filters that can effectively remove dust, pollutants, and other airborne particles.
Electrical and Lighting
-
LED Lighting: LED lights are energy-efficient and long-lasting, making them a practical choice for underground lighting. They consume less power and have a longer lifespan, reducing the need for frequent replacements.
-
Electrical Wiring and Components: Use high-quality electrical wiring and components that are designed for underground installations. Ensure that all electrical work complies with safety standards and regulations.
Emergency Supplies
-
Emergency Food and Water Storage: Stock up on non-perishable food items and water for emergency situations. Consider long-term food storage options such as canned goods, dehydrated meals, and water purification systems.
-
First Aid Kits and Medical Supplies: Keep a well-equipped first aid kit and essential medical supplies in the bunker. Include medications, bandages, antiseptics, and other items necessary for addressing injuries and medical emergencies.
Security and Access
-
Heavy-Duty Door and Locking Mechanisms: Invest in a heavy-duty door with secure locking mechanisms to fortify the entrance to the bunker. Consider reinforced steel doors with multiple locking points for enhanced security.
-
Surveillance Equipment: Depending on your security needs, consider installing surveillance cameras and monitoring systems to keep an eye on the surroundings of the bunker.
By carefully selecting the right materials and supplies for your DIY underground bunker, you can ensure that it is not only cost-effective but also well-equipped to provide safety, comfort, and security in times of need.
Construction Process
The construction process of your DIY underground bunker is a significant undertaking that requires careful planning and execution. Here's a detailed breakdown of the essential steps involved in building your underground shelter:
-
Excavation and Site Preparation: Begin by excavating the chosen location for your bunker. Use heavy machinery or manual labor to dig out the designated area, ensuring that the dimensions and depth align with your planned layout. Clear the site of any debris, rocks, or obstructions to create a clean and level foundation for the construction.
-
Foundation and Structural Reinforcement: Once the excavation is complete, focus on laying the foundation for the bunker. Pour reinforced concrete to form the base and walls of the structure. Incorporate steel beams and supports to reinforce the foundation and provide structural stability. Ensure that the foundation is properly cured before proceeding to the next phase.
-
Waterproofing and Drainage Installation: Install a high-quality waterproofing membrane to protect the bunker from water infiltration. Additionally, set up a drainage system to redirect any excess moisture away from the structure. Proper waterproofing and drainage are crucial for maintaining a dry and secure underground space.
-
Ventilation and Air Circulation: Implement the ventilation and air circulation systems as per the planned layout. Install PVC piping for air ducts and ventilation shafts to facilitate the flow of fresh air into the bunker. Consider incorporating air filtration systems to maintain air quality within the underground space.
-
Electrical Wiring and Lighting Installation: Proceed with the installation of electrical wiring, outlets, and lighting fixtures. Ensure that all electrical work complies with safety standards and regulations. Use LED lighting for energy-efficient illumination and carefully plan the placement of lights to provide adequate visibility throughout the bunker.
-
Entrance and Security Features: Install the entrance door and secure locking mechanisms to fortify the access point to the bunker. Consider the installation of surveillance equipment, such as cameras and monitoring systems, to enhance security and surveillance around the perimeter of the underground structure.
-
Interior Finishing and Furnishing: Once the essential structural and functional elements are in place, focus on the interior finishing and furnishing. Add insulation to regulate temperature and soundproof the bunker. Incorporate storage solutions, furniture, and amenities according to the planned layout and intended use of the space.
-
Testing and Inspection: Before finalizing the construction, conduct thorough testing and inspection of all systems and components within the bunker. Check for any structural weaknesses, electrical issues, or ventilation problems. Address any identified issues to ensure that the underground shelter is fully functional and safe.
By following these steps and paying attention to detail throughout the construction process, you can successfully build a budget-friendly DIY underground bunker that meets your specific needs for safety, security, and preparedness.
Safety and Security Measures
Ensuring the safety and security of your DIY underground bunker is paramount to its effectiveness as a protective shelter. Here are the key measures to implement for a secure and well-protected underground space:
-
Reinforced Construction: Utilize reinforced concrete, steel beams, and supports to fortify the structural integrity of the bunker. These materials provide enhanced protection against external forces and ensure the stability of the underground structure.
-
Secure Entrance: Install a heavy-duty door equipped with secure locking mechanisms to fortify the entrance to the bunker. Consider reinforced steel doors with multiple locking points to prevent unauthorized access.
-
Surveillance Systems: Depending on your security needs, consider installing surveillance cameras and monitoring systems to monitor the surroundings of the bunker. Strategically place cameras to provide comprehensive coverage of the perimeter and access points.
-
Emergency Exits: Incorporate multiple emergency exits into the bunker's design to ensure safe egress in the event of an emergency. These exits should be easily accessible from each area of the underground space and comply with safety regulations.
-
Fire Safety: Implement fire safety measures, including the installation of fire extinguishers and smoke detectors within the bunker. Ensure that all electrical wiring and components are up to code to minimize the risk of fire hazards.
-
Air Quality Monitoring: Regularly monitor and maintain the air quality within the bunker. Install carbon monoxide detectors and air quality sensors to ensure a safe and healthy environment for occupants.
-
Emergency Communication: Establish a reliable communication system within the bunker to stay connected with the outside world in case of an emergency. Consider including a two-way radio, satellite phone, or other communication devices.
-
Security Protocols: Develop and communicate security protocols to all occupants of the bunker. Establish procedures for accessing the bunker, handling emergencies, and maintaining security measures.
By implementing these safety and security measures, you can create a well-protected and secure underground bunker that provides peace of mind and preparedness for unforeseen circumstances.
Stocking the Bunker
Stocking your DIY underground bunker with essential supplies and provisions is a critical aspect of preparedness for any potential emergency or disaster. Here's a comprehensive guide on how to effectively stock your bunker to ensure the well-being and sustenance of its occupants:
Food and Water
- Non-Perishable Food: Store a variety of non-perishable food items such as canned goods, dried fruits, nuts, and long-lasting snacks. Opt for high-protein and nutrient-dense foods to sustain energy levels.
- Water: Ensure an ample supply of clean drinking water for each occupant. Consider water purification systems or water storage containers with purification tablets for long-term water needs.
Medical and First Aid Supplies
- First Aid Kit: Equip the bunker with a fully stocked first aid kit containing bandages, antiseptics, pain relievers, and essential medical supplies for treating injuries and illnesses.
- Medications: Store a sufficient supply of prescription medications, over-the-counter drugs, and any necessary medical equipment for managing chronic conditions or addressing health concerns.
Emergency Equipment
- Flashlights and Batteries: Include durable, long-lasting flashlights and a supply of extra batteries for illumination during power outages or emergencies.
- Portable Radio: Keep a battery-powered or hand-cranked radio for receiving emergency broadcasts and staying informed about external conditions.
- Emergency Tools: Store basic tools such as a multi-tool, wrench, hammer, and duct tape for minor repairs and maintenance.
Clothing and Bedding
- Seasonal Clothing: Prepare a set of weather-appropriate clothing, including warm layers, sturdy footwear, and protective gear for potential outdoor activities.
- Bedding and Blankets: Have comfortable bedding, sleeping bags, and blankets to ensure rest and comfort during extended stays in the bunker.
Communication and Documentation
- Communication Devices: Include a portable two-way radio, satellite phone, or other communication devices to maintain contact with external assistance or other individuals.
- Important Documents: Safeguard essential documents such as identification, insurance papers, and emergency contact information in a waterproof and secure container.
Entertainment and Comfort
- Books and Games: Provide entertainment and mental stimulation with books, playing cards, board games, or other recreational activities to alleviate stress and boredom.
- Comfort Items: Include comfort items such as pillows, cushions, and personal hygiene products to promote a sense of normalcy and well-being.
Pet Supplies (If Applicable)
- Pet Food and Water: Stock an adequate supply of pet food and water for any animals that may accompany occupants in the bunker.
- Pet Medications: Ensure that necessary medications and comfort items for pets are readily available for their well-being.
By thoughtfully stocking your DIY underground bunker with these essential supplies, you can create a well-prepared and resilient shelter that offers comfort, security, and sustenance during challenging circumstances.
Maintenance and Upkeep
Maintaining and upkeeping your DIY underground bunker is essential to ensure its functionality and readiness for any potential use. Here's a detailed guide on the key aspects of maintenance and upkeep for your underground shelter:
Regular Inspections
Perform routine inspections of the bunker to check for any signs of structural damage, water infiltration, or equipment malfunctions. Look for cracks in the walls, ceiling, or floor, and address any issues promptly to prevent further deterioration. Inspect the waterproofing and drainage systems to ensure they are effectively diverting moisture away from the bunker.
Cleaning and Sanitization
Regularly clean and sanitize the interior of the bunker to maintain a hygienic and comfortable environment. Remove dust, debris, and any potential contaminants to uphold cleanliness. Pay special attention to ventilation ducts, air filters, and storage areas to prevent the buildup of mold or mildew.
Equipment Maintenance
Conduct regular maintenance checks on all equipment and systems within the bunker. Test the functionality of emergency lighting, ventilation fans, air filtration systems, and communication devices. Replace batteries, filters, and other consumable components as needed to ensure optimal performance.
Structural Repairs
Address any structural repairs or maintenance requirements promptly to uphold the integrity of the bunker. Repair any cracks, leaks, or damage to the concrete walls and foundation. Ensure that the entrance door, locking mechanisms, and emergency exits are in proper working condition.
Stock Rotation
Regularly review and rotate the stock of food, water, and supplies stored in the bunker. Check expiration dates and replenish any items that are approaching their expiration. Ensure that emergency equipment, such as flashlights, radios, and first aid supplies, are in good working order and readily accessible.
Emergency Drills and Training
Conduct periodic emergency drills and training exercises with all occupants of the bunker. Practice evacuation procedures, emergency communication protocols, and the proper use of safety and security equipment. Regular training enhances preparedness and ensures that everyone is familiar with the bunker's operation.
Pest Control
Implement measures to prevent and control pests within the bunker. Seal any entry points that may allow insects or rodents to enter the underground space. Store food and supplies in airtight containers to minimize the risk of infestation.
Documentation and Records
Maintain detailed documentation of maintenance activities, inspections, and stock inventory. Keep records of equipment maintenance, repairs, and any modifications made to the bunker. Documentation provides a valuable reference for future maintenance and ensures accountability.
By diligently addressing maintenance and upkeep tasks, you can sustain the functionality, safety, and resilience of your DIY underground bunker, ultimately ensuring its reliability and effectiveness in times of need.
Conclusion
In conclusion, building a budget-friendly DIY underground bunker is a feasible and practical endeavor with the right approach and considerations. By carefully choosing the location, designing the layout, selecting suitable materials, and following a methodical construction process, you can create a secure and functional underground shelter without exceeding your budget. Prioritizing safety and security measures, stocking the bunker with essential supplies, and committing to regular maintenance and upkeep are essential steps to ensure the effectiveness and readiness of the bunker for any potential use. Whether it's for emergency preparedness, storage, or a multi-purpose space, a well-planned and well-constructed underground bunker offers peace of mind and a sense of security in uncertain times. With the knowledge and guidance provided in this article, you are well-equipped to embark on the journey of building your own budget-friendly DIY underground bunker.