
Home>Organize & Storage>Closet Organization>DIY Closet Island: How to Build a Stylish Storage Solution
Closet Organization
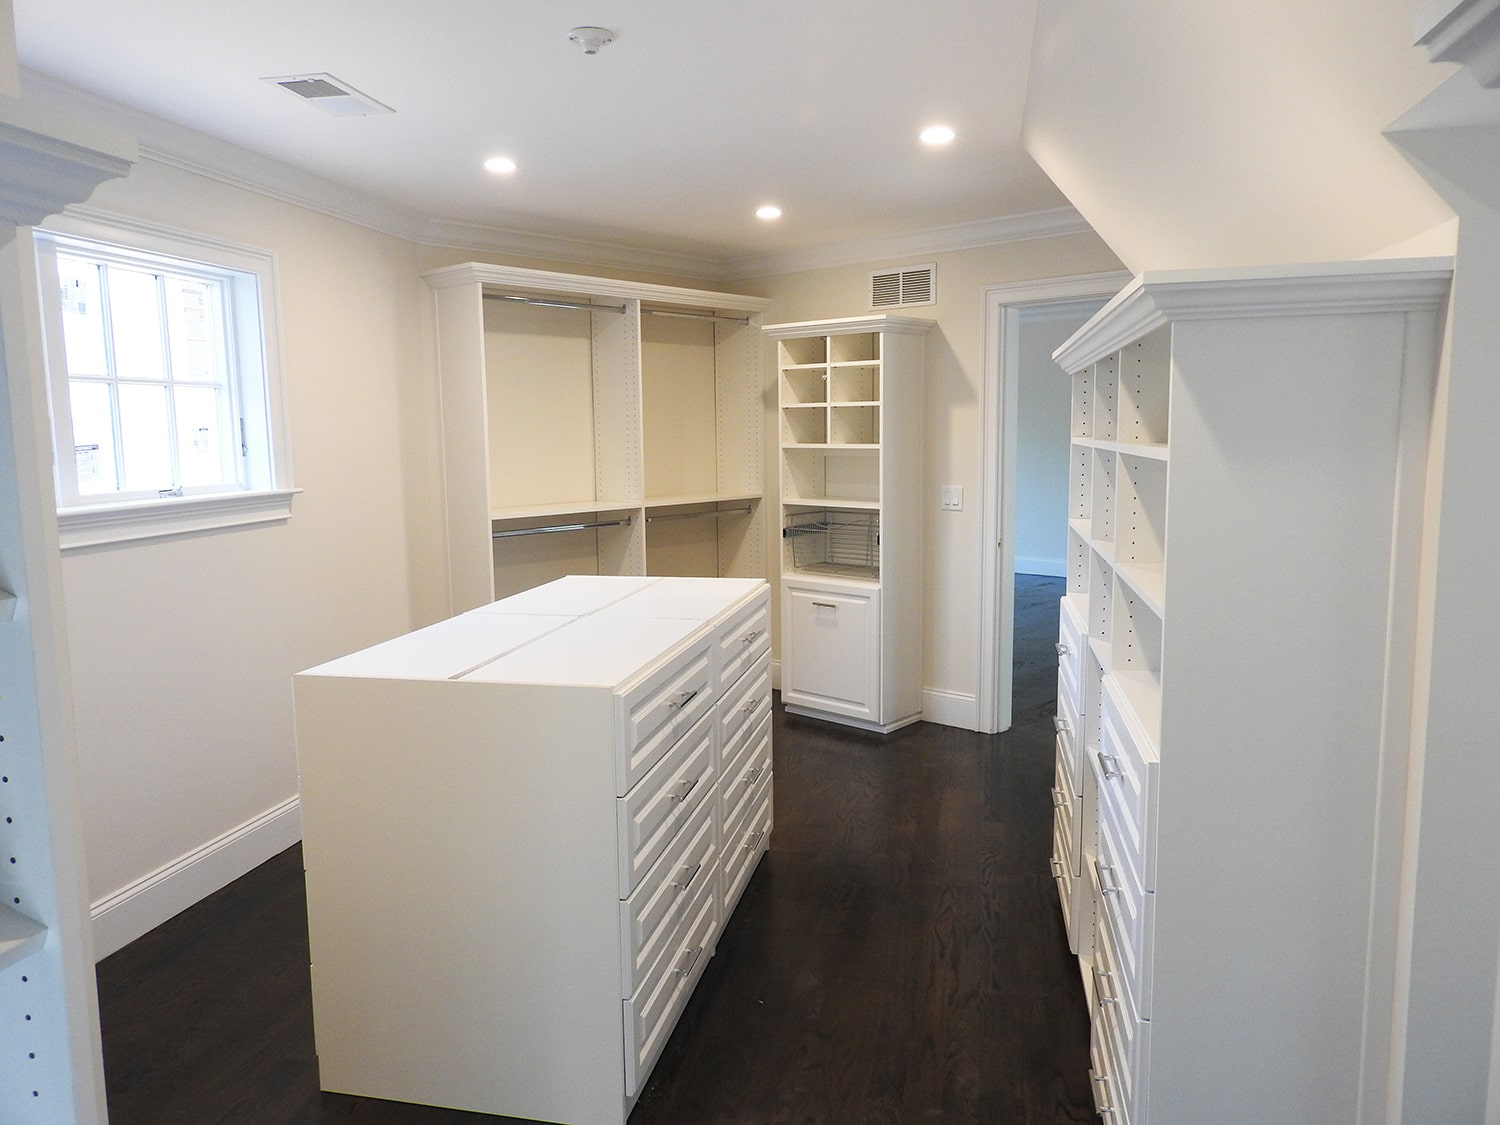
DIY Closet Island: How to Build a Stylish Storage Solution
Published: September 2, 2024
Discover how to build a stylish DIY closet island with our step-by-step guide. Maximize your storage space and add a touch of elegance to your closet effortlessly!
(Many of the links in this article redirect to a specific reviewed product. Your purchase of these products through affiliate links helps to generate commission for Twigandthistle.com, at no extra cost. Learn more)
Imagine having a central piece in your closet that not only looks fantastic but also keeps everything organized. Building a closet island is easier than you might think, even if you're not a pro. With some basic tools, materials, and a bit of patience, you can create a stylish storage solution tailored to your needs. This guide will walk you through the steps to build your own DIY closet island, providing both function and flair. Ready to transform your space? Let’s dive in and see what you can achieve!
Getting Ready for Your Project
Measure the Space: Use a tape measure to get the dimensions of your closet. Make sure the island will fit comfortably without obstructing movement.
Gather Materials: Collect all necessary materials like wood, screws, nails, paint, and handles. Make a checklist to ensure nothing is missing.
Create a Design Plan: Sketch a simple design of your island. Include shelves, drawers, and any other features you want.
Clear the Area: Remove any items from the closet. Clean the floor to ensure a smooth workspace.
Set Up Workspace: Lay down a drop cloth to protect the floor. Arrange your tools like saws, drills, and hammers within easy reach.
Safety Gear: Wear safety goggles, gloves, and a dust mask. Keep a first aid kit nearby in case of accidents.
Cut the Wood: Use a saw to cut the wood according to your design plan. Double-check measurements before cutting.
Assemble the Frame: Start by building the base frame. Use screws and a drill to secure the pieces together.
Add Shelves and Drawers: Install shelves and drawers as per your design. Ensure they are level and securely attached.
Paint or Stain: Apply paint or stain to the wood. Let it dry completely before moving the island into the closet.
Install Handles: Attach handles to drawers and doors. Make sure they are aligned properly.
Final Check: Inspect the island for any loose screws or uneven surfaces. Make necessary adjustments.
Gathering Materials and Tools
Materials:
- Plywood Sheets: Used for the base, sides, and shelves of the island. Choose a sturdy type like birch or oak.
- Wood Screws: Essential for assembling the plywood pieces securely.
- Wood Glue: Provides extra strength to the joints.
- Drawer Slides: Needed if you plan to include drawers in your island.
- Drawer Pulls/Handles: Makes opening and closing drawers easier.
- Sandpaper: Smooths out rough edges and surfaces.
- Paint or Stain: Adds color and protects the wood.
- Primer: Prepares the wood for painting or staining.
- Wood Filler: Fills in any gaps or holes in the wood.
- Trim Molding: Adds a decorative touch to the edges.
Tools:
- Measuring Tape: Ensures accurate measurements for cutting and assembling.
- Circular Saw: Cuts the plywood sheets to the required sizes.
- Drill: Used for making holes and driving screws.
- Screwdriver: Tightens screws securely.
- Clamps: Holds pieces together while the glue dries.
- Level: Ensures everything is even and straight.
- Paintbrushes or Rollers: Applies paint or stain smoothly.
- Sanding Block or Electric Sander: Speeds up the sanding process.
- Hammer: Useful for tapping pieces into place.
- Square: Ensures corners are perfectly right-angled.
Skill Level and Time Commitment
Skill Level: Intermediate
Time Required: 2-3 days
- Planning and Measuring: 2-3 hours
- Cutting Materials: 3-4 hours
- Assembling the Frame: 4-5 hours
- Painting or Staining: 6-8 hours (including drying time)
- Installing Drawers and Shelves: 3-4 hours
- Final Touches: 1-2 hours
Building Instructions
Gather Materials and Tools
- Plywood sheets
- Wood screws
- Wood glue
- Sandpaper
- Paint or stain
- Measuring tape
- Circular saw
- Drill
- Screwdriver
- Paintbrush or roller
Measure and Cut Plywood
- Measure the desired dimensions of the island.
- Use a circular saw to cut plywood into panels for the base, sides, top, and shelves.
Assemble the Base
- Attach the side panels to the base panel using wood screws and wood glue.
- Ensure corners are square.
Install Shelves
- Measure and mark shelf positions inside the island.
- Attach shelves using wood screws and wood glue.
Attach the Top
- Place the top panel on the assembled base.
- Secure it with wood screws and wood glue.
Sand and Finish
- Sand all surfaces to smooth out rough edges.
- Apply paint or stain to the island.
- Allow it to dry completely.
Add Hardware (Optional)
- Install drawer pulls or handles if desired.
- Attach any additional accessories like hooks or baskets.
Place in Closet
- Move the finished island into the closet.
- Ensure it fits well and is stable.
Organize Items
- Arrange clothes, shoes, or accessories on the shelves.
- Use baskets or bins for smaller items.
Helpful Tips and Tricks
Measure Twice, Cut Once: Always double-check measurements before cutting materials. This prevents waste and ensures pieces fit perfectly.
Use Quality Materials: Opt for sturdy wood like plywood or MDF. These provide durability and a polished look.
Pre-Drill Holes: Pre-drilling holes for screws avoids splitting the wood. It also makes assembly smoother.
Level the Base: Ensure the base is level before adding shelves or drawers. This keeps the island stable and functional.
Add Adjustable Shelves: Adjustable shelves offer flexibility for different storage needs. Use shelf pins for easy adjustments.
Incorporate Drawers: Drawers add hidden storage for smaller items. Soft-close drawer slides make them more user-friendly.
Paint or Stain Before Assembly: Painting or staining pieces before assembly ensures even coverage and a cleaner finish.
Use Corner Braces: Corner braces add extra support and stability to the structure. They are especially useful for larger islands.
Install Casters: Adding casters makes the island mobile. Locking casters keep it in place when needed.
Common Mistakes to Avoid:
Skipping the Plan: Not having a detailed plan can lead to mistakes and wasted materials. Sketch out your design and list all materials needed.
Ignoring Weight Limits: Overloading shelves or drawers can cause them to sag or break. Stick to recommended weight limits for all components.
Poor Sanding: Not sanding edges and surfaces can result in a rough finish. Sand all pieces thoroughly for a smooth look.
Alternatives for Materials or Methods:
Repurposed Furniture: Use an old dresser or cabinet as the base. This saves time and adds a unique touch.
Laminate Sheets: Instead of painting, use laminate sheets for a sleek, modern finish. They are easy to clean and durable.
Ready-Made Drawers: Purchase pre-assembled drawers to save time. They come in various sizes and styles to fit your design.
Floating Shelves: Instead of built-in shelves, use floating shelves. They are easier to install and can be adjusted as needed.
Estimating the Cost
Materials:
- Plywood (for the base and shelves): $50-$70
- Wood trim (for edges): $20-$30
- Paint or stain: $15-$25
- Drawer slides: $10-$20 per pair
- Handles/knobs: $2-$5 each
- Screws and nails: $5-$10
- Wood glue: $5-$10
Tools:
- Circular saw: $50-$100 (or borrow)
- Drill: $30-$60 (or borrow)
- Screwdriver set: $10-$20
- Paintbrushes: $5-$10
- Measuring tape: $5-$10
- Sandpaper: $5-$10
Total estimated cost: $212-$410
Budget-friendly alternatives:
- Use reclaimed wood or leftover plywood: Free or cheaper
- Borrow tools from friends or family: Free
- Buy handles/knobs in bulk: Lower cost per piece
- Use basic paint instead of premium: Save $5-$10
Different Ways to Customize
Materials: Instead of using standard wood, try reclaimed wood for a rustic look or plywood for a budget-friendly option. For a modern touch, consider metal or glass elements.
Colors: Paint the island in bold colors like navy blue or emerald green for a statement piece. For a more subtle look, use neutral shades like white, gray, or beige. You can also use stain to highlight the natural wood grain.
Styles: Add decorative molding or trim for a classic style. For a minimalist approach, keep lines clean and simple. If you prefer a farmhouse look, incorporate shiplap or barn door hardware.
Countertop: Use marble or granite for a luxurious feel. Butcher block offers a warm, functional surface. For an eco-friendly option, try recycled glass countertops.
Storage Options: Include drawers of various sizes for different items. Add open shelves for easy access to frequently used items. Install pull-out baskets or bins for flexible storage.
Handles and Knobs: Choose brass or gold hardware for a touch of elegance. Matte black or brushed nickel offers a modern look. For a vintage feel, use ceramic or glass knobs.
Lighting: Install under-cabinet lighting to illuminate the workspace. Add a pendant light above the island for focused lighting. Use LED strips for a contemporary touch.
Seating: If space allows, add a bench or stools on one side of the island. Choose upholstered seating for comfort or wooden stools for a cohesive look.
Wheels: For mobility, attach casters to the bottom of the island. This allows you to move it around as needed, making it a versatile piece.
Hooks and Racks: Install hooks on the sides for hanging bags or accessories. Add a rack for scarves, belts, or ties.
Mirror: Attach a mirror to one side for a functional and stylish addition. This can help with outfit checks and make the space feel larger.
Personal Touches: Decorate with plants, picture frames, or decorative trays to make the island uniquely yours.
Eco-Friendly Tips
Reclaimed wood makes a great base for your closet island. It adds character and reduces waste. Bamboo is another eco-friendly option. It grows quickly and is very durable. For the top, consider using recycled glass countertops. They look stylish and are made from repurposed materials.
Use low-VOC paints or stains to finish the wood. These products have fewer harmful chemicals. For drawer pulls or handles, look for recycled metal or repurposed leather. Both options are sustainable and add a unique touch.
Instead of buying new storage bins, repurpose old wooden crates or baskets. They can be painted or stained to match your island. Cork is another sustainable material that can be used for drawer liners or even as a bulletin board on the side of the island.
When assembling, use water-based adhesives. They are less toxic and better for the environment. Finally, consider adding solar-powered LED lights inside the drawers or cabinets. They save energy and are easy to install.
Your Closet Island Awaits
Building a DIY closet island isn't just about adding storage; it's about creating a space that reflects your style. You've got the tools, the materials, and the know-how. Now, it's time to bring your vision to life. Measure your space, cut your wood, and assemble your masterpiece. Don't forget to sand and paint for that polished look. Add drawers, shelves, or hooks to fit your needs. Personalize it with unique handles or a pop of color. This project not only maximizes your closet space but also adds a touch of elegance. So, roll up your sleeves, grab your tools, and get started. Your dream closet island is just a few steps away. Happy building!
What materials do I need to build a closet island?
You'll need plywood, wood screws, wood glue, paint or stain, drawer slides, handles, and casters if you want it to be mobile.
How much time will it take to build a closet island?
Depending on your skill level, it might take a weekend. Plan for about 10-15 hours of work, including drying time for paint or stain.
Do I need special tools for this project?
Basic tools like a drill, saw, measuring tape, screwdriver, and sander should do the trick. A circular saw or table saw can make cutting plywood easier.
Can I customize the size of my closet island?
Absolutely! Measure your closet space and design the island to fit. Just make sure to leave enough room to move around comfortably.
How do I add drawers to my closet island?
Use drawer slides to install drawers. Measure the space, cut the wood to size, assemble the drawer box, and attach the slides to both the drawer and the island frame.
What kind of finish should I use?
You can paint or stain the wood, depending on your style. Use a primer before painting and a sealant after staining to protect the wood.
Can I add a countertop to my closet island?
Yes, you can add a countertop for a polished look. Use materials like marble, granite, or laminate. Secure it with adhesive and screws.