
Home>Organize & Storage>Closet Organization>DIY Cardboard Closet Organizer Ideas
Closet Organization
DIY Cardboard Closet Organizer Ideas
Published: September 1, 2024
Discover creative DIY cardboard closet organizer ideas to maximize your space, keep your wardrobe tidy, and save money. Perfect for any budget and easy to make!
(Many of the links in this article redirect to a specific reviewed product. Your purchase of these products through affiliate links helps to generate commission for Twigandthistle.com, at no extra cost. Learn more)
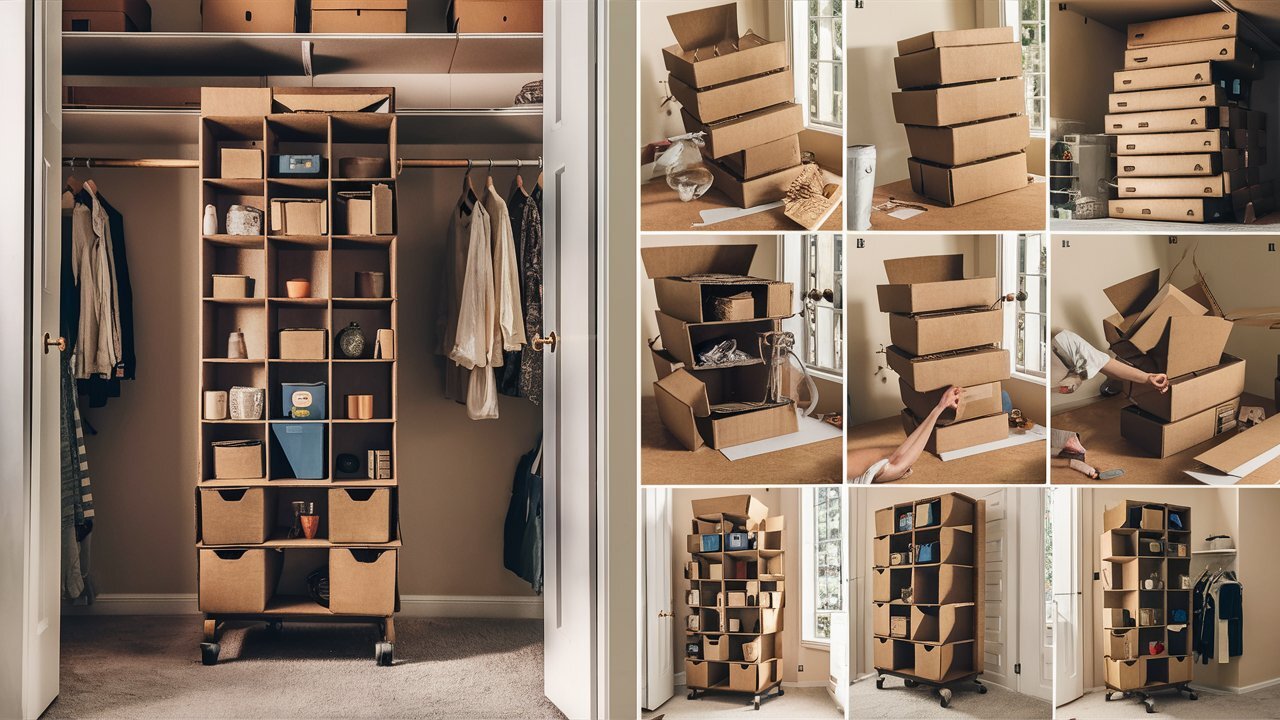
Are you tired of dealing with a messy closet? Are clothes and accessories scattered everywhere? Making a DIY cardboard closet organizer might just be the solution. Not only is it budget-friendly, but it also gives you a chance to get creative. Using everyday materials, you can create compartments, shelves, and even hangers to keep everything in place. This project is perfect for a weekend activity and can be a fun way to recycle old boxes. Ready to transform your cluttered closet into a neat, organized space? Let’s dive into some easy and clever ideas.
Preparation Steps
Gather Materials: Collect sturdy cardboard, a ruler, a pencil, a box cutter, glue, and decorative paper or paint.
Safety First: Wear gloves to protect hands from cuts. Use a cutting mat to avoid damaging surfaces.
Measure Your Closet: Use a tape measure to get the dimensions of the space where the organizer will go. Write these down.
Design Your Organizer: Sketch a simple plan. Decide how many sections or compartments you need.
Cut Cardboard Pieces: Mark measurements on the cardboard using a pencil and ruler. Cut pieces carefully with a box cutter.
Assemble the Organizer: Use glue to stick pieces together according to your design. Hold pieces in place until the glue dries.
Decorate: Cover the organizer with decorative paper or paint. Let it dry completely.
Set Up Workspace: Ensure you have a clean, flat surface to work on. Keep tools and materials within reach.
Ventilation: Work in a well-ventilated area, especially when using glue or paint.
Test Fit: Place the organizer in your closet to make sure it fits well. Adjust if needed.
Gather Your Materials and Tools
- Cardboard Boxes: Use sturdy boxes from old shipments or purchases. They form the main structure.
- Box Cutter or Utility Knife: Essential for cutting cardboard to desired sizes and shapes.
- Ruler or Measuring Tape: Ensures accurate measurements for a neat finish.
- Pencil: Marks cutting lines on the cardboard.
- Glue Gun and Glue Sticks: Provides strong adhesion for joining pieces together.
- Scissors: Useful for cutting smaller pieces or trimming edges.
- Decorative Paper or Fabric: Covers the cardboard for a polished look.
- Double-Sided Tape: Helps attach decorative paper or fabric smoothly.
- Paint and Brushes: Adds color and personalization to the organizer.
- Binder Clips or Clothespins: Holds pieces together while glue dries.
- Self-Adhesive Hooks: Adds functionality by allowing items to hang.
- Sandpaper: Smooths rough edges of cut cardboard.
- Markers or Labels: Helps in organizing and labeling different sections.
- Cutting Mat: Protects surfaces while cutting cardboard.
Skill Level and Time Commitment
Skill Level: Beginner
Time Required: 2-4 hours
- Gather Materials: 15 minutes
- Measure and Cut Cardboard: 30-45 minutes
- Assemble Pieces: 1-2 hours
- Decorate and Finish: 30-60 minutes
Instructions: Step by Step
Gather Materials:
- Cardboard boxes
- Scissors or a box cutter
- Ruler
- Pencil
- Glue or tape
- Decorative paper or paint (optional)
Measure Your Closet:
- Use a ruler to measure the width, height, and depth of your closet shelves.
- Note down these measurements.
Cut Cardboard:
- Mark the dimensions on the cardboard using a pencil.
- Cut the cardboard to match the measurements of your closet shelves.
Create Dividers:
- Cut additional pieces of cardboard to act as dividers.
- These should fit snugly within the main cardboard piece.
Assemble the Organizer:
- Use glue or tape to attach the dividers to the main cardboard piece.
- Ensure they are evenly spaced and secure.
Decorate (Optional):
- Cover the cardboard with decorative paper or paint for a polished look.
- Let it dry completely if using paint.
Install in Closet:
- Place the cardboard organizer on your closet shelf.
- Adjust as needed to fit perfectly.
Organize Items:
- Sort your clothes, shoes, or accessories into the different sections.
- Enjoy your newly organized closet!
Helpful Tips and Tricks
Measure your space before starting. Knowing the exact dimensions helps avoid wasted materials.
Use sturdy cardboard. Thicker cardboard from shipping boxes works best. Thin cardboard can sag or collapse.
Reinforce edges with duct tape. This adds strength and prevents fraying.
Cut carefully using a sharp utility knife. Dull blades can tear the cardboard.
Label sections with markers. This helps keep everything organized.
Decorate with contact paper or fabric. This makes the organizer look nicer and adds durability.
Use hot glue for assembly. It dries quickly and holds well.
Plan your layout. Sketch a design before cutting. This ensures all pieces fit together.
Common mistakes to avoid:
- Skipping measurements. This leads to pieces not fitting.
- Using weak cardboard. It won't hold up over time.
- Not reinforcing edges. This causes wear and tear faster.
- Rushing cuts. Uneven cuts make assembly harder.
- Ignoring layout planning. This results in wasted materials.
Alternatives for materials or methods:
- Foam board instead of cardboard. It's sturdier and easier to cut.
- Wooden crates for a more durable option.
- Plastic bins for easy cleaning and longer life.
- Velcro strips instead of glue for adjustable sections.
- Wire shelving for a more permanent solution.
Estimating the Cost
Cardboard boxes: $0-$10 (reuse old boxes or buy new ones)
Scissors: $5
Ruler: $2
Glue: $3
Tape: $2
Wrapping paper or fabric: $5-$10 (for decoration)
Markers or paint: $3
Total cost: $20-$35
Budget-friendly alternatives:
- Use old cardboard boxes from deliveries.
- Decorate with leftover wrapping paper or fabric scraps.
- Borrow scissors and ruler from friends or family.
Creative Variations and Customizations
Alternative Materials: Instead of cardboard, use foam board for a sturdier structure. Wooden crates can add a rustic touch. Plastic bins offer durability and are easy to clean.
Colors: Paint your cardboard with bright colors like yellow or blue for a cheerful look. Use metallic spray paint for a sleek, modern vibe. Pastel shades can create a calm, soothing atmosphere.
Styles: For a minimalist style, keep the design simple with clean lines and neutral colors. Add fabric covers for a cozy, homey feel. Use washi tape or stickers to create fun patterns and designs.
Additional Features: Add hooks for hanging accessories. Use dividers to create separate compartments. Attach small mirrors for a functional and decorative touch.
Handles and Labels: Attach ribbon handles for easy pulling. Use chalkboard labels for a customizable labeling system. Try printed labels for a polished, organized look.
Eco-Friendly Tips
Recycled cardboard makes a great base for closet organizers. Use old boxes from deliveries or packaging. Cut and shape the cardboard into shelves, dividers, or drawers. Glue or tape pieces together for sturdiness. Decorate with eco-friendly paint or fabric scraps to add color. Reinforce edges with extra layers of cardboard for durability. Use biodegradable glue to keep everything eco-friendly. Label sections using old paper or cardboard pieces. Repurpose old handles or knobs from broken furniture for drawer pulls. Seal with non-toxic varnish to protect the surface.
Your Closet's New Best Friend
Creating your own cardboard closet organizer isn't just a fun project, it's a game-changer for your space. With some basic materials and a bit of creativity, you can transform clutter into a neat, organized haven. Plus, it's super budget-friendly. No need to spend big bucks on store-bought organizers when you can make one that fits your exact needs.
Remember, the key is to measure your space and plan your design before cutting anything. This ensures everything fits perfectly. And don't forget to personalize it with some paint or fabric to match your style.
So, grab those old boxes and get crafting. Your closet will thank you, and you'll feel a sense of accomplishment every time you open those doors. Happy organizing!
How can I make a simple cardboard closet organizer?
Grab some sturdy cardboard, a ruler, a box cutter, and some glue. Measure the space in your closet where you want the organizer. Cut the cardboard into pieces that fit those measurements. Glue the pieces together to form shelves or compartments. Let it dry, then place it in your closet.
What tools do I need for this project?
You’ll need a ruler, box cutter, glue, and sturdy cardboard. Optional items include paint or decorative paper to make it look nicer.
How do I make the organizer more durable?
Use thicker cardboard and reinforce the joints with extra glue or tape. You can also cover the cardboard with fabric or paper for added strength and a polished look.
Can I customize the size and shape?
Absolutely! Measure your closet space and cut the cardboard to fit. You can make tall shelves, small compartments, or even add drawers.
How long will it take to make?
Depending on the complexity, it could take a couple of hours. Simple designs might take less time, while more intricate ones could take longer.
Is it safe to store heavy items?
Cardboard is best for lighter items like clothes, shoes, or accessories. For heavier items, consider reinforcing the cardboard or using it for smaller compartments.
Can kids help with this project?
Yes, but make sure an adult handles the cutting. Kids can help with measuring, gluing, and decorating.