
Home>Home & Furniture>Roof>How to Fix Roof Leaks
Roof
How to Fix Roof Leaks
Published: August 21, 2024
Learn how to fix roof leaks with our comprehensive guide. Discover step-by-step instructions, essential tools, and expert tips to keep your roof leak-free and secure.
(Many of the links in this article redirect to a specific reviewed product. Your purchase of these products through affiliate links helps to generate commission for Twigandthistle.com, at no extra cost. Learn more)
Got a leaky roof? No need to panic. Fixing minor roof leaks yourself can save both money and time. Whether it's a damaged shingle, a cracked flashing, or a clogged gutter, you can tackle these issues with some basic tools and a bit of patience. Doing it yourself also gives you the satisfaction of knowing you've taken care of your home. In this guide, we'll walk you through the steps needed to identify and fix those pesky leaks. Let’s dive in and get started on making your roof leak-free!
Getting Ready for the Job
Inspect the Roof: Check for damaged shingles, cracks, or any obvious signs of leaks. Use binoculars for a closer look without climbing up.
Gather Tools and Materials: Collect a ladder, roofing nails, hammer, roofing cement, replacement shingles, and a utility knife.
Check the Weather: Ensure clear skies. Working on a wet roof is dangerous and ineffective.
Set Up a Safe Workspace: Place the ladder on stable ground. Wear non-slip shoes and a safety harness if possible.
Clear Debris: Remove leaves, branches, or any debris from the roof. This helps identify the problem areas better.
Locate the Leak: Use a garden hose to simulate rain. Have someone inside the attic to spot where water seeps through.
Mark the Area: Use chalk to mark the leak spot. This makes it easier to find when you start repairs.
Check for Mold: Look for mold or mildew in the attic. This indicates long-term leaks needing more extensive repairs.
Prepare Replacement Shingles: Cut new shingles to size if needed. Have them ready to install once the damaged ones are removed.
Safety First: Always work with a buddy. Never attempt roof repairs alone.
What You Need to Fix Roof Leaks
- Ladder: To safely reach the roof.
- Roofing Nails: Secure shingles or patches.
- Hammer: Drive nails into place.
- Roofing Cement: Seal leaks and secure patches.
- Utility Knife: Cut shingles or patches to size.
- Roofing Shingles: Replace damaged or missing shingles.
- Tarp: Temporary cover for large leaks.
- Caulk Gun: Apply roofing cement or sealant.
- Roofing Sealant: Seal small cracks or gaps.
- Putty Knife: Spread roofing cement or sealant.
- Measuring Tape: Measure areas needing repair.
- Gloves: Protect hands from sharp edges.
- Safety Harness: Prevent falls while working on the roof.
- Bucket: Catch water from leaks inside the house.
- Flashlight: Inspect dark areas for leaks.
- Brush: Clean debris from the repair area.
- Pry Bar: Remove damaged shingles or nails.
- Chalk Line: Mark straight lines for shingle placement.
How Much Time and Skill Are Needed?
Skill Level: Intermediate
Time Required: 3-6 hours
- Identify the Leak: 30-60 minutes
- Gather Materials: 15-30 minutes
- Prepare the Area: 30-45 minutes
- Apply Roofing Cement: 1-2 hours
- Seal the Leak: 1-2 hours
- Clean Up: 15-30 minutes
Follow These Steps to Fix Roof Leaks
Identify the Leak:
- Look for water stains on ceilings or walls.
- Check the attic for damp spots or mold.
Inspect the Roof:
- Use a ladder to safely access the roof.
- Look for damaged or missing shingles, cracked flashing, or clogged gutters.
Clean the Area:
- Remove debris, leaves, or dirt around the leak.
- Ensure the area is dry before proceeding.
Repair Shingles:
- Lift the damaged shingle with a pry bar.
- Remove nails and slide out the damaged shingle.
- Slide a new shingle into place and nail it down.
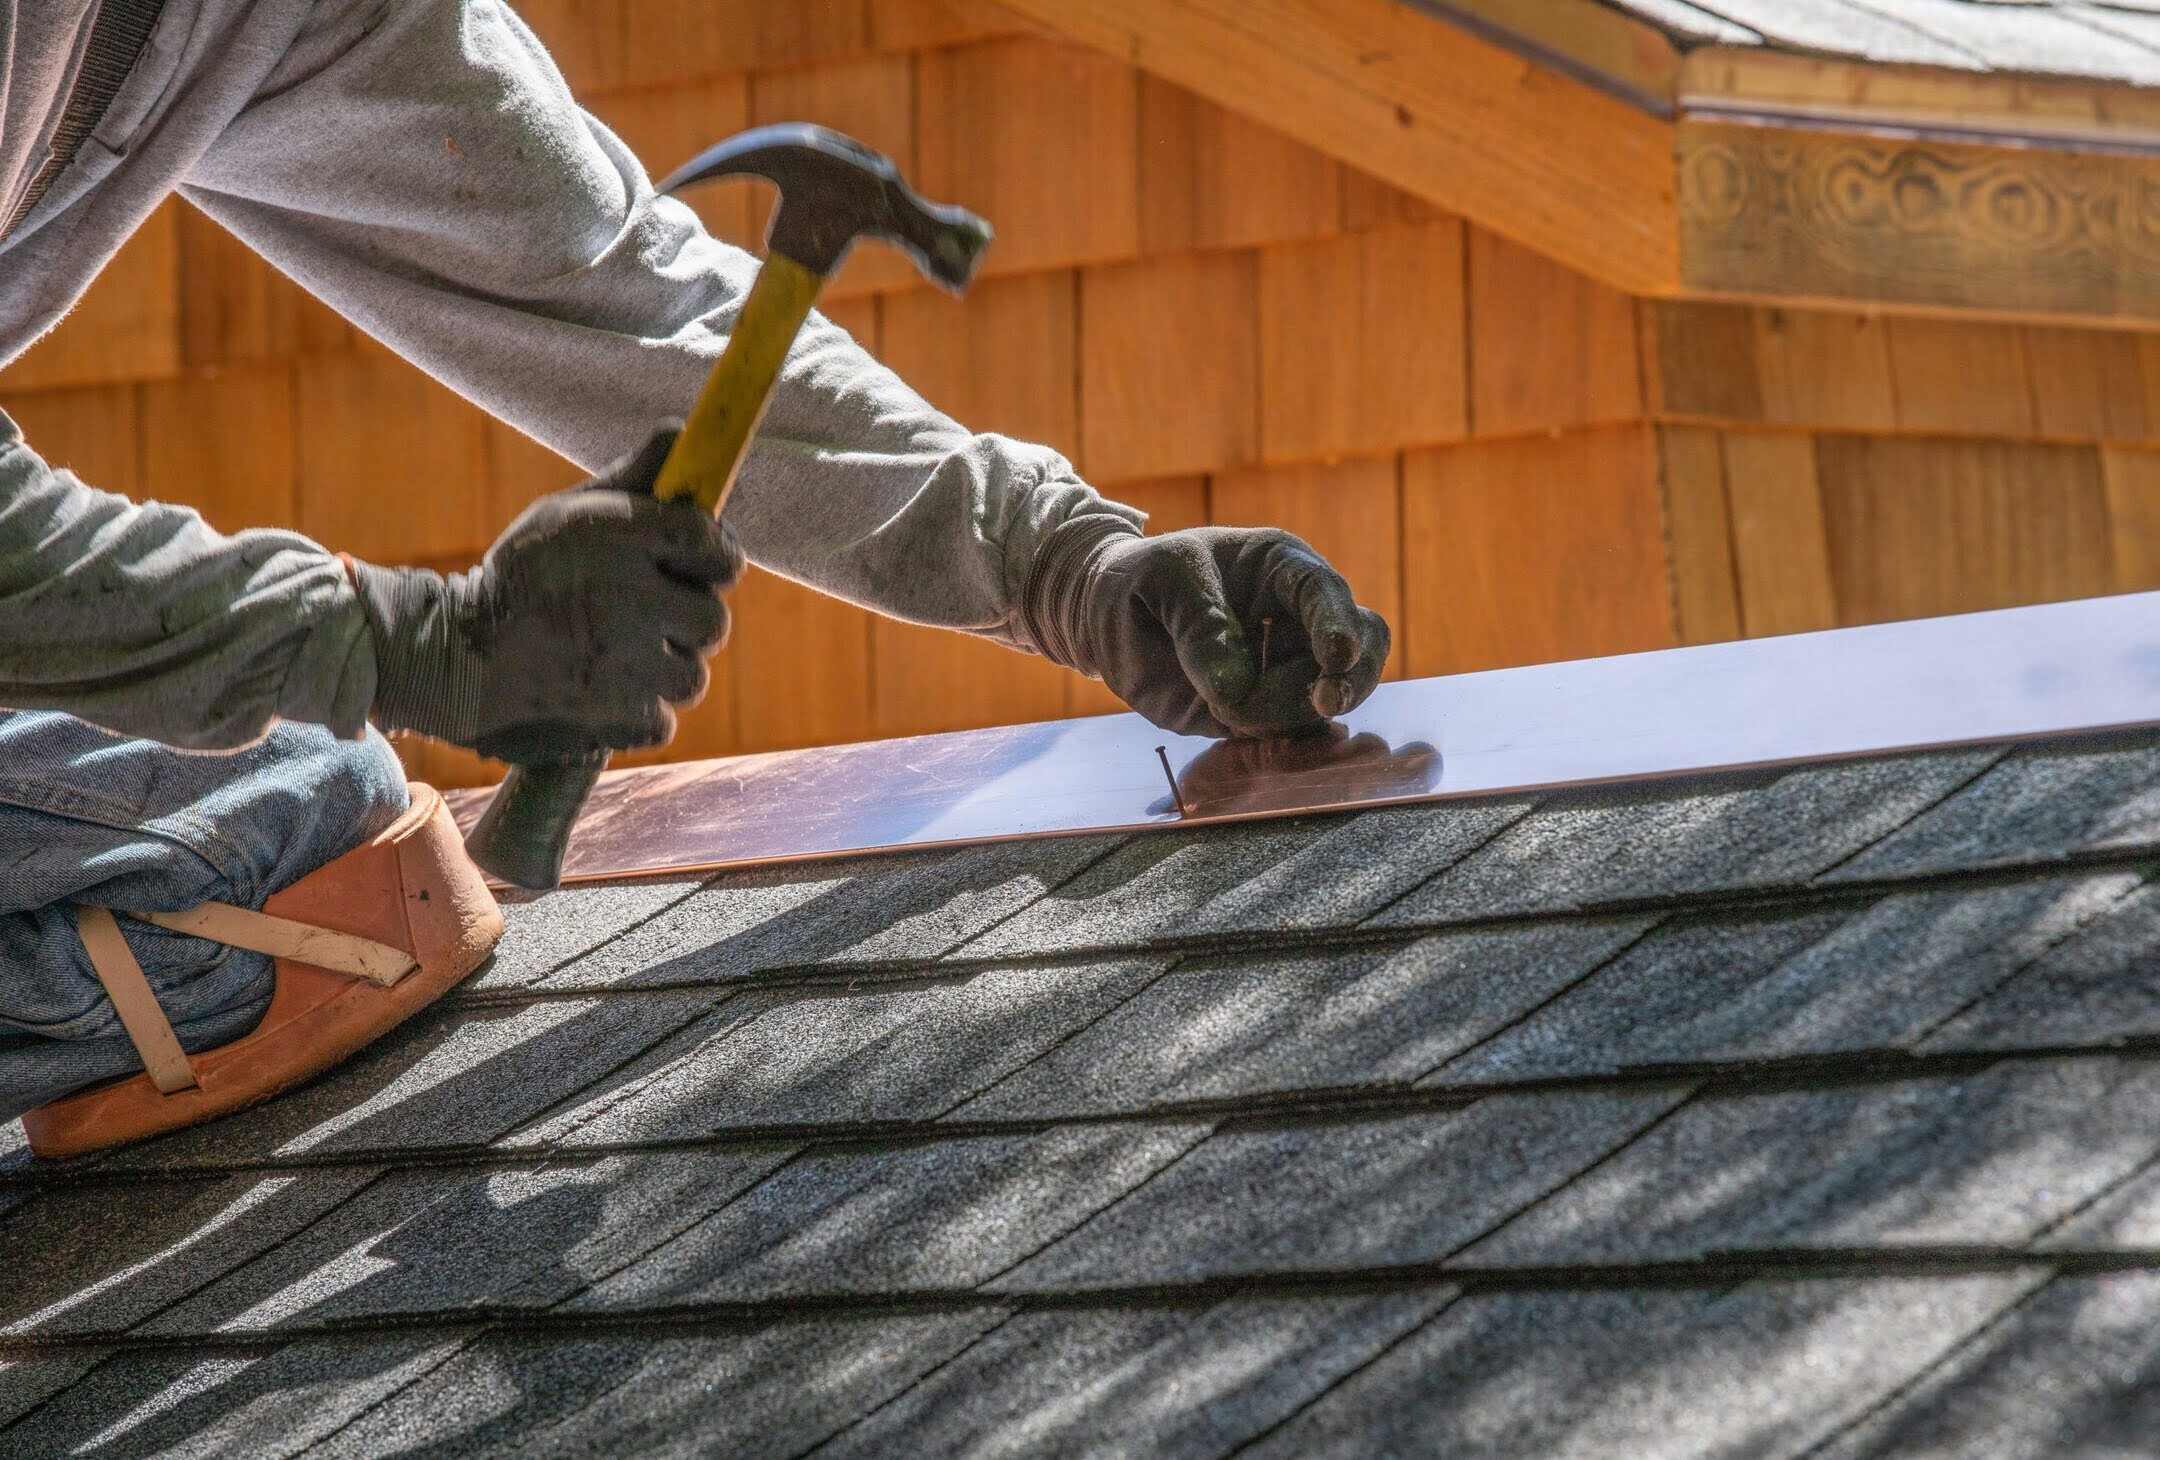
Fix Flashing:
- Pry up the old flashing with a crowbar.
- Apply roofing cement under the new flashing.
- Nail the new flashing in place and seal edges with roofing cement.
Seal Small Cracks:
- Apply roofing sealant to small cracks or holes.
- Use a putty knife to smooth the sealant.
Check Gutters:
- Clear out any debris from gutters and downspouts.
- Ensure water flows freely to prevent future leaks.
Test the Repair:
- Spray water over the repaired area with a garden hose.
- Check inside for any signs of leaks.
Maintain Regularly:
- Inspect the roof periodically for new damage.
- Clean gutters and downspouts regularly to prevent clogs.
Helpful Tips and Tricks
Identify the Leak: Start by finding the source. Water stains on ceilings or walls can help. Check the attic during daylight; look for sunlight coming through the roof.
Temporary Fix: Use roofing tape or tarps to cover the leak until permanent repairs can be made. This prevents further damage.
Clean the Area: Remove debris, dirt, or old roofing material around the leak. A clean surface ensures better adhesion for repair materials.
Apply Roofing Cement: Spread roofing cement over the leak using a putty knife. Press a piece of roofing fabric into the cement, then cover it with another layer of cement.
Replace Damaged Shingles: If shingles are cracked or missing, gently lift the surrounding shingles and remove nails. Slide the new shingle into place, secure it with nails, and apply roofing cement over the nails.
Seal Flashing: Check the metal flashing around chimneys, vents, and skylights. Apply roofing cement to any gaps or cracks.
Common Mistakes to Avoid:
- Ignoring Small Leaks: Small leaks can lead to big problems if not addressed.
- Using the Wrong Materials: Ensure you use materials suitable for your roof type.
- Not Checking the Attic: Often, the source of the leak is visible from the attic.
Alternative Materials or Methods:
- Roofing Tape: Quick and easy for temporary fixes.
- Silicone Caulk: Good for sealing small cracks or gaps.
- Roof Sealant Paint: Can be applied over larger areas for added protection.
Safety First: Always use a sturdy ladder, wear non-slip shoes, and consider a safety harness when working on the roof.
Estimating the Cost
Materials:
- Roofing Nails: $5 per pound
- Roofing Cement: $10 per gallon
- Roofing Shingles: $30 per bundle
- Flashing: $15 per roll
- Sealant: $8 per tube
- Roofing Felt: $20 per roll
Tools:
- Hammer: $10
- Utility Knife: $5
- Caulking Gun: $7
- Ladder: $50
- Measuring Tape: $5
- Safety Gear: $20 (gloves, goggles)
Total Cost: Around $185
Budget-Friendly Alternatives:
- Reuse old nails if in good condition
- Borrow tools from friends or neighbors
- Buy used tools from thrift stores or online marketplaces
- Use tarps instead of roofing felt for temporary fixes
Different Ways to Customize Your Fix
Materials: Instead of traditional asphalt shingles, consider using metal roofing for better durability. Clay tiles offer a classic look, while rubber roofing provides flexibility and resistance to extreme weather.
Colors: Choose light-colored shingles to reflect sunlight and keep your home cooler. Dark shingles can give a more traditional look but may absorb more heat. Earth tones like browns and greens blend well with natural surroundings.
Styles: For a modern touch, use standing seam metal roofing. Architectural shingles add depth and texture. Slate tiles offer a timeless, elegant appearance but are heavier and may require additional support.
Sealants: Use silicone-based sealants for flexibility and longevity. Acrylic sealants are easier to apply and dry quickly. Polyurethane sealants provide strong adhesion and durability.
Underlayment: Opt for synthetic underlayment for better water resistance and durability. Felt paper is a traditional choice but may not last as long. Rubberized asphalt underlayment offers excellent waterproofing.
Gutters: Install seamless gutters to reduce leaks and maintenance. Copper gutters add a touch of elegance and are highly durable. Vinyl gutters are cost-effective and easy to install.
Flashing: Use aluminum flashing for a lightweight, rust-resistant option. Copper flashing is durable and visually appealing. Rubber flashing can be used for irregular shapes and provides a good seal.
Insulation: Add spray foam insulation for better energy efficiency. Fiberglass batts are easy to install and cost-effective. Rigid foam boards offer high insulation value and moisture resistance.
Skylights: Install energy-efficient skylights to bring natural light into your home. Fixed skylights are less prone to leaks than vented ones. Tubular skylights are great for small spaces and easy to install.
Roof Vents: Use ridge vents for even ventilation along the roof peak. Soffit vents help with airflow in the attic. Turbine vents are effective in hot climates for removing heat.
Eco-Friendly Tips for Roof Repairs
Inspect your roof for damaged shingles or tiles. Reuse any that are still in good condition. Replace broken ones with recycled or sustainable materials like reclaimed wood or recycled metal.
Seal leaks with eco-friendly sealants. Look for products labeled low-VOC (volatile organic compounds) to reduce harmful emissions.
Patch small holes using recycled rubber or reclaimed wood. These materials are durable and reduce waste.
Install a rainwater collection system to divert water away from the roof. This reduces the risk of future leaks and provides a sustainable water source for gardening.
Use solar-powered attic fans to reduce moisture buildup, which can cause leaks. These fans are energy-efficient and environmentally friendly.
Consider adding a green roof. Planting vegetation on your roof can absorb rainwater, provide insulation, and extend the roof's lifespan.
Recycle any old materials you remove. Many communities have recycling programs for construction debris.
Keep Your Roof Leak-Free
Fixing roof leaks yourself can save money and give you a sense of accomplishment. Regular inspections and maintenance are key to preventing future issues. Always keep safety in mind when working on your roof. Use the right tools and materials to ensure a lasting repair. If a problem seems too big or complex, don't hesitate to call a professional. Your roof is a crucial part of your home, protecting you from the elements. Taking the time to fix leaks properly will extend its life and keep your home safe. Remember, a little effort now can prevent bigger headaches later. Keep your roof in top shape, and you'll enjoy a dry, comfortable home for years to come. Happy fixing!
How can I identify a roof leak?
Look for water stains on ceilings or walls, damp spots in the attic, or missing shingles. Sometimes, you might even see mold or mildew.
What tools do I need to fix a roof leak?
You'll need a ladder, roofing nails, hammer, roofing cement, caulking gun, and replacement shingles. Safety gear like gloves and goggles is also important.
Can I fix a roof leak myself?
Yes, you can! Small leaks are usually easy to fix with some basic tools and materials. However, for major damage, it's best to call a professional.
How do I find the source of the leak?
Start by checking the attic during daylight. Look for sunlight coming through the roof or water stains. Outside, inspect the shingles, flashing, and gutters.
What should I do if the leak is around a chimney or vent?
Use roofing cement or caulk to seal gaps around the chimney or vent. Sometimes, you might need to replace the flashing if it's damaged.
How can I prevent future roof leaks?
Regular maintenance is key. Clean your gutters, inspect your roof for damage, and replace any missing shingles. Trim overhanging branches to prevent damage from falling limbs.
Is it safe to work on my roof?
Safety first! Always use a sturdy ladder, wear non-slip shoes, and avoid working in wet or windy conditions. If you're unsure, don't hesitate to call a professional.