
Home>Home & Furniture>Roof>How to Build a DIY Pop Top Roof Kit
Roof
How to Build a DIY Pop Top Roof Kit
Published: August 18, 2024
Learn how to build a DIY pop top roof kit with our step-by-step guide. Enhance your vehicle's functionality and enjoy more space on your adventures. Start your project today!
(Many of the links in this article redirect to a specific reviewed product. Your purchase of these products through affiliate links helps to generate commission for Twigandthistle.com, at no extra cost. Learn more)
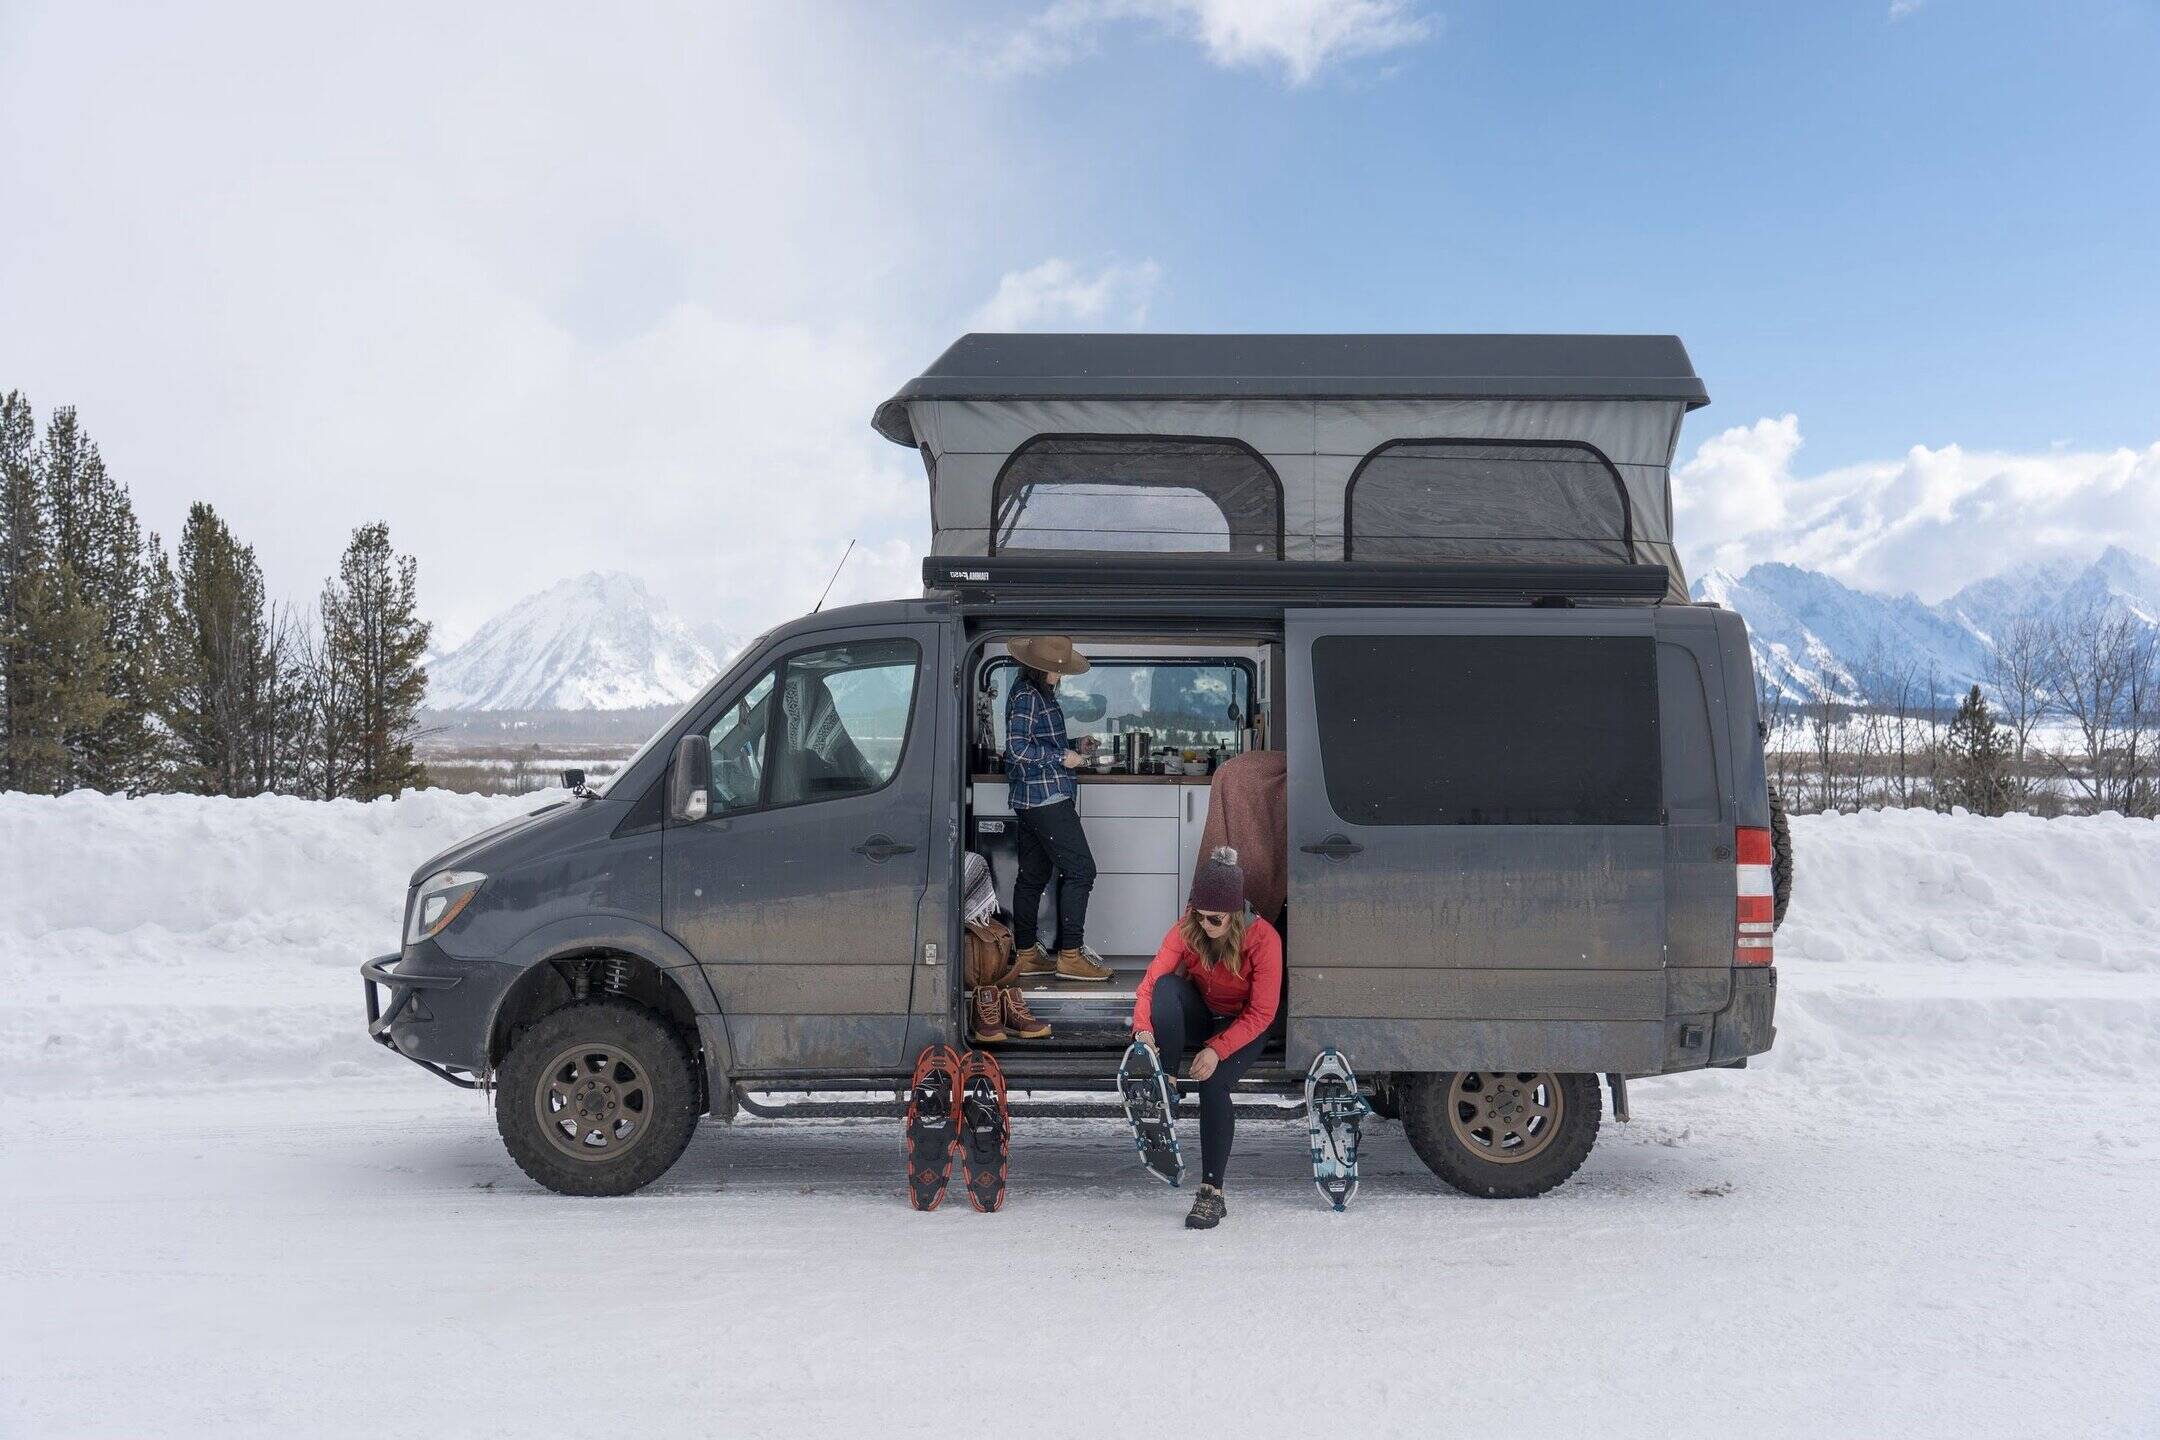
Building a DIY pop top roof kit can turn any standard vehicle into a more versatile and spacious camper. With some basic tools and materials, you can create a pop top roof that provides extra headroom and sleeping space. This project may seem challenging, but breaking it down into manageable steps makes it achievable for most DIY enthusiasts. Whether you are prepping for weekend getaways or long road trips, a pop top roof can enhance your travel experience. Gather your materials, set aside some time, and prepare to transform your vehicle into a mobile adventure hub.
Getting Ready for Your Project
Gather Materials: Collect all necessary tools and materials. This includes the pop top roof kit, drill, screws, measuring tape, saw, safety goggles, gloves, and a ladder.
Read Instructions: Carefully read the manual that comes with the pop top roof kit. Understanding each step beforehand helps avoid mistakes.
Safety Gear: Wear safety goggles and gloves to protect your eyes and hands. Use a hard hat if working under the roof.
Clear Workspace: Ensure the area around your vehicle is clear of obstacles. This helps prevent accidents and makes moving around easier.
Measure Twice: Use a measuring tape to double-check all dimensions. Accurate measurements ensure a proper fit for the pop top roof.
Mark Cutting Lines: Mark where you need to cut on the roof. Use a pencil or chalk for clear, visible lines.
Secure Vehicle: Park your vehicle on a flat surface and engage the parking brake. This prevents any movement while you work.
Check Weather: Choose a day with good weather. Rain or strong winds can make the job harder and less safe.
Gather Help: Have a friend or family member assist you. Extra hands make lifting and positioning the roof easier.
Test Fit: Before final installation, do a test fit. This ensures everything aligns correctly and adjustments can be made if needed.
Prepare Tools: Lay out all tools within reach. This saves time and keeps you focused on the task.
Ventilation: Work in a well-ventilated area. If using adhesives or sealants, proper airflow prevents inhaling harmful fumes.
Materials and Tools Checklist
- Plywood Sheets: Used for the base and sides of the pop top. Choose sturdy, weather-resistant plywood.
- Hinges: Allow the roof to open and close smoothly. Heavy-duty hinges are best.
- Gas Struts: Help lift and hold the roof in place. Make sure they can support the weight of the roof.
- Weather Stripping: Seals the edges to keep out rain and wind. Choose durable, flexible stripping.
- Aluminum or Steel Tubing: Provides structural support. Aluminum is lighter, while steel is stronger.
- Screws and Bolts: Secure all parts together. Use rust-resistant hardware.
- Sealant: Ensures waterproofing at joints and seams. Silicone sealant is a good option.
- Canvas or Fabric: Covers the sides when the roof is popped up. Look for waterproof, UV-resistant fabric.
- Saw: Cuts plywood and tubing to size. A circular saw works well for plywood, while a hacksaw is good for metal.
- Drill: Makes holes for screws and bolts. A cordless drill with various bits is versatile.
- Measuring Tape: Ensures accurate cuts and placements. A standard 25-foot tape measure is ideal.
- Screwdriver: Tightens screws and bolts. A multi-bit screwdriver can handle different types of screws.
- Wrench Set: Tightens bolts. An adjustable wrench or a set of different sizes will work.
- Clamps: Hold pieces in place while assembling. C-clamps or bar clamps are useful.
- Sandpaper: Smooths rough edges on plywood. Medium-grit sandpaper is good for this task.
- Paint or Varnish: Protects the wood from weather. Choose outdoor-grade paint or varnish.
- Brushes or Rollers: Apply paint or varnish evenly. Foam brushes or rollers work well for large surfaces.
- Safety Gear: Protects you while working. Safety glasses, gloves, and a dust mask are essential.
Required Skills and Time Commitment
Skill Level: Advanced
Time Required: 40-60 hours
- Planning and Measuring: 5-10 hours
- Cutting and Preparing Materials: 10-15 hours
- Assembling the Frame: 10-15 hours
- Installing the Roof Mechanism: 10-15 hours
- Finishing Touches and Testing: 5-10 hours
Detailed Instructions
Gather Materials and Tools
- Pop top roof kit
- Measuring tape
- Drill
- Screws and bolts
- Screwdriver
- Saw
- Sealant
- Safety gear (gloves, goggles)
Prepare the Vehicle
- Park on a flat surface.
- Remove any roof racks or accessories.
- Clean the roof thoroughly.
Measure and Mark
- Use measuring tape to find the center of the roof.
- Mark the area where the pop top will be installed.
Cut the Roof
- Put on safety gear.
- Use a saw to cut along the marked lines.
- Remove the cut-out section carefully.
Install the Frame
- Place the frame of the pop top kit into the cut-out area.
- Secure it with screws and bolts using a drill.
Attach the Pop Top
- Position the pop top onto the frame.
- Use screws to attach it securely.
- Ensure it opens and closes smoothly.
Seal the Edges
- Apply sealant around the edges of the frame.
- Let it dry according to the instructions on the sealant.
Test the Pop Top
- Open and close the pop top several times.
- Check for any leaks or loose screws.
- Make adjustments if necessary.
Clean Up
- Remove any debris from the installation.
- Store tools and leftover materials properly.
Enjoy Your New Pop Top Roof
- Take your vehicle for a test drive.
- Enjoy the added space and functionality.
Helpful Tips and Tricks
Measure twice, cut once. This saves time and materials. Use quality materials like marine-grade plywood and stainless steel hardware. Pre-drill holes to avoid splitting wood. Label all parts before disassembly to make reassembly easier. Use a template for cutting roof sections to ensure accuracy. Seal all edges with waterproof sealant to prevent leaks. Test fit everything before final assembly.
Common mistakes to avoid include not checking for roof clearance, using improper sealants, and rushing measurements. Skipping insulation can lead to temperature issues. Ignoring ventilation can cause condensation problems.
Alternatives for materials include using aluminum instead of steel for lighter weight. Fiberglass can replace plywood for better durability. Butyl tape can be used instead of silicone for sealing. Pop rivets can be an alternative to screws for a cleaner look.
Budgeting Your Project
Materials:
- Plywood: $50-$100
- Fiberglass Sheets: $100-$150
- Resin and Hardener: $50-$75
- Hinges and Gas Struts: $50-$100
- Weather Seals: $20-$40
- Insulation: $30-$50
- Canvas or Tent Fabric: $100-$200
- Screws, Bolts, and Nuts: $20-$30
Tools:
- Jigsaw: $50-$100
- Drill: $40-$80
- Sander: $30-$60
- Paintbrushes and Rollers: $10-$20
- Measuring Tape: $5-$10
- Safety Gear (Gloves, Goggles): $15-$25
Total Cost: $570-$1,050
Budget-Friendly Alternatives:
- Recycled Plywood: $30-$60
- Second-Hand Tools: $100-$150 for all
- Discount Canvas: $50-$100
Total Cost with Alternatives: $380-$670
Personalizing Your Build
Materials: Instead of using standard plywood, consider marine-grade plywood for better water resistance. Aluminum can replace wood for a lighter, more durable frame. Fiberglass offers a sleek, modern look and is also lightweight.
Colors: Paint the roof in bright colors like blue or red for a vibrant look. For a more classic appearance, use neutral tones like beige or gray. Adding patterns or decals can give it a personalized touch.
Styles: Opt for a sleek, modern design with clean lines and minimalistic features. For a rustic feel, use reclaimed wood and add decorative elements like iron brackets. A retro style can be achieved with rounded edges and vintage colors.
Roof Mechanism: Use gas struts for easier lifting. Electric actuators can provide a more high-tech, automated solution. Manual hinges offer a simple, cost-effective option.
Windows and Ventilation: Install skylights for natural light. Mesh windows can provide ventilation while keeping bugs out. Solar-powered fans can help with airflow and temperature control.
Interior Customizations: Add LED strip lights for a modern touch. Use insulating materials to keep the interior comfortable. Built-in storage can maximize space and keep things organized.
Exterior Add-ons: Attach solar panels for off-grid power. Awning systems can provide extra shade and outdoor living space. Roof racks can be added for carrying extra gear.
Eco-Friendly Building Tips
Reclaimed Wood: Use reclaimed wood for the frame. It’s sturdy and gives a rustic look.
Recycled Metal: Opt for recycled metal for hinges and brackets. It’s durable and eco-friendly.
Bamboo: Consider bamboo for lightweight support beams. It’s strong and grows quickly.
Insulation: Use natural wool or recycled denim for insulation. Both are effective and sustainable.
Solar Panels: Install solar panels on the roof. They provide renewable energy and reduce electricity costs.
Low-VOC Paint: Choose low-VOC paint for any finishing touches. It’s better for indoor air quality.
Recycled Plastic: Use recycled plastic for any plastic components. It reduces waste and is often just as strong.
Natural Sealants: Opt for natural sealants like beeswax or linseed oil. They protect wood without harmful chemicals.
Rainwater Collection: Integrate a rainwater collection system. It’s great for off-grid living and conserves water.
LED Lighting: Install LED lights inside. They use less energy and last longer than traditional bulbs.
Your DIY Adventure Awaits
Building a DIY pop top roof kit can be a rewarding project. You've learned the steps, gathered the materials, and understood the process. Now, it's time to put your skills to the test. Remember, patience and attention to detail are key. Don't rush the installation; take your time to ensure everything fits perfectly. If you hit a snag, don't hesitate to consult online forums or reach out to fellow DIY enthusiasts. Your effort will pay off when you see the finished product. So, grab your tools, roll up your sleeves, and get started. Your customized pop top roof is just a few steps away. Enjoy the journey and the satisfaction of creating something with your own hands. Happy building!
What tools do I need to build a DIY pop top roof kit?
You’ll need a drill, jigsaw, screwdriver, measuring tape, clamps, and safety gear like gloves and goggles.
How long does it take to install a pop top roof?
It usually takes 2-3 days if you’re working steadily. Make sure to plan for some extra time in case you run into any unexpected issues.
Can I install a pop top roof on any vehicle?
Most vans and campers can accommodate a pop top roof, but you’ll need to check your vehicle’s specifications and dimensions to be sure.
Do I need any special skills to install a pop top roof?
Basic carpentry and mechanical skills are helpful. If you’re comfortable using power tools and following instructions, you should be good to go.
How much does a DIY pop top roof kit cost?
Kits can range from $1,000 to $3,000 depending on the brand and features. Don’t forget to budget for any additional materials or tools you might need.
What materials are included in a pop top roof kit?
Most kits come with the roof panel, hinges, struts, seals, and hardware. Some might also include insulation and finishing materials.
Is it safe to drive with a pop top roof?
Yes, as long as it’s properly installed and secured. Always double-check the latches and seals before hitting the road to ensure everything is tight and secure.