
Home>Home & Furniture>Kitchen>How to Create DIY Epoxy Countertops
Kitchen
How to Create DIY Epoxy Countertops
Published: July 27, 2024
Learn how to create stunning DIY epoxy countertops with our step-by-step guide. Transform your kitchen with this budget-friendly, durable, and stylish solution.
(Many of the links in this article redirect to a specific reviewed product. Your purchase of these products through affiliate links helps to generate commission for Twigandthistle.com, at no extra cost. Learn more)
Creating your own epoxy countertops can be a fun and rewarding project. Whether you're updating an old kitchen or adding flair to a bathroom, epoxy can give surfaces a fresh, modern look. It’s more affordable than replacing counters and allows for endless customization. With a bit of patience and some basic materials, anyone can do it. This guide will help you through each step, from prep work to the final pour. Get ready to transform your space with a personal touch that showcases your creativity. Let’s get started on your journey to beautiful, custom countertops!
Getting Ready for Your Project
Gather Materials: Get epoxy resin, hardener, mixing cups, stir sticks, drop cloths, painter's tape, sandpaper, and a heat gun or torch.
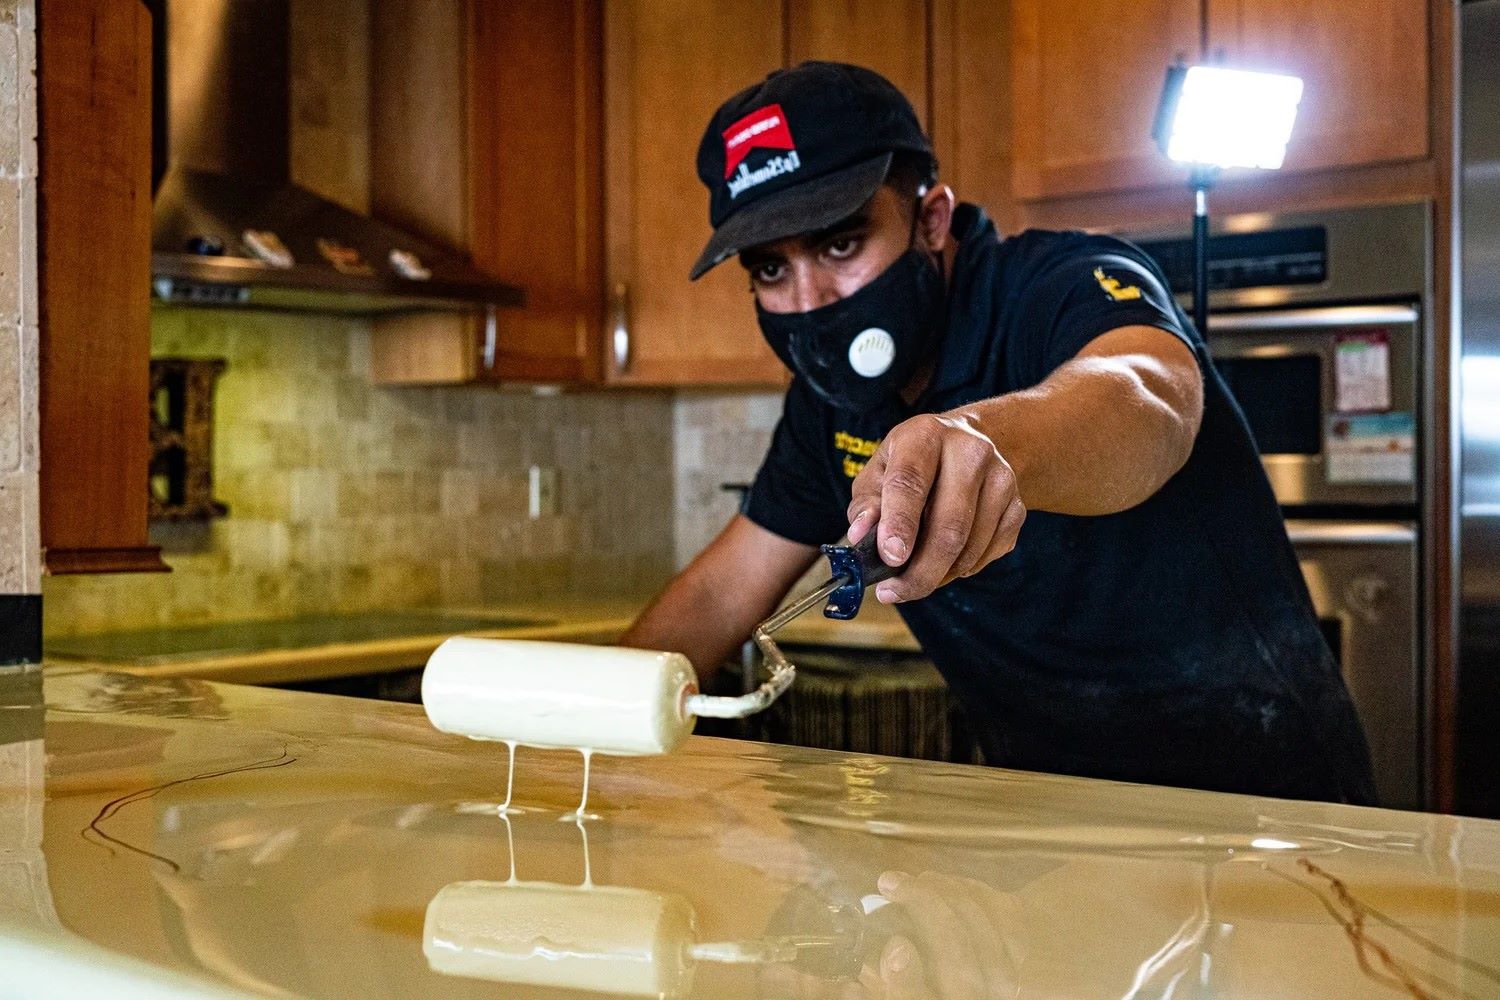
Safety First: Wear gloves, safety goggles, and a respirator mask. Ensure good ventilation in your workspace.
Clear the Area: Remove any items from the countertop. Cover nearby surfaces with drop cloths to protect from spills.
Clean the Surface: Scrub the countertop with soap and water. Dry thoroughly. Sand the surface lightly to help the epoxy stick better.
Tape Off Edges: Use painter's tape to cover edges and any areas you don't want epoxy on. This helps create clean lines.
Mix Epoxy: Follow the instructions on your epoxy kit. Mix resin and hardener in the correct ratio. Stir slowly to avoid bubbles.
Test a Small Area: Apply a small amount of epoxy to a hidden spot. Check for any reactions or issues before doing the entire surface.
Level the Countertop: Ensure the countertop is perfectly level. Use a level tool to check and adjust if necessary.
Prepare for Drips: Place cardboard or plastic under the edges of the countertop to catch any drips.
Plan Your Design: Decide on your color and pattern. Have all your colorants and tools ready before you start pouring.
Practice Safety: Keep a fire extinguisher nearby. Epoxy can be flammable, especially when using a heat gun or torch.
Work Quickly: Epoxy has a limited working time. Be ready to move fast once you start mixing and pouring.
Essential Materials and Tools
- Epoxy Resin Kit: Includes resin and hardener. This forms the durable, glossy surface.
- Measuring Cups: Used to measure resin and hardener accurately.
- Mixing Sticks: For stirring the resin and hardener together.
- Heat Gun or Torch: Removes air bubbles from the epoxy surface.
- Painter’s Tape: Protects edges and areas you don’t want epoxy on.
- Plastic Drop Cloths: Keeps your workspace clean from drips and spills.
- Sandpaper: Smooths the countertop surface before applying epoxy.
- Primer Paint: Ensures epoxy adheres well to the countertop.
- Disposable Gloves: Protects your hands from sticky resin.
- Respirator Mask: Keeps you safe from fumes while working.
- Level: Ensures your countertop is even before pouring epoxy.
- Paint Brushes or Rollers: Applies primer and spreads epoxy evenly.
- Mixing Buckets: Holds the resin and hardener while mixing.
- Color Pigments: Adds color to the epoxy for a custom look.
- Plastic Spreader: Helps spread epoxy smoothly across the surface.
Required Skills and Time Commitment
Skill Level: Intermediate
Time Required: 2-3 days
- Preparation: 4-6 hours
- Priming: 2-3 hours
- Mixing Epoxy: 1-2 hours
- Pouring Epoxy: 2-3 hours
- Curing Time: 24-48 hours
Detailed Steps to Follow
Gather Materials:
- Epoxy resin and hardener
- Mixing containers
- Stir sticks
- Painter's tape
- Drop cloths or plastic sheeting
- Sandpaper (120-grit and 220-grit)
- Paintbrushes and foam rollers
- Heat gun or propane torch
- Protective gloves and safety glasses
Prepare the Surface:
- Clean the countertop thoroughly.
- Sand the surface with 120-grit sandpaper to remove any gloss.
- Wipe away dust with a damp cloth.
- Tape off edges and any areas you don't want epoxy on.
Mix the Epoxy:
- Follow the manufacturer's instructions for mixing resin and hardener.
- Pour the resin and hardener into a mixing container.
- Stir slowly for the recommended time, usually 3-5 minutes.
Apply the Epoxy:
- Pour the mixed epoxy onto the countertop.
- Use a paintbrush or foam roller to spread it evenly.
- Work quickly, as epoxy starts to set in about 20-30 minutes.
Remove Air Bubbles:
- Use a heat gun or propane torch to eliminate bubbles.
- Hold the heat source about 6 inches above the surface.
- Move it in a sweeping motion across the epoxy.
Let It Cure:
- Allow the epoxy to cure for at least 24 hours.
- Avoid touching or disturbing the surface during this time.
Sand and Reapply (if needed):
- If the surface isn't smooth, sand with 220-grit sandpaper.
- Clean off dust and apply another coat of epoxy.
- Repeat the bubble removal process.
Final Curing:
- Let the final coat cure for 72 hours.
- Ensure the area is dust-free to avoid imperfections.
Remove Tape and Clean Up:
- Carefully remove painter's tape.
- Clean any tools used before the epoxy hardens.
Enjoy Your New Countertop:
- Once fully cured, your countertop is ready for use.
Helpful Tips and Tricks
Preparation is Key: Clean the surface thoroughly before starting. Any dust or debris will show through the epoxy.
Use Painter's Tape: Tape off edges and areas you don't want epoxy on. This helps keep the workspace neat.
Mix Epoxy Properly: Follow the instructions on the epoxy kit. Mix slowly to avoid bubbles.
Work in Sections: Pour epoxy in small sections. This helps control the spread and ensures even coverage.
Use a Heat Gun: Remove bubbles by gently passing a heat gun over the surface. Don't hold it too close.
Level Surface: Ensure the countertop is level before pouring. Epoxy will flow to the lowest point.
Wear Protective Gear: Gloves and goggles protect your skin and eyes from epoxy.
Ventilation: Work in a well-ventilated area. Epoxy fumes can be strong.
Practice First: Try a small project first to get the hang of it.
Common Mistakes to Avoid:
Rushing the Process: Take your time. Rushing can lead to mistakes.
Skipping Surface Prep: Not cleaning or sanding the surface can cause adhesion issues.
Ignoring Temperature: Epoxy cures best at specific temperatures. Check the product guidelines.
Overheating: Using a heat gun too long can cause the epoxy to burn or discolor.
Alternatives:
Resin Alternatives: Consider using polyurethane or acrylic resin if epoxy seems too tricky.
Countertop Materials: Instead of epoxy, try concrete or butcher block for a different look.
DIY Kits: Some kits come with everything needed, making the process simpler.
Budgeting for Your DIY Epoxy Countertops
Epoxy Resin: $100-$150 for a gallon kit. This covers around 20 square feet.
Primer: $20-$30 for a quart. Helps the epoxy stick better.
Color Pigments: $20-$40 for a set. Adds color to the epoxy.
Mixing Buckets: $10-$15 for a set. Needed to mix the epoxy and pigments.
Stir Sticks: $5-$10 for a pack. Used for mixing.
Heat Gun or Torch: $20-$50. Removes bubbles from the epoxy.
Painter’s Tape: $5-$10. Protects areas you don’t want epoxy on.
Plastic Sheeting: $10-$20. Covers the floor and other surfaces.
Sandpaper: $5-$10 for a pack. Smooths the surface before applying epoxy.
Gloves: $5-$10 for a pack. Protects your hands from chemicals.
Total Cost: $200-$345
Budget-Friendly Alternatives:
- Use acrylic paint instead of color pigments: $10-$15.
- Borrow or rent a heat gun or torch.
- Use old newspapers instead of plastic sheeting.
Creative Variations and Customizations
Alternative Materials: Instead of traditional wood or laminate, consider using concrete or plywood as the base. Concrete offers a sturdy, industrial look, while plywood is budget-friendly and easy to work with.
Colors: Experiment with different pigments and dyes to achieve unique colors. You can mix metallic powders for a shimmering effect or use glow-in-the-dark pigments for a fun twist. Try blending multiple colors to create a marbled or swirled appearance.
Styles: For a modern look, go with solid colors and clean lines. If you prefer a rustic style, add wood inlays or natural stone fragments. For a beachy vibe, incorporate seashells or sand into the epoxy.
Textures: Add texture by embedding small objects like pebbles, glass beads, or glitter into the epoxy. You can also use a heat gun to create waves or ripples on the surface.
Finishes: Choose between a glossy or matte finish. A glossy finish gives a sleek, polished look, while a matte finish offers a more subtle, understated appearance.
Edges: Customize the edges by using molding or tape to create different shapes. You can make them rounded, beveled, or even live-edge for a natural look.
Add-ons: Incorporate LED lights under the epoxy for a glowing effect. You can also add decals or stickers before pouring the epoxy to personalize the design further.
Experiment with these ideas to create a countertop that fits your style and needs perfectly.
Eco-Friendly Tips for Your Project
Eco-friendly materials can make your DIY epoxy countertops more sustainable. Reclaimed wood or recycled glass can be used as a base. These materials reduce waste and give a unique look.
For the epoxy, choose low-VOC (volatile organic compounds) or bio-based options. These are less harmful to the environment and your health.
When mixing the epoxy, use reusable mixing containers instead of disposable ones. This cuts down on plastic waste.
Sandpaper made from recycled materials can be used for smoothing surfaces.
For coloring, use natural pigments or eco-friendly dyes. These are less toxic and safer for the environment.
Finally, any leftover epoxy can be stored for future projects instead of being thrown away.
Your New Masterpiece Awaits
You've got all the tools and know-how to create stunning epoxy countertops. Remember, preparation is key. Clean surfaces, mix epoxy well, and pour with care. Don't rush the curing process; patience pays off. If you make a mistake, don't sweat it. Sand it down and try again. Your countertops will be unique, reflecting your effort and creativity.
This project not only saves money but also gives a sense of accomplishment. Plus, you'll have a one-of-a-kind piece in your home. So, roll up your sleeves, gather your materials, and get started. Your kitchen or bathroom will thank you for the upgrade. Happy crafting!
What materials do I need to create epoxy countertops?
You’ll need epoxy resin, hardener, a mixing container, stir sticks, drop cloths, painters' tape, sandpaper, and protective gear like gloves and goggles.
How long does it take for epoxy to cure?
Epoxy usually takes about 24-72 hours to fully cure, depending on the brand and environmental conditions like temperature and humidity.
Can I use epoxy on existing countertops?
Yes, you can apply epoxy over existing countertops like laminate, wood, or concrete. Just make sure to sand and clean the surface thoroughly before starting.
How do I mix the epoxy resin and hardener?
Follow the manufacturer’s instructions for the correct ratio. Typically, it’s a 1:1 or 2:1 ratio. Mix them in a clean container and stir slowly to avoid bubbles.
What’s the best way to avoid bubbles in the epoxy?
Stir the mixture slowly and use a heat gun or torch to gently pass over the surface, which helps to pop any bubbles that form.
How do I clean up after working with epoxy?
Clean tools and spills with acetone or isopropyl alcohol before the epoxy hardens. Once cured, epoxy can only be removed by sanding or scraping.
Are epoxy countertops durable?
Yes, epoxy countertops are highly durable, heat-resistant, and waterproof. However, avoid cutting directly on them and use trivets for hot pots to maintain their finish.