
Home>Home & Furniture>Kitchen>DIY Temporary Kitchen Setup
Kitchen
DIY Temporary Kitchen Setup
Published: August 4, 2024
Discover how to create a functional and efficient DIY temporary kitchen setup with our step-by-step guide. Perfect for renovations, events, or small spaces!
(Many of the links in this article redirect to a specific reviewed product. Your purchase of these products through affiliate links helps to generate commission for Twigandthistle.com, at no extra cost. Learn more)
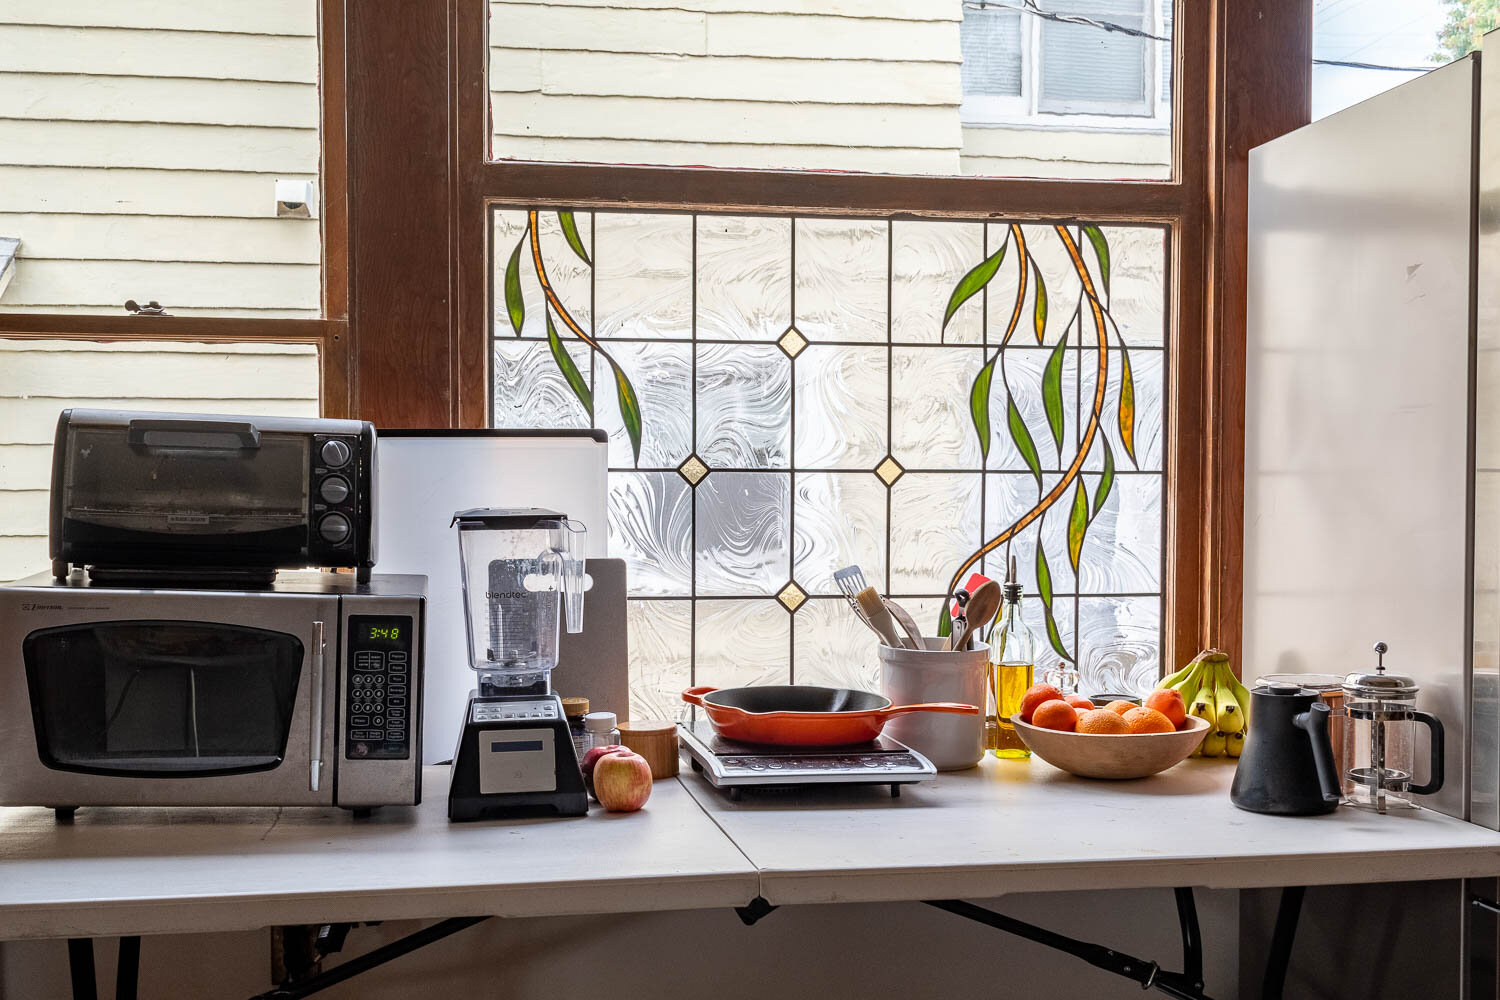
Setting up a temporary kitchen can be a lifesaver during home renovations or emergencies. With just a few key items and a bit of planning, you can create a functional and efficient space to prepare meals without a hitch. This guide will help you identify essential tools, find suitable locations within your home, and offer tips to keep your temporary kitchen organized. Whether you’re dealing with a kitchen remodel or waiting for new appliances, a DIY approach ensures you don’t miss out on home-cooked meals. Let’s dive into the essentials for your temporary kitchen setup.
Getting Ready for Your Project
Clear the Space: Remove any unnecessary items from the area where the temporary kitchen will be set up. This includes furniture, decorations, and clutter.
Gather Supplies: Collect all essential kitchen items like a portable stove, microwave, mini-fridge, utensils, pots, and pans. Don't forget cleaning supplies like dish soap, sponges, and towels.
Set Up a Workstation: Use a sturdy table or countertop as your main prep area. Ensure it's at a comfortable height for cooking and food preparation.
Organize Storage: Use shelves, bins, or boxes to keep food, utensils, and appliances organized. Label containers to make finding items easier.
Ensure Ventilation: If using a portable stove or any appliance that generates heat, make sure the area is well-ventilated to avoid any fire hazards.
Check Electrical Outlets: Ensure there are enough outlets for your appliances. Use power strips if needed, but avoid overloading them.
Plan for Water Access: If possible, set up near a sink. If not, have large water containers for cooking and cleaning.
Safety First: Keep a fire extinguisher nearby. Make sure all appliances are in good working condition and follow the manufacturer's safety guidelines.
Lighting: Ensure the area is well-lit. Use portable lamps or overhead lights to avoid accidents while cooking.
Trash Management: Set up a trash can and recycling bin to keep the area clean and organized.
Test Everything: Before you start cooking, test all appliances to make sure they work properly. This includes checking the stove, microwave, and any other electrical devices.
What You Need to Get Started
Materials and Tools Needed:
- Portable Stove: A small, movable stove for cooking. Electric or gas options work well.
- Folding Table: Provides a surface for food prep and dining. Easy to set up and store.
- Cooler: Keeps perishable items cold. Choose one with good insulation.
- Plastic Bins: For storing utensils, dishes, and non-perishable food. Keeps everything organized.
- Disposable Plates and Cutlery: Reduces the need for washing dishes. Opt for eco-friendly options if possible.
- Dishpan and Dish Soap: For washing any reusable items. A dishpan can double as a sink.
- Paper Towels and Cleaning Wipes: Essential for quick clean-ups. Keep the area tidy.
- Extension Cord: Useful if you need to plug in multiple appliances. Make sure it’s heavy-duty.
- Portable Water Container: Provides water for cooking and cleaning. Look for one with a spout for easy pouring.
- Trash Bags: For disposing of waste. Strong, durable bags are best.
- Cutting Board and Knife: Basic tools for food prep. A sturdy cutting board and sharp knife are essential.
- Camp Stove Fuel: If using a gas stove, ensure you have enough fuel. Check compatibility with your stove.
- Portable Shelving Unit: Adds extra storage space. Keeps items off the ground and organized.
- Clip-on Light: Provides extra lighting if needed. Useful for evening cooking or prep.
- Reusable Grocery Bags: Handy for carrying items to and from the temporary kitchen. Easy to store when not in use.
Each item plays a crucial role in setting up a functional, temporary kitchen.
How Much Time and Skill You Need
Skill Level: Intermediate
Time Required: 4-6 hours
- Gather Materials: 30 minutes
- Set Up Work Area: 1 hour
- Install Temporary Countertops: 1.5 hours
- Set Up Temporary Sink: 1 hour
- Organize Cooking Area: 1 hour
Follow These Steps
Choose a Location:
- Pick a spot with easy access to water and electricity.
- Ensure good ventilation.
Set Up a Table:
- Use a sturdy table or countertop.
- Cover with a plastic tablecloth for easy cleaning.
Arrange Cooking Appliances:
- Place a microwave, toaster oven, or hot plate on the table.
- Keep appliances spaced out to avoid overheating.
Organize Storage:
- Use plastic bins or shelves for storing utensils, pots, and pans.
- Label bins for easy access.
Create a Dishwashing Station:
- Use a large plastic tub for washing dishes.
- Set up a drying rack nearby.
Set Up a Food Prep Area:
- Use a cutting board and keep knives handy.
- Store cutting tools in a safe, accessible place.
Arrange a Temporary Pantry:
- Use a small bookshelf or cabinet for dry goods.
- Keep frequently used items at eye level.
Organize a Mini-Fridge:
- Place a mini-fridge near the table.
- Keep perishables and drinks inside.
Set Up a Trash and Recycling Station:
- Use separate bins for trash and recyclables.
- Place them in a convenient spot.
Add Lighting:
- Use a desk lamp or portable light.
- Ensure the area is well-lit for safety.
Keep Cleaning Supplies Handy:
- Store sponges, dish soap, and towels nearby.
- Keep a small broom and dustpan for quick cleanups.
Helpful Tips and Tricks
Use folding tables for extra counter space. Portable burners or a camp stove can replace your regular stove. Slow cookers and microwaves are handy for quick meals. Disposable plates and utensils reduce dishwashing. Plastic bins help organize utensils and ingredients.
Common mistakes to avoid: Don't forget to plan for ventilation if using portable burners. Avoid placing appliances too close to each other to prevent overheating. Don't neglect food storage; use coolers or mini-fridges.
Alternatives: Instead of a camp stove, consider an electric griddle. For countertops, use plywood covered with a tablecloth. Instead of disposable items, use reusable ones to reduce waste.
How Much Will It Cost?
Basic Materials and Tools:
- Portable Stove: $30-$50
- Folding Table: $20-$40
- Plastic Storage Bins: $10 each (need 3-4)
- Disposable Plates and Utensils: $10-$20
- Cooler: $25-$50
- Extension Cord: $10-$15
- Basic Cooking Utensils: $15-$30
- Dishwashing Basin: $5-$10
- Paper Towels and Cleaning Supplies: $10-$15
Total Estimated Cost: $135-$270
Budget-Friendly Alternatives:
- Portable Stove: Use a camping stove or borrow one.
- Folding Table: Use an old table or borrow one.
- Plastic Storage Bins: Use cardboard boxes.
- Disposable Plates and Utensils: Use reusable ones you already own.
- Cooler: Use a large insulated bag.
- Extension Cord: Borrow one.
- Basic Cooking Utensils: Use what you already have.
- Dishwashing Basin: Use a large bowl.
- Paper Towels and Cleaning Supplies: Use rags and homemade cleaners.
Total Estimated Cost with Alternatives: $0-$50
Different Ways to Customize
Alternative Materials: Use folding tables instead of fixed countertops. Opt for plastic bins for storage instead of traditional cabinets. Consider portable induction cooktops instead of gas stoves.
Colors: Choose bright colors like yellow or turquoise for a cheerful vibe. Use neutral tones like beige or gray for a more sophisticated look. Try chalkboard paint on one wall for a fun, interactive space.
Styles: Go for a rustic look with wooden crates and burlap accents. Create a modern feel with sleek, metallic finishes and minimalistic designs. Aim for a bohemian style with colorful textiles and eclectic decor.
Layouts: Arrange the space in a U-shape for efficient workflow. Opt for an L-shape if space is limited. Try a galley layout with parallel counters for a compact setup.
Lighting: Use string lights for a cozy atmosphere. Install clip-on lamps for adjustable lighting. Choose battery-operated LED lights for easy installation.
Storage Solutions: Hang pegboards for utensils and pots. Use rolling carts for mobile storage. Install shelves with brackets for easy access to essentials.
Flooring: Lay down interlocking foam mats for comfort. Use vinyl flooring for easy cleaning. Consider outdoor rugs for a quick, stylish solution.
Seating: Incorporate folding chairs for flexibility. Use bar stools for a casual dining area. Try bean bags for a relaxed, informal seating option.
Eco-Friendly Tips
Reusing old furniture can save money and reduce waste. An old table can become a prep station. Wooden crates make great shelves for storing dishes or pantry items.
Recycling materials like glass jars can help organize utensils or store spices. Cardboard boxes can be used for temporary storage solutions.
Eco-friendly materials like bamboo or reclaimed wood are perfect for countertops or cutting boards. Compostable plates and utensils can reduce plastic waste.
Energy-efficient appliances, like a small induction cooktop, use less power than traditional stoves. Solar-powered lights can illuminate your space without increasing your electricity bill.
Reusable cloth towels instead of paper towels can cut down on waste. Glass containers can store leftovers, reducing the need for plastic bags.
Natural cleaning products like vinegar and baking soda are effective and less harmful to the environment. Reusable shopping bags can help transport groceries without using plastic bags.
Second-hand stores often have kitchen items at a fraction of the cost. Borrowing items from friends or family can also be a temporary solution without buying new things.
Your DIY Kitchen Adventure Awaits
Setting up a temporary kitchen doesn't have to be a hassle. With some basic tools, a bit of planning, and a dash of creativity, you can create a functional space that meets your needs. Remember to keep essential items like a portable stove, microwave, and storage containers handy. Utilize folding tables and shelves to maximize space. Don't forget to keep a cleaning station with soap, sponges, and trash bags nearby. This setup will keep you cooking and comfortable during renovations or moves. Happy cooking!
How can I set up a temporary kitchen in my living room?
Use a folding table or portable island as your main workspace. Add a hot plate, microwave, and toaster oven for cooking. Don’t forget a mini-fridge for perishables. Keep utensils and ingredients in plastic bins or caddies for easy access.
What’s the best way to handle dishwashing without a sink?
Use a large plastic tub or basin for washing dishes. Fill one with soapy water and another with clean water for rinsing. Dry dishes on a folding rack or towel.
How do I manage food storage in a temporary kitchen?
Store non-perishables in stackable bins or shelves. Use a mini-fridge for items that need refrigeration. Label everything to keep it organized and easy to find.
What are some easy meals to prepare in a temporary kitchen?
Think sandwiches, salads, stir-fries, and one-pot meals. Use a slow cooker or instant pot for more complex dishes. Pre-cooked or frozen meals can also be lifesavers.
How can I ensure safety in a temporary kitchen?
Keep appliances away from flammable materials. Use extension cords safely and avoid overloading outlets. Always have a fire extinguisher nearby. Make sure your workspace is well-ventilated.
What’s the best way to keep a temporary kitchen clean?
Wipe down surfaces with disinfectant wipes or a spray cleaner. Use disposable plates and utensils to cut down on washing. Take out the trash regularly to avoid odors and pests.
How do I deal with limited counter space?
Use multi-purpose items like a cutting board that fits over the sink or stove. Invest in stackable or collapsible tools. Utilize vertical space with hanging racks or shelves.