
Home>Home & Furniture>Kitchen>DIY Camp Kitchen Trailer Build
Kitchen
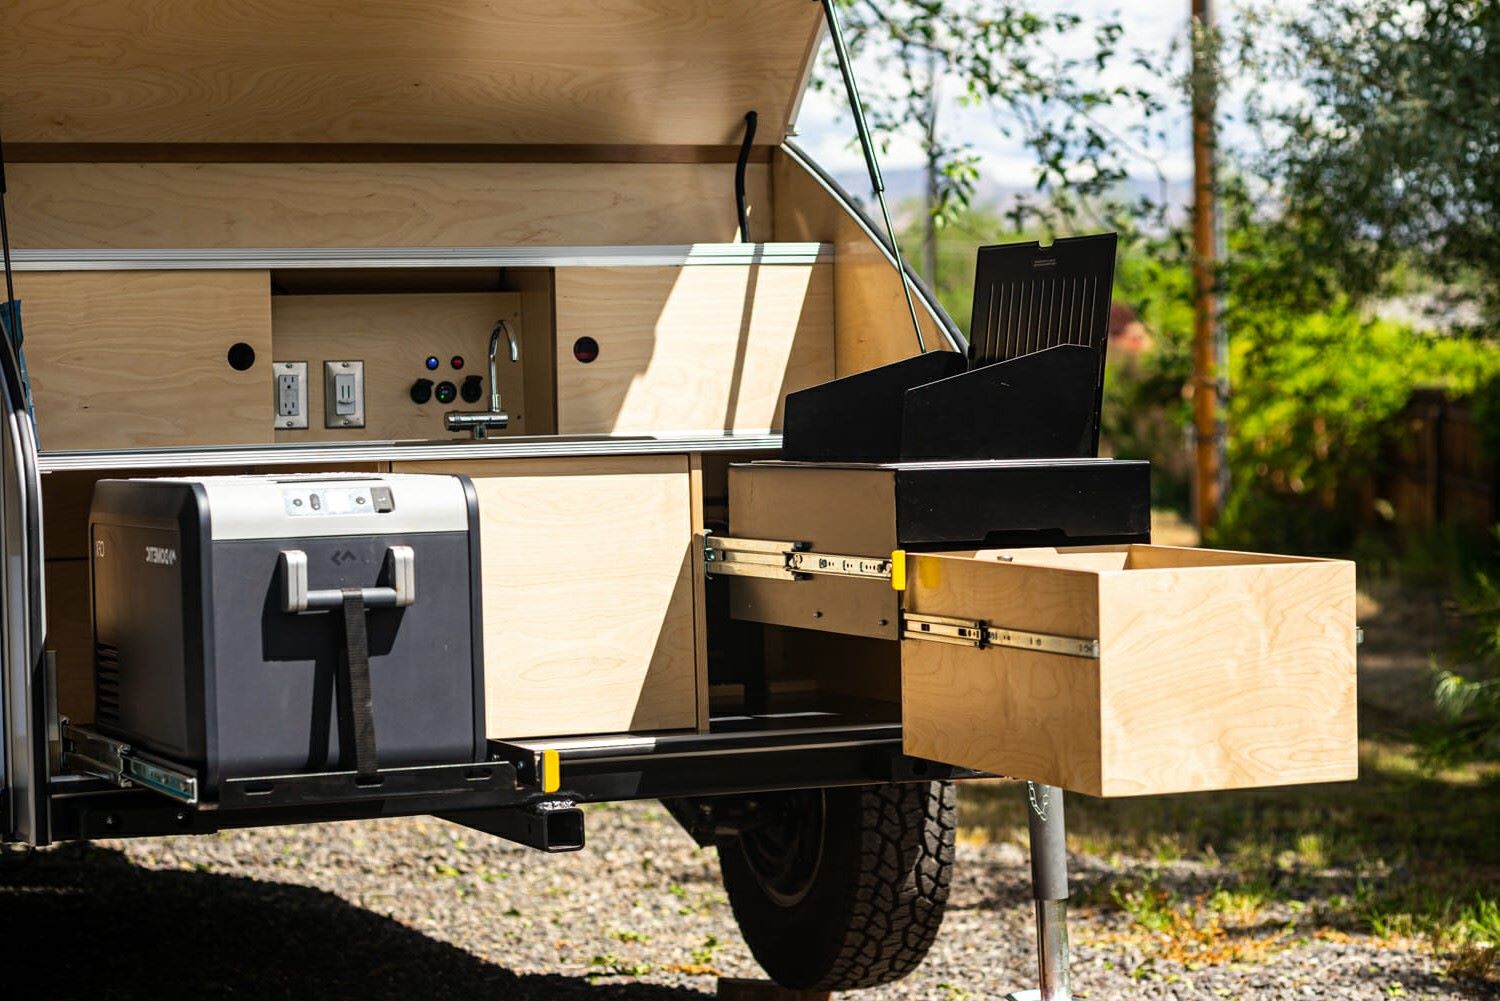
DIY Camp Kitchen Trailer Build
Published: August 4, 2024
Learn how to build your own DIY camp kitchen trailer with our step-by-step guide. Perfect for outdoor enthusiasts looking to enhance their camping experience!
(Many of the links in this article redirect to a specific reviewed product. Your purchase of these products through affiliate links helps to generate commission for Twigandthistle.com, at no extra cost. Learn more)
Building your own camp kitchen trailer can be a fun and rewarding project. Imagine having all your cooking gear organized and ready to go wherever your adventures take you. This guide will help you create a simple, practical setup that meets your needs. Whether it's weekend getaways or longer trips, a DIY camp kitchen trailer makes outdoor cooking more enjoyable. You'll learn how to plan your layout, choose the right materials, and put everything together. With some time and effort, you can make a personalized camp kitchen trailer that will serve you for years.
Getting Ready for Your Build
Gather Materials: Collect all necessary tools and materials like plywood, screws, hinges, a saw, drill, and measuring tape.
Plan Your Design: Sketch out your camp kitchen trailer design. Include compartments for storage, a cooking area, and space for utensils.
Safety Gear: Wear safety goggles, gloves, and a dust mask to protect yourself from debris and dust.
Clear Workspace: Ensure your workspace is clean and spacious. Remove any obstacles that could cause tripping or accidents.
Measure Twice, Cut Once: Double-check all measurements before cutting any materials to avoid mistakes.
Pre-Drill Holes: Pre-drill holes for screws to prevent wood from splitting and to ensure a cleaner finish.
Check for Level: Use a level to make sure all surfaces are even. This will prevent items from sliding off when the trailer is in motion.
Secure Components: Make sure all parts are securely fastened. Loose components can become dangerous while traveling.
Test Stability: Before loading up the trailer, test its stability. Ensure it can handle the weight of your gear without tipping over.
Organize Tools: Keep your tools organized and within reach. This will make the building process smoother and more efficient.
Essential Materials and Tools
- Plywood Sheets: Used for building the main structure. Choose sturdy, weather-resistant types.
- 2x4 Lumber: Provides framing support. Essential for a strong, durable build.
- Screws and Nails: Fasten pieces together. Use galvanized ones to prevent rust.
- Hinges and Latches: Allow doors and compartments to open and close. Ensure they are heavy-duty.
- Drawer Slides: Enable smooth operation of drawers. Opt for full-extension types.
- Paint or Sealant: Protects wood from moisture. Choose outdoor-grade options.
- Handles and Knobs: For easy access to compartments. Pick ergonomic designs.
- Butcher Block or Countertop Material: Creates a durable work surface. Consider waterproof options.
- Sink and Faucet: For washing up. Portable camping sinks work well.
- Water Storage Containers: Store fresh and grey water. Look for food-grade plastic.
- Propane Tank and Stove: For cooking. Ensure the stove is camp-friendly.
- Cooler or Mini Fridge: Keeps food fresh. Choose one with good insulation.
- LED Lighting: Illuminates the workspace. Battery-operated or solar-powered options are ideal.
- Power Drill: Essential for drilling holes and driving screws. Cordless models offer flexibility.
- Circular Saw: Cuts wood to size. Ensure it has a sharp blade.
- Jigsaw: For cutting curves and intricate shapes. Handy for custom fits.
- Measuring Tape: Ensures accurate measurements. A must-have for precise cuts.
- Level: Keeps everything straight and even. Crucial for a professional finish.
- Clamps: Hold pieces in place while working. Look for adjustable ones.
- Safety Gear: Includes gloves, goggles, and ear protection. Keeps you safe during the build.
Required Skills and Time Commitment
Skill Level: Advanced
Time Required: 40-60 hours
- Planning and Design: 5-10 hours
- Gathering Materials: 3-5 hours
- Frame Construction: 10-15 hours
- Electrical and Plumbing: 8-12 hours
- Installing Appliances: 5-8 hours
- Finishing Touches: 4-6 hours
Detailed Step-by-Step Guide
Plan Your Design
- Sketch your kitchen layout.
- Decide on storage, cooking, and prep areas.
- Measure your trailer space.
Gather Materials
- Plywood or MDF for cabinets.
- Hinges, screws, and brackets.
- Countertop material.
- Sink and water containers.
- Stove or cooking surface.
- Paint or sealant.
Build the Frame
- Cut plywood to fit trailer dimensions.
- Assemble the base frame using screws and brackets.
- Ensure the frame is sturdy and level.
Install Cabinets and Storage
- Cut and assemble cabinet boxes.
- Attach cabinets to the frame.
- Install shelves and dividers.
Add the Countertop
- Cut countertop material to fit.
- Secure the countertop to the cabinets.
- Cut out space for the sink.
Install the Sink
- Place the sink in the cutout.
- Attach water containers for fresh and grey water.
- Connect a hand pump or faucet.
Set Up Cooking Area
- Secure the stove or cooking surface.
- Ensure proper ventilation.
- Store fuel safely.
Paint and Seal
- Sand all surfaces.
- Apply paint or sealant to protect wood.
- Let it dry completely.
Add Finishing Touches
- Install hooks for utensils.
- Add lighting if needed.
- Organize storage for easy access.
Test Everything
- Check stability and safety.
- Ensure water flows properly.
- Test the stove and ventilation.
Helpful Tips and Tricks
Plan your layout before starting. Measure everything twice to ensure all components fit. Use lightweight materials like aluminum or plywood to keep the trailer easy to tow. Install modular units for flexibility; you can rearrange or remove them as needed. Include plenty of storage with drawers and shelves to keep items organized. Use weather-resistant materials for surfaces and cabinets to withstand outdoor conditions.
Common mistakes to avoid: Skipping the planning phase can lead to poor layout and wasted space. Using heavy materials can make towing difficult. Forgetting to seal edges and joints can result in water damage. Not considering ventilation can lead to cooking fumes and heat buildup.
Alternatives: Instead of plywood, consider using composite materials for durability. For countertops, stainless steel or laminate can be easier to clean than wood. If building your own cabinets seems daunting, pre-made units can save time and effort.
Estimating the Costs
Trailer Frame: $500 - $1,000
Plywood: $100 - $200
Aluminum Sheets: $150 - $300
Screws and Bolts: $50 - $100
Paint: $30 - $60
Sink: $50 - $100
Water Container: $20 - $40
Propane Stove: $50 - $150
Cooler: $30 - $100
Storage Bins: $20 - $50
Lighting: $20 - $40
Tools: $100 - $200 (if you don't already have them)
Total Cost: $1,120 - $2,340
Budget-Friendly Alternatives:
- Trailer Frame: Look for second-hand options or repurpose an old trailer.
- Plywood: Use reclaimed wood.
- Aluminum Sheets: Consider using cheaper metal or even heavy-duty plastic.
- Propane Stove: Opt for a portable camping stove.
- Cooler: Use an insulated bag instead.
Unique Variations and Customizations
Alternative materials can make a big difference. Instead of using plywood for cabinets, try aluminum for a lightweight, durable option. Stainless steel countertops offer a sleek, easy-to-clean surface, while butcher block adds a rustic touch.
Colors can set the mood. Paint the trailer in earthy tones like green or brown for a natural look. Bright colors like yellow or red can make it stand out. Use chalkboard paint on cabinet doors for a fun, functional twist.
Styles vary widely. Go for a modern look with clean lines and minimal decor. For a vintage feel, add retro handles and fixtures. A bohemian style can be achieved with colorful fabrics and eclectic accessories.
Storage solutions are key. Install pull-out drawers for easy access to pots and pans. Use magnetic strips to hold knives and utensils. Add hanging baskets for fruits and vegetables.
Lighting changes everything. Use LED strip lights under cabinets for a soft glow. Solar-powered lights can be a great eco-friendly option. String lights add a cozy, campfire vibe.
Water systems can be customized too. Install a foot pump for hands-free water access. Use a collapsible sink to save space. Add a water filter for clean drinking water on the go.
Power sources vary. Solar panels can charge batteries for lights and small appliances. A portable generator offers more power but takes up space. Battery packs are a compact option for charging phones and other gadgets.
Seating options can be flexible. Foldable chairs save space when not in use. Built-in benches with storage underneath offer dual functionality. Hammocks provide a fun, relaxing spot to unwind.
Cooking setups can be tailored. A propane stove is a classic choice. For a more modern touch, try an induction cooktop. A portable grill adds versatility for outdoor cooking.
Personal touches make it yours. Add a custom logo or decal to the trailer. Use family photos or travel souvenirs as decor. A custom-built spice rack keeps your favorite flavors within reach.
Eco-Friendly Building Tips
Reclaimed Wood: Use old pallets or barn wood for countertops and cabinets. Sand and treat them to make them durable and safe for food prep.
Recycled Metal: Look for scrap metal to create sturdy frames or shelves. Old bed frames or metal pipes can be repurposed.
Natural Insulation: Use sheep's wool or recycled denim for insulation. These materials are eco-friendly and provide excellent thermal protection.
Solar Panels: Install small solar panels to power lights and small appliances. This reduces reliance on non-renewable energy sources.
Eco-Friendly Paint: Choose low-VOC or zero-VOC paints for any wood or metal surfaces. These paints are less harmful to the environment and your health.
Bamboo: Use bamboo for cutting boards, utensils, or even small shelves. Bamboo grows quickly and is a sustainable resource.
Recycled Plastic: Look for recycled plastic for countertops or storage bins. This helps reduce plastic waste and is often very durable.
Natural Sealants: Use beeswax or linseed oil to seal wood surfaces. These natural options are safer for the environment and food-safe.
Upcycled Fabrics: Use old curtains or tablecloths for making storage pouches or covers. This reduces waste and adds a personal touch.
Compostable Bags: Use compostable trash bags for waste. They break down more easily and are better for the environment.
LED Lighting: Install LED lights. They use less energy and last longer than traditional bulbs.
Rainwater Collection: Set up a small rainwater collection system for washing dishes or cleaning. This conserves water and is practical for camping.
Natural Cleaners: Use vinegar, baking soda, and lemon for cleaning. These are effective and environmentally friendly.
Recycled Glass: Use recycled glass jars for storage. They are durable and reduce the need for plastic containers.
Portable Compost Bin: Include a small compost bin for food scraps. This reduces waste and can be used for gardening later.
Your Adventure Awaits
Building a DIY camp kitchen trailer is a rewarding project. You've learned how to plan, gather materials, and assemble everything. Now, you can enjoy the freedom of cooking outdoors with ease. Remember, the key is organization and efficiency. Keep your tools and supplies in designated spots to save time. Don't forget to personalize your trailer with unique touches that suit your style. Whether you're a weekend warrior or a full-time traveler, this trailer will make your adventures more enjoyable. So, get out there, explore new places, and cook up some amazing meals. Your hard work has paid off, and now it's time to reap the benefits. Happy camping!
What materials do I need to build a camp kitchen trailer?
You'll need plywood, aluminum sheets, screws, hinges, drawer slides, and sealant. Don't forget tools like a drill, saw, and measuring tape.
How much time will it take to complete the build?
Depending on your experience and tools, it could take anywhere from a weekend to a couple of weeks.
Do I need any special skills to build a camp kitchen trailer?
Basic carpentry and metalworking skills are helpful. If you can measure, cut, and assemble, you're good to go.
How do I ensure the trailer is weatherproof?
Use weather-resistant materials and apply sealant to all joints and edges. Make sure to cover any exposed wood with aluminum or paint.
Can I customize the layout of my camp kitchen trailer?
Absolutely! You can design the storage, cooking area, and prep space to fit your needs. Sketch out your ideas before you start building.
What kind of stove should I install?
A propane stove is a popular choice because it's portable and easy to use. Make sure it's securely mounted and has proper ventilation.
How do I add water storage to my camp kitchen trailer?
Install a water tank with a pump and faucet. You can place the tank under the trailer or inside a cabinet. Make sure it's secure and leak-proof.
Is it possible to add electrical outlets to my camp kitchen trailer?
Yes, you can add electrical outlets by installing a battery and inverter system. This allows you to power small appliances and lights.