
Home>Home & Furniture>Garage & Basement>How to Build DIY Garage Shelf Brackets
Garage & Basement
How to Build DIY Garage Shelf Brackets
Published: September 27, 2024
Learn how to build sturdy DIY garage shelf brackets with our step-by-step guide. Maximize your garage storage space efficiently and affordably with these easy-to-follow instructions.
(Many of the links in this article redirect to a specific reviewed product. Your purchase of these products through affiliate links helps to generate commission for Twigandthistle.com, at no extra cost. Learn more)
Garage shelves can make organizing tools, equipment, and other items much easier. Building your own shelf brackets saves money and lets you customize them to fit your space perfectly. You don’t need to be a professional carpenter to do this project; just a few tools, some wood, and a bit of time. In this guide, we’ll show you how to create sturdy, functional brackets that will hold up your shelves and keep your garage tidy. Ready to get started? Let’s gather some materials and make your garage more organized.
Getting Ready for Your Project
Gather Materials: Collect wood, screws, brackets, a measuring tape, a saw, a drill, and a level.
Safety Gear: Wear safety goggles and gloves to protect your eyes and hands.
Clear Workspace: Ensure your workspace is clean and well-lit. Remove any clutter to avoid accidents.
Measure and Mark: Use a measuring tape to mark where the brackets will go. Ensure they are evenly spaced.
Cut Wood: Measure and cut the wood to the desired length using a saw. Double-check measurements before cutting.
Pre-Drill Holes: Pre-drill holes in the wood to make it easier to screw in the brackets. This prevents the wood from splitting.
Install Brackets: Attach the brackets to the wall using a drill. Make sure they are level and secure.
Attach Shelves: Place the cut wood on the brackets and secure them with screws. Ensure the shelves are level.
Check Stability: Test the stability of the shelves by placing a few items on them. Adjust if necessary.
Materials and Tools Needed
Materials:
- 2x4 Lumber: Strong wood pieces for the shelf frame.
- Plywood: Flat surface for the shelves.
- Wood Screws: Fasteners to hold everything together.
- Wood Glue: Adhesive for extra strength.
- Sandpaper: Smooths rough edges.
- Paint or Stain: Finishes the wood for protection and appearance.
Tools:
- Tape Measure: Measures wood pieces accurately.
- Circular Saw: Cuts the wood to size.
- Drill: Makes holes for screws and drives them in.
- Screwdriver: Tightens screws.
- Level: Ensures shelves are even.
- Clamps: Holds wood pieces in place while gluing.
- Paintbrush: Applies paint or stain evenly.
Summary:
2x4 lumber and plywood form the structure. Wood screws and glue secure the pieces. Sandpaper smooths surfaces, while paint or stain finishes the project. Tools like a tape measure, circular saw, drill, screwdriver, level, clamps, and paintbrush help build and finish the shelf brackets.
Skill Level and Time Required
Skill Level: Intermediate
Time Required: 4-6 hours
Steps:
- Measure and Cut Wood: 1 hour
- Assemble Brackets: 2 hours
- Sand and Finish: 1 hour
- Install Brackets: 1-2 hours
Step-by-Step Instructions
Gather Materials:
- 2x4 lumber (for the brackets)
- Plywood (for the shelves)
- Wood screws
- Drill
- Saw
- Measuring tape
- Level
- Pencil
Measure and Cut:
- Measure the desired length for your shelf.
- Cut the 2x4 lumber into three pieces per bracket: one for the wall, one for the shelf support, one for the diagonal brace.
Assemble Brackets:
- Attach the wall piece to the shelf support piece using wood screws.
- Add the diagonal brace between the wall piece and the shelf support for extra strength.
Mount Brackets:
- Use a level to ensure brackets are straight.
- Mark the spots on the wall where brackets will be mounted.
- Drill pilot holes into the wall studs.
- Secure brackets to the wall using wood screws.
Prepare Shelves:
- Cut plywood to fit the length and width of your shelf space.
- Sand edges to smooth any rough spots.
Install Shelves:
- Place plywood on top of the mounted brackets.
- Secure plywood to brackets using wood screws.
Check Stability:
- Ensure everything is level and secure.
- Test by placing a few items on the shelf to check stability.
Tips and Tricks
Measure Twice, Cut Once: Always double-check measurements before cutting wood. This saves time and materials.
Use a Stud Finder: Ensure brackets are anchored into studs for maximum strength. Drywall alone won't support heavy loads.
Pre-Drill Holes: Prevent wood from splitting by pre-drilling holes for screws.
Level Brackets: Use a level to make sure brackets are even. Uneven shelves can cause items to slide off.
Sand Edges: Smooth out rough edges with sandpaper to avoid splinters.
Paint or Stain: Protect wood from moisture by painting or staining it. This also gives a polished look.
Use L-Brackets: For extra support, add L-brackets underneath shelves.
Common Mistakes to Avoid:
Skipping Studs: Attaching brackets to drywall instead of studs can lead to shelves collapsing.
Wrong Screws: Using screws that are too short or weak won't hold the weight. Use heavy-duty screws.
Ignoring Weight Limits: Overloading shelves can cause them to break. Always check weight limits.
Alternatives for Materials or Methods:
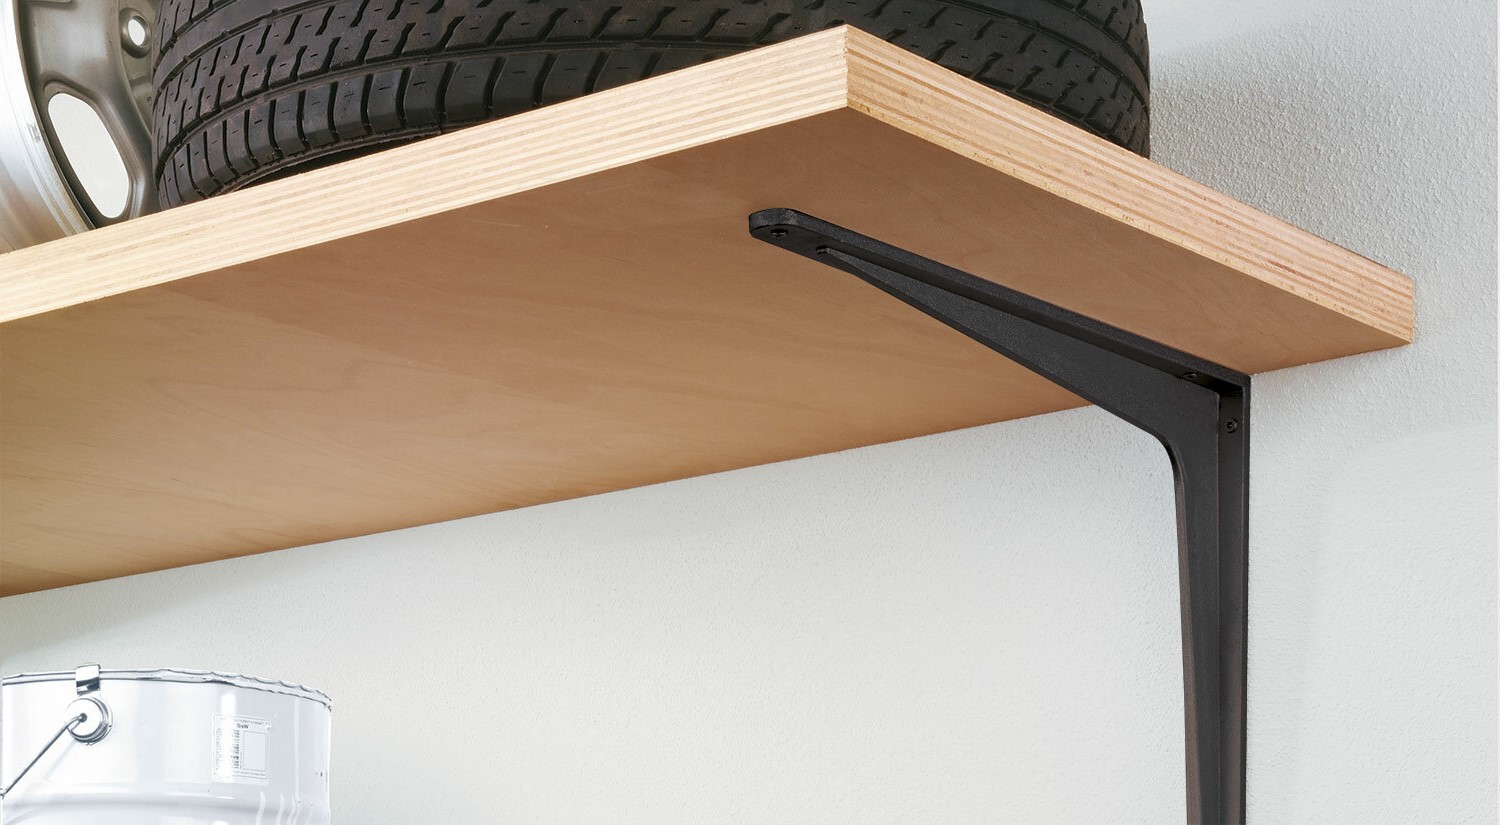
Metal Brackets: Instead of wood, use metal brackets for a modern look and extra strength.
Floating Shelves: For a cleaner appearance, consider floating shelves that hide brackets inside the wall.
Adjustable Shelving: Use adjustable shelving systems for flexibility in shelf height.
Cost Estimation
Materials:
- 2x4 lumber: $3 each, need 4 pieces = $12
- Plywood: $20 per sheet, need 1 sheet = $20
- Screws: $5 per box, need 1 box = $5
- Wood glue: $4 per bottle, need 1 bottle = $4
Tools:
- Circular saw: $50 (or borrow)
- Drill: $40 (or borrow)
- Measuring tape: $5
- Level: $10
Total Cost: $146
Budget-friendly alternatives:
- Borrow tools from friends or family: Save $100
- Reclaimed wood: Often free or very cheap from construction sites or online marketplaces
- Basic screws: $2 per box, save $3
New Total Cost: $43
Variations and Customizations
Materials: Instead of standard wood, consider using metal for a more industrial look. Plywood offers a budget-friendly option, while hardwood like oak or maple provides durability and a polished finish.
Colors: Paint the brackets to match your garage's color scheme. Black or gray gives a modern touch, while white or blue can brighten the space. Use stain to highlight wood grain for a natural look.
Styles: For a rustic feel, use reclaimed wood or distressed metal. Opt for sleek, minimalist designs with straight lines for a contemporary style. Add decorative braces or scrollwork for a classic, ornate appearance.
Sizes: Customize the bracket size to fit different shelf dimensions. Larger brackets can support heavier items, while smaller ones work well for lighter loads.
Finishes: Use matte or glossy finishes to change the look. Powder coating metal brackets adds durability and color options. For wood, consider varnish or polyurethane for protection and shine.
Mounting Options: Use hidden brackets for a floating shelf effect. Adjustable brackets allow for changing shelf heights. Corner brackets can maximize space in tight areas.
Additional Features: Add hooks or pegs to the brackets for hanging tools or accessories. Incorporate LED strip lights under the shelves for better visibility and a modern touch.
Sustainability Tips
Reclaimed Wood: Use old pallets or leftover wood from previous projects. Sand them down to remove splinters and give a smooth finish.
Metal Scraps: Repurpose metal pieces from old furniture or appliances. Cut them to size and shape for sturdy brackets.
Eco-Friendly Paint: Choose paints with low or no VOCs (volatile organic compounds). These are better for the environment and your health.
Natural Finishes: Use beeswax or linseed oil instead of chemical sealants. They protect the wood and give a nice finish.
Recycled Fasteners: Look for screws, nails, and bolts from old projects or buy ones made from recycled materials.
Minimalist Design: Keep the design simple. Use fewer materials, which reduces waste and makes the project easier.
Local Sourcing: Get materials from local suppliers. This reduces the carbon footprint associated with transportation.
Upcycled Items: Think creatively. Old bed frames, door hinges, or even bicycle parts can be transformed into unique shelf brackets.
Durable Materials: Choose materials that will last a long time. This reduces the need for replacements and minimizes waste.
Proper Measurements: Measure twice, cut once. Accurate measurements prevent mistakes and reduce material waste.
Your Garage Just Got an Upgrade
Building DIY garage shelf brackets is a game-changer. You’ve saved money, customized your space, and learned some handy skills. With just some wood, screws, and basic tools, you’ve created sturdy storage that fits your needs. No more clutter, no more mess. Everything has its place now. Plus, you’ve got the satisfaction of knowing you did it yourself. Next time you need more storage, you’ll know exactly what to do. Keep those tools handy, and don’t be afraid to tackle more DIY projects. Your garage isn’t just a place for cars anymore; it’s a well-organized, efficient space. Enjoy the extra room and the peace of mind that comes with it. Happy building!
How much weight can DIY garage shelf brackets hold?
The weight capacity depends on the materials used and how well they're installed. Generally, sturdy wood or metal brackets can hold anywhere from 50 to 200 pounds.
What tools do I need to build garage shelf brackets?
You'll need a saw, drill, measuring tape, level, screws, and wood or metal for the brackets. Safety gear like gloves and goggles is also a good idea.
Can I use reclaimed wood for the brackets?
Absolutely! Reclaimed wood can add a rustic look and is often just as strong as new wood. Just make sure it's free of rot and pests.
How do I ensure the brackets are level?
Use a level when marking where the brackets will go. Double-check before drilling any holes. If the brackets aren't level, your shelves won't be either.
Should I anchor the brackets into studs?
Yes, anchoring into studs provides the most support. If you can't find studs, use heavy-duty wall anchors to ensure stability.
How far apart should I space the brackets?
Space the brackets 16 to 24 inches apart. This spacing provides good support for most shelving materials and loads.
Can I paint or stain the brackets?
Definitely! Painting or staining can protect the wood and match your garage decor. Just make sure the paint or stain is fully dry before installing the shelves.