
Home>Home & Furniture>Garage & Basement>How to Build a Wine Cellar in Your Basement
Garage & Basement
How to Build a Wine Cellar in Your Basement
Published: August 31, 2024
Learn how to build a wine cellar in your basement with our step-by-step guide. From insulation to racking, create the perfect storage for your wine collection.
(Many of the links in this article redirect to a specific reviewed product. Your purchase of these products through affiliate links helps to generate commission for Twigandthistle.com, at no extra cost. Learn more)
Building a wine cellar in your basement can be a fun project, especially if you love collecting wine. You’ll need some basic tools, materials, and a bit of patience to create the perfect storage space for your collection. This guide will help you through the initial steps, from planning the layout to selecting the right cooling system. By the end, you'll have a cozy spot where your wines can age gracefully. Whether you're a beginner or have some DIY experience, transforming your basement into a wine sanctuary is an achievable goal. Let's get started on this exciting endeavor!
Getting Ready for Your Project
Assess the Space: Measure the basement area where the wine cellar will go. Ensure there's enough room for shelves, cooling units, and walking space.
Check for Moisture: Basements can be damp. Use a moisture meter to check humidity levels. If too high, consider installing a dehumidifier.
Plan Ventilation: Proper airflow is crucial. Plan where vents or fans will go to keep air circulating and prevent mold.
Gather Materials: Collect all necessary tools and materials like insulation, vapor barriers, wine racks, and cooling units. Make a checklist to ensure nothing is missed.
Set Up Workspace: Clear the area of any clutter. Lay down drop cloths to protect floors. Organize tools for easy access.
Safety Gear: Wear safety glasses, gloves, and a dust mask. Ensure the workspace is well-lit to avoid accidents.
Electrical Check: Ensure the basement has enough outlets for lighting and cooling units. If not, plan to add more.
Insulate: Install insulation on walls and ceiling to maintain a consistent temperature. Use a vapor barrier to prevent moisture from seeping in.
Mark Layout: Use chalk or tape to outline where shelves, cooling units, and other elements will go. This helps visualize the final setup.
Double-Check Plans: Review your plans one last time. Make sure all measurements are accurate and materials are ready.
Essential Materials and Tools
- Insulation: Keeps the temperature stable. Use foam boards or fiberglass.
- Vapor Barrier: Prevents moisture from seeping in. Plastic sheeting works well.
- Drywall: Covers the insulation and vapor barrier. Use moisture-resistant drywall.
- Wine Racks: Stores the wine bottles. Choose wood or metal racks.
- Cooling Unit: Maintains the right temperature. Look for a wine cellar-specific unit.
- Thermometer and Hygrometer: Monitors temperature and humidity. Essential for wine preservation.
- Lighting: Provides visibility. Use LED lights to avoid heat.
- Sealant: Seals gaps and cracks. Use silicone or caulk.
- Paint: Protects walls and adds color. Choose mold-resistant paint.
- Flooring: Durable and moisture-resistant. Tile or sealed concrete works best.
Tools:
- Measuring Tape: Measures dimensions accurately.
- Utility Knife: Cuts insulation and vapor barrier.
- Screwdriver: Installs racks and cooling unit.
- Drill: Makes holes for screws and anchors.
- Hammer: Drives nails and secures materials.
- Level: Ensures everything is even.
- Saw: Cuts wood or metal for racks.
- Paintbrush/Roller: Applies paint evenly.
- Caulking Gun: Applies sealant smoothly.
- Safety Gear: Protects you during construction. Use gloves, goggles, and a mask.
Required Skills and Time Commitment
Skill Level: Advanced
Time Required: 2-4 weeks
Steps:
- Planning and Design: 1-2 days
- Framing and Insulation: 3-5 days
- Installing Vapor Barrier: 1-2 days
- Electrical and Lighting: 2-3 days
- Drywall and Painting: 3-5 days
- Flooring Installation: 2-3 days
- Shelving and Racks: 2-4 days
- Climate Control System: 2-3 days
Important Keywords:
- Advanced
- 2-4 weeks
- Planning
- Framing
- Insulation
- Vapor Barrier
- Electrical
- Lighting
- Drywall
- Painting
- Flooring
- Shelving
- Racks
- Climate Control System
Detailed Step-by-Step Guide
Plan Your Space
- Measure the basement area.
- Decide on the cellar size.
- Sketch a layout.
Prepare the Basement
- Clear out the space.
- Check for moisture issues.
- Fix any leaks or cracks.
Insulate the Walls
- Install vapor barriers.
- Add insulation (R-19 for walls, R-30 for ceiling).
- Seal gaps with foam.
Install a Vapor Barrier
- Cover walls and ceiling with plastic sheeting.
- Overlap seams by 6 inches.
- Secure with tape.
Frame the Walls
- Use 2x4 lumber.
- Space studs 16 inches apart.
- Secure frames to floor and ceiling.
Install Drywall
- Attach drywall to framed walls.
- Use moisture-resistant drywall.
- Tape and mud seams.
Install Flooring
- Choose moisture-resistant flooring (tile, vinyl).
- Lay underlayment if needed.
- Install flooring according to type.
Install a Cooling System
- Choose a wine cellar cooling unit.
- Cut a hole for the unit.
- Mount and seal the unit.
Add Lighting
- Install recessed or track lighting.
- Use LED bulbs.
- Ensure proper wiring.
Install Wine Racks
- Choose wood or metal racks.
- Secure racks to walls.
- Ensure racks are level.
Finish the Cellar
- Paint walls with mold-resistant paint.
- Add a door with weather stripping.
- Install a hygrometer and thermometer.
Stock Your Cellar
- Organize wines by type.
- Label shelves.
- Maintain proper temperature and humidity.
Helpful Tips and Tricks
Plan the Space: Measure your basement to determine the best spot for your wine cellar. Make sure it's away from direct sunlight and vibrations.
Insulate Properly: Use vapor barriers and insulation to keep the temperature stable. This helps prevent mold and keeps your wine at the right temperature.
Choose the Right Cooling Unit: Pick a cooling system designed for wine cellars. It should maintain a temperature between 55-58°F and humidity around 60-70%.
Use Quality Racks: Invest in sturdy wine racks made from wood or metal. They should be able to hold the weight of your wine collection.
Seal the Door: Install a solid door with weather stripping to keep the cool air in and warm air out.
Lighting Matters: Use LED lights to avoid heat buildup. Place lights where they won't shine directly on the wine bottles.
Flooring Options: Choose tile, stone, or sealed concrete for the floor. Avoid carpet as it can trap moisture and cause mold.
Monitor Conditions: Install a thermometer and hygrometer to keep track of temperature and humidity levels.
Common Mistakes to Avoid:
- Skipping Insulation: Not insulating properly can lead to temperature fluctuations.
- Ignoring Humidity: Low humidity can dry out corks, while high humidity can cause mold.
- Using Regular Lights: Incandescent bulbs generate heat, which can affect wine quality.
Alternatives for Materials or Methods:
- Instead of traditional wood racks, consider metal racks for a modern look.
- Use portable cooling units if installing a built-in system is too costly.
- For insulation, spray foam can be a quicker alternative to traditional fiberglass batts.
Budgeting and Cost Breakdown
Insulation: You'll need insulation to keep the temperature stable. Expect to spend around $500 for quality insulation.
Vapor Barrier: A vapor barrier prevents moisture from entering. This will cost about $100.
Framing Materials: Wood for framing the walls will cost roughly $300.
Drywall: Cover the walls with drywall, which will cost around $200.
Flooring: Choose a moisture-resistant flooring like tile or vinyl. Budget about $400.
Cooling Unit: A wine cellar cooling unit is essential. This will be the most expensive item, costing between $1,000 and $3,000.
Lighting: Proper lighting is important. Plan to spend around $150.
Racks and Shelving: Wine racks and shelves can vary in price. Budget around $500 for basic options.
Door: A well-sealed door is crucial. This will cost about $300.
Tools: Basic tools like a saw, drill, and hammer will cost around $200 if you don't already have them.
Total Estimated Cost: Between $3,650 and $5,650.
Budget-Friendly Alternatives:
Insulation: Use foam board insulation instead of spray foam to save about $200.
Flooring: Consider laminate flooring instead of tile to save around $200.
Racks and Shelving: Build your own racks using DIY plans to save about $300.
Cooling Unit: Look for a used cooling unit to save up to $1,000.
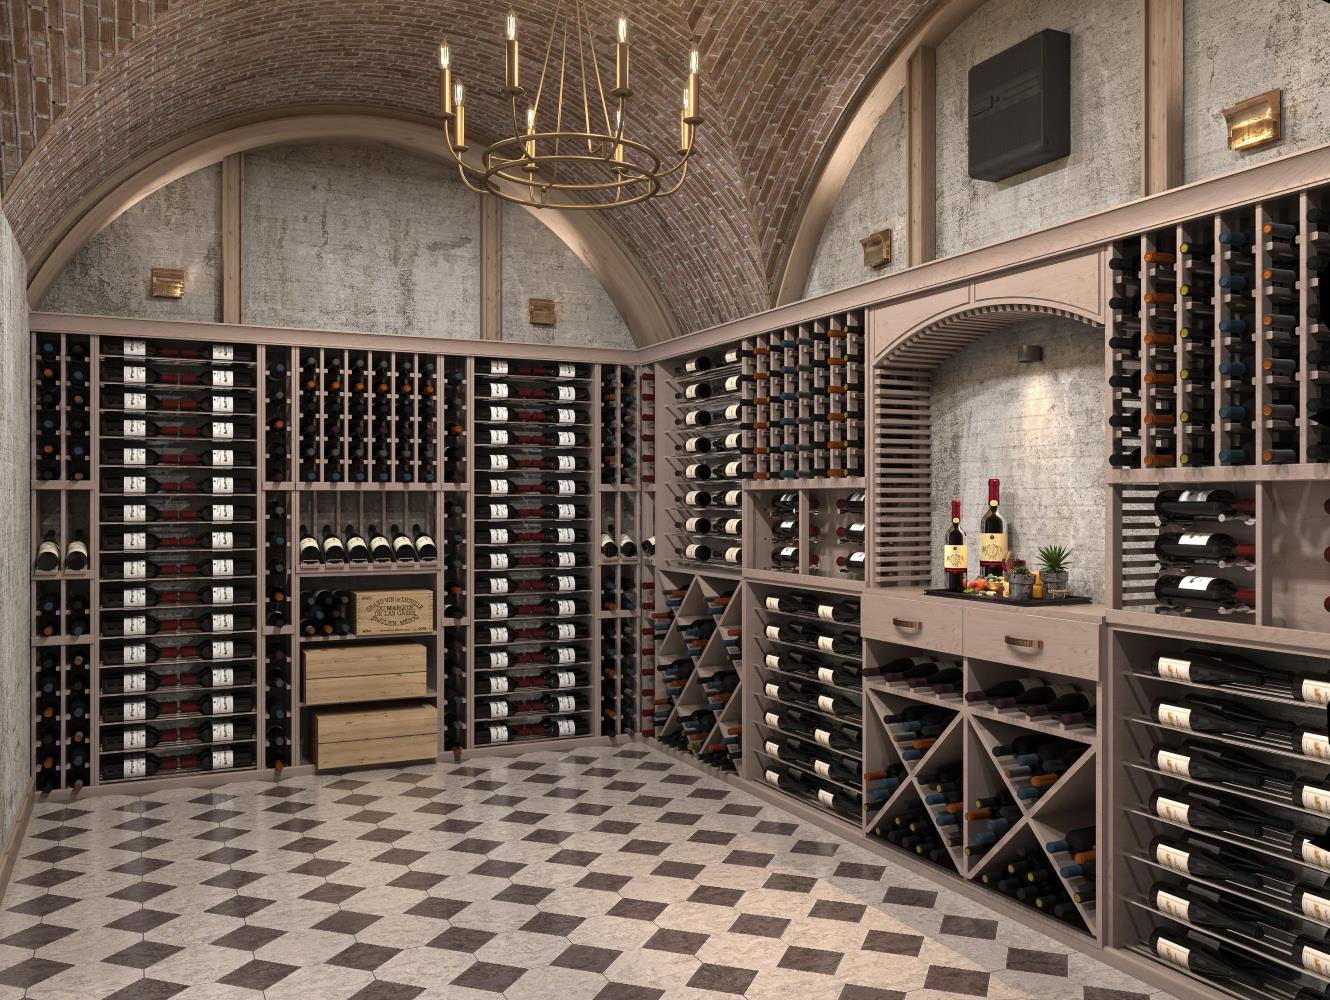
Personalize Your Wine Cellar
Shelving Materials: Use wood, metal, or glass for shelves. Wood gives a classic look, metal offers a modern touch, and glass adds elegance.
Flooring Options: Choose tile, hardwood, or concrete. Tile is easy to clean, hardwood adds warmth, and concrete provides durability.
Lighting Styles: Install LED strips, recessed lights, or chandeliers. LED strips highlight shelves, recessed lights offer a clean look, and chandeliers add a touch of luxury.
Wall Finishes: Paint walls with neutral colors, bold hues, or use stone veneer. Neutral colors keep it simple, bold hues make it stand out, and stone veneer adds a rustic feel.
Door Choices: Select a glass door, wooden door, or metal door. Glass doors showcase the collection, wooden doors provide insulation, and metal doors add security.
Climate Control: Use a cooling unit, humidifier, or dehumidifier. Cooling units maintain temperature, humidifiers add moisture, and dehumidifiers remove excess humidity.
Storage Styles: Opt for individual racks, diamond bins, or custom cabinetry. Individual racks organize bottles, diamond bins maximize space, and custom cabinetry offers a tailored look.
Decor Elements: Add artwork, mirrors, or wine-themed decor. Artwork personalizes the space, mirrors make it look larger, and wine-themed decor enhances the ambiance.
Eco-Friendly Building Tips
Reclaimed wood can be used for shelving and racks. It adds character and reduces waste. Cork flooring is sustainable and provides good insulation. Recycled glass tiles make an eco-friendly choice for walls or accents. Use low-VOC paints to minimize harmful emissions. LED lighting is energy-efficient and produces less heat, which is crucial for wine storage. Insulate with eco-friendly materials like sheep's wool or cotton. Reuse old doors or windows for cellar entrances. Consider a natural ventilation system to reduce energy consumption. Rainwater harvesting can be used for any cleaning needs.
Cheers to Your New Wine Cellar
Building a wine cellar in your basement is a rewarding project. You've learned the steps, from planning to insulation and cooling. Now, you can store your wine collection properly, ensuring each bottle ages perfectly. Remember, humidity and temperature control are key. Don't forget to add some personal touches, like shelves or lighting, to make the space uniquely yours. Enjoy the fruits of your labor, literally and figuratively. Invite friends over, share a glass, and bask in the satisfaction of a job well done. Cheers to your new wine cellar!
What materials do I need to build a wine cellar in my basement?
You'll need insulation, vapor barriers, drywall, wine racks, a cooling unit, and lighting. Don't forget sealant for the door and flooring that can handle moisture.
How do I control the temperature and humidity in my wine cellar?
Install a wine cellar cooling unit to maintain a steady temperature between 55-58°F. Use a hygrometer to monitor humidity, aiming for 60-70%. A humidifier or dehumidifier can help adjust levels.
Can I build a wine cellar if my basement is unfinished?
Absolutely! Start by framing the walls and ceiling. Add insulation and a vapor barrier to control temperature and moisture. Finish with drywall and flooring suitable for a wine cellar.
How much space do I need for a wine cellar?
The size depends on your collection. A small cellar can be 25-50 square feet, holding 100-500 bottles. Larger collections might need 100 square feet or more. Plan for future growth.
Do I need a permit to build a wine cellar in my basement?
Check with your local building department. Some areas require permits for electrical work, plumbing, or structural changes. Better safe than sorry!
What kind of lighting should I use in my wine cellar?
Use LED lights to avoid heat buildup. Recessed lighting or track lighting works well. Avoid UV light, which can damage wine. Consider dimmable options for ambiance.
How do I choose the right wine racks?
Consider material (wood, metal, or plastic), capacity, and style. Ensure racks are sturdy and easy to access. Modular racks offer flexibility for growing collections.