
Home>Home & Furniture>Garage & Basement>How to Build a Basement Kitchenette
Garage & Basement
How to Build a Basement Kitchenette
Published: August 30, 2024
Learn how to build a basement kitchenette with our step-by-step guide. Transform your basement into a functional and stylish space with these expert tips and ideas.
(Many of the links in this article redirect to a specific reviewed product. Your purchase of these products through affiliate links helps to generate commission for Twigandthistle.com, at no extra cost. Learn more)
Building a basement kitchenette can be a fun and rewarding project. Whether you need extra space for entertaining guests or want a small area for quick meals, a kitchenette can be perfect. Creating this space doesn't have to be complicated. With some planning, basic tools, and a few weekends, you can set up a functional and stylish kitchenette. This guide will help you understand the steps needed, including measuring your space, selecting appliances, and installing cabinets. Get ready to transform your basement into a useful and inviting area for cooking, eating, and enjoying time with family and friends.
Getting Ready for Your Project
Plan Your Layout: Measure the space. Sketch a layout including cabinets, appliances, and countertops.
Gather Permits: Check local building codes. Obtain necessary permits for plumbing and electrical work.
Safety Gear: Wear safety goggles, gloves, and a dust mask. Keep a first aid kit nearby.
Clear the Area: Remove any clutter. Ensure the workspace is clean and well-lit.
Check for Moisture: Inspect for dampness. Use a dehumidifier if needed.
Electrical Setup: Turn off the main power. Plan outlet locations. Hire an electrician if unsure.
Plumbing Prep: Locate existing pipes. Plan sink and dishwasher placement. Consult a plumber if needed.
Ventilation: Ensure proper airflow. Install a vent hood if cooking appliances are included.
Gather Tools and Materials: Collect necessary tools like a drill, saw, and measuring tape. Purchase materials such as cabinets, countertops, and appliances.
Create a Timeline: Set realistic goals. Break the project into manageable steps.
Essential Materials and Tools
- Measuring Tape: Essential for measuring spaces accurately.
- Pencil and Notepad: For jotting down measurements and plans.
- Level: Ensures surfaces are even.
- Stud Finder: Locates wall studs for secure mounting.
- Drill and Drill Bits: For making holes and driving screws.
- Screwdriver Set: Tightens or loosens screws.
- Hammer: Useful for nailing and minor demolition.
- Utility Knife: Cuts through various materials like drywall or tape.
- Saw: Cuts wood or other materials to size.
- Pliers: Grips, bends, or cuts wires and small objects.
- Wrench Set: Tightens or loosens nuts and bolts.
- Safety Gear: Includes gloves, goggles, and ear protection.
- Paint and Brushes/Rollers: For finishing walls and cabinets.
- Cabinets and Countertops: Core components of the kitchenette.
- Sink and Faucet: Provides water access.
- Plumbing Supplies: Pipes, fittings, and sealants for water connections.
- Electrical Supplies: Wires, outlets, and switches for power needs.
- Tile and Grout: For backsplash and flooring.
- Adhesive and Sealant: Secures tiles and seals gaps.
- Lighting Fixtures: Illuminates the space.
- Appliances: Mini-fridge, microwave, and possibly a small stove or cooktop.
- Shelving and Storage Units: Adds extra storage space.
- Trash Bags and Cleaning Supplies: Keeps the work area tidy.
Required Skills and Time Commitment
Skill Level: Intermediate
Time Required: 3-5 days
- Planning and Design: 4-6 hours
- Framing and Drywall: 1-2 days
- Plumbing and Electrical: 1-2 days
- Cabinet Installation: 4-6 hours
- Countertops and Finishing Touches: 1 day
Detailed Steps to Follow
Plan Your Layout
- Measure the space.
- Sketch a layout including cabinets, appliances, and countertops.
- Decide on plumbing and electrical needs.
Gather Materials and Tools
- Purchase cabinets, countertops, sink, faucet, and appliances.
- Get plumbing supplies like pipes and fittings.
- Gather electrical supplies such as outlets, switches, and wiring.
- Tools: Drill, saw, screwdriver, wrench, tape measure, level.
Prepare the Space
- Clear the area of any debris or obstacles.
- Ensure walls and floors are clean and level.
Install Plumbing
- Shut off the main water supply.
- Run pipes for the sink and any other water-using appliances.
- Connect pipes to the main water line and drainage system.
- Install the sink and faucet.
Set Up Electrical
- Turn off the power at the breaker box.
- Run wiring for outlets, switches, and lighting.
- Install outlets and switches in designated spots.
- Connect wiring to the main electrical panel.
Install Cabinets
- Assemble cabinets if needed.
- Use a level to ensure they are even.
- Secure cabinets to the wall studs with screws.
Install Countertops
- Measure and cut countertops to fit.
- Secure countertops to the cabinets with screws or adhesive.
Install Appliances
- Place appliances in designated spots.
- Connect appliances to plumbing and electrical outlets.
- Ensure all connections are secure and appliances are level.
Finishing Touches
- Install backsplash if desired.
- Add cabinet hardware like handles and knobs.
- Touch up any paint or caulking as needed.
Test Everything
- Turn on the water supply and check for leaks.
- Restore power and test all electrical connections.
- Ensure appliances are working correctly.
Helpful Tips and Tricks
Plan the layout before starting. Measure the space and decide where appliances, cabinets, and counters will go. This helps avoid mistakes later.
Use moisture-resistant materials. Basements can be damp, so choose materials like vinyl flooring and moisture-resistant drywall.
Install proper ventilation. Cooking produces steam and odors. A good exhaust fan or range hood will keep the air fresh.
Consider plumbing and electrical needs. Ensure there are enough outlets for appliances and that plumbing is accessible for sinks and dishwashers.
Maximize storage. Use wall-mounted cabinets and shelves to save floor space. Corner cabinets and pull-out shelves can also help.
Choose compact appliances. Smaller appliances fit better in limited spaces. Look for mini-fridges, compact microwaves, and slim dishwashers.
Add good lighting. Basements can be dark. Use a mix of overhead lights, under-cabinet lighting, and task lights to brighten the area.
Common mistakes to avoid:
- Skipping permits. Always check local building codes and get necessary permits.
- Ignoring moisture issues. Not addressing dampness can lead to mold and damage.
- Poor ventilation. Without proper airflow, the kitchenette can become stuffy and smelly.
- Overloading circuits. Make sure the electrical system can handle the load of new appliances.
Alternatives for materials or methods:
- Instead of traditional cabinets, use open shelving for a more spacious feel.
- For countertops, consider butcher block instead of granite. It's cheaper and easier to install.
- Use peel-and-stick tiles for a quick and easy backsplash.
- Instead of a full-sized sink, opt for a bar sink to save space.
Budgeting for Your Kitchenette
Cabinets: Basic stock cabinets cost around $100-$200 each. For a small kitchenette, you might need 4-6 cabinets, totaling $400-$1,200.
Countertops: Laminate countertops are budget-friendly, costing about $10-$30 per square foot. For a 10-foot countertop, expect to pay $100-$300.
Sink and Faucet: A basic stainless steel sink costs $50-$100. A simple faucet adds another $30-$70. Together, they total $80-$170.
Appliances: A mini fridge costs $100-$300. A microwave costs $50-$150. A small electric cooktop costs $50-$200. Total for appliances: $200-$650.
Plumbing Supplies: Pipes, fittings, and other plumbing materials cost around $50-$100.
Electrical Supplies: Outlets, wiring, and other electrical materials cost about $50-$100.
Flooring: Vinyl flooring is affordable, costing $1-$3 per square foot. For a 100-square-foot area, expect to pay $100-$300.
Paint: A gallon of paint covers about 350 square feet and costs $20-$50. For a small kitchenette, one gallon should suffice.
Tools: Basic tools like a drill, screwdriver set, and measuring tape might cost around $50-$100 if you don't already have them.
Total Cost: Adding everything up, the total cost ranges from $1,050 to $2,970.
Budget-Friendly Alternatives:
- Cabinets: Consider used or refurbished cabinets from a resale store.
- Countertops: Use butcher block or tile instead of laminate.
- Sink and Faucet: Look for sales or second-hand options.
- Appliances: Check for used or discounted models.
- Flooring: Peel-and-stick tiles can be cheaper than vinyl sheets.
- Paint: Buy paint from clearance sections or use leftover paint from other projects.
Personalizing Your Space
Cabinet Materials: Instead of standard wood, consider reclaimed wood for a rustic look or metal cabinets for an industrial style. Bamboo cabinets offer an eco-friendly option.
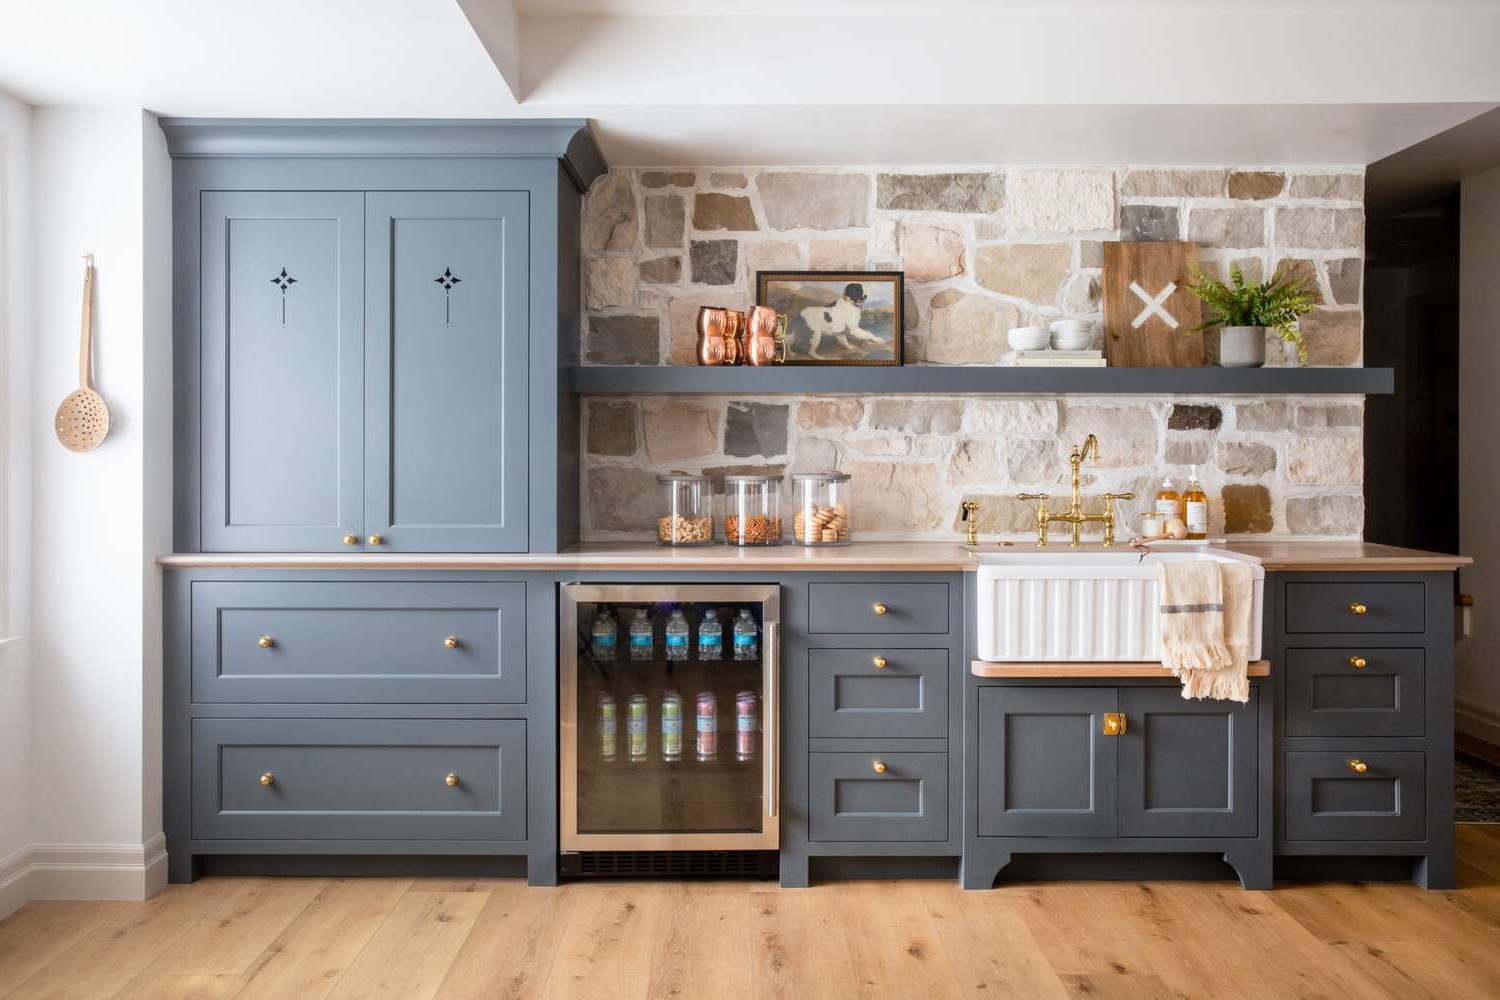
Countertops: Swap out laminate for granite or quartz for a more luxurious feel. Butcher block countertops add warmth and are great for food prep. Concrete countertops can be customized with different colors and textures.
Backsplash: Use subway tiles for a classic look or glass tiles for a modern touch. Peel-and-stick tiles offer an easy, budget-friendly option. Stainless steel backsplashes are durable and easy to clean.
Flooring: Vinyl plank flooring mimics the look of wood but is more water-resistant, perfect for basements. Ceramic tiles are durable and come in various designs. Cork flooring is soft underfoot and provides good insulation.
Lighting: Install under-cabinet lighting for better visibility. Pendant lights over the countertop add style and functionality. Recessed lighting can make the space feel larger and more open.
Appliances: Choose stainless steel appliances for a sleek, modern look. Retro-style appliances add a fun, vintage vibe. Compact appliances save space and are ideal for smaller kitchenettes.
Paint Colors: Light colors like white or pale gray can make the space feel larger. Bold colors like navy blue or forest green add character. Two-tone cabinets with different colors for upper and lower cabinets create visual interest.
Storage Solutions: Install open shelving for easy access and a more open feel. Pull-out pantry shelves maximize storage in small spaces. Corner cabinets with lazy Susans make use of awkward spaces.
Sink Options: A farmhouse sink adds a rustic touch. Undermount sinks provide a seamless look with the countertop. Bar sinks are smaller and save space.
Decor: Add plants for a touch of greenery. Wall art or decorative plates can personalize the space. Rugs add warmth and define different areas within the kitchenette.
Eco-Friendly Ideas
Reclaimed wood makes excellent countertops or cabinets. It adds character while reducing waste. Bamboo is another great option for flooring or cabinetry. It grows quickly, making it a renewable resource.
For countertops, consider recycled glass. These surfaces are durable and come in various colors. Cork flooring is soft underfoot and sustainable. Cork is harvested from tree bark, which regrows, making it eco-friendly.
Use low-VOC paints to reduce harmful emissions. These paints are better for indoor air quality. LED lighting consumes less energy and lasts longer than traditional bulbs.
When possible, reuse old fixtures. Salvaged sinks or faucets can add a unique touch. Recycled metal can be used for cabinet handles or light fixtures.
For insulation, choose recycled denim or sheep's wool. Both are effective and sustainable. Energy-efficient appliances will save electricity and reduce your carbon footprint.
Compostable or biodegradable materials for kitchen accessories like cutting boards or utensils are also a good choice. Water-saving faucets and fixtures help conserve water.
Lastly, consider solar panels for powering your kitchenette. They provide renewable energy and can reduce utility bills.
Your Basement Kitchenette Awaits
Building a basement kitchenette is a rewarding project. You've learned how to plan, choose materials, and install everything from cabinets to plumbing. Remember, measurements are key. Double-check them to avoid costly mistakes. Safety should always be a priority, especially when dealing with electrical and plumbing work. Don't hesitate to consult professionals for complex tasks.
Once the basics are in place, personalize your space. Add a splash of color, unique fixtures, or even a cozy seating area. This space can be a game-changer for entertaining guests or providing a convenient spot for snacks and drinks.
Enjoy the process and take pride in your work. Your new kitchenette will not only add value to your home but also offer a functional, stylish space for years to come. Happy building!
What tools will I need to build a basement kitchenette?
You'll need basic tools like a drill, screwdriver, measuring tape, level, saw, and pliers. For plumbing and electrical work, you might need a pipe wrench and wire strippers.
How much space do I need for a kitchenette?
A small kitchenette can fit in as little as 6x6 feet. However, more space allows for additional features like a full-sized fridge or extra counter space.
Do I need a permit to build a basement kitchenette?
Yes, most areas require a permit for plumbing and electrical work. Check with your local building department to ensure you're following all regulations.
What kind of flooring is best for a basement kitchenette?
Water-resistant flooring like vinyl, tile, or sealed concrete works best. Basements can be damp, so avoid materials like hardwood that can warp.
Can I install a dishwasher in my basement kitchenette?
Absolutely! Just make sure you have the necessary plumbing and electrical hookups. A compact or drawer-style dishwasher can save space.
How do I handle ventilation in a basement kitchenette?
Install a range hood or vent fan to remove cooking odors and moisture. If venting outside isn't possible, consider a recirculating hood with a charcoal filter.
What are some space-saving tips for a basement kitchenette?
Use wall-mounted shelves, compact appliances, and multi-functional furniture. A fold-down table or pull-out pantry can also maximize space.