
Home>Home & Furniture>Garage & Basement>DIY Unfinished Basement Home Gym Ideas
Garage & Basement
DIY Unfinished Basement Home Gym Ideas
Published: August 28, 2024
Transform your unfinished basement into a home gym with these DIY ideas. Maximize space, enhance functionality, and create a motivating workout environment.
(Many of the links in this article redirect to a specific reviewed product. Your purchase of these products through affiliate links helps to generate commission for Twigandthistle.com, at no extra cost. Learn more)
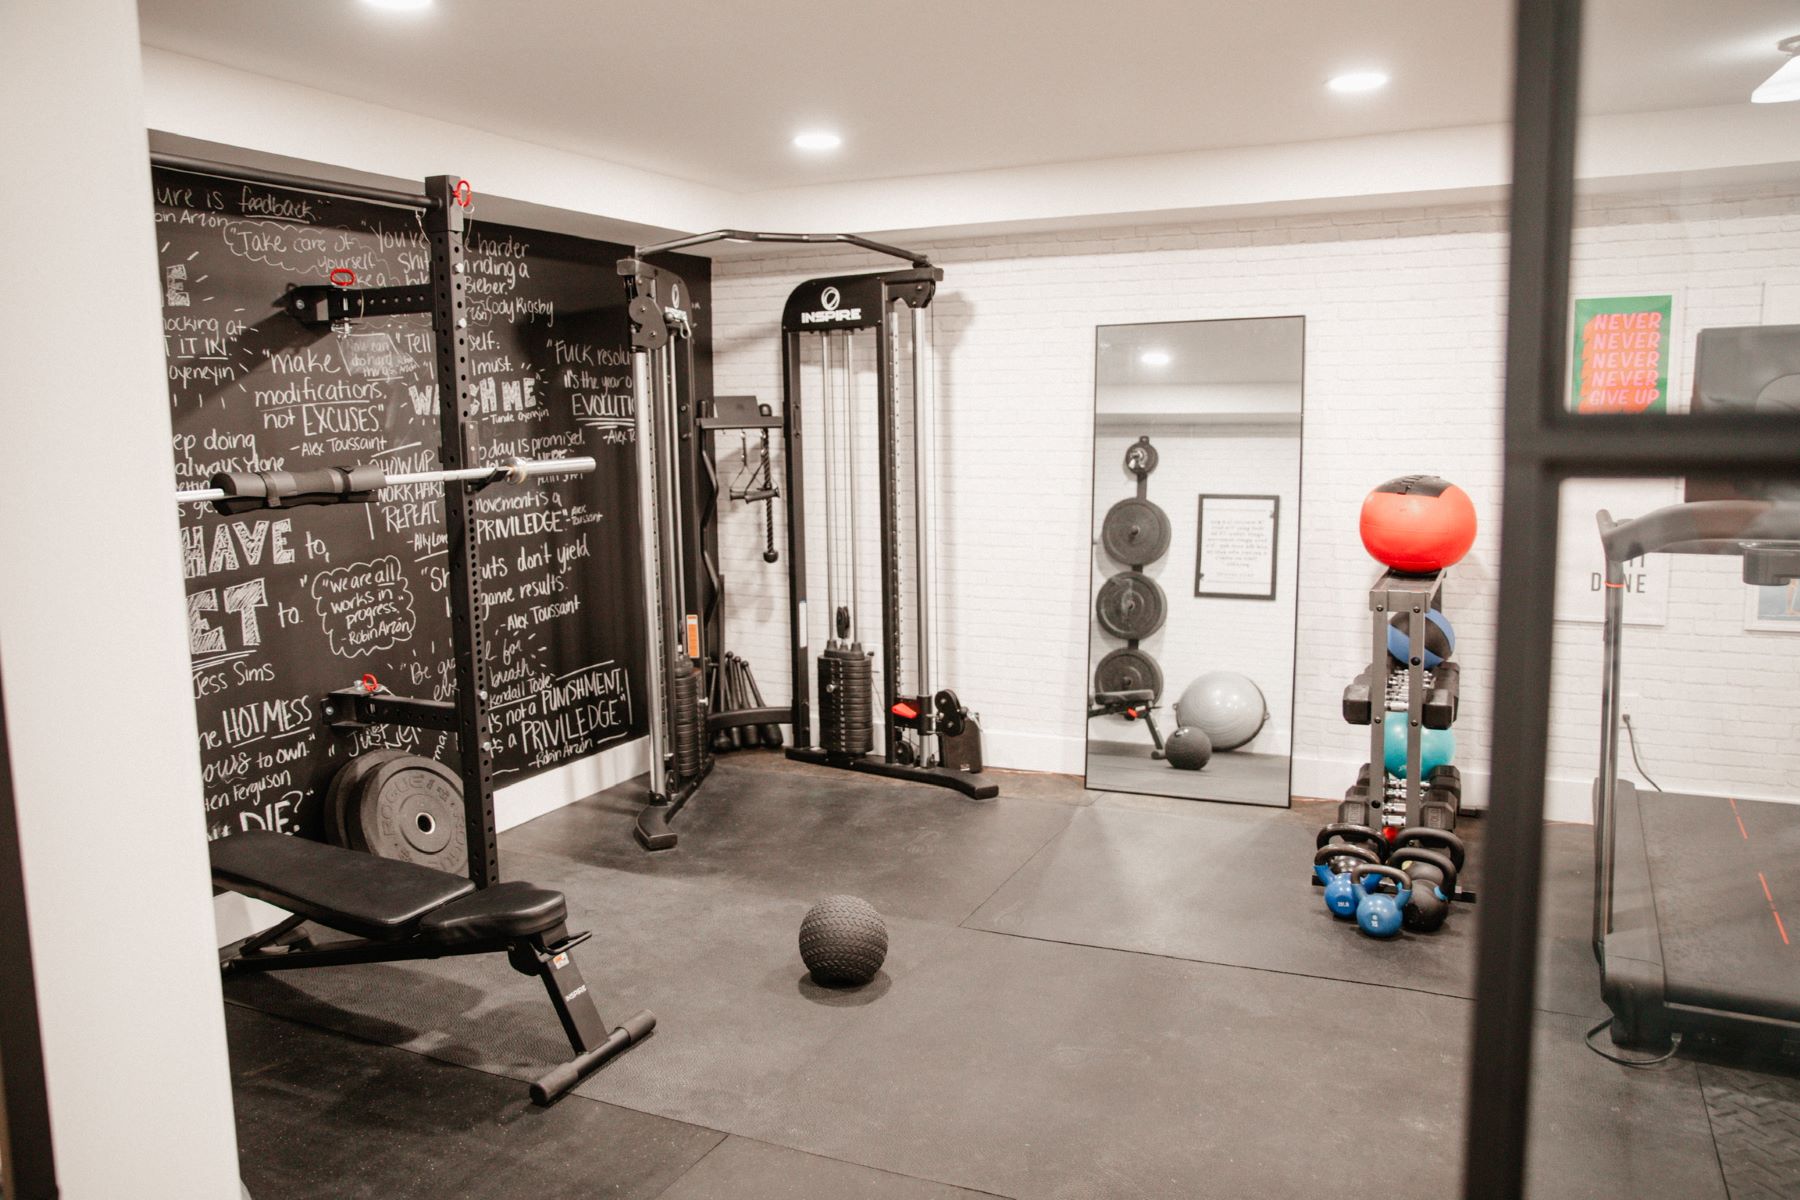
Transforming an unfinished basement into a home gym can be both fun and budget-friendly. You don't need fancy equipment or a complete renovation to create a functional workout space. With a bit of creativity and some basic tools, even a concrete floor and exposed pipes can become a motivating workout zone. This guide will help you make the most of your basement's raw potential, offering tips on flooring, lighting, and essential equipment. Whether you're a fitness newbie or a seasoned athlete, setting up a home gym in your basement can be a rewarding project that boosts both your health and home value.
Getting Ready for Your Home Gym Project
Clear the Space: Remove any clutter, old furniture, or stored items. A clean area helps you visualize the gym layout better.
Inspect for Moisture: Check for any signs of water leaks or dampness. Use a dehumidifier if needed to keep the space dry.
Plan the Layout: Decide where each piece of equipment will go. Measure the space to ensure everything fits comfortably.
Improve Lighting: Basements can be dark. Add bright LED lights to make the area inviting and safe.
Install Flooring: Use rubber mats or foam tiles to protect the floor and provide cushioning for workouts.
Check Ventilation: Ensure proper airflow. Install fans or vents if necessary to keep the area cool and fresh.
Gather Tools and Materials: Have all necessary tools like a drill, screws, and measuring tape ready. Gather materials like paint, mirrors, and storage racks.
Safety Gear: Wear gloves, safety glasses, and a dust mask when working. Keep a first aid kit nearby.
Set Up a Workspace: Create a designated area for tools and materials. Keep it organized to avoid accidents.
Test Equipment: Before using, make sure all gym equipment is assembled correctly and securely.
Essential Materials and Tools
- Rubber Flooring: Provides cushioning and protects the floor.
- Foam Mats: Adds extra padding for exercises like yoga or stretching.
- Dumbbells: Essential for strength training.
- Resistance Bands: Great for a variety of exercises and easy to store.
- Jump Rope: Perfect for cardio workouts.
- Pull-Up Bar: Useful for upper body strength exercises.
- Weight Bench: Supports various weightlifting exercises.
- Mirrors: Helps monitor form and technique.
- Storage Racks: Keeps equipment organized.
- Lighting Fixtures: Ensures the space is well-lit.
- Paint: Brightens up the basement and makes it more inviting.
- Fan or Portable AC: Keeps the area cool during workouts.
- Bluetooth Speaker: Adds music for motivation.
- Towels and Cleaning Supplies: Maintains hygiene and cleanliness.
Tools Needed:
- Measuring Tape: Ensures accurate placement of equipment.
- Utility Knife: Cuts rubber flooring and foam mats.
- Screwdriver Set: Assembles equipment like weight benches and storage racks.
- Drill: Installs pull-up bars and other fixtures.
- Level: Ensures everything is even and properly aligned.
- Hammer: Useful for minor adjustments and installations.
- Paintbrushes or Rollers: Applies paint evenly on walls.
- Stud Finder: Locates wall studs for secure mounting of heavy items.
Required Skills and Time Commitment
Skill Level: Intermediate
Time Required: 2-3 weekends
- Cleaning and Decluttering: 4-6 hours
- Flooring Installation: 8-10 hours
- Lighting Setup: 3-4 hours
- Painting Walls: 6-8 hours
- Equipment Assembly: 4-5 hours
Instructions for Building Your Gym
Clear the Space
- Remove any clutter, old furniture, or items stored in the basement.
- Sweep and mop the floor to ensure a clean working area.
Plan the Layout
- Decide where each piece of equipment will go.
- Leave enough space for movement and stretching.
Install Flooring
- Choose durable, non-slip flooring like rubber mats or interlocking foam tiles.
- Lay the flooring across the entire workout area.
Paint the Walls
- Use light, bright colors to make the space feel larger.
- Apply a moisture-resistant primer before painting.
Add Lighting
- Install bright LED lights to ensure good visibility.
- Consider adding mirrors to reflect light and make the space feel bigger.
Set Up Equipment
- Assemble larger equipment like treadmills, weight benches, or squat racks first.
- Place smaller items like dumbbells, resistance bands, and yoga mats in accessible spots.
Install Storage Solutions
- Use wall-mounted racks or shelves to store weights and accessories.
- Consider adding hooks for jump ropes, resistance bands, and towels.
Create a Ventilation System
- Use fans or portable air conditioners to keep the space cool.
- Ensure there is proper airflow to avoid mustiness.
Add Personal Touches
- Hang motivational posters or a whiteboard for tracking workouts.
- Include a sound system for music or workout videos.
Safety Measures
- Install a first aid kit within reach.
- Ensure all equipment is securely fastened and stable.
Helpful Tips and Tricks
Plan Your Layout: Measure your space. Decide where each piece of equipment will go. Keep enough room for movement.
Lighting: Use bright LED lights. They save energy and make the space feel bigger. Avoid dim or yellow lights.
Flooring: Install rubber mats. They protect the floor and reduce noise. Avoid carpet; it traps moisture and smells.
Walls: Paint walls with light colors. It makes the room feel open. Use moisture-resistant paint to prevent mold.
Mirrors: Add large mirrors. They help with form and make the space look larger. Avoid placing mirrors where they can easily break.
Storage: Use wall-mounted racks for weights and accessories. Keeps the floor clear. Avoid clutter; it can cause accidents.
Ventilation: Install a dehumidifier. Keeps the air dry and fresh. Avoid poor ventilation; it leads to mold and bad odors.
Soundproofing: Use acoustic panels. They reduce noise for the rest of the house. Avoid thin walls; they let sound travel.
Equipment: Choose multi-functional machines. Save space and money. Avoid buying too much; it clutters the area.
Safety: Install non-slip mats. Prevents accidents. Avoid slippery surfaces; they are dangerous.
Budget-Friendly Alternatives: Use resistance bands instead of heavy weights. They are cheaper and versatile. Make your own plyo box with sturdy wood. Save money and customize the size.
Common Mistakes to Avoid: Don’t skip planning. It leads to poor use of space. Avoid ignoring ventilation; it causes health issues. Don’t overcrowd the gym; it makes workouts difficult. Avoid cheap flooring; it wears out quickly.
Estimating the Cost
Flooring: Rubber mats or foam tiles are great for gym floors. Rubber mats cost around $2 per square foot. Foam tiles are cheaper at about $1 per square foot.
Lighting: LED shop lights are bright and energy-efficient. Each light costs about $20. You might need 4-6 lights for a basement.
Mirrors: Large wall mirrors help with form. A 4x6-foot mirror costs around $100. You may need 2-3 mirrors.
Weights: Dumbbells and barbells are essential. A basic set of dumbbells costs about $200. A barbell with weight plates can cost around $300.
Bench: A sturdy weight bench is necessary. A good bench costs around $100.
Cardio Equipment: Treadmills or exercise bikes are popular. A basic treadmill costs around $300. An exercise bike costs about $200.
Storage: Shelves or racks keep things organized. A basic storage rack costs around $50.
Budget-Friendly Alternatives:
- Use yoga mats instead of rubber mats. They cost about $10 each.
- Opt for clip-on lights instead of LED shop lights. They cost around $10 each.
- Look for second-hand weights and equipment. Check online marketplaces or garage sales.
- Build a DIY bench using wood and cushions. This can cost around $30.
- Use resistance bands instead of dumbbells. A set costs about $20.
Customizing Your Home Gym
Flooring: Use rubber mats for durability, carpet tiles for comfort, or vinyl planks for a sleek look.
Walls: Paint the walls with bright colors to energize the space, or use mirrors to make the room feel larger. Wood paneling can add warmth, while drywall offers a clean finish.
Lighting: Install LED strip lights for a modern touch, or use track lighting to focus on specific areas. Natural light can be maximized with glass block windows.
Equipment Storage: Build custom shelves from plywood or use metal racks for an industrial feel. Pegboards can keep smaller items organized.
Decor: Add motivational posters or wall decals for inspiration. Use plants to bring life into the space. Corkboards can display workout plans or progress photos.
Ceiling: Leave the ceiling exposed for an industrial look, or cover it with acoustic tiles to reduce noise. Fabric drapes can add a soft touch.
Workout Zones: Create separate areas for cardio, strength training, and stretching. Use different flooring or paint colors to define each zone.
Sound System: Install wireless speakers for flexibility, or use built-in ceiling speakers for a clean look. Soundproofing panels can improve acoustics.
Cooling and Ventilation: Use portable fans or install a ceiling fan for airflow. Dehumidifiers can keep the space comfortable.
Personal Touches: Add a mini fridge for water and snacks, or a towel rack for convenience. Custom artwork can make the space uniquely yours.
Eco-Friendly Gym Ideas
Reclaimed Wood: Use old pallets or barn wood for flooring or wall accents. Sand them down for a smooth finish.
Rubber Flooring: Recycled rubber mats from old tires provide cushioning and durability. They’re perfect for weightlifting areas.
Second-Hand Equipment: Check online marketplaces or local thrift stores for used gym equipment. Often, you can find weights, benches, or cardio machines in good condition.
Eco-Friendly Paint: Choose low-VOC or zero-VOC paints for walls. These paints release fewer harmful chemicals into the air.
Insulation: Use recycled denim or cellulose insulation to keep the basement warm. These materials are made from recycled fabrics and paper.
Natural Lighting: Install energy-efficient LED lights and add mirrors to reflect light, reducing the need for additional fixtures.
DIY Storage: Repurpose old crates or shelves for storing gym equipment. This keeps the space organized without buying new furniture.
Ventilation: Use energy-efficient fans or a small air purifier to keep the air fresh. This is especially important in a basement setting.
Yoga Mats: Opt for mats made from natural rubber or jute. These materials are biodegradable and free from harmful chemicals.
Water Station: Set up a water station with a reusable water bottle and a filter pitcher. This reduces plastic waste from single-use bottles.
Your Basement Gym Awaits
Transforming your unfinished basement into a home gym is totally doable. With some creativity and elbow grease, you can make a space that fits your fitness goals. Start by clearing out clutter and planning the layout. Use rubber mats or carpet tiles for the floor. Mirrors can help with form and make the space feel bigger. Lighting is key, so add some bright lights or LED strips. Don't forget storage solutions for your equipment. Paint the walls a motivating color, and add some decor like posters or plants. Finally, make sure you have a good sound system for your workout tunes. With these tips, your basement gym will be ready in no time. Get started today and enjoy your new workout space!
How can I make my unfinished basement suitable for a home gym?
Start by clearing out clutter and giving the space a good cleaning. Lay down rubber mats or carpet tiles to protect the floor and reduce noise. Install mirrors on the walls to check your form. Add lighting to brighten up the area.
What equipment should I get for a basement gym?
Focus on versatile equipment like dumbbells, resistance bands, and a yoga mat. If you have more space, consider a treadmill, stationary bike, or a weight bench.
How can I deal with the low ceiling in my basement?
Choose compact equipment and avoid machines that require a lot of vertical space. Adjustable dumbbells and resistance bands are great options. You can also do bodyweight exercises like push-ups and squats.
What can I do about the dampness in my basement?
Use a dehumidifier to keep moisture levels down. Make sure to seal any cracks in the walls or floor. Consider installing a sump pump if water is a recurring issue.
How do I make my basement gym more inviting?
Add some colorful posters or motivational quotes on the walls. Use bright lighting and maybe even a small speaker for music. A fan can help keep the air circulating and make the space more comfortable.
Can I install a TV in my basement gym?
Absolutely! Mount a flat-screen TV on the wall to watch workout videos or your favorite shows while exercising. Just make sure to secure the cables to avoid tripping hazards.
How do I ensure my basement gym is safe?
Make sure the area is well-lit and free of tripping hazards. Use non-slip mats and ensure all equipment is properly assembled. Keep a first aid kit nearby just in case.