
Home>Home & Furniture>Garage & Basement>DIY Ideas: Budget-Friendly Small Basement
Garage & Basement
DIY Ideas: Budget-Friendly Small Basement
Published: August 29, 2024
Transform your small basement on a budget with these DIY ideas! Discover cost-effective tips and creative solutions to maximize space and functionality.
(Many of the links in this article redirect to a specific reviewed product. Your purchase of these products through affiliate links helps to generate commission for Twigandthistle.com, at no extra cost. Learn more)
Transforming a small basement into a functional and cozy space doesn't have to break the bank. With a bit of creativity and some DIY skills, you can turn that often-overlooked area into a useful part of your home. Whether you're looking for extra storage, a quiet workspace, or a comfy hangout spot, there are plenty of budget-friendly ideas to explore. Using affordable materials, clever design tricks, and smart planning, your small basement can become a bright and welcoming space. Get ready to roll up your sleeves and start on a fun DIY project that adds value and comfort to your home.
Getting Ready for Your Project
Clear the Space: Remove any clutter, old furniture, or items stored in the basement. This makes it easier to work and ensures nothing gets damaged.
Inspect for Moisture: Check for any signs of dampness or leaks. Fix these issues before starting any renovation to prevent future problems.
Plan Your Layout: Decide how you want to use the space. Sketch a simple floor plan to visualize where everything will go.
Gather Materials: Make a list of all the tools and materials needed. This might include paint, flooring, lighting, and furniture.
Set Up a Workspace: Designate an area for cutting, painting, and assembling. Keep tools organized and within reach.
Ensure Proper Ventilation: Basements can get stuffy. Use fans or open windows to keep air circulating while you work.
Wear Safety Gear: Always wear gloves, safety goggles, and a mask when handling tools or chemicals.
Check Electrical Outlets: Ensure all outlets are working and consider adding more if needed. Hire a professional for any electrical work.
Prepare the Walls and Floor: Clean and prep surfaces for painting or installing new flooring. Fill any cracks or holes.
Lighting: Plan for adequate lighting. Basements often lack natural light, so consider adding bright, energy-efficient fixtures.
Gathering Materials and Tools
Materials:
- Paint: Freshens up walls and ceilings. Choose light colors to make the space feel bigger.
- Drywall: Covers unfinished walls. Provides a smooth surface for painting.
- Insulation: Keeps the basement warm. Reduces noise from upstairs.
- Flooring: Options like vinyl, carpet tiles, or laminate. Easy to install and budget-friendly.
- Lighting Fixtures: Brightens up the space. Use LED lights for energy efficiency.
- Furniture: Multi-functional pieces like fold-out couches or storage ottomans. Saves space and adds utility.
- Storage Solutions: Shelves, bins, and cabinets. Keeps the area organized.
- Decor: Rugs, curtains, and wall art. Adds personality and comfort.
Tools:
- Paintbrushes and Rollers: For applying paint evenly on walls and ceilings.
- Utility Knife: Cuts drywall and insulation to size.
- Tape Measure: Ensures accurate measurements for materials.
- Screwdriver and Screws: Secures drywall and fixtures.
- Hammer and Nails: Basic tool for various tasks.
- Level: Ensures surfaces are even and straight.
- Power Drill: Speeds up the process of installing screws.
- Saw: Cuts wood or other materials for custom projects.
- Stud Finder: Locates studs behind walls for secure mounting.
- Safety Gear: Gloves, goggles, and masks. Protects you while working.
Skill Level and Time Needed
Skill Level: Intermediate
Time Required: 2-3 weekends
- Planning and Design: 4-6 hours
- Cleaning and Prepping: 6-8 hours
- Painting Walls and Ceiling: 8-10 hours
- Installing Flooring: 10-12 hours
- Adding Furniture and Decor: 4-6 hours
Instructions to Follow Step-by-Step
Clean and Declutter
- Remove all items from the basement.
- Sweep and mop the floors.
- Wipe down walls and surfaces.
Inspect for Issues
- Check for leaks or moisture.
- Look for cracks in walls or floors.
- Address any mold or mildew.
Plan Your Layout
- Measure the space.
- Decide on the purpose (e.g., storage, living area, gym).
- Sketch a simple floor plan.
Paint the Walls
- Choose light colors to brighten the space.
- Use mold-resistant paint.
- Apply primer before painting.
Install Flooring
- Select budget-friendly options like vinyl or laminate.
- Lay down a moisture barrier if needed.
- Install the flooring according to manufacturer instructions.
Add Lighting
- Use LED bulbs for energy efficiency.
- Install ceiling lights or wall sconces.
- Consider adding floor lamps for extra light.
Furnish the Space
- Use multipurpose furniture to save space.
- Add shelves for storage.
- Place rugs to make the area cozy.
Decorate
- Hang artwork or photos.
- Add plants for a touch of greenery.
- Use mirrors to make the space feel larger.
Organize
- Use bins and baskets for storage.
- Label everything for easy access.
- Keep frequently used items within reach.
Final Touches
- Add curtains or blinds to any windows.
- Place a dehumidifier to control moisture.
- Ensure the space is well-ventilated.
Helpful Tips and Tricks
Maximize vertical space by installing shelves or wall-mounted storage. This keeps the floor clear and makes the room feel larger.
Use light colors on walls and ceilings. Light shades reflect more light, making the basement appear brighter and more spacious.
Install mirrors to create an illusion of more space. Place them strategically to reflect light and open up the room.
Opt for multi-functional furniture like a sofa bed or storage ottoman. These pieces save space and add functionality.
Improve lighting with a mix of overhead lights, floor lamps, and table lamps. Basements often lack natural light, so good lighting is essential.
Seal and insulate walls and floors to keep the basement warm and dry. This prevents mold and makes the space more comfortable.
Use area rugs to define different zones within the basement. Rugs add warmth and can make the space feel cozier.
Repurpose old furniture by giving it a fresh coat of paint or new hardware. This saves money and adds a personal touch.
Common mistakes to avoid:
Ignoring moisture issues can lead to mold and damage. Always address leaks and dampness before starting any project.
Overcrowding the space with too much furniture makes it feel cramped. Stick to essential pieces and keep it simple.
Neglecting proper lighting can make the basement feel dark and uninviting. Invest in good lighting solutions.
Using dark colors on walls and ceilings can make the space feel smaller. Stick to light, neutral tones.
Alternatives for materials or methods:
Instead of drywall, consider using beadboard or paneling for a quicker, easier installation.
Use peel-and-stick tiles as an alternative to traditional flooring. They are budget-friendly and easy to install.
Opt for fabric storage bins instead of bulky wooden cabinets. They are lightweight, versatile, and inexpensive.
Consider vinyl or laminate flooring instead of hardwood. These materials are more resistant to moisture and easier to maintain.
Estimating the Cost
Drywall: $10 per sheet. For a small basement, you might need around 20 sheets, totaling $200.
Insulation: $0.50 per square foot. For a 500 square foot basement, expect to spend about $250.
Paint: $30 per gallon. You might need 3 gallons, costing $90.
Flooring: $2 per square foot for budget-friendly options like vinyl. For 500 square feet, it will be $1,000.
Lighting: Basic fixtures cost around $20 each. If you need 10 fixtures, that's $200.
Electrical Wiring: $100 for basic supplies like wires, outlets, and switches.
Tools: Basic tools like a screwdriver, hammer, and paintbrushes might cost around $50 if you don't already own them.
Budget-Friendly Alternatives:
- Recycled Materials: Look for second-hand drywall or flooring at places like Habitat for Humanity ReStores.
- Paint Samples: Use paint samples or mistinted paint from hardware stores for a cheaper option.
- DIY Lighting: Repurpose old lamps or use string lights for a cozy feel.
Total estimated cost: Around $1,890.
Different Variations and Customizations
Flooring: Use peel-and-stick vinyl tiles for a quick, affordable option. For a warmer feel, consider carpet tiles. If you prefer a rustic look, try laminate flooring that mimics wood.
Walls: Paint walls with light colors to make the space feel larger. Add removable wallpaper for an accent wall. For a cozy vibe, install wood paneling or shiplap.
Lighting: Use LED strip lights under shelves or along baseboards. Install recessed lighting to save headroom. Add a floor lamp with multiple heads for adjustable lighting.
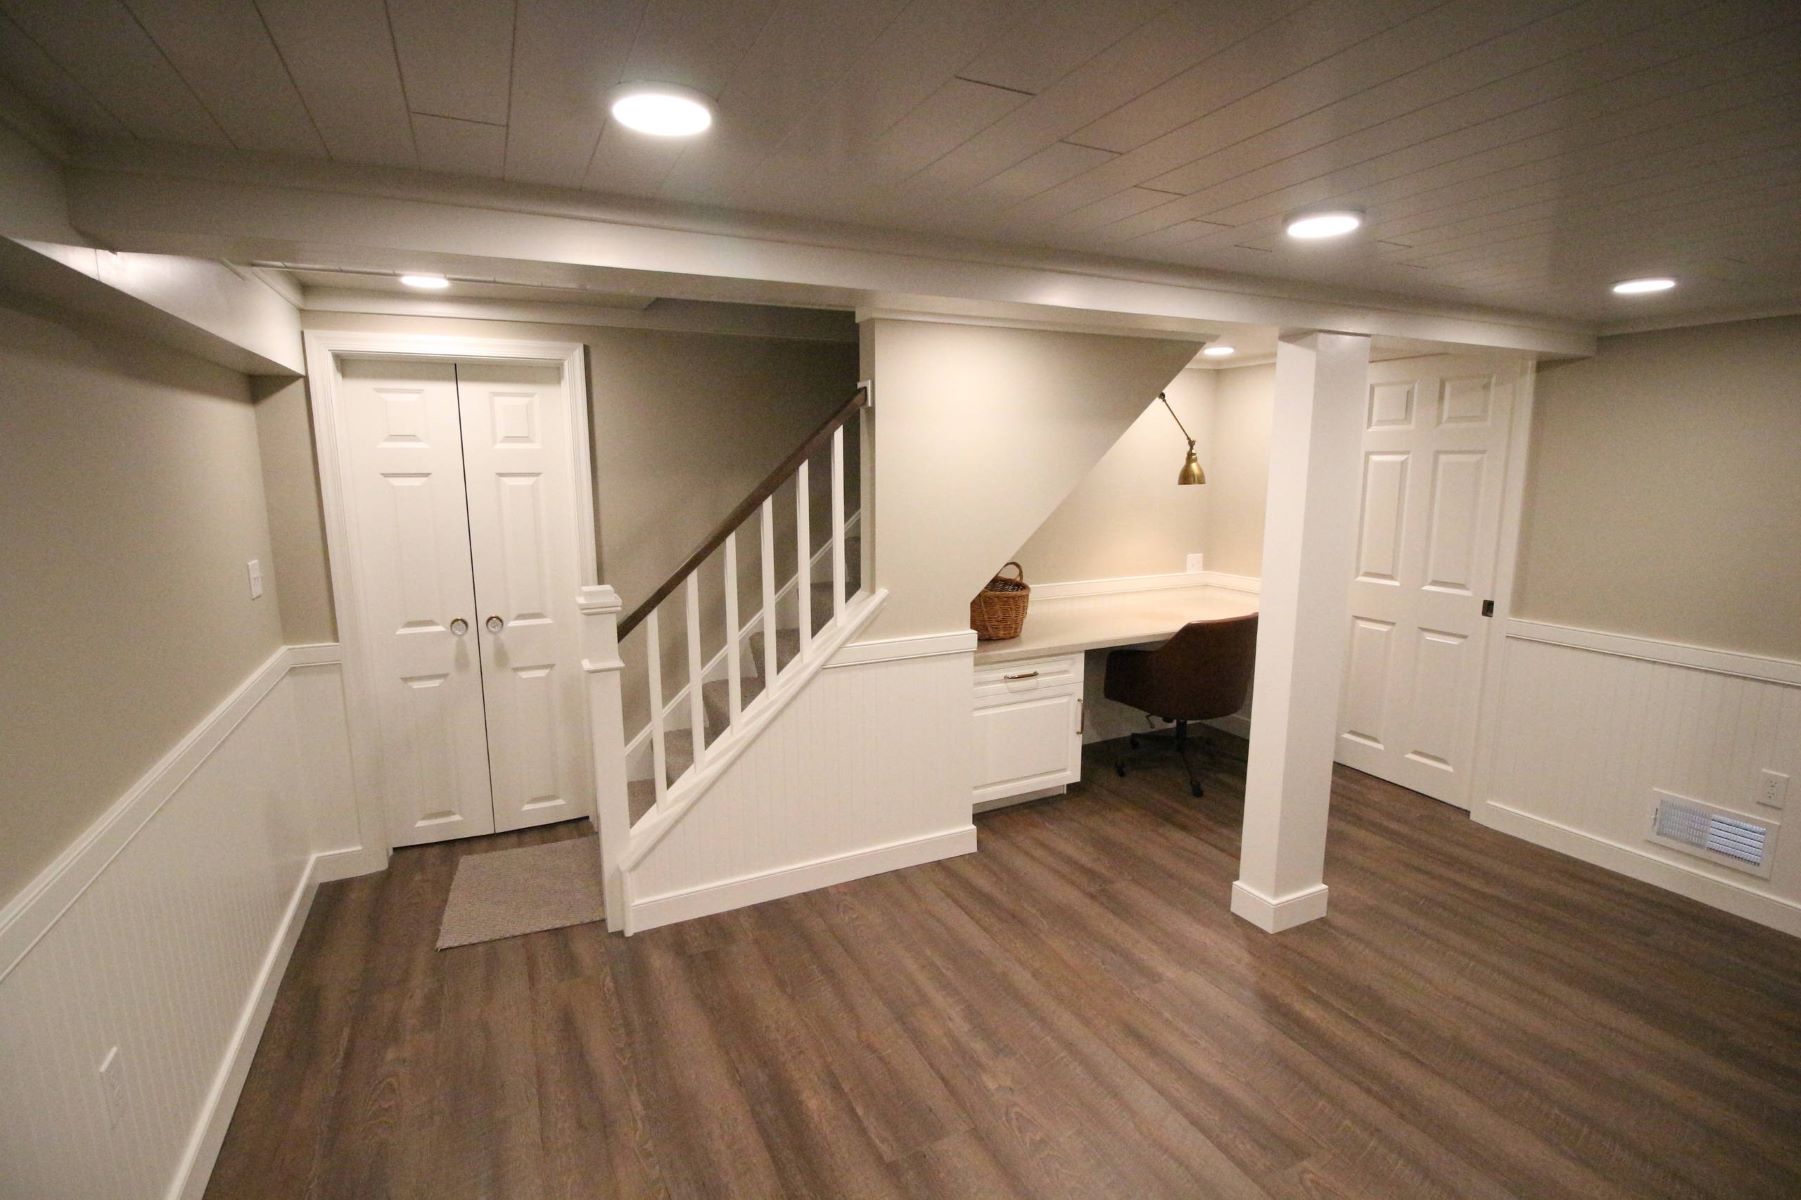
Furniture: Opt for multi-functional furniture like a sofa bed or storage ottoman. Use floating shelves to save floor space. Consider a fold-out desk for a compact workspace.
Storage: Install built-in shelves to maximize vertical space. Use storage bins under stairs or in corners. Hang pegboards for tools or craft supplies.
Decor: Add mirrors to make the room feel bigger. Use area rugs to define different zones. Hang artwork or photos to personalize the space.
Ceiling: Paint the ceiling a bright white to open up the room. Install drop ceiling tiles for easy access to pipes and wires. Add exposed beams for a rustic touch.
Windows: Use sheer curtains to let in natural light. Install window film for privacy without blocking light. Add window seats with storage underneath.
Heating: Use a space heater for targeted warmth. Install baseboard heaters for even heating. Consider heated floor mats for a cozy feel.
Entertainment: Mount a flat-screen TV on the wall to save space. Use a projector for a home theater experience. Add bean bags or floor cushions for casual seating.
Eco-Friendly Tips
Reclaimed Wood: Use old pallets or barn wood for shelves, flooring, or wall accents. Sand and stain them for a fresh look.
Recycled Insulation: Choose insulation made from recycled materials like denim or cellulose. These options are eco-friendly and effective.
Low-VOC Paint: Opt for paints with low volatile organic compounds (VOCs). They are better for indoor air quality and the environment.
Second-Hand Furniture: Thrift stores or online marketplaces often have great deals on gently used furniture. A fresh coat of paint or new upholstery can make them look new.
LED Lighting: Replace old bulbs with energy-efficient LED lights. They use less power and last longer.
Natural Rugs: Choose rugs made from natural fibers like jute, sisal, or wool. They are biodegradable and often more durable.
Eco-Friendly Flooring: Bamboo or cork flooring are sustainable choices. Both materials are renewable and add a unique look to your basement.
Repurposed Storage: Use old crates, baskets, or jars for storage. They add character and reduce waste.
Water-Based Sealants: When sealing floors or walls, use water-based sealants. They are less harmful to the environment and your health.
Solar-Powered Gadgets: If possible, incorporate solar-powered chargers or lights. They reduce electricity usage and are a fun project to install.
Your Basement Awaits
Transforming your basement into a cozy, functional space doesn't have to break the bank. With some creativity and elbow grease, you can turn that underutilized area into a home theater, game room, or even a guest suite. Remember to focus on lighting, storage solutions, and multi-purpose furniture to maximize the space. Don't shy away from DIY projects like building your own shelves or painting the walls. These small touches can make a big difference. So grab your toolbox, roll up your sleeves, and start making your basement the best room in the house. Happy DIY-ing!
How can I make my small basement feel bigger?
Use light colors on walls and floors. Add mirrors to reflect light and create an illusion of space. Keep furniture minimal and opt for multi-functional pieces.
What are some budget-friendly flooring options for a basement?
Consider vinyl planks, laminate flooring, or painted concrete. These options are affordable, durable, and can handle basement moisture.
How can I improve basement lighting without spending a lot?
Use LED strip lights, floor lamps, and string lights. These are inexpensive and can brighten up dark corners.
What’s a cheap way to insulate my basement?
Use foam board insulation or spray foam. Both are cost-effective and can help keep your basement warm.
How can I prevent my basement from feeling damp?
Invest in a dehumidifier. Also, seal any cracks in walls and floors, and ensure proper ventilation.
What are some easy DIY storage solutions for a small basement?
Install shelves on walls, use stackable bins, and repurpose old furniture for storage. Pegboards can also help organize tools and small items.
Can I create a cozy seating area in my basement on a budget?
Use second-hand furniture, add throw pillows, and lay down a rug. String lights or a small lamp can add a warm touch.