
Home>Home & Furniture>Garage & Basement>DIY Basement Wall Bracing Guide
Garage & Basement
DIY Basement Wall Bracing Guide
Published: August 29, 2024
Learn how to brace your basement walls with our comprehensive DIY guide. Step-by-step instructions, essential tools, and expert tips for a sturdy, safe foundation.
(Many of the links in this article redirect to a specific reviewed product. Your purchase of these products through affiliate links helps to generate commission for Twigandthistle.com, at no extra cost. Learn more)
Are your basement walls starting to bow or crack? If so, you might need to brace them to prevent further damage. Bracing basement walls may sound like a tough job, but with the right tools and guidance, it can be a manageable DIY project. This guide will walk you through the basics of wall bracing, helping secure your home’s foundation. You'll learn about the materials needed, steps for installation, and safety tips to ensure the job gets done right. Get ready to roll up your sleeves and give your basement the support it needs!
Getting Ready for the Project
Inspect the Walls: Check for cracks, bulges, or water damage. Use a level to see if walls are leaning.
Gather Tools and Materials: You'll need a level, measuring tape, concrete screws, steel braces, drill, safety goggles, gloves, and dust mask.
Clear the Area: Move furniture, boxes, and other items away from the walls. Ensure you have enough space to work comfortably.
Mark the Bracing Spots: Use a pencil and measuring tape to mark where each brace will go. Typically, braces should be placed every 4-6 feet.
Drill Pilot Holes: Put on safety goggles and a dust mask. Drill pilot holes where you marked for the braces. This makes it easier to insert screws later.
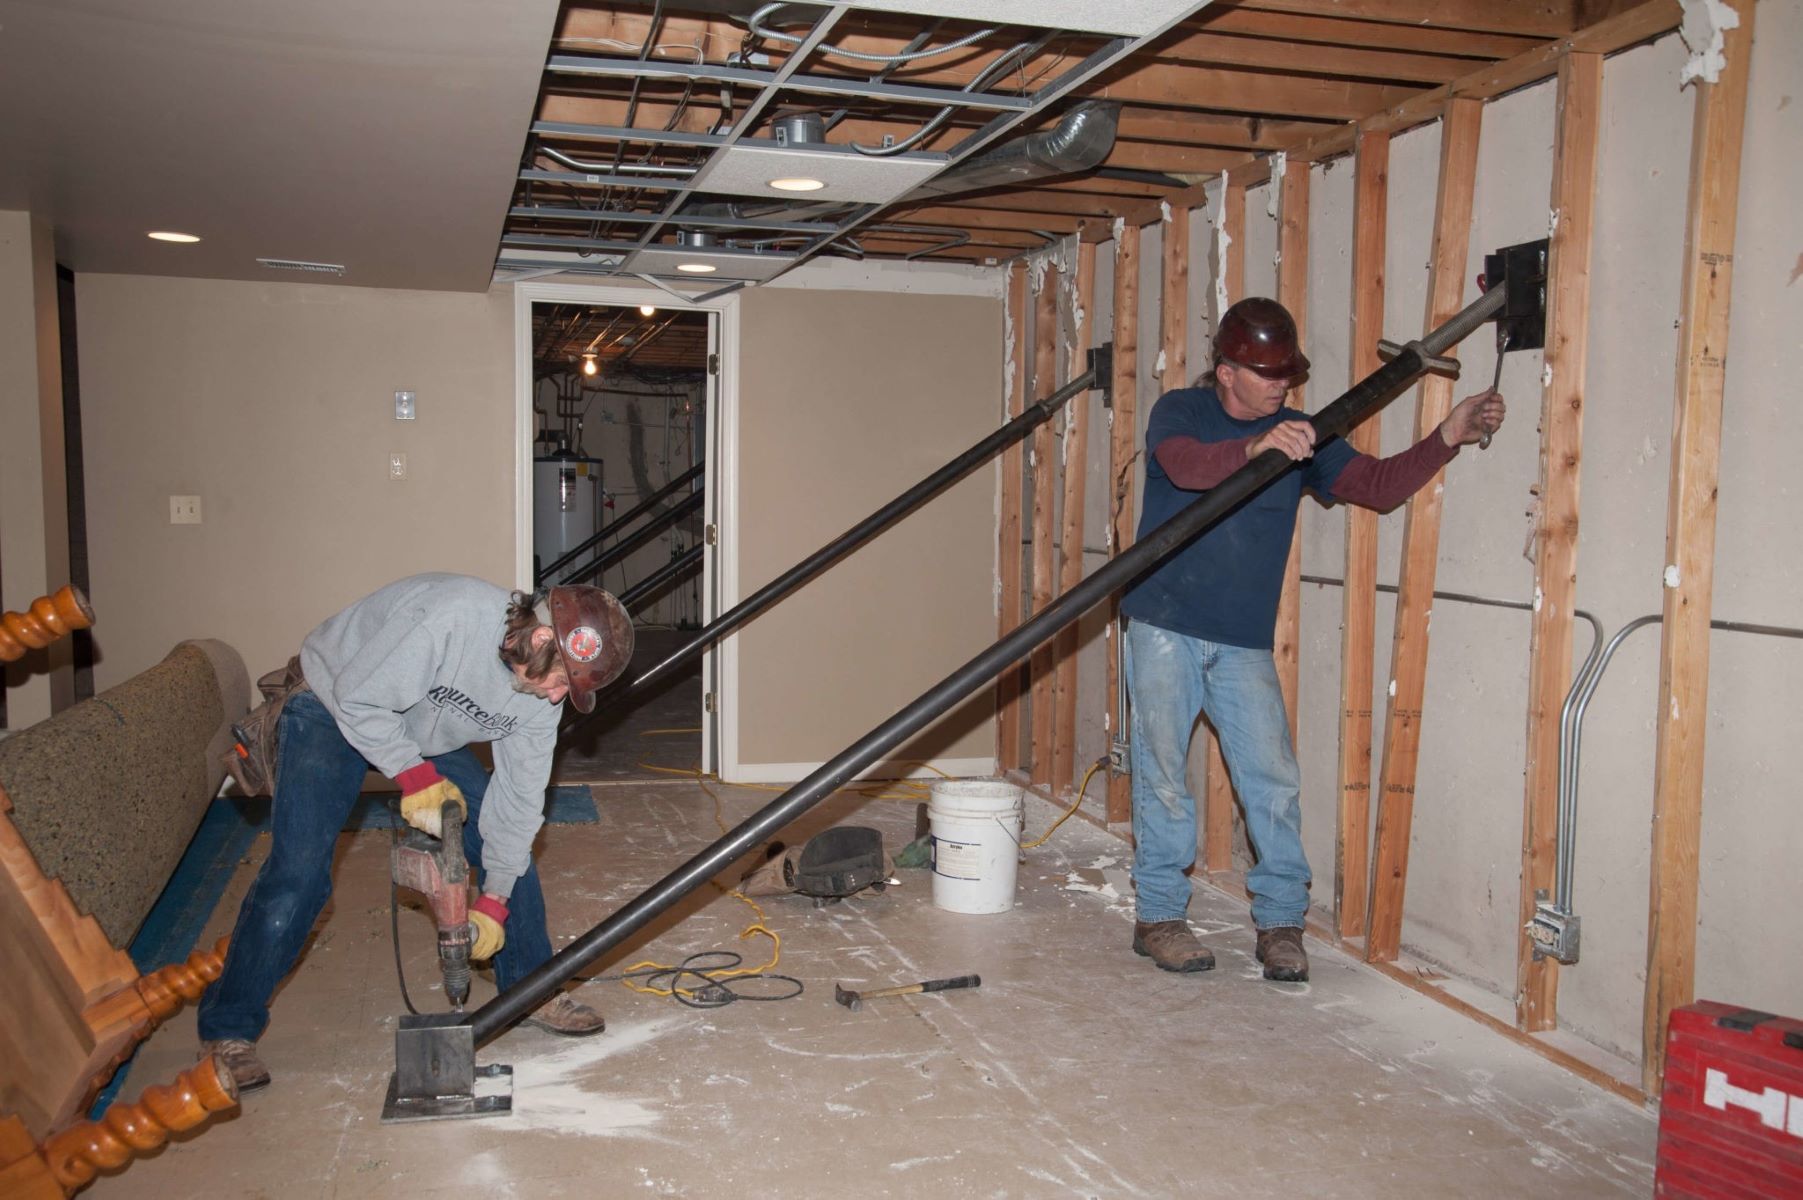
Install the Braces: Position each steel brace against the wall. Secure them with concrete screws, ensuring they are level.
Check for Stability: Once all braces are installed, double-check that they are secure and the wall is stable.
Clean Up: Remove any debris and put tools away. Make sure the area is safe and clear.
Safety Tips:
- Always wear safety goggles and gloves.
- Use a dust mask when drilling into concrete.
- Ensure the workspace is well-lit to avoid accidents.
What You Will Need
- Concrete Blocks: Used to provide additional support to the basement walls.
- Steel Beams: Essential for reinforcing the walls and preventing further movement.
- Epoxy Resin: Helps bond the steel beams to the concrete walls.
- Hydraulic Jack: Used to lift and position the steel beams accurately.
- Drill: Necessary for creating holes in the walls to insert the steel beams.
- Anchor Bolts: Secure the steel beams to the concrete floor and ceiling.
- Measuring Tape: Ensures precise measurements for accurate placement of materials.
- Level: Ensures the steel beams are installed straight and even.
- Safety Goggles: Protects eyes from debris while drilling and working with concrete.
- Work Gloves: Protects hands from sharp edges and rough materials.
- Dust Mask: Prevents inhalation of dust and particles during drilling and cutting.
- Hammer: Useful for driving in anchor bolts and other fasteners.
- Wrench Set: Tightens the anchor bolts and other hardware securely.
- Utility Knife: Cuts through packaging, tape, and other materials.
- Chalk Line: Marks straight lines on the walls for beam placement.
Concrete blocks and steel beams provide the main support. Epoxy resin bonds materials together. A hydraulic jack helps position beams. Drills and anchor bolts secure everything in place. Measuring tape and level ensure accuracy. Safety gear like goggles, gloves, and dust masks protect you. Hammers, wrenches, utility knives, and chalk lines assist in the installation process.
Skills and Time Commitment
Skill Level: Advanced
Estimated Time Required: 2-3 days
Important Keywords:
- Wall Bracing
- Foundation
- Structural Integrity
- Moisture Control
- Safety Precautions
Steps Involved:
- Assess the Wall Condition: 2-3 hours
- Gather Materials and Tools: 1-2 hours
- Prepare the Work Area: 1-2 hours
- Install Braces: 1-2 days
- Inspect and Test: 2-3 hours
How to Brace Basement Walls
Assess the Wall:
- Check for cracks, bowing, or water damage.
- Measure the extent of the bowing using a level.
Gather Materials:
- Steel beams or carbon fiber straps
- Concrete mix
- Anchor bolts
- Drill
- Level
- Safety gear (gloves, goggles)
Prepare the Area:
- Clear the basement wall of any obstructions.
- Clean the wall surface to ensure proper adhesion.
Mark Beam Locations:
- Use a level to mark vertical lines where beams will be placed.
- Space beams 4-6 feet apart.
Install Bottom Anchors:
- Drill holes into the basement floor along the marked lines.
- Insert anchor bolts into the holes.
Position Beams:
- Place steel beams or carbon fiber straps against the wall.
- Ensure they are aligned with the marked lines.
Secure Top Anchors:
- Drill holes into the basement ceiling joists.
- Attach top anchor brackets to the beams and secure them to the joists.
Tighten Anchors:
- Use a wrench to tighten the anchor bolts at both the top and bottom.
- Ensure beams are snug against the wall.
Check Alignment:
- Use a level to confirm beams are straight.
- Adjust if necessary.
Seal and Finish:
- Mix concrete and fill any gaps around the bottom anchors.
- Allow concrete to cure as per instructions.
- Paint or cover beams to match the basement decor.
Monitor Wall:
- Regularly check the wall for any new signs of movement.
- Tighten anchors if needed.
Helpful Tips and Tricks
Measure Twice, Cut Once: Always double-check measurements before cutting materials. This saves time and reduces waste.
Use a Level: Ensure braces are perfectly vertical. A slight tilt can compromise stability.
Pre-drill Holes: Prevent wood from splitting by pre-drilling holes for screws or nails.
Choose Treated Lumber: Use pressure-treated wood to resist moisture and prevent rot.
Anchor Securely: Attach braces to both the floor and ceiling joists for maximum stability.
Wear Safety Gear: Always wear gloves, safety glasses, and a dust mask when cutting or drilling.
Common Mistakes to Avoid:
- Skipping Permits: Some areas require permits for structural changes. Check local regulations.
- Ignoring Water Issues: Address any water leaks or moisture problems before bracing walls.
- Using Incorrect Fasteners: Use screws or nails appropriate for the materials being joined.
- Overlooking Insulation: Insulate walls before bracing to improve energy efficiency.
Material Alternatives:
- Metal Braces: Use metal braces instead of wood for added strength and durability.
- Epoxy Anchors: For securing braces to concrete, epoxy anchors provide a strong bond.
- Composite Lumber: Consider composite lumber for a moisture-resistant, eco-friendly option.
Budgeting for the Project
Materials:
- Steel Beams: $50 each. You might need 4-6 beams, so $200-$300.
- Concrete: $5 per bag. Around 10 bags, so $50.
- Epoxy Resin: $30 per gallon. One gallon should be enough.
- Anchor Bolts: $1 each. About 20 bolts, so $20.
- Pressure-treated Wood: $15 per piece. Around 10 pieces, so $150.
Tools:
- Drill: $50 if you don't already have one.
- Hammer: $10.
- Level: $15.
- Measuring Tape: $10.
- Safety Gear: $20 for gloves, goggles, and mask.
Total Cost: Roughly $555-$655.
Budget-Friendly Alternatives:
- Reclaimed Wood: Use old wood instead of buying new. Could save $50-$100.
- Borrow Tools: Ask friends or family to lend tools. Could save $100.
- Discount Stores: Check for sales or second-hand stores for materials. Could save $50-$75.
Different Approaches and Customizations
Materials: Instead of using standard steel braces, consider carbon fiber straps. They are strong, lightweight, and easier to install. Wooden beams can also be used for a more rustic look, though they may not be as durable.
Colors: Paint the braces to match your basement's color scheme. Use metallic paints for a modern look or earth tones for a cozier feel. You can even use chalkboard paint on the braces to create a fun, writable surface.
Styles: For a more industrial style, leave the braces exposed and use raw steel. If you prefer a cleaner look, cover the braces with drywall or wood paneling. Add decorative trim to the edges for a polished finish.
Alternative Bracing Methods: Instead of traditional braces, use adjustable jacks. These can be easily adjusted over time if the wall shifts. Helical piers are another option, providing strong support by anchoring deep into the ground.
Decorative Elements: Add shelves or hooks to the braces for extra storage. Attach LED strip lights to the braces for ambient lighting. You can also hang artwork or mirrors on the braces to make the space feel larger and more inviting.
Eco-Friendly Tips
Reclaimed Wood: Use old wood from barns or pallets. It’s strong and gives a rustic look.
Recycled Steel: Steel from old buildings or cars can be repurposed. It’s durable and eco-friendly.
Natural Insulation: Use materials like cork or wool. They insulate well and are biodegradable.
Low-VOC Paint: Choose paints with low volatile organic compounds. They’re better for your health and the environment.
Eco-Friendly Adhesives: Opt for water-based or plant-based glues. They have fewer harmful chemicals.
Recycled Plastic: Some braces can be made from recycled plastic. It’s sturdy and reduces waste.
Energy-Efficient Tools: Use tools that consume less power. Battery-operated tools with rechargeable batteries are a good choice.
Local Materials: Buy materials from local suppliers. This reduces transportation emissions and supports local businesses.
Reused Fasteners: Screws, nails, and bolts can often be reused. Clean them up and they’re as good as new.
Natural Sealants: Use sealants made from natural ingredients like beeswax or linseed oil. They’re effective and non-toxic.
Your Basement's New Backbone
Bracing your basement walls isn't just about stability; it's about peace of mind. By following these steps, you've taken a big leap toward a safer, more secure home. Remember, preparation is key. Measure twice, cut once, and don't rush the process. Using the right materials and tools ensures your work stands the test of time. If you hit a snag, don't hesitate to seek advice or consult a professional. Your basement is now ready to handle whatever comes its way, from heavy rains to shifting soil. Enjoy the confidence that comes with knowing your foundation is solid. Happy DIY-ing!
What tools do I need for basement wall bracing?
You’ll need concrete anchors, a drill, steel braces, a level, measuring tape, and safety gear like gloves and goggles.
How do I know if my basement walls need bracing?
Look for cracks, bowing, or water leaks. If you see any of these signs, your walls might need bracing.
Can I brace basement walls by myself?
Yes, but it’s a big job. Make sure you’re comfortable using power tools and lifting heavy materials. If not, consider hiring a pro.
How long does it take to brace basement walls?
It usually takes a weekend if you’re doing it yourself. Professionals might finish faster, depending on the size of your basement.
How much does it cost to brace basement walls?
DIY costs can range from $500 to $1,500 for materials. Hiring a professional can cost $3,000 to $5,000 or more.
Will bracing fix all my basement wall problems?
Bracing helps with structural issues but won’t fix waterproofing problems. You might need additional solutions for leaks.
Do I need a permit to brace my basement walls?
Check with your local building authority. Some areas require permits for structural work, while others don’t.