
Home>Home & Furniture>Garage & Basement>DIY Basement Playground Guide
Garage & Basement
DIY Basement Playground Guide
Published: August 30, 2024
Transform your basement into a fun and safe playground with our DIY guide. Discover tips, materials, and step-by-step instructions for creating the ultimate indoor play area.
(Many of the links in this article redirect to a specific reviewed product. Your purchase of these products through affiliate links helps to generate commission for Twigandthistle.com, at no extra cost. Learn more)
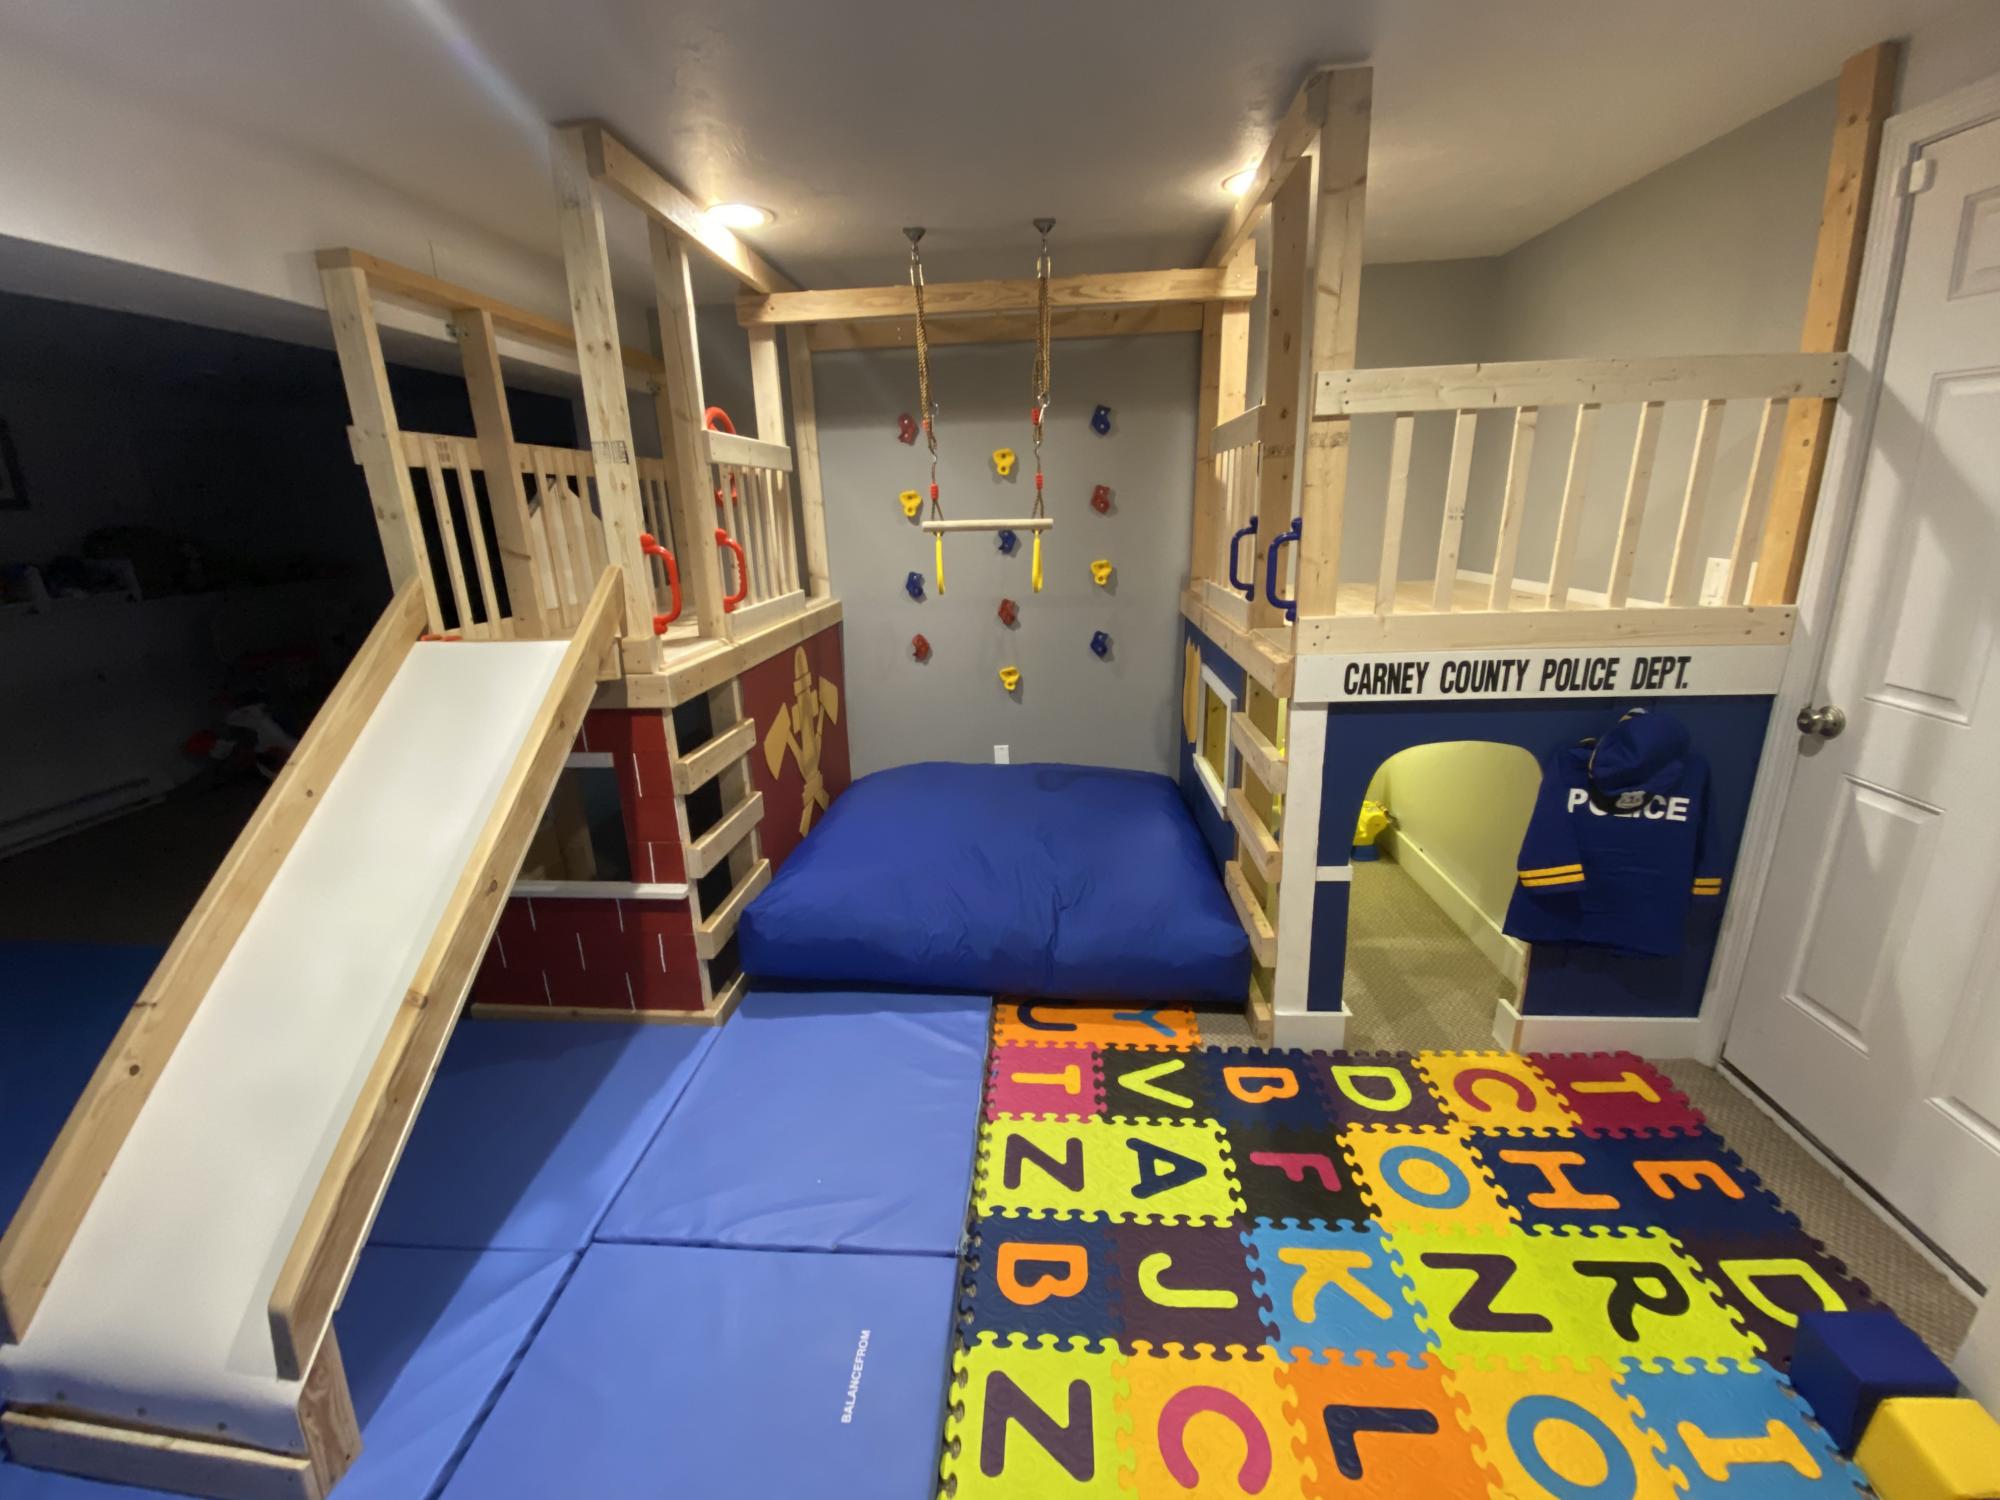
Transforming your basement into a fun playground can provide kids with a safe place to play all year round. With some planning and a bit of effort, you can create a space filled with exciting adventures. From climbing walls to mini basketball courts, it’s possible to construct a variety of activities that keep children engaged. This guide will show basic steps and creative ideas to build a basement playground tailored to your family's needs. Whether you’re handy with tools or just getting started, every family can make a fantastic play area that everyone will love.
Getting Ready for Your Project
Clear the Space: Remove any clutter, furniture, or items that could get in the way. A clean area helps you see what you’re working with.
Inspect for Safety: Check for any leaks, mold, or structural issues. Fix these problems before starting your project to ensure a safe environment.
Plan the Layout: Decide where each play area will go. Sketch a simple floor plan to visualize the setup.
Gather Materials: Make a list of all the materials and tools you’ll need. This might include foam mats, paint, play equipment, and safety gear.
Set Up a Workspace: Designate a spot for cutting, painting, and assembling. Keep tools organized and within reach.
Install Proper Lighting: Ensure the basement has adequate lighting. Bright lights make the space more inviting and safer.
Ventilation: Make sure the area is well-ventilated. Use fans or dehumidifiers to keep the air fresh and dry.
Safety Gear: Wear gloves, goggles, and a mask when working with tools or chemicals. Safety first!
Childproofing: Install safety gates, cover sharp edges, and secure heavy items to the walls. Make the space as safe as possible for kids.
Test Equipment: Before letting kids play, test all equipment to ensure it’s secure and stable. Double-check everything to avoid accidents.
Gathering Materials and Tools
Materials:
- Foam Mats: Soft flooring to cushion falls and provide a safe play area.
- Plywood Sheets: Used for building structures like playhouses or climbing walls.
- Paint: Adds color and fun designs to the playground.
- Rope: Essential for swings, climbing nets, or rope ladders.
- PVC Pipes: Useful for constructing tunnels or frames for various play equipment.
- Bolts and Screws: Securely fasten different components together.
- Sandpaper: Smooths rough edges on wood or other materials.
- Safety Padding: Extra protection for sharp corners or hard surfaces.
- Netting: Prevents falls from elevated play areas.
- Wooden Planks: Build platforms, bridges, or other structures.
Tools:
- Drill: Makes holes for screws and bolts.
- Saw: Cuts wood or PVC pipes to the required size.
- Measuring Tape: Ensures accurate measurements for all components.
- Hammer: Drives nails into wood or other materials.
- Screwdriver: Tightens screws and bolts.
- Level: Ensures structures are even and stable.
- Wrench: Tightens bolts and nuts.
- Paintbrushes: Applies paint to surfaces.
- Utility Knife: Cuts foam mats or other soft materials.
- Safety Goggles: Protects eyes while cutting or drilling.
Foam mats provide a soft surface to prevent injuries. Plywood sheets and wooden planks create sturdy structures. Paint adds a fun touch, while rope and netting offer climbing and swinging options. PVC pipes can form tunnels or frames. Bolts, screws, and a drill ensure everything stays together. Sandpaper smooths rough edges, and safety padding adds extra protection. A saw, measuring tape, hammer, screwdriver, level, wrench, paintbrushes, utility knife, and safety goggles complete the toolkit for building a safe and fun basement playground.
Skill Level and Time Required
Skill Level: Intermediate
Estimated Time Required: 2-3 weekends
- Planning and Design: 4-6 hours
- Clearing and Cleaning: 3-5 hours
- Flooring Installation: 6-8 hours
- Building Structures (e.g., slides, climbing walls): 10-12 hours
- Painting and Decorating: 4-6 hours
- Safety Checks and Final Touches: 2-3 hours
Step-by-Step Instructions
Plan Your Space
- Measure the basement area.
- Sketch a layout including play zones.
Clear the Area
- Remove any clutter.
- Clean floors and walls.
Install Flooring
- Choose soft, safe flooring like foam mats or carpet.
- Lay down the flooring, ensuring it covers the entire play area.
Paint the Walls
- Pick bright, fun colors.
- Use non-toxic, washable paint.
Set Up Play Zones
- Reading Corner: Add a bookshelf, bean bags, and good lighting.
- Art Station: Place a small table, chairs, and art supplies.
- Active Play Area: Install a mini slide, climbing wall, or swing.
Add Storage
- Use bins, shelves, or cubbies for toys and games.
- Label storage for easy organization.
Ensure Safety
- Cover outlets with safety plugs.
- Secure heavy furniture to walls.
- Use corner protectors on sharp edges.
Decorate
- Hang fun posters or decals.
- Add colorful rugs and cushions.
Lighting
- Install bright, child-friendly lights.
- Ensure all areas are well-lit.
Final Touches
- Add a music player for fun tunes.
- Include a small table for snacks and drinks.
Helpful Tips and Tricks
Plan the Layout: Sketch a simple floor plan. Include areas for different activities like a playhouse, slide, or reading nook. This helps you visualize the space and avoid overcrowding.
Use Soft Flooring: Install foam tiles or rubber mats. These materials cushion falls and are easy to clean. Avoid hard surfaces like concrete or tile.
Brighten the Space: Basements can be dark. Use bright, colorful paint on the walls. Add plenty of lighting with LED fixtures or string lights.
Safety First: Secure heavy furniture to walls. Cover sharp corners with padding. Ensure all electrical outlets are childproofed.
Incorporate Storage: Use bins, shelves, or cubbies to keep toys organized. Label each container to make cleanup easier for kids.
Create Zones: Designate specific areas for different activities. For example, a reading corner with bean bags and bookshelves, or an art station with a small table and supplies.
Ventilation: Basements can be stuffy. Use a dehumidifier to keep the air fresh and prevent mold.
Common Mistakes to Avoid:
- Ignoring Moisture Issues: Always check for leaks or dampness before starting. Use a moisture barrier if needed.
- Overloading the Space: Too many toys or furniture can make the area feel cramped. Keep it simple.
- Neglecting Safety: Don’t skip securing furniture or covering outlets. Safety should be a priority.
Material Alternatives:
- Instead of foam tiles, consider carpet squares for a softer feel.
- Use washable paint for easy cleaning instead of regular paint.
- For storage, repurpose old furniture like dressers or bookshelves instead of buying new items.
Estimating the Cost
Materials:
- Foam Flooring: $100-$200
- Paint: $30-$50
- Drywall: $10 per sheet (estimate 10 sheets) = $100
- Lumber: $50-$100
- Swingset: $150-$300
- Climbing Wall: $100-$200
- Slide: $100-$200
- Lighting: $50-$100
Tools:
- Drill: $50-$100
- Saw: $30-$60
- Paintbrushes/Rollers: $10-$20
- Screws/Nails: $10-$20
- Measuring Tape: $5-$10
- Level: $10-$20
Total Cost: $795-$1,480
Budget-Friendly Alternatives:
- Foam Flooring: Use carpet remnants ($50-$100)
- Paint: Opt for discounted paint or leftover paint from other projects ($10-$20)
- Swingset: Build a simple wooden swing ($50-$100)
- Climbing Wall: Use plywood and handholds from old furniture ($50-$100)
- Slide: Look for second-hand slides ($50-$100)
- Lighting: Use LED string lights ($20-$40)
Total Cost with Alternatives: $495-$1,020
Creative Variations and Customizations
Flooring: Use foam mats for a soft surface or carpet tiles for a cozy feel. Vinyl flooring can be a durable, easy-to-clean option.
Walls: Paint with bright colors like yellow or blue to make the space cheerful. Add chalkboard paint on one wall for drawing. Use wall decals of animals, trees, or space themes.
Climbing Wall: Install a rock climbing wall with colorful holds. For a different challenge, create a rope climbing area or a cargo net.
Swing: Hang a swing from the ceiling using sturdy hardware. Try a hammock chair for a cozy reading nook.
Slide: Build a wooden slide or use a plastic one from a playground set. Add a ball pit at the bottom for extra fun.
Lighting: Use string lights for a magical feel. Install LED strip lights that change colors. Add floor lamps with fun shapes like stars or animals.
Storage: Create built-in shelves for toys and books. Use colorful bins or baskets for easy organization. Add a toy chest with a cushioned top for seating.
Art Area: Set up a small table with art supplies like crayons, markers, and paper. Hang a corkboard or magnetic board for displaying artwork.
Reading Nook: Use bean bags or floor cushions for a comfy spot. Add a canopy or tent for a cozy hideaway. Include a bookshelf with a variety of books.
Obstacle Course: Design a mini obstacle course with balance beams, tunnels, and stepping stones. Use pool noodles and hula hoops for creative challenges.
Themes: Choose a theme like jungle, underwater, or space. Decorate with themed decals, pillows, and toys. Change the theme periodically to keep it exciting.
Eco-Friendly Tips
Reclaimed wood can be used for building structures like playhouses or climbing walls. It’s sturdy and gives a rustic look. Old tires can be repurposed into swings or obstacle courses. They are durable and provide a fun, bouncy element.
Recycled rubber flooring is perfect for cushioning falls. It’s made from old tires and provides a safe, non-slip surface. Cardboard boxes can be transformed into tunnels or forts. They are easy to replace and can be decorated with eco-friendly paint.
Natural fabrics like cotton or hemp can be used for curtains, cushions, or play mats. They are soft, breathable, and biodegradable. Pallets can be turned into seating areas or platforms. They are versatile and often available for free.
Non-toxic paints and finishes ensure a safe environment for kids. They have fewer chemicals and are better for indoor air quality. Second-hand furniture can be refurbished and used in the play area. It’s cost-effective and reduces waste.
Solar-powered lights can brighten up the space without increasing electricity bills. They are energy-efficient and eco-friendly. Plants can be added to bring a touch of nature indoors. They improve air quality and create a calming atmosphere.
Your Basement Playground Awaits
You've got all the tools and tips needed to create an awesome basement playground. From planning the layout to picking the right materials, every step is covered. Remember, safety first! Double-check those installations and make sure everything's secure. Don't forget to add some personal touches to make the space uniquely yours. Whether it's a climbing wall, a reading nook, or a mini basketball court, the possibilities are endless. Now, roll up your sleeves and get to work. Your dream playground is just a few steps away. Enjoy the process, and soon enough, you'll have a fantastic space where fun and creativity can thrive. Happy building!
How do I start planning a basement playground?
First, measure your basement. Then, sketch a layout. Think about zones for different activities like a play area, reading nook, and storage.
What kind of flooring is best for a basement playground?
Rubber mats or foam tiles are great. They’re soft, easy to clean, and provide a safe surface for kids to play on.
How can I make the basement playground safe?
Cover outlets, pad sharp corners, and ensure toys are age-appropriate. Also, install good lighting and a dehumidifier to keep the space dry.
What are some fun activities to include?
Think about a climbing wall, swing, or slide. You can also add a craft table, reading corner, or mini basketball hoop.
How do I keep the basement organized?
Use bins and shelves for toys. Label everything so kids know where things go. Consider a toy rotation system to keep things fresh.
Can I make the playground educational?
Absolutely! Include books, puzzles, and educational games. Create a learning corner with a small desk and supplies for drawing or homework.
What’s a good way to decorate the space?
Use bright colors and fun themes. Think about murals, wall decals, or posters. Make it a place where kids feel happy and excited to play.