
Home>Home & Furniture>Doors & Windows>How to Build a DIY Garage Door Lock
Doors & Windows
How to Build a DIY Garage Door Lock
Published: September 14, 2024
Learn how to build a DIY garage door lock with our step-by-step guide. Enhance your home's security with easy-to-follow instructions and expert tips.
(Many of the links in this article redirect to a specific reviewed product. Your purchase of these products through affiliate links helps to generate commission for Twigandthistle.com, at no extra cost. Learn more)
A secure garage door is crucial for keeping your home safe. Sometimes, standard locks don't offer enough protection, so making your own can be a great solution. This guide will help you build a DIY garage door lock using basic tools and materials found around the house or at a local hardware store. Whether you're a seasoned handyman or a beginner, following these steps can give you peace of mind. Get ready to enhance your home's security with a practical, cost-effective project that you can complete in a short time.
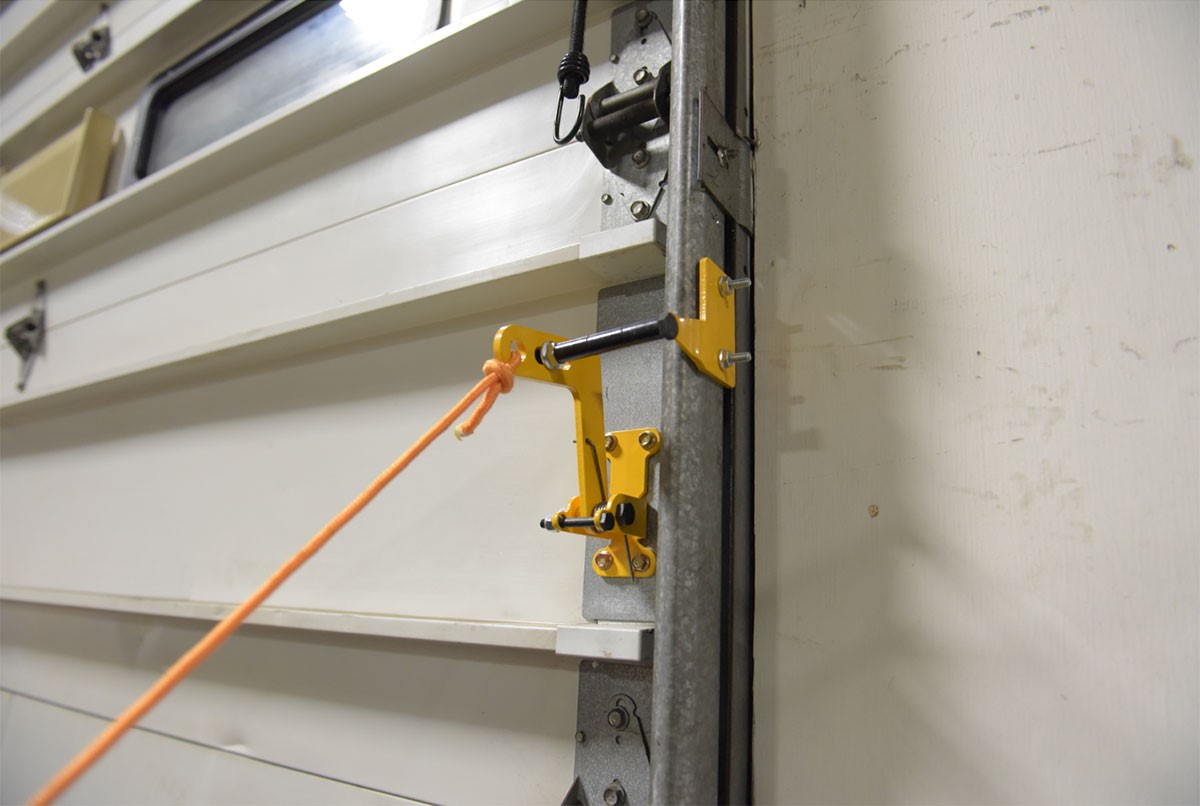
Getting Ready for the Project
Gather Materials: Collect all necessary tools and materials. You will need a drill, screws, metal brackets, padlock, measuring tape, and safety goggles.
Safety First: Wear safety goggles and gloves to protect your eyes and hands. Ensure the workspace is well-lit and free of clutter to avoid accidents.
Measure and Mark: Use a measuring tape to measure where the lock will be installed. Mark these spots with a pencil to ensure accuracy.
Prepare the Door: Clean the area where the lock will be installed. Remove any dirt or debris to ensure the lock fits securely.
Drill Holes: Drill holes at the marked spots. Make sure the holes are the correct size for the screws and brackets.
Install Brackets: Attach the metal brackets to the door using screws. Ensure they are tightly secured and aligned properly.
Attach Padlock: Place the padlock through the brackets. Test the lock to make sure it functions correctly.
Test the Lock: Open and close the garage door several times to ensure the lock does not interfere with its operation. Adjust if necessary.
Clean Up: Remove any tools and debris from the workspace. Store tools safely to prevent accidents.
Gather Your Materials and Tools
- Padlock: A sturdy lock to secure the door.
- Hasp: Metal plate with a loop to attach the padlock.
- Drill: For making holes in the door and wall.
- Drill Bits: Different sizes for various screws.
- Screws: To attach the hasp to the door.
- Screwdriver: For tightening screws.
- Measuring Tape: Ensures accurate placement of the hasp.
- Pencil: Marks where to drill.
- Level: Keeps the hasp straight.
- Safety Glasses: Protects eyes while drilling.
- Work Gloves: Protects hands from sharp edges.
Padlock: Choose a strong, weather-resistant lock. Hasp: Metal plate with a loop for the padlock. Drill: Needed to make holes. Drill Bits: Various sizes for different screws. Screws: Secure the hasp to the door. Screwdriver: Tightens screws. Measuring Tape: Ensures precise placement. Pencil: Marks drilling spots. Level: Keeps everything straight. Safety Glasses: Protects eyes. Work Gloves: Keeps hands safe.
Required Skills and Time Commitment
Skill Level: Intermediate
Time Required: 2-3 hours
- Gather Materials: 15 minutes
- Measure and Mark: 20 minutes
- Drill Holes: 30 minutes
- Install Lock Mechanism: 45 minutes
- Test and Adjust: 30 minutes
Important Keywords: Skill Level, Time Required, Gather Materials, Measure and Mark, Drill Holes, Install Lock Mechanism, Test and Adjust
Detailed Step-by-Step Guide
Gather Materials:
- Padlock
- Metal hasp
- Screws
- Drill
- Screwdriver
- Measuring tape
- Pencil
Measure and Mark:
- Use the measuring tape to find the best spot for the lock on the garage door.
- Mark the spots for the screws with a pencil.
Drill Holes:
- Drill holes where you marked the spots for the screws.
Attach the Hasp:
- Align the hasp with the drilled holes.
- Use the screwdriver to secure the hasp with screws.
Install the Padlock:
- Close the hasp.
- Insert the padlock through the hasp's loop.
- Lock the padlock.
Test the Lock:
- Ensure the garage door is securely locked.
- Check that the padlock and hasp are firmly in place.
Helpful Tips and Tricks
Measure Twice, Cut Once: Always double-check measurements before cutting any materials. This saves time and prevents waste.
Use Quality Materials: Opt for sturdy metal or heavy-duty wood for the lock mechanism. Cheap materials can compromise security.
Pre-Drill Holes: Pre-drilling holes prevents wood from splitting and ensures screws go in straight.
Lubricate Moving Parts: Apply lubricant to any moving parts to ensure smooth operation and prevent rust.
Securely Fasten: Use long screws or bolts to attach the lock to the door and frame. This ensures it stays in place and provides maximum security.
Test the Lock: Before finalizing, test the lock multiple times to ensure it works smoothly and securely.
Common Mistakes to Avoid:
Incorrect Measurements: Misjudging dimensions can lead to a poorly fitting lock. Always measure accurately.
Using Weak Materials: Avoid using thin or weak materials that can easily be broken or tampered with.
Ignoring Alignment: Ensure the lock aligns perfectly with the strike plate. Misalignment can make the lock difficult to use.
Skipping Pre-Drilling: Not pre-drilling can cause wood to split, weakening the structure.
Alternatives for Materials or Methods:
Materials: Instead of metal, consider using reinforced plastic for a lighter but still strong option. For wood, hardwood like oak or maple offers better durability than softwood.
Methods: Instead of a traditional lock, consider a sliding bolt or barrel bolt for a simpler installation. For added security, you can also use a padlock with a hasp.
Estimating the Cost
Materials:
- Steel bar: $10-$15
- Padlock: $5-$10
- Mounting brackets: $5-$8
- Bolts and nuts: $3-$5
- Washers: $1-$2
- Drill bit: $2-$5
Tools:
- Drill: $30-$50 (if you don't have one)
- Wrench set: $10-$20
- Measuring tape: $5-$10
- Marker: $1-$2
Total Cost: $72-$127
Budget-friendly alternatives:
- Use a wooden bar instead of steel: $5-$8
- Borrow tools from friends or neighbors
- Buy a used drill: $15-$25
New Total Cost with alternatives: $29-$55
Different Ways to Customize
Materials: Instead of using standard metal for the lock, consider stainless steel for better durability or aluminum for a lighter option. For a rustic look, try wrought iron.
Colors: Paint the lock in black for a classic look, silver for a modern touch, or bronze for a vintage feel. Use spray paint for a smooth finish or brush-on paint for a textured appearance.
Styles: Opt for a padlock style for simplicity or a deadbolt for extra security. For a more sophisticated look, consider a keyless entry system with a keypad or smart lock.
Handles: Swap out the standard handle with a decorative one. Choose from antique brass, polished chrome, or matte black.
Mounting Plates: Use decorative mounting plates to add flair. Options include ornate designs, geometric patterns, or minimalist styles.
Bolts: Instead of a single bolt, use double bolts for added security. Choose heavy-duty bolts for extra strength.
Weatherproofing: Add weatherstripping around the lock area to protect against the elements. Use rubber seals or foam tape.
Key Options: Customize the key by choosing a unique shape or engraving. Consider a keyless option like a combination lock.
Finishes: For a sleek look, use a polished finish. For a more rugged appearance, go with a brushed or hammered finish.
Additional Features: Add a security camera or motion sensor near the lock for extra protection. Install a light above the lock for better visibility at night.
Eco-Friendly Suggestions
Use reclaimed wood for the lock body. Old furniture or pallets work great. Repurpose metal from old tools or hardware for the locking mechanism. Upcycle an old padlock instead of buying new. Natural oils like linseed oil can protect wood instead of chemical sealants. Solar-powered lights can illuminate the lock area, reducing electricity use. Recycled screws and nails can be sourced from old projects. Eco-friendly paint or stains can give the lock a finished look without harmful chemicals.
Lock It Down
Building a DIY garage door lock isn't just about saving money, it's about gaining confidence in your handyman skills. With some basic tools and a bit of patience, you can create a secure and reliable lock that keeps your garage safe. Remember to measure accurately, follow the steps carefully, and test the lock thoroughly before calling it a day. If you run into any trouble, don't hesitate to ask for help or look up additional resources. Your garage will be more secure, and you'll have the satisfaction of knowing you did it yourself. So grab your tools, get to work, and enjoy the peace of mind that comes with a job well done.
How do I choose the right materials for a DIY garage door lock?
Look for sturdy materials like steel or heavy-duty aluminum. Avoid plastic since it can break easily. Check your local hardware store for lock kits designed for garage doors.
What tools will I need to build a garage door lock?
You’ll need a drill, screwdriver, measuring tape, wrench, and some screws. A level helps ensure everything’s straight.
How long does it take to install a DIY garage door lock?
It usually takes about 1-2 hours. If you’re handy with tools, it might take less time. Just make sure to measure twice and drill once.
Can I install a garage door lock by myself?
Absolutely! Most DIY garage door locks are designed for easy installation. Just follow the instructions carefully. If you get stuck, there are plenty of online tutorials to help.
How do I ensure my garage door lock is secure?
Make sure all screws and bolts are tightened properly. Test the lock a few times to ensure it latches securely. Consider adding a secondary lock for extra security.
What should I do if my DIY lock doesn’t fit my garage door?
Double-check your measurements and make sure you’re using the right tools. If it still doesn’t fit, you might need a different lock kit. Consult with a hardware store expert for advice.
Are there any safety tips I should follow while installing the lock?
Always wear safety goggles and gloves. Keep your work area clean to avoid accidents. If using a power drill, make sure it’s charged and in good condition.