
Home>Home & Furniture>Doors & Windows>DIY Gila Application Solution: Alternative Ways
Doors & Windows
DIY Gila Application Solution: Alternative Ways
Published: August 8, 2024
Discover alternative DIY solutions for applying Gila window film. Learn easy, cost-effective methods to achieve professional results without the standard application kit.
(Many of the links in this article redirect to a specific reviewed product. Your purchase of these products through affiliate links helps to generate commission for Twigandthistle.com, at no extra cost. Learn more)
Applying Gila window film can save money and help control heat or glare in a room. However, the cost of the official application solution can add up. Luckily, making your own Gila application solution is simple and effective. With a few basic ingredients, you can create a mix that works just as well as the store-bought version. This guide will introduce you to various methods and tips for making your own Gila application solution. Whether you prefer natural ingredients or items found in your kitchen, there's an option for everyone. Let's get started on this DIY journey!
Getting Ready for Your Project
Gather Materials: Collect Gila film, spray bottle, soapy water, squeegee, utility knife, tape measure, cleaning cloth, and masking tape.
Clean Windows: Use a cleaning cloth and soapy water to remove dirt and grime. Ensure windows are completely dry before starting.
Measure and Cut: Measure the window dimensions. Cut the Gila film slightly larger than the window size using a utility knife.
Prepare Solution: Fill a spray bottle with water and a few drops of dish soap. Shake gently to mix.
Set Up Workspace: Clear the area around the window. Lay out all materials within easy reach.
Safety Tips: Wear gloves to protect hands from cuts. Use a step ladder if needed, ensuring it’s stable.
Apply Masking Tape: Place masking tape on the window frame to avoid damaging it during application.
Spray Window: Lightly spray the window with the soapy water solution to help the film adhere smoothly.
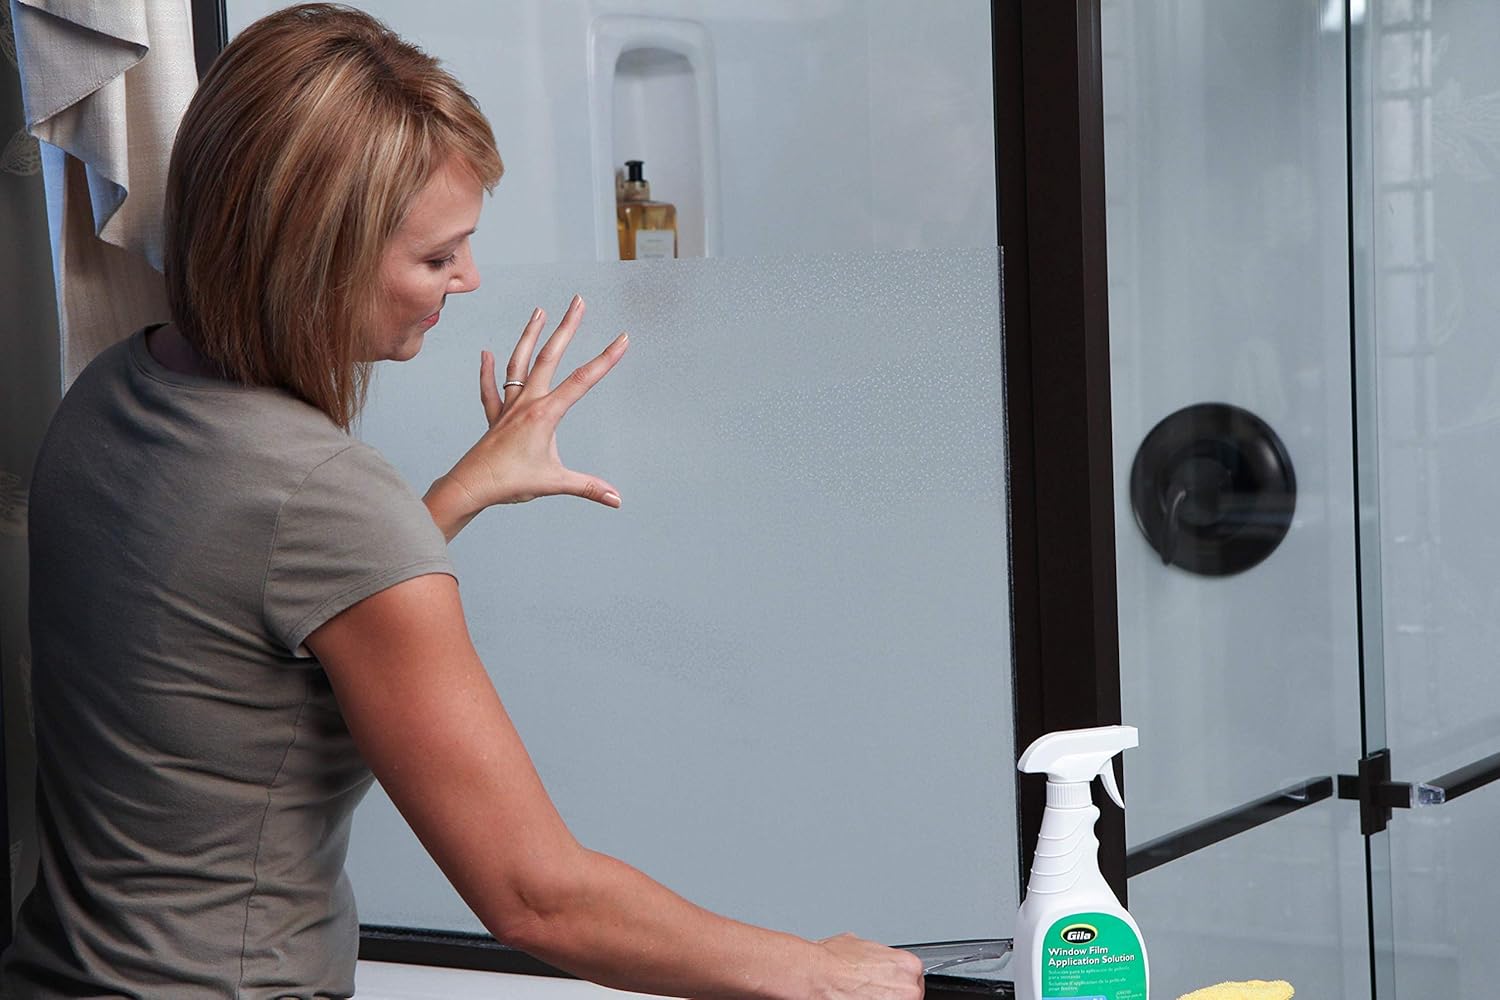
Apply Film: Peel off the backing from the Gila film. Carefully place the film on the wet window, starting from the top.
Smooth Out Bubbles: Use a squeegee to smooth out air bubbles and excess water, working from the center to the edges.
Trim Excess Film: Use a utility knife to trim any excess film around the edges for a clean finish.
Gather Your Materials and Tools
Materials:
- Gila Film: Special window film that reduces heat and glare.
- Spray Bottle: Used to apply a soapy water solution.
- Baby Shampoo: Mixed with water to create a soapy solution for application.
- Squeegee: Helps remove air bubbles and smooth out the film.
- Utility Knife: Cuts the film to the correct size.
- Lint-Free Cloth: Cleans the window before application.
- Measuring Tape: Ensures accurate measurements of the window.
- Ruler: Assists in cutting straight lines on the film.
- Masking Tape: Temporarily holds the film in place during application.
Tools:
- Spray Bottle: Fill with water and a few drops of baby shampoo. This solution helps the film adhere smoothly.
- Squeegee: Essential for pressing out air bubbles and ensuring the film sticks evenly.
- Utility Knife: Sharp blade cuts the film to fit the window perfectly.
- Measuring Tape: Measures window dimensions accurately.
- Ruler: Guides straight cuts on the film.
- Masking Tape: Holds the film in place while you work.
Explanation:
- Gila Film: This is the main material. It reduces heat and glare, making rooms more comfortable.
- Spray Bottle: Used to apply a soapy water solution that helps the film stick without bubbles.
- Baby Shampoo: Mixed with water in the spray bottle to create a soapy solution.
- Squeegee: Smooths out the film and removes air bubbles.
- Utility Knife: Cuts the film to the right size for your window.
- Lint-Free Cloth: Cleans the window to ensure no dust or dirt gets trapped under the film.
- Measuring Tape: Ensures you cut the film to the correct size.
- Ruler: Helps you cut straight lines on the film.
- Masking Tape: Temporarily holds the film in place while you adjust it.
Skill Level and Time Commitment
Skill Level: Intermediate
Time Required: 2-4 hours
Steps:
- Gather Materials: 15 minutes
- Prepare Surface: 30 minutes
- Mix Solution: 10 minutes
- Apply Solution: 1-2 hours
- Drying Time: 1 hour
Follow These Step-by-Step Instructions
Gather Materials:
- Dish soap
- Water
- Spray bottle
- Squeegee
- Soft cloth or paper towels
Prepare the Solution:
- Fill the spray bottle with water.
- Add a few drops of dish soap.
- Shake gently to mix.
Clean the Window:
- Spray the window with the solution.
- Wipe with a soft cloth or paper towels until clean and dry.
Apply the Film:
- Cut the film to the size of the window.
- Peel off the backing from the film.
Spray the Window Again:
- Generously spray the window with the soapy solution.
Position the Film:
- Place the film on the wet window.
- Adjust until it fits perfectly.
Remove Air Bubbles:
- Use the squeegee to smooth out the film.
- Start from the center and move towards the edges.
Dry the Film:
- Wipe away excess solution with a soft cloth.
- Let the film dry completely.
Helpful Tips and Tricks
Clean the surface thoroughly before applying the Gila film. Dust and grime can cause bubbles.
Use a spray bottle filled with soapy water to wet the window. This helps the film slide into place.
Cut the film slightly larger than the window. Trim the excess after application for a perfect fit.
Use a squeegee to remove air bubbles. Start from the center and work your way out.
Avoid direct sunlight during application. Heat can make the film stick too quickly, causing wrinkles.
Common Mistakes to Avoid:
- Skipping the cleaning step. Dirt will create bubbles and make the film peel.
- Not using enough soapy water. Dry surfaces make it hard to adjust the film.
- Applying in direct sunlight. Heat can cause the film to stick too fast, leading to errors.
Alternative Materials or Methods:
- Static cling film instead of adhesive-backed film. Easier to reposition and remove.
- Use a credit card wrapped in a soft cloth if you don't have a squeegee. This helps smooth out bubbles.
- Baby shampoo mixed with water can replace the soapy water solution. Gentle and effective.
Estimating the Cost
Gila Window Film: $20-$30 per roll
Utility Knife: $5-$10
Squeegee: $5-$10
Spray Bottle: $2-$5
Dish Soap: $1-$3
Measuring Tape: $5-$10
Microfiber Cloth: $3-$5
Total Cost: $41-$73
Budget-Friendly Alternatives:
Plastic Wrap: $5-$10 (instead of Gila Window Film)
Old Credit Card: Free (instead of Squeegee)
Water Bottle: Free (instead of Spray Bottle)
Vinegar: $1-$2 (instead of Dish Soap)
Ruler: Free (instead of Measuring Tape)
Old T-Shirt: Free (instead of Microfiber Cloth)
Alternative Total Cost: $12-$22
Different Variations and Customizations
Alternative Materials: Instead of the standard Gila application solution, use a mix of water and baby shampoo. This combination helps the film slide easily and stick well. Another option is a vinegar and water mix, which can clean the glass while applying the film.
Colors: Experiment with different tinted films. Choose from light gray, bronze, or blue to match your room's decor. For a more creative touch, try frosted or patterned films.
Styles: Go beyond plain films. Use decorative window clings with designs like stained glass, floral patterns, or geometric shapes. These add a unique look to your windows.
Tools: Instead of a squeegee, use a credit card wrapped in a soft cloth to smooth out bubbles. For cutting the film, a sharp utility knife or scissors works well.
Application Techniques: Apply the film in sections rather than all at once. This method helps manage larger pieces and reduces mistakes. For a smoother finish, use a spray bottle to mist the solution evenly on the glass.
Edge Sealing: To prevent peeling, seal the edges with clear nail polish or double-sided tape. This step ensures the film stays in place longer.
Cleaning: Maintain the film with a soft cloth and mild cleaner. Avoid abrasive materials that could scratch the surface.
Eco-Friendly Tips
Eco-friendly materials can make a big difference. Instead of buying new, reuse old spray bottles for your solution. Mix water and vinegar for a natural cleaner. Vinegar is effective and safe for the environment.
Use microfiber cloths instead of paper towels. They can be washed and reused many times. This reduces waste and saves money.
Consider using a squeegee to apply the solution. It helps spread the liquid evenly and reduces the need for excess product.
Recycle old newspapers to dry the windows. Newspapers work well for streak-free drying and can be recycled afterward.
Make your own solution with ingredients like lemon juice and baking soda. These are natural, non-toxic, and effective for cleaning.
Avoid plastic packaging by buying ingredients in bulk. This reduces plastic waste and often saves money.
Store leftover solution in glass jars. Glass is more sustainable and can be reused indefinitely.
Opt for biodegradable sponges. They break down naturally and are better for the planet.
Use a reusable spray nozzle. Attach it to different bottles as needed, reducing plastic waste.
Choose eco-friendly brands for any additional products. Look for certifications like Green Seal or EcoLogo.
Wrapping Things Up
DIY Gila application offers a fantastic way to save money and customize your space. By following the steps, you can achieve professional results without hiring someone. Remember to gather all necessary tools and materials before starting. Clean the surface thoroughly to ensure proper adhesion. Measure and cut the film accurately to avoid waste. Apply the film slowly, smoothing out any bubbles as you go. Patience is key. If you make a mistake, don’t worry; you can always peel it off and try again. With practice, your skills will improve, and the process will become quicker. Enjoy the satisfaction of completing a project on your own. Happy DIY-ing!
How can I make a homemade gila application solution?
Mix water, vinegar, and a bit of dish soap in a spray bottle. Shake well and spray on areas where you see gila activity.
What ingredients do I need for a DIY gila repellent?
You'll need garlic, onion, cayenne pepper, and water. Blend them together, strain the mixture, and spray it around your home.
How often should I apply the homemade solution?
Apply the solution every few days or whenever you notice gila activity. Consistency helps keep them away.
Is the DIY solution safe for pets and kids?
Yes, the ingredients are non-toxic. Just make sure to keep the spray out of reach to avoid any accidental ingestion.
Can I use essential oils in my gila repellent?
Absolutely! Peppermint oil and eucalyptus oil are great options. Add a few drops to your spray bottle for an extra kick.
What areas should I focus on when applying the solution?
Spray around windows, doors, and any cracks or crevices where gilas might enter. Pay special attention to dark corners and basements.
How long does the homemade solution last?
The solution can last up to two weeks if stored in a cool, dark place. Shake well before each use to ensure effectiveness.