
Home>Home & Furniture>Doors & Windows>DIY Cardboard Door Ideas
Doors & Windows
DIY Cardboard Door Ideas
Published: September 8, 2024
Discover creative and easy DIY cardboard door ideas to enhance your home decor. Learn step-by-step instructions and tips for crafting unique, eco-friendly doors.
(Many of the links in this article redirect to a specific reviewed product. Your purchase of these products through affiliate links helps to generate commission for Twigandthistle.com, at no extra cost. Learn more)
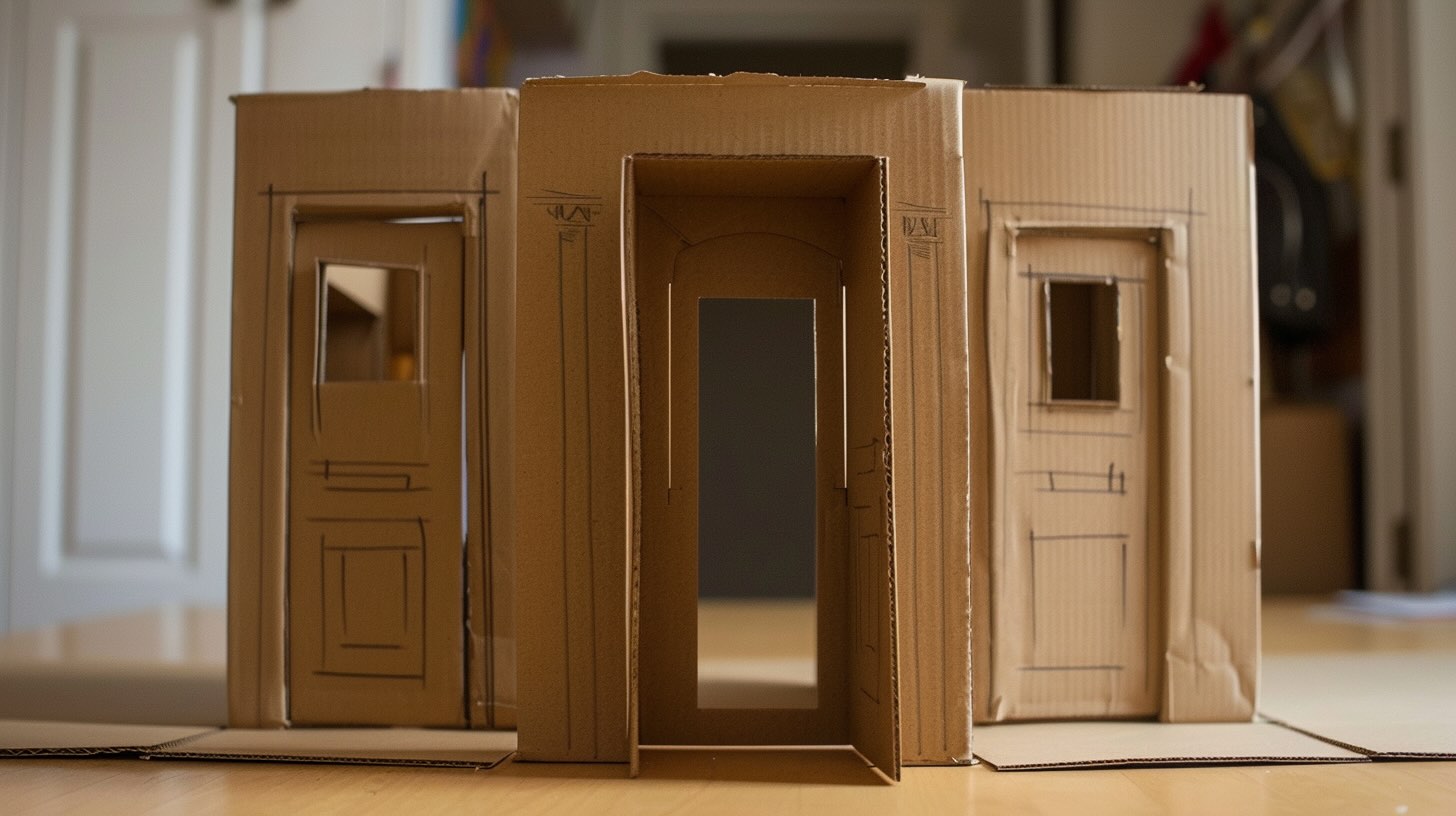
Creating a DIY cardboard door can be a fun and easy home project. It's a great way to use materials you might already have, saving money while also being kind to the environment. Whether you need a temporary solution or just want to try something crafty, cardboard offers a surprising amount of flexibility. This project doesn't require any special skills, just a bit of creativity and some basic supplies. Let's dive into some ideas and tips for making your very own cardboard door that can add a unique touch to your space.
Getting Ready for Your Cardboard Door Project
Gather Materials: Collect cardboard sheets, box cutter, ruler, pencil, glue, and decorative items like paint or stickers.
Safety Gear: Wear gloves to protect hands from cuts and safety glasses to shield eyes from debris.
Workspace Setup: Choose a flat, clean surface like a large table or floor. Ensure good lighting to see clearly.
Measure and Mark: Use a ruler and pencil to measure and mark the dimensions of the door on the cardboard.
Cutting: Carefully cut along the marked lines with a box cutter. Always cut away from your body to avoid injuries.
Reinforce Edges: Glue extra strips of cardboard along the edges to make the door sturdier.
Decorate: Paint or add stickers to personalize your door. Let everything dry completely before handling.
Install: Attach the door to its frame using hinges made from cardboard or other materials. Ensure it swings open and closed smoothly.
Gathering Materials and Tools
- Cardboard Sheets: Large, sturdy pieces to form the main structure.
- Box Cutter or Utility Knife: For cutting the cardboard into desired shapes and sizes.
- Ruler or Measuring Tape: Ensures precise measurements for a perfect fit.
- Pencil: Marks cutting lines and measurements on the cardboard.
- Hot Glue Gun: Secures pieces together quickly and firmly.
- Glue Sticks: Used with the hot glue gun for bonding.
- Duct Tape: Reinforces edges and adds extra strength.
- Paint and Brushes: Adds color and design to the door.
- Decorative Paper or Stickers: Enhances the door's appearance with patterns and designs.
- Scissors: Cuts smaller pieces of cardboard, paper, or tape.
- Sandpaper: Smooths rough edges for a cleaner finish.
- Hinges: Allows the door to open and close if you want it functional.
- Knob or Handle: Provides a way to open the door easily.
- Cutting Mat: Protects surfaces while cutting cardboard.
- Safety Gloves: Protects hands from cuts and glue burns.
Skill Level and Time Commitment
Skill Level: Beginner
Time Required: 2-4 hours
- Gather Materials: 15 minutes
- Measure and Cut Cardboard: 30-45 minutes
- Assemble Door Panels: 30-45 minutes
- Decorate and Paint: 1-2 hours
How to Make a Cardboard Door: Step-by-Step
Gather Materials:
- Large cardboard sheets
- Box cutter or scissors
- Ruler or measuring tape
- Pencil
- Glue or tape
- Paint or markers (optional)
Measure Door Frame:
- Use a ruler or measuring tape to measure the height and width of the door frame.
- Write down the measurements.
Cut Cardboard:
- Lay the cardboard sheets flat.
- Use a pencil to mark the measurements on the cardboard.
- Cut along the lines with a box cutter or scissors.
Create Door Panels:
- If you want a more detailed door, cut smaller pieces to create panels.
- Glue or tape these panels onto the main cardboard piece.
Reinforce Edges:
- Cut strips of cardboard to reinforce the edges.
- Glue or tape these strips along the edges of the door.
Decorate:
- Paint or color the door as desired.
- Add any additional designs or decorations.
Attach Hinges:
- Cut small strips of cardboard to create hinges.
- Attach one side of the hinge to the door and the other to the door frame using glue or tape.
Install Door Handle:
- Create a handle using a small piece of cardboard.
- Attach it to the door with glue or tape.
Mount Door:
- Position the door in the frame.
- Ensure the hinges are secure and the door can open and close smoothly.
Final Touches:
- Check for any loose edges or parts.
- Secure any areas that need extra glue or tape.
Helpful Tips and Tricks
Measure accurately before cutting. Use a sharp utility knife for clean edges. Reinforce the door with multiple layers of cardboard for strength. Glue the layers together using a strong adhesive like hot glue. Add a handle by attaching a piece of sturdy material like wood or plastic. Paint or cover the door with contact paper for a finished look.
Common mistakes to avoid: Not measuring properly can lead to a door that doesn't fit. Using a dull knife results in jagged edges. Skipping reinforcement makes the door flimsy. Avoid using weak glue, which won't hold layers together well.
Alternatives: Instead of cardboard, consider using foam board for a sturdier door. For a more durable handle, use a repurposed drawer pull. Instead of hot glue, try wood glue for a stronger bond.
Estimating the Cost
Cardboard: $10 for a large pack of sheets.
Box cutter: $5 for a basic one.
Ruler: $2 for a plastic one.
Glue: $3 for a strong adhesive.
Paint: $5 for basic colors.
Brushes: $3 for a set.
Tape: $2 for a roll.
Decorations: $5 for stickers or other items.
Total: Around $35.
Budget-friendly alternatives:
Recycled cardboard: Free from old boxes.
Scissors: Use instead of a box cutter.
Old paint: Use leftover from other projects.
Homemade glue: Mix flour and water.
Handmade decorations: Draw or cut out from magazines.
Different Ways to Customize
Alternative materials can make your cardboard door sturdier or more decorative. Use foam board for added strength or corkboard for a functional twist, allowing you to pin notes or photos. Fabric can cover the cardboard, giving it a softer look and feel.
Colors can transform the door's appearance. Paint it with bright colors for a playful vibe or neutral tones for a more sophisticated look. Spray paint offers a smooth finish, while acrylic paint allows for detailed designs.
Styles can vary based on your preference. Create a rustic look by adding faux wood grain with paint or adhesive vinyl. For a modern style, use geometric patterns or metallic accents. A themed door can be fun, like a castle door for a kid's room or a vintage style for a study.
Decorative elements can add personality. Attach stickers or decals for easy decoration. Use stencils to paint intricate designs. Add handles or knobs for a realistic touch. LED lights can create a magical effect, especially for a child's room.
Functional modifications can make the door more useful. Cut out sections to create windows or pockets for storage. Add a mirror for a practical touch in a bedroom or hallway. Use magnets to make parts of the door interactive, like a magnetic chalkboard section for notes or drawings.
Eco-Friendly Tips for Your Project
Reusing old cardboard boxes can create sturdy, lightweight doors. Reinforce the cardboard by layering multiple sheets together using eco-friendly glue. Paint the door with non-toxic, water-based paints for a safe, colorful finish. Decorate with recycled materials like fabric scraps or old magazines for a unique look. Add handles made from repurposed wood or metal for durability. Insulate by adding a layer of recycled foam or felt between the cardboard sheets. Seal edges with biodegradable tape to prevent wear and tear. Hinge the door using reclaimed hinges from old furniture.
Crafting Your Own Masterpiece
Creating a cardboard door can be a fun, rewarding project. With just a few materials and some creativity, you can transform simple cardboard into a functional door. Remember to measure carefully, cut precisely, and reinforce where needed. Decorate it to match your style or theme. This project not only saves money but also teaches valuable skills like problem-solving and resourcefulness. Plus, it’s a great way to recycle and reuse materials. Whether for a playhouse, temporary partition, or just a fun experiment, a cardboard door is a unique addition to any space. So, gather your supplies, get creative, and start building. You’ll be amazed at what you can achieve with a bit of effort and imagination. Happy crafting!
How do I make a cardboard door sturdy?
Use multiple layers of cardboard glued together. Reinforce the edges with duct tape or wooden strips for extra strength.
Can I paint a cardboard door?
Absolutely! Use acrylic paint for the best results. Make sure to apply a primer first to help the paint stick better.
What tools will I need?
You'll need a box cutter, glue, duct tape, a ruler, and paint. Optional tools include a hot glue gun and wooden strips for reinforcement.
How do I attach a cardboard door to a frame?
Use hinges attached with hot glue or brads. For a lightweight door, you can even use duct tape as a hinge.
Can I add a handle or knob?
Yes, you can! Use a drawer pull or knob from a hardware store. Attach it with hot glue or small screws.
Is it possible to make a lockable cardboard door?
You can create a simple latch using Velcro or a hook-and-eye closure. For a more secure lock, consider using a small padlock and hasp.
How long will a cardboard door last?
With proper care and reinforcement, a cardboard door can last several months to a year. Keep it away from moisture to extend its life.