
Home>Home & Furniture>Bathroom>DIY Rustic Outdoor Shower Ideas
Bathroom
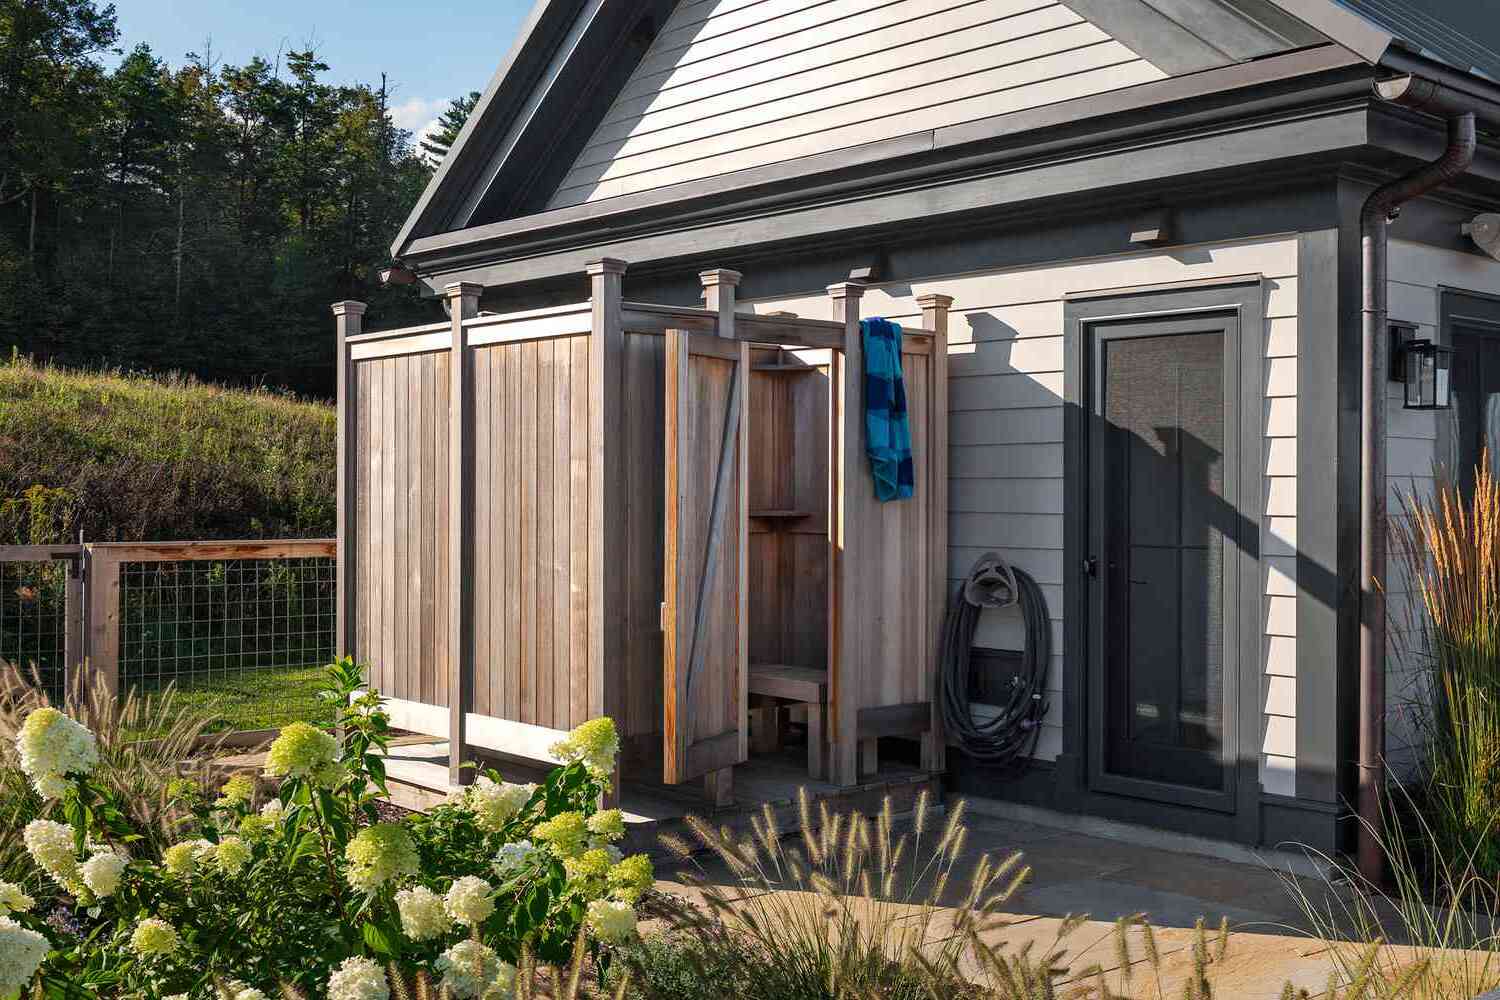
DIY Rustic Outdoor Shower Ideas
Published: July 15, 2024
Discover creative DIY rustic outdoor shower ideas to transform your backyard into a serene oasis. Get inspired with tips and designs for a perfect rustic retreat.
(Many of the links in this article redirect to a specific reviewed product. Your purchase of these products through affiliate links helps to generate commission for Twigandthistle.com, at no extra cost. Learn more)
Thinking about adding a unique touch to your backyard? An outdoor shower offers a refreshing way to cool off during hot summer days and adds a rustic charm to any garden space. Building one yourself can be a fun project that showcases creativity while providing practical benefits. Imagine rinsing off after a long day at the beach or a sweaty hike, surrounded by nature. Plus, you can use recycled or repurposed materials to keep costs low and add character. Ready to get started? Let’s dive into some DIY rustic outdoor shower ideas that are simple, affordable, and charming.
Getting Ready for Your Project
Choose a Location: Pick a spot with good drainage, privacy, and access to water. Avoid areas with overhanging trees to prevent debris.
Gather Materials: Collect all necessary materials like wood, pipes, showerhead, screws, and waterproof sealant. Make sure everything is weather-resistant.
Check Local Codes: Ensure your project complies with local building codes and regulations. This might include permits or specific construction guidelines.
Prepare the Ground: Clear the area of any debris, level the ground, and lay a solid foundation. Gravel or concrete works well for drainage.
Set Up a Workspace: Organize tools and materials in a nearby, easily accessible area. Keep a first aid kit handy.
Safety Gear: Wear gloves, safety goggles, and sturdy footwear. Use ear protection if operating loud machinery.
Plan the Plumbing: Map out the water supply route. Shut off the main water supply before connecting pipes to avoid leaks.
Build the Frame: Construct a sturdy frame using treated wood or metal. Ensure it’s level and secure.
Install the Showerhead: Attach the showerhead and connect it to the water supply. Test for leaks before finalizing.
Waterproofing: Apply a waterproof sealant to all wooden parts to prevent rot and damage.
Decorate: Add rustic elements like wooden slats, pebbles, or plants to enhance the aesthetic.
Gathering Materials and Tools
Wooden Pallets: Used for creating the shower walls. They give a rustic look and are easy to assemble.
Galvanized Steel Tub: Acts as the shower base. Durable and adds to the rustic charm.
PVC Pipes: Needed for the plumbing. They carry water to the showerhead.
Showerhead: Essential for the water flow. Choose one that fits the rustic theme.
Hose Adapter: Connects the garden hose to the PVC pipes. Ensures water supply to the shower.
Waterproof Sealant: Prevents water damage. Apply to wooden pallets and other exposed areas.
Screws and Nails: Fasten the wooden pallets and other components. Ensure everything stays in place.
Drill: Makes holes for screws and nails. Essential for assembling the structure.
Saw: Cuts the wooden pallets and PVC pipes to the required size. Ensures everything fits perfectly.
Measuring Tape: Measures materials accurately. Helps in cutting and assembling.
Level: Ensures the structure is even. Prevents a lopsided shower.
Sandpaper: Smooths rough edges on the wood. Makes the shower safe and splinter-free.
Paint or Stain: Protects the wood and enhances its appearance. Choose a color that complements the rustic look.
Tarp or Shower Curtain: Provides privacy. Choose a material that can withstand outdoor conditions.
Hooks and Brackets: Hold the shower curtain or tarp in place. Ensure they are rust-resistant.
Garden Hose: Supplies water to the shower. Connects to the hose adapter.
Bucket: Useful for mixing sealant or paint. Also handy for cleaning up.
Gloves and Safety Goggles: Protect your hands and eyes. Essential for safety when cutting and drilling.
Skill Level and Time Commitment
Skill Level: Intermediate
Time Required: Approximately 2-3 days
- Gather Materials: 2 hours
- Prepare the Site: 4 hours
- Build the Frame: 6 hours
- Install Plumbing: 8 hours
- Add Finishing Touches: 4 hours
How to Build Your Outdoor Shower
Choose a Location
- Pick a spot with good drainage.
- Ensure privacy by selecting a secluded area or adding a privacy screen.
Gather Materials
- Wooden pallets or reclaimed wood
- Showerhead and plumbing fixtures
- Hose or water supply line
- Screws, nails, and brackets
- Waterproof sealant
- Gravel or stones for drainage
Prepare the Ground
- Clear the area of debris.
- Level the ground using a shovel.
- Lay down a layer of gravel or stones for drainage.
Build the Base
- Arrange wooden pallets or planks to form a sturdy base.
- Secure the wood together using screws or nails.
- Apply waterproof sealant to protect the wood.
Construct the Walls
- Use more wooden pallets or planks to create walls.
- Attach the walls to the base with brackets and screws.
- Ensure the walls are tall enough for privacy.
Install the Plumbing
- Connect the showerhead to the water supply line or hose.
- Attach the plumbing fixtures to the wall.
- Test the water flow to ensure everything works properly.
Add Finishing Touches
- Place a wooden mat or more gravel inside the shower area.
- Add hooks for towels and shelves for toiletries.
- Decorate with plants or rustic accessories for a cozy feel.
Test the Shower
- Turn on the water to check for leaks.
- Make any necessary adjustments to the plumbing or structure.
- Enjoy your new rustic outdoor shower!
Helpful Tips and Tricks
Choose the Right Location: Pick a spot with good drainage and privacy. Near a garden hose or water source makes things easier.
Use Reclaimed Wood: Reclaimed wood gives a rustic look and is eco-friendly. Make sure to treat it to prevent rot.
Simple Plumbing: Use a garden hose for water supply. Attach a showerhead to the hose for an easy setup.
Stone Flooring: Use flat stones or gravel for the shower floor. They drain well and add to the rustic feel.
Natural Privacy Screens: Use tall plants, bamboo, or wooden panels for privacy. They blend well with the outdoor setting.
Weatherproof Fixtures: Choose fixtures that can withstand outdoor conditions. Brass or stainless steel works well.
Solar Shower Bags: If plumbing is too complex, use solar shower bags. They heat water using sunlight and are easy to install.
Common Mistakes to Avoid:
- Poor Drainage: Ensure water drains away from your house to avoid flooding.
- Untreated Wood: Always treat wood to prevent mold and rot.
- Weak Water Pressure: Check water pressure before finalizing the setup. Low pressure can make showers less enjoyable.
Alternatives for Materials or Methods:
- PVC Pipes: Use PVC pipes instead of metal for a budget-friendly option.
- Canvas Curtains: Instead of wooden panels, use canvas curtains for privacy. They’re easy to install and remove.
- Portable Shower Kits: Consider portable shower kits if you want a temporary setup. They’re easy to assemble and disassemble.
Estimating the Cost
Materials:
- Wood (for the frame and flooring): $100-$200
- Galvanized Pipes (for plumbing): $50-$100
- Showerhead: $20-$50
- Hose (if connecting to an existing water source): $10-$30
- Concrete (for the base): $30-$50
- Waterproof Sealant: $15-$25
- Screws and Nails: $10-$20
Tools:
- Saw: $30-$60
- Drill: $40-$80
- Hammer: $10-$20
- Wrench: $10-$20
- Level: $10-$15
- Tape Measure: $5-$10
Total Estimated Cost: $340-$680
Budget-Friendly Alternatives:
- Reclaimed Wood: Often free or much cheaper than new wood.
- PVC Pipes: Cheaper than galvanized pipes, costing around $20-$40.
- Basic Showerhead: Can be found for as low as $10.
- Gravel Base: Instead of concrete, use gravel which costs around $10-$20.
- Borrow Tools: Borrow from friends or family to save on tool costs.
Different Styles and Customizations
Alternative materials can change the look and feel of your outdoor shower. Instead of traditional wood, consider using bamboo for a tropical vibe or reclaimed wood for a more rustic appearance. Stone tiles or pebbles can be used for the flooring to add a natural touch.
Colors can also make a big difference. Paint the wood in earthy tones like browns, greens, or grays to blend with nature. For a pop of color, try bright blues or turquoise to mimic the ocean.
Styles can vary too. For a modern rustic look, combine metal pipes with wooden planks. If you prefer a vintage style, use antique fixtures and weathered wood. For a bohemian feel, add colorful textiles and hanging plants.
Accessories can personalize your shower. Install shelves for soaps and shampoos, or add hooks for towels and robes. A rain showerhead can give a luxurious touch, while a handheld showerhead offers flexibility.
Privacy options include using curtains, bamboo screens, or wooden panels. These can be customized to match the overall design and provide a secluded space.
Lighting can enhance the ambiance. Use solar-powered lights or string lights to create a cozy atmosphere for evening showers. Lanterns can add a rustic charm.
Plants can make the space feel more inviting. Surround the shower with ferns, succulents, or flowering plants to create a natural oasis. Hanging plants can also add a vertical element to the design.
Water sources can be customized too. Connect the shower to your home's plumbing for a consistent water supply, or use a rainwater collection system for an eco-friendly option.
Eco-Friendly Building Tips
Reclaimed wood can create a charming, rustic look. Old barn wood or pallets work well. Repurposed metal like corrugated tin adds a vintage touch. For the base, use recycled bricks or stones. Salvaged doors or shutters make great privacy screens.
Rainwater collection systems can supply water. Install a solar water heater for warm showers. Use eco-friendly paint or sealant to protect wood. Natural materials like bamboo or river rocks enhance the rustic feel.
Repurpose an old metal bucket or watering can for the showerhead. Driftwood can serve as towel racks or hooks. Recycled glass bottles can create a unique mosaic design.
Compostable soap and shampoo keep the environment clean. Native plants around the shower area help with drainage and add beauty. Use LED solar lights for nighttime use.
Reusing materials reduces waste and adds character. Local thrift stores or salvage yards often have unique finds. DIY projects save money and reduce your carbon footprint.
Your Outdoor Oasis Awaits
Building a rustic outdoor shower can be a fun and rewarding project. Using reclaimed wood, galvanized metal, and natural stone adds charm and character. Remember to plan for proper drainage and privacy. Don't forget to add some personal touches like a vintage showerhead or handmade soap holder. This project not only enhances your outdoor space but also provides a unique way to enjoy nature. Plus, it's a great way to cool off during hot summer days. So grab your tools, gather your materials, and start building your own outdoor oasis. Happy DIY-ing!
How do I build a rustic outdoor shower?
Start by choosing a location with good drainage. Use wooden pallets or reclaimed wood for the walls. Install a simple showerhead connected to a garden hose. Add a gravel base to prevent mud.
What materials should I use?
Use reclaimed wood, bamboo, or stone for a rustic look. Galvanized pipes work great for plumbing. Natural materials blend well with outdoor settings.
How do I ensure privacy?
Use tall wooden panels, bamboo screens, or fabric curtains. Plant tall shrubs or vines around the shower area for added privacy.
Can I heat the water?
Yes, you can use a solar shower bag or install a propane tankless water heater. Both options are eco-friendly and provide warm water.
How do I maintain it?
Regularly check for wood rot and rust on metal parts. Clean the showerhead to prevent clogging. Treat wood with sealant to protect against weather.
What about drainage?
Ensure the shower area has proper drainage. Use a gravel base or install a drainage pipe leading to a garden or soakaway pit.
Can I add extra features?
Absolutely! Add shelves for toiletries, a bench for seating, or hooks for towels. Use outdoor lighting for evening showers.