
Home>Home & Furniture>Bathroom>DIY Rustic Bathroom Vanity: Homemade Project
Bathroom
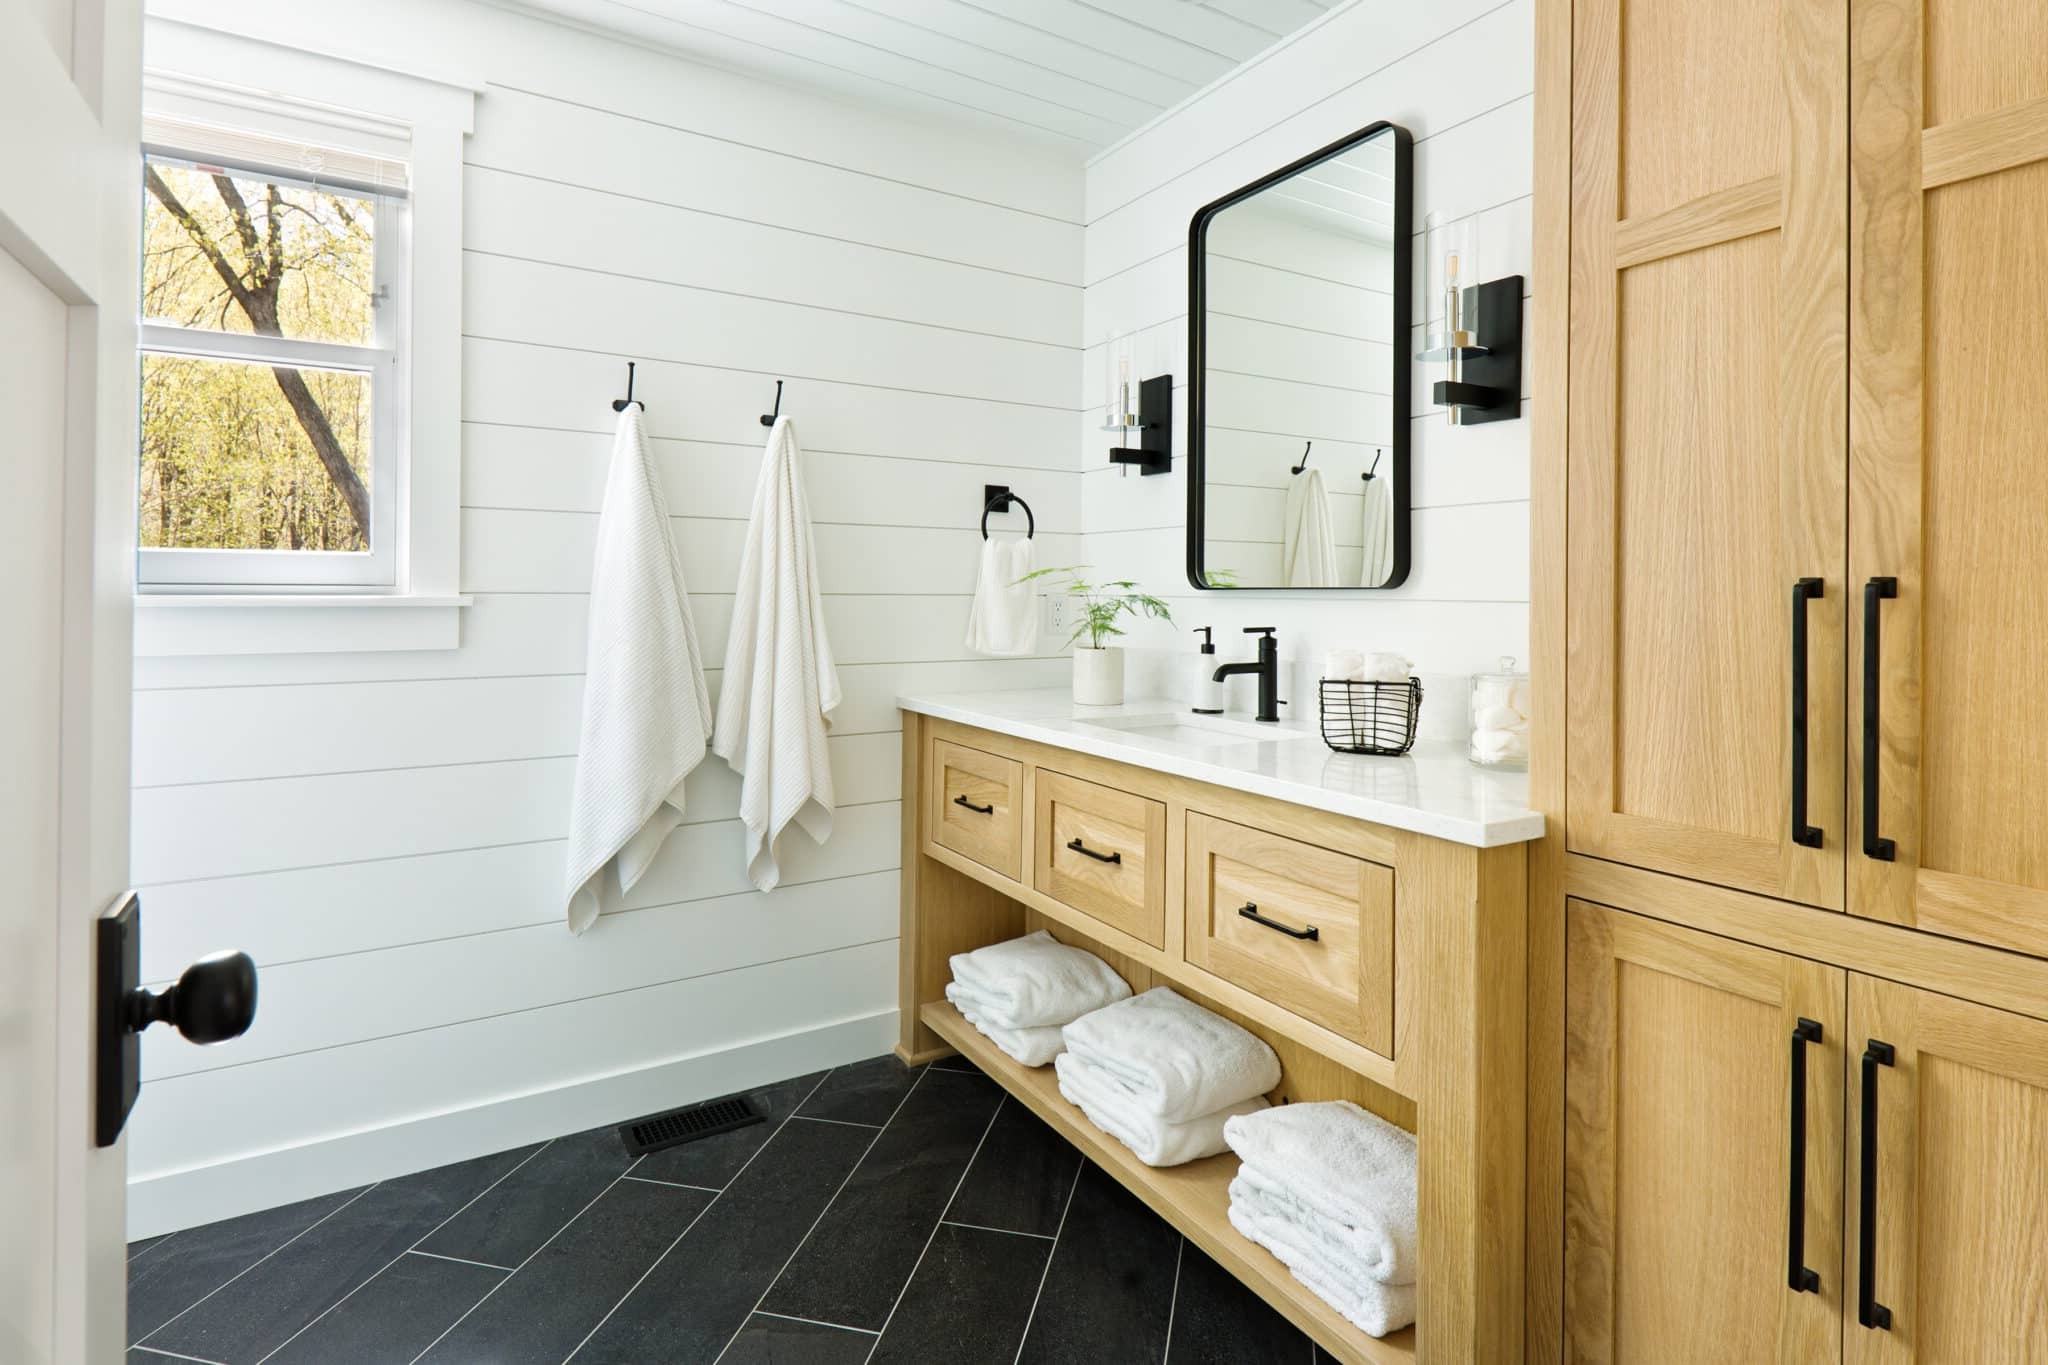
DIY Rustic Bathroom Vanity: Homemade Project
Published: July 16, 2024
Discover how to create a stunning DIY rustic bathroom vanity with our step-by-step guide. Transform your bathroom with a unique, homemade touch. Perfect for DIY enthusiasts!
(Many of the links in this article redirect to a specific reviewed product. Your purchase of these products through affiliate links helps to generate commission for Twigandthistle.com, at no extra cost. Learn more)
Looking to add a touch of rustic charm to your bathroom? Building a DIY rustic bathroom vanity might be the perfect project. Creating your own vanity gives you the freedom to customize it to your space, style, and storage needs. Plus, working with wood and repurposed materials can be fun and rewarding. You don’t need to be a master carpenter to get started; with some basic tools, a bit of patience, and creativity, you can transform your bathroom with a unique piece that adds character and warmth. Let’s dive into this exciting homemade project!
Getting Ready for Your Project
Gather Materials: Collect all necessary materials like wood, screws, nails, sandpaper, stain, and sealant. Make sure you have all tools ready, such as a saw, drill, measuring tape, and safety gear.
Safety Gear: Wear safety goggles, gloves, and a dust mask to protect yourself from wood dust and splinters.
Workspace Setup: Find a well-ventilated area with enough space to move around. Lay down a drop cloth to catch any debris or spills.
Measure and Plan: Measure your bathroom space to determine the vanity's dimensions. Sketch a simple plan to guide your construction.
Cut Wood: Use a saw to cut wood pieces according to your measurements. Double-check each piece for accuracy.
Sand Wood: Sand all wood pieces to smooth out rough edges. This helps the stain or paint adhere better.
Pre-drill Holes: Pre-drill holes where screws or nails will go. This prevents the wood from splitting during assembly.
Stain or Paint: Apply stain or paint to the wood pieces. Let them dry completely before assembling.
Assemble Vanity: Follow your plan to assemble the vanity. Use screws or nails to secure the pieces together.
Seal Wood: Apply a sealant to protect the wood from moisture. Let it dry thoroughly before installing the vanity in your bathroom.
What You Need: Materials and Tools
Materials Needed:
- Wood Planks: Used for the main structure. Choose reclaimed wood for a rustic look.
- Wood Screws: Essential for securing the planks together.
- Wood Glue: Adds extra strength to the joints.
- Sandpaper: Smooths out rough edges and surfaces.
- Stain or Paint: Gives the wood a finished look. Choose a color that matches your bathroom decor.
- Sealant: Protects the wood from moisture.
- Sink: The centerpiece of your vanity. Choose one that fits the size of your project.
- Faucet: Complements the sink and adds functionality.
- Drawer Pulls or Knobs: Adds a decorative touch to drawers and cabinets.
- Plywood: Used for the back panel and drawer bottoms.
Tools Needed:
- Tape Measure: Ensures accurate measurements.
- Saw: Cuts the wood planks to the desired size. A circular saw or hand saw works well.
- Drill: Makes holes for screws and hardware.
- Screwdriver: Tightens screws. A power screwdriver can save time.
- Clamps: Holds pieces together while the glue dries.
- Paintbrushes or Rags: Applies stain, paint, and sealant.
- Level: Ensures your vanity is even and balanced.
- Hammer: Useful for tapping pieces into place.
- Chisel: Helps with detailed woodwork or removing small pieces.
- Safety Gear: Includes gloves, goggles, and a dust mask to protect yourself while working.
Skill Level and Time Commitment
Skill Level: Intermediate
Time Required: 10-12 hours
Steps:
- Gather Materials: 1 hour
- Cut Wood: 2 hours
- Assemble Frame: 3 hours
- Sand and Stain: 2 hours
- Install Sink and Fixtures: 2-3 hours
How to Build It: Step-by-Step Guide
Gather Materials
- Wooden planks (reclaimed wood works best)
- Screws and nails
- Wood glue
- Sandpaper
- Stain or paint
- Sink and faucet
- Measuring tape
- Saw
- Drill
- Screwdriver
Measure and Cut Wood
- Measure the space where the vanity will go.
- Cut wooden planks to the required dimensions for the top, sides, and shelves.
Assemble the Frame
- Attach the side planks to the top plank using screws and wood glue.
- Ensure the frame is square and level.
Add Shelves
- Measure and cut wood for shelves.
- Attach shelves inside the frame using screws and wood glue.
Sand the Wood
- Sand all surfaces to remove splinters and rough edges.
- Wipe down with a damp cloth to remove dust.
Stain or Paint
- Apply stain or paint to the wood.
- Allow to dry completely.
Install Sink and Faucet
- Cut a hole in the top plank for the sink.
- Place the sink in the hole and secure it.
- Attach the faucet according to the manufacturer's instructions.
Secure Vanity to Wall
- Position the vanity against the wall.
- Use screws to secure it to wall studs for stability.
Connect Plumbing
- Attach water supply lines to the faucet.
- Connect the drain to the sink.
Final Touches
- Check for any loose screws or nails.
- Touch up any paint or stain if needed.
- Ensure everything is secure and functional.
Helpful Tips and Tricks
Measure Twice, Cut Once: Always double-check measurements before cutting wood. This avoids wasting materials and ensures a perfect fit.
Use Reclaimed Wood: Reclaimed wood gives a rustic look and is eco-friendly. Sand it well to remove splinters and old paint.
Seal the Wood: Apply a clear sealant to protect against water damage. Bathrooms are humid, so this step is crucial.
Pre-Drill Holes: Pre-drill holes for screws to prevent wood from splitting. This makes assembly easier and cleaner.
Level the Vanity: Use a level to ensure the vanity sits evenly. An uneven vanity can cause water to pool and damage the wood.
Common Mistakes to Avoid:
- Skipping Sanding: Not sanding the wood can lead to rough surfaces and splinters.
- Ignoring Ventilation: Proper ventilation is necessary when using sealants or paints. Fumes can be harmful.
- Overloading Shelves: Avoid placing heavy items on shelves that aren’t reinforced. This can cause them to sag or break.
Material Alternatives:
- Plywood Instead of Solid Wood: Plywood is cheaper and easier to work with. It can be stained to mimic solid wood.
- Laminate Countertops: Laminate is a budget-friendly alternative to stone or wood countertops. It’s also easier to clean.
- Metal Hardware: Use metal brackets and handles for a modern twist on the rustic look. They’re durable and add a unique touch.
Budgeting for Your Vanity
Wood: $50-$100, depending on type and quality. Pine is cheaper, oak costs more.
Screws and Nails: $10-$15.
Wood Stain or Paint: $15-$25.
Sandpaper: $5-$10.
Sealant: $10-$20.
Sink: $50-$150, depending on style and material.
Faucet: $30-$100.
Handles and Knobs: $10-$30.
Plywood for Shelves: $20-$40.
Saw: $20-$50 if you don't already have one.
Drill: $30-$60 if needed.
Measuring Tape: $5-$10.
Level: $10-$20.
Brushes or Rollers: $5-$15.
Total Estimated Cost: $270-$645.
Budget-Friendly Alternatives:
- Use reclaimed wood or pallets: Free or very cheap.
- Buy a used sink and faucet from a thrift store: $20-$50.
- Borrow tools from friends or family: Free.
- Use leftover paint from other projects: Free.
Personalize Your Vanity: Variations and Customizations
Wood Types: Use reclaimed wood for a more authentic rustic look or pine for a lighter, softer feel. Oak or maple can add durability and a polished appearance.
Finishes: Stain the wood with dark walnut for a deep, rich tone or whitewash for a weathered, coastal vibe. Clear varnish can highlight the natural grain.
Countertops: Install a concrete countertop for an industrial touch or a butcher block for warmth. Marble or granite can add a touch of luxury.
Sinks: Choose a vessel sink for a modern twist or a farmhouse sink for classic charm. Copper sinks can add a unique, rustic element.
Hardware: Use iron handles and knobs for a rugged look or brass for a vintage feel. Ceramic or glass knobs can add a touch of elegance.
Colors: Paint the vanity in muted earth tones like sage green or slate gray. Bold colors like navy blue or deep red can make a statement.
Storage: Add open shelves for easy access or basket drawers for a cozy, farmhouse style. Cabinet doors can hide clutter and keep a clean look.
Mirrors: Frame a mirror with barn wood for a cohesive look or use a metal frame for contrast. Antique mirrors can add character.
Lighting: Install Edison bulb fixtures for a vintage feel or mason jar lights for a quirky touch. Sconce lighting can provide a soft, ambient glow.
Backsplash: Use subway tiles for a classic look or peel-and-stick tiles for an easy update. Stone veneer can add texture and depth.
Accessories: Decorate with woven baskets for storage or potted plants for a fresh touch. Vintage signs or artwork can enhance the rustic theme.
Eco-Friendly Ideas for Your Project
Reclaimed wood is perfect for a rustic look. Old barn wood or pallets can be sanded and treated for a beautiful finish.
Recycled metal can be used for handles or accents. Look for old pipes or hardware at salvage yards.
Eco-friendly paint or stain is a must. Choose low-VOC options to keep the air clean.
Repurposed sinks add character. Vintage basins or even old buckets can be turned into unique sinks.
Natural stone countertops are durable and stylish. Look for remnants or off-cuts to save money and resources.
Upcycled mirrors can complete the look. Find an old mirror and give it a new frame with reclaimed wood.
Energy-efficient lighting is essential. Use LED bulbs to save energy and reduce your carbon footprint.
Your DIY Masterpiece Awaits
You've got all the steps to create a rustic bathroom vanity that'll wow anyone who sees it. With some wood, tools, and a bit of elbow grease, you can transform your bathroom into a cozy, stylish space. Remember, the beauty of DIY projects lies in the personal touch you bring to them. Don't stress over perfection; those little imperfections add character. So, gather your materials, roll up your sleeves, and dive into this rewarding project. Before you know it, you'll have a stunning vanity that not only serves a purpose but also tells a story. Happy building!
How do I choose the right wood for my rustic bathroom vanity?
Look for reclaimed wood or hardwoods like oak, maple, or walnut. These types are durable and give that authentic rustic look. Plus, they’re less likely to warp in a humid bathroom.
What tools will I need for this project?
You’ll need a saw, drill, sander, measuring tape, screws, and wood glue. A level and clamps will also come in handy to keep everything straight and secure.
How do I protect the wood from water damage?
Apply a waterproof sealant or polyurethane finish. This will help keep moisture out and prevent the wood from swelling or rotting over time.
Can I add drawers or shelves to my vanity?
Absolutely! Adding drawers or shelves can increase storage space. Just make sure to measure carefully and use drawer slides for smooth operation.
How do I attach the sink to the vanity?
Cut a hole in the top of the vanity to fit your sink basin. Use silicone caulk around the edges to seal it in place. Follow the sink manufacturer’s instructions for any additional steps.
What kind of countertop should I use?
For a rustic look, consider a wooden countertop sealed with waterproof finish. If you prefer something more durable, stone or concrete countertops work well and still match the rustic style.
How can I make my vanity look more rustic?
Use distressing techniques like sanding edges or adding stain to give the wood an aged look. Adding iron hardware or barn-style doors can also enhance the rustic charm.