
Home>Home & Furniture>Bathroom>DIY Over the Toilet Storage Ideas
Bathroom
DIY Over the Toilet Storage Ideas
Published: July 17, 2024
Discover creative and practical DIY over the toilet storage ideas to maximize your bathroom space. Transform clutter into organized elegance with these easy-to-follow tips!
(Many of the links in this article redirect to a specific reviewed product. Your purchase of these products through affiliate links helps to generate commission for Twigandthistle.com, at no extra cost. Learn more)
Running out of space in the bathroom? Finding smart storage solutions can be a game-changer. One often overlooked area is the space over the toilet. With a bit of creativity and some DIY skills, you can transform that blank wall into a functional and stylish storage spot. Whether you need extra room for toiletries, towels, or decor, there are plenty of ideas to help you maximize this area. Plus, making your own storage solutions means you can customize them to fit your needs and style. Get ready to turn that unused space into something both practical and attractive.
Getting Ready for Your Project
Measure the Space: Use a tape measure to check the height, width, and depth above the toilet. Write down these measurements to ensure your storage unit fits perfectly.
Gather Materials: Collect all necessary tools and materials. Common items include wood, screws, brackets, a drill, a saw, sandpaper, paint, and a level.
Safety Gear: Wear safety goggles, gloves, and a dust mask to protect yourself from wood dust and debris.
Clear the Area: Remove any items around the toilet. This will give you enough room to work and prevent accidents.
Workspace Setup: Set up a sturdy workbench or table. Ensure good lighting and ventilation in your workspace.
Cut and Sand Wood: Measure and cut the wood pieces according to your design. Sand the edges to smooth out any rough spots.
Pre-drill Holes: Pre-drill holes in the wood to make assembly easier and prevent splitting.
Paint or Stain: Apply paint or stain to the wood pieces. Let them dry completely before assembling.
Assemble the Unit: Follow your design plan to assemble the storage unit. Use screws and brackets for stability.
Mounting: Use a level to ensure the unit is straight. Secure it to the wall with appropriate anchors or screws.
Final Check: Double-check all screws and brackets to ensure everything is secure.
Gathering Supplies and Tools
- Wooden Boards: Used to create the shelves. Choose sturdy wood like pine or oak.
- Brackets: Metal or wooden supports that hold the shelves in place.
- Screws: Fasteners to attach the brackets to the wall and the shelves to the brackets.
- Drill: Power tool for making holes in the wall and wooden boards.
- Screwdriver: Tool for driving screws into the wall and wood.
- Level: Ensures shelves are even and straight.
- Measuring Tape: Measures the space above the toilet and the length of the shelves.
- Pencil: Marks where to drill holes and place brackets.
- Stud Finder: Locates wall studs for secure bracket installation.
- Sandpaper: Smooths the edges and surfaces of the wooden boards.
- Paint or Stain: Adds color or finish to the wooden shelves.
- Paintbrush: Applies paint or stain to the wood.
- Safety Goggles: Protects eyes while drilling and sanding.
- Dust Mask: Prevents inhalation of dust during sanding.
Skill Level and Time Needed
Skill Level: Beginner
Time Required: 2-4 hours
- Measure and Plan: 30 minutes
- Gather Materials: 15 minutes
- Assemble Shelving Unit: 1-2 hours
- Install Shelving Unit: 30 minutes
- Organize Items: 15-30 minutes
Instructions for Building
Measure the Space
- Use a tape measure to find the height, width, and depth above the toilet.
- Write down these measurements.
Choose Materials
- Decide on wood, metal, or plastic for shelves.
- Gather screws, brackets, and a drill.
Cut Shelves
- Cut shelves to fit the measured space.
- Sand edges to smooth them.
Install Brackets
- Mark where brackets will go on the wall.
- Drill holes for the brackets.
- Screw brackets into the wall.
Attach Shelves
- Place shelves on brackets.
- Secure shelves with screws.
Paint or Stain
- Apply paint or stain to shelves if desired.
- Let dry completely.
Add Storage Bins or Baskets
- Place bins or baskets on shelves for organized storage.
- Label bins for easy access.
Decorate
- Add decorative items like plants or candles.
- Ensure items are stable and won't fall.
Helpful Tips and Tricks
Measure the space above your toilet carefully. Knowing the exact dimensions helps avoid buying or building shelves that don't fit.
Use vertical space efficiently. Tall, narrow shelves or cabinets can maximize storage without taking up much room.
Floating shelves are a great option. They look modern and don't require floor space. Make sure to use strong wall anchors to support the weight.
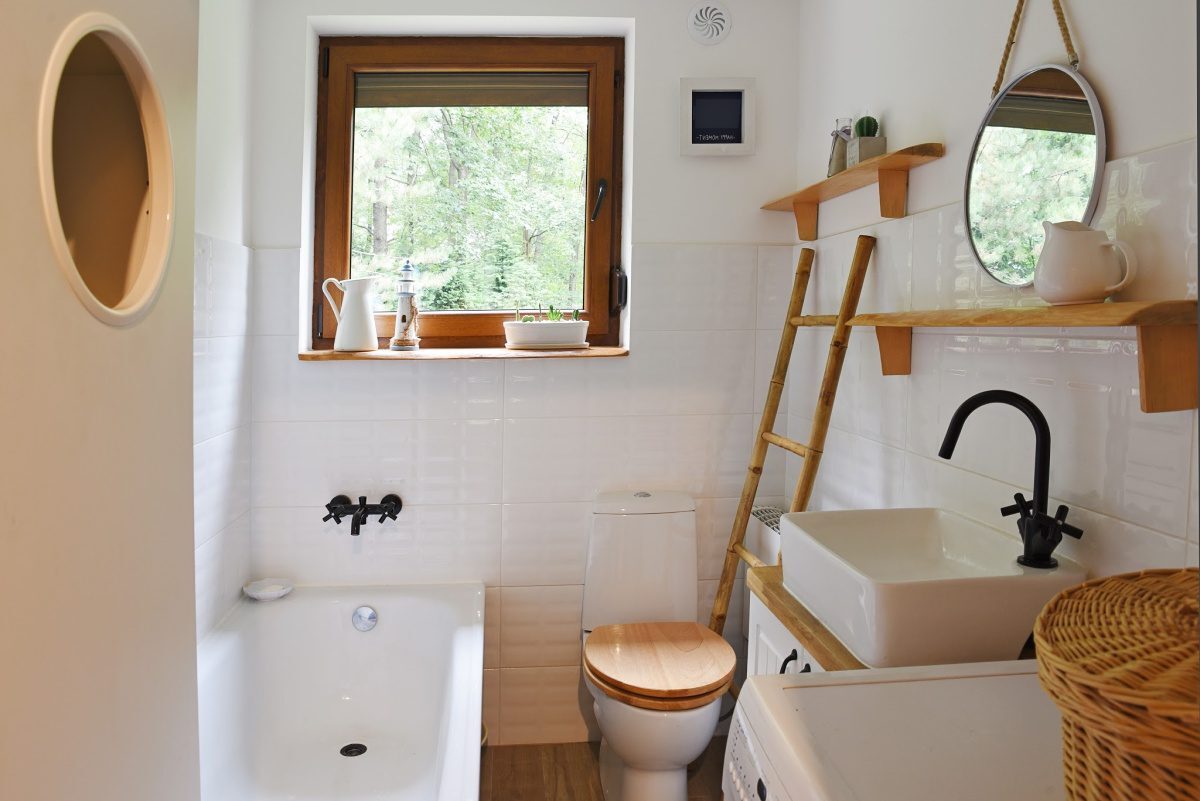
Repurpose old furniture like a small ladder or crates. Paint them to match your bathroom decor and stack them for a unique look.
Baskets and bins can keep items organized. Choose ones that fit your shelves and match your bathroom style.
Install hooks on the sides of shelves or cabinets. They can hold towels, robes, or even small baskets for extra storage.
Consider adjustable shelves. They allow you to change the height between shelves as your storage needs change.
Avoid overcrowding. Too many items can make the space look cluttered and messy.
Use water-resistant materials. Bathrooms can be humid, so choose materials like metal, plastic, or treated wood to prevent damage.
Common mistakes to avoid:
Skipping measurements. Always measure your space to ensure a good fit.
Ignoring wall studs. Shelves need to be anchored into studs for stability.
Overloading shelves. Too much weight can cause shelves to sag or fall.
Alternatives:
Tension rods with hanging baskets can create storage without drilling holes.
Over-the-toilet cabinets offer enclosed storage, keeping items out of sight.
Corner shelves utilize often-overlooked space and can add extra storage without taking up much room.
Estimating the Cost
Materials:
- Wood (for shelves): $20-$40
- Brackets (to hold shelves): $10-$20
- Paint or Stain (for finishing): $10-$15
- Screws and Anchors: $5-$10
Tools:
- Drill: $30-$50 (or borrow one)
- Screwdriver: $5-$10
- Measuring Tape: $5-$10
- Level: $10-$15
- Sandpaper: $5
Total Cost: $100-$175
Budget-Friendly Alternatives:
- Repurpose Old Wood: Free or very cheap
- Use Recycled Brackets: Free or cheap from thrift stores
- Borrow Tools: Free from friends or neighbors
- Skip Paint/Stain: Save $10-$15
Different Ways to Customize
Shelving Materials: Use wooden planks for a rustic look, glass shelves for a modern touch, or metal racks for an industrial vibe.
Colors: Paint shelves in bright colors like teal or yellow for a pop of color, or stick to neutral tones like white or gray for a minimalist feel.
Styles: Opt for floating shelves for a sleek appearance, ladder shelves for a trendy look, or cabinet-style storage for a more traditional approach.
Alternative Materials: Recycle old crates or pallets for a budget-friendly option, or use bamboo for an eco-friendly choice.
Decorative Touches: Add baskets or bins for extra organization, or incorporate hooks for hanging towels and other items.
Lighting: Install LED strip lights under shelves for a modern touch, or use clip-on lamps for a more functional approach.
Personalization: Customize with stencils or decals to add unique patterns or quotes, or use fabric liners to add texture and color.
Adjustable Shelves: Create adjustable shelving to accommodate different-sized items, making the storage more versatile.
Mixed Materials: Combine wood and metal for a mixed-material look, or use glass and wood for a blend of modern and rustic styles.
Space Utilization: Use corner shelves to maximize space, or install a tall, narrow unit for small bathrooms.
Eco-Friendly Tips
Reclaimed wood can be a fantastic choice for building shelves. It adds a rustic touch and reduces waste. Look for old pallets or leftover wood from other projects.
Repurposed crates or boxes can be stacked or mounted on the wall. These can often be found at thrift stores or even in your garage.
Glass jars or containers can be used to store smaller items like cotton balls or Q-tips. Clean out old food jars and give them a new life.
Metal pipes and fittings can create a sturdy and industrial-looking shelf. These can often be found at salvage yards or hardware stores.
Bamboo is a sustainable material that grows quickly. Bamboo shelves or baskets can add a natural look to your bathroom.
Old ladders can be repurposed into shelving units. Simply lean one against the wall and use the rungs to hold baskets or towels.
Fabric scraps can be sewn into small pouches or pockets to hang on hooks. These can hold toiletries or other small items.
Wine crates can be mounted on the wall for a unique storage solution. They are sturdy and often have a charming, vintage look.
Recycled plastic bins or containers can be used for organizing. Look for ones made from post-consumer materials to keep things eco-friendly.
Natural finishes like beeswax or linseed oil can be used to treat wood instead of chemical-laden varnishes. This keeps your project green and safe.
Making the Most of Your Space
Creating over-the-toilet storage can really transform your bathroom. By using shelves, cabinets, or even baskets, you can keep things tidy and accessible. Plus, it's a fun project that lets you add a personal touch to your space. Whether you go for a sleek, modern look or something more rustic, there's a solution that fits your style. Don't forget to measure your space carefully and choose materials that can handle bathroom humidity. With a bit of effort, you'll have a more organized, stylish bathroom in no time. So grab your tools, get creative, and make the most of that often-overlooked area above the toilet. Happy DIY-ing!
What materials do I need for over-the-toilet storage?
You’ll need wood, screws, brackets, and paint or stain. For a more polished look, consider adding molding or trim.
How much space should I leave between shelves?
Leave about 12-15 inches between shelves. This gives enough room for towels, toiletries, and decorative items.
Can I install over-the-toilet storage without drilling?
Yes, you can use tension rods or freestanding units. These options are great for renters or those who don’t want to damage walls.
What tools will I need?
Basic tools include a drill, level, measuring tape, and screwdriver. A saw might be needed if you’re cutting wood to size.
How do I ensure the storage is stable?
Use wall anchors and brackets to secure shelves. Make sure to find studs in the wall for extra stability.
Can I customize the storage to match my bathroom decor?
Absolutely! Paint or stain the wood to match your bathroom’s color scheme. Add decorative baskets or bins for a personalized touch.
Is it difficult to build over-the-toilet storage?
Not at all! With basic DIY skills and the right materials, you can build functional and stylish storage in just a few hours.