
Home>Home & Furniture>Bathroom>DIY Bathroom Plumbing: Step-by-Step Guide
Bathroom
DIY Bathroom Plumbing: Step-by-Step Guide
Published: July 15, 2024
Learn how to tackle DIY bathroom plumbing with our step-by-step guide. Save money and gain confidence by mastering essential plumbing skills for your bathroom projects.
(Many of the links in this article redirect to a specific reviewed product. Your purchase of these products through affiliate links helps to generate commission for Twigandthistle.com, at no extra cost. Learn more)
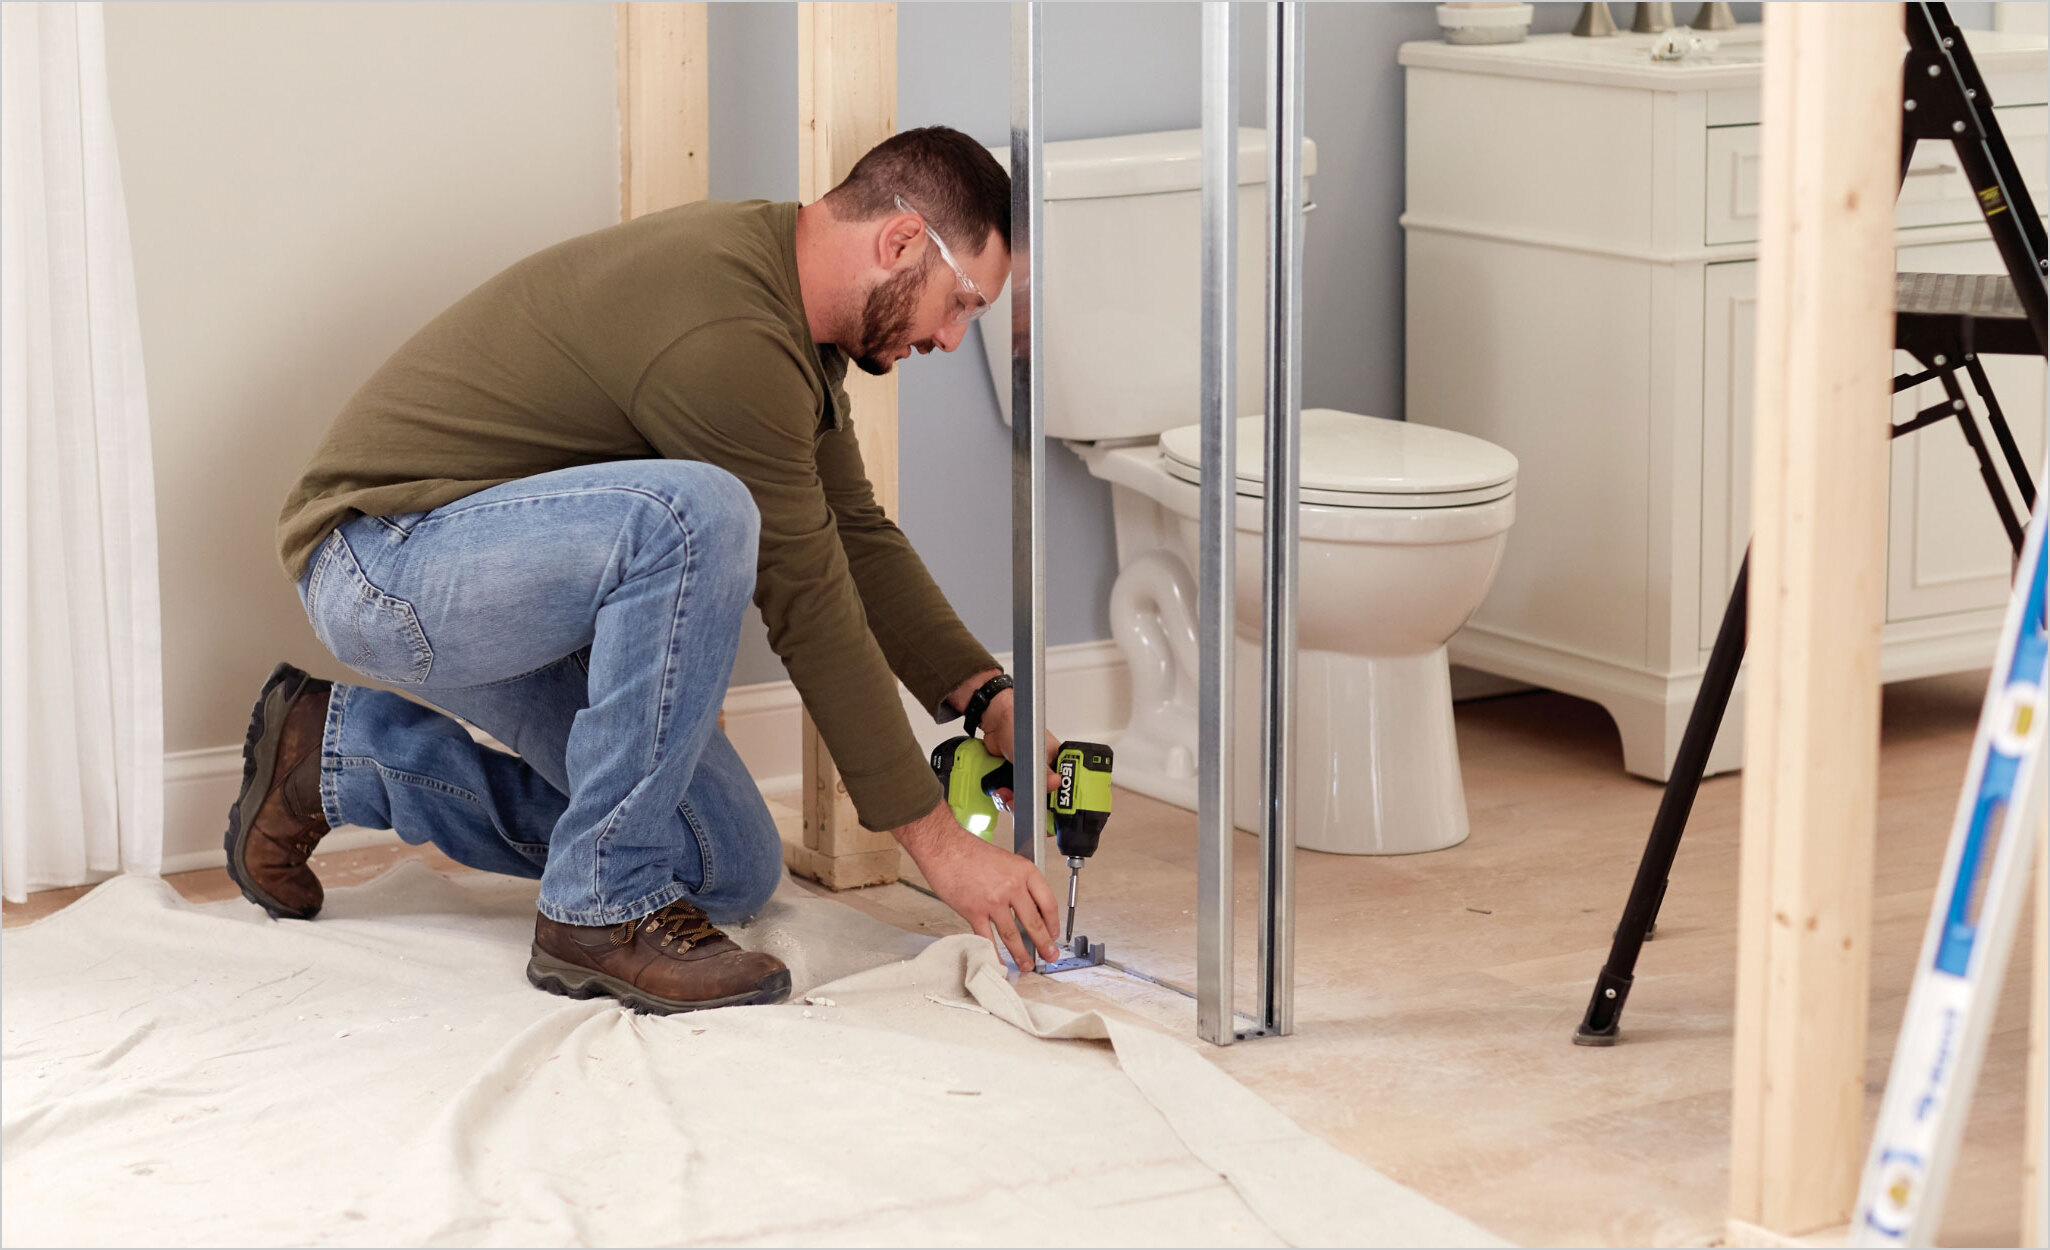
Tackling bathroom plumbing yourself can save money and boost your DIY skills. Though it might seem challenging at first, breaking it down into simple steps makes the task manageable. This guide will walk you through basic fixes, like unclogging drains or stopping leaks. No need for expensive tools or calling in professionals. You’ll learn how to identify issues, the right tools to use, and essential tips to keep everything running smoothly. Whether you're a beginner or looking to refine your plumbing knowledge, this guide offers practical advice for every homeowner. Ready to get started? Let's dive in!
Getting Ready for Your Plumbing Project
Gather Tools and Materials: Collect all necessary tools like wrenches, pipe cutters, plumber's tape, and materials such as pipes, fittings, and sealants.
Turn Off Water Supply: Locate and shut off the main water valve to prevent any leaks or flooding.
Clear the Workspace: Remove any items around the work area to ensure you have enough space to move and work comfortably.
Wear Safety Gear: Put on safety goggles and gloves to protect your eyes and hands from debris and sharp objects.
Check for Leaks: Inspect existing pipes for any signs of leaks or damage. Fix any issues before starting the new project.
Plan the Layout: Sketch a diagram of your plumbing layout. This helps visualize where each pipe and fitting will go.
Measure and Cut Pipes: Measure the lengths of pipes needed and cut them accurately using a pipe cutter.
Clean Pipe Ends: Use sandpaper to smooth the edges of cut pipes, ensuring a better fit and seal.
Apply Plumber’s Tape: Wrap plumber's tape around the threads of fittings to ensure a watertight seal.
Test Fit: Assemble the pipes and fittings without glue to check if everything fits correctly.
Ventilation: Ensure the area is well-ventilated, especially if using adhesives or sealants that emit fumes.
Have a Bucket Ready: Keep a bucket nearby to catch any residual water when disconnecting old pipes.
Read Instructions: Go through the manufacturer's instructions for any new fixtures or materials being installed.
Emergency Plan: Know where the nearest shut-off valve is in case of an emergency during the project.
Essential Materials and Tools
- Pipe Wrench: A large adjustable wrench used for gripping and turning pipes.
- Adjustable Wrench: A smaller wrench for tightening or loosening nuts and bolts.
- Plumber's Tape: Also known as Teflon tape, it helps seal pipe threads to prevent leaks.
- Pipe Cutter: A tool for cutting pipes to the desired length.
- PVC Pipes: Plastic pipes commonly used for plumbing.
- PVC Cement: A special adhesive for bonding PVC pipes and fittings.
- Pipe Fittings: Connectors used to join sections of pipe together.
- Plunger: A tool for clearing blockages in drains.
- Plumber's Putty: A malleable substance used to create watertight seals around fixtures.
- Bucket: Useful for catching water when working on pipes.
- Hacksaw: A saw for cutting metal or plastic pipes.
- Tape Measure: For measuring pipe lengths and distances.
- Level: Ensures pipes and fixtures are installed straight.
- Safety Glasses: Protects eyes from debris and splashes.
- Gloves: Protect hands from sharp edges and chemicals.
- Drain Snake: A flexible tool for removing clogs from pipes.
- Caulk and Caulk Gun: Used to seal gaps around fixtures to prevent water leaks.
- Bucket: Handy for catching water when working on pipes.
- Flashlight: Helps see in dark or hard-to-reach areas.
- Screwdrivers: Both flathead and Phillips for removing and installing screws.
Required Skills and Time Commitment
Skill Level: Intermediate
Time Required: Approximately 4-6 hours
Important Keywords:
- Skill Level
- Time Required
- Intermediate
- 4-6 hours
Steps:
- Turn off water supply: Prevent leaks and flooding.
- Remove old fixtures: Unscrew and detach.
- Install new fixtures: Follow manufacturer instructions.
- Connect plumbing: Ensure tight seals.
- Test for leaks: Run water and check connections.
- Seal and finish: Apply caulk around fixtures.
Detailed Steps to Follow
Turn Off Water Supply
- Locate the main water valve.
- Turn the valve clockwise to shut off water.
Drain Existing Water
- Open faucets to drain remaining water.
- Flush the toilet to empty the tank.
Remove Old Fixtures
- Use a wrench to disconnect pipes.
- Unscrew and remove old faucets, sinks, or toilets.
Install New Fixtures
- Position new sink or toilet in place.
- Secure fixtures with screws or bolts.
Connect Plumbing
- Attach supply lines to new fixtures.
- Tighten connections with a wrench.
Seal Joints
- Apply plumber’s tape to threaded connections.
- Use pipe sealant on non-threaded joints.
Turn On Water Supply
- Slowly turn the main valve counterclockwise.
- Check for leaks around new fixtures.
Test Fixtures
- Open faucets to ensure water flows properly.
- Flush the toilet to check for proper operation.
Clean Up
- Wipe down new fixtures.
- Dispose of old materials responsibly.
Handy Tips and Tricks
Plan Ahead: Before starting, gather all necessary tools and materials. This includes wrenches, pipe cutters, Teflon tape, and replacement parts.
Turn Off Water Supply: Always shut off the water supply to avoid flooding. Locate the main valve and turn it off.
Use Teflon Tape: Wrap Teflon tape around pipe threads to prevent leaks. Wrap it clockwise to ensure a tight seal.
Measure Twice, Cut Once: Double-check measurements before cutting pipes. This avoids wasting materials and ensures a proper fit.
Label Pipes: Label hot and cold water pipes to avoid confusion during installation.
Check for Leaks: After completing the plumbing work, turn the water back on and check for leaks. Tighten connections if necessary.
Common Mistakes to Avoid:
- Overtightening Connections: This can damage threads and cause leaks. Tighten just enough to secure.
- Ignoring Local Codes: Follow local plumbing codes to ensure safety and compliance.
- Using the Wrong Tools: Using improper tools can damage pipes and fittings. Invest in quality tools.
Alternatives for Materials or Methods:
- PVC vs. Copper Pipes: PVC is easier to work with and cheaper, but copper is more durable and heat-resistant.
- Push-Fit Fittings: These are easier to install than traditional fittings and don’t require soldering.
- Flexible Hoses: Use flexible hoses for easier installation and adjustments. They can replace rigid pipes in tight spaces.
Estimating the Costs
Pipes and Fittings: Expect to spend around $100-$150 for PVC pipes, connectors, and valves.
Wrenches and Pliers: A basic set of wrenches and pliers will cost about $30-$50.
Pipe Cutter: A pipe cutter is essential, costing around $15-$25.
Plumber's Tape: A roll of plumber's tape is about $2-$5.
Sealant and Adhesive: Budget $10-$20 for plumber's putty and PVC cement.
Drain Snake: A drain snake costs roughly $20-$30.
Bucket and Towels: A bucket and towels for cleanup will be around $10-$15.
Safety Gear: Gloves and goggles are necessary, costing about $10-$20.
Total Estimated Cost: $197-$315
Budget-Friendly Alternatives:
- Borrow Tools: Ask friends or family to borrow wrenches, pliers, and a pipe cutter.
- Buy Used: Check online marketplaces for used tools and materials.
- Discount Stores: Visit discount or dollar stores for buckets, towels, and safety gear.
Personalizing Your Plumbing Work
Alternative materials can make a big difference. Instead of traditional PVC pipes, consider using PEX tubing. PEX is flexible, easier to install, and resistant to freezing. For a more eco-friendly option, copper pipes can be used, though they are more expensive and require soldering skills.
Colors can also be customized. Standard white or chrome fixtures are common, but you can opt for matte black, brushed nickel, or even oil-rubbed bronze for a more unique look. These finishes can give your bathroom a modern or vintage feel, depending on your preference.
Styles of fixtures can vary widely. For a contemporary look, choose sleek, minimalist faucets and showerheads. For a vintage or rustic style, consider antique-style fixtures with intricate designs. You can also mix and match styles for an eclectic look.
Sink options are another area for customization. Instead of a standard drop-in sink, consider a vessel sink that sits on top of the counter. These come in various materials like glass, stone, or ceramic. For a more modern look, an undermount sink provides a seamless appearance.
Showerheads offer another chance for personalization. A rainfall showerhead can provide a luxurious experience, while a handheld showerhead offers flexibility. Some showerheads even come with LED lights that change color based on water temperature.
Toilet styles can also vary. A wall-mounted toilet saves space and gives a modern look, while a high-tank pull chain toilet can add a vintage touch. Dual-flush toilets are an eco-friendly option, allowing you to choose between a full or half flush.
Vanity options range from freestanding units to built-in cabinets. Freestanding vanities can be moved and offer a more flexible layout, while built-in cabinets provide more storage and a streamlined look. Materials for vanities can include wood, metal, or even concrete for a unique touch.
Lighting is another area to get creative. Instead of standard overhead lights, consider wall sconces or pendant lights. LED strip lighting under cabinets can add a modern touch and improve visibility.
Flooring choices can also impact the overall look. Instead of traditional tile, consider vinyl planks that mimic wood or stone. These are easier to install and maintain. For a more luxurious feel, heated floors can be added, especially in colder climates.
Mirror options can range from simple frameless designs to ornate framed mirrors. Some mirrors come with built-in LED lighting or anti-fog features, adding both functionality and style.
Storage solutions can be customized to fit your needs. Instead of standard shelves, consider recessed niches in the shower or above the sink. Floating shelves can add a modern touch and keep the floor space clear.
Towel racks and hooks can also be personalized. Instead of traditional bars, consider ladder-style racks or individual hooks for a more modern look. Heated towel racks can add a touch of luxury.
Accessories like soap dispensers, toothbrush holders, and waste bins can also be chosen to match your overall style. Opt for materials like stainless steel, glass, or bamboo to complement your design.
Wall treatments can range from paint to tile to wallpaper. For a unique look, consider a feature wall with a bold color or pattern. Waterproof wallpaper can add a touch of personality without compromising functionality.
Ceiling treatments can also be customized. Instead of a plain white ceiling, consider wood paneling or beadboard for a more rustic look. Painted ceilings can add a pop of color and make the room feel more cohesive.
Ventilation is crucial in a bathroom. Instead of a standard exhaust fan, consider a fan with a built-in light or heater. Some fans are designed to be ultra-quiet, adding to the overall comfort of the space.
Eco-Friendly Plumbing Tips
Eco-friendly materials can make your bathroom plumbing project more sustainable. Copper pipes are a great choice because they are durable and recyclable. PEX pipes are another option; they are flexible, require fewer fittings, and have a lower environmental impact during production.
Reusing materials is another way to be eco-friendly. If you have old pipes or fixtures in good condition, clean them up and use them again. This reduces waste and saves money.
Low-flow fixtures help conserve water. Install low-flow showerheads, faucets, and toilets to reduce water usage. These fixtures are easy to find and install.
Seal leaks with eco-friendly sealants. Look for products labeled as non-toxic or low-VOC (volatile organic compounds). These are better for your health and the environment.
Insulate pipes to save energy. Use pipe insulation made from recycled materials to keep hot water hot and reduce energy consumption.
Compostable or biodegradable materials can be used for temporary fixes. For example, use biodegradable pipe tape instead of traditional plastic tape.
Solar water heaters are a sustainable option for heating water. They use the sun's energy, reducing reliance on fossil fuels.
Greywater systems can recycle water from sinks and showers for use in toilets or irrigation. This reduces water waste and can be a fun DIY project.
Rainwater harvesting systems collect rainwater for use in your bathroom. This can be used for flushing toilets or even showering if properly filtered.
Proper disposal of old materials is crucial. Recycle old metal pipes and fixtures. Take hazardous materials like old sealants or adhesives to a proper disposal facility.
Energy-efficient pumps can be used if your plumbing system requires a pump. Look for pumps with the Energy Star label to ensure they use less electricity.
Smart water monitors can help you track water usage and detect leaks early. These devices can be installed easily and help you conserve water.
Natural cleaning products should be used to maintain your plumbing. Avoid harsh chemicals that can harm the environment. Use vinegar, baking soda, or eco-friendly cleaners instead.
Educate yourself on local building codes and regulations. Some areas have specific requirements for eco-friendly plumbing, and following these can make your project more sustainable.
Your DIY Bathroom Plumbing Adventure
You've tackled bathroom plumbing like a pro. From fixing leaks to installing new fixtures, you've gained valuable skills. Remember, patience and attention to detail are your best friends in any DIY project. If you ever feel stuck, don't hesitate to consult online tutorials or ask for advice at your local hardware store.
Keep your tools organized and always double-check your work. This ensures everything runs smoothly and safely. With each project, your confidence will grow, making future tasks easier.
So, next time you face a plumbing issue, you'll know exactly what to do. Happy plumbing!
How do I fix a leaky faucet?
First, turn off the water supply. Then, remove the handle and use a wrench to take out the cartridge. Replace any worn-out parts, reassemble everything, and turn the water back on. Test to make sure the leak is gone.
What tools do I need for bathroom plumbing?
You’ll need a wrench, pliers, a pipe cutter, plumber’s tape, and a plunger. A bucket and some old towels can also come in handy for spills.
How do I unclog a bathroom sink?
Start with a plunger. If that doesn’t work, use a drain snake or a mixture of baking soda and vinegar. Pour boiling water down the drain to finish the job.
Can I replace a toilet myself?
Yes, you can! Turn off the water supply, drain the toilet, and disconnect it from the floor. Install the new toilet by following the manufacturer’s instructions, then reconnect the water supply.
Why is my shower pressure low?
Check the showerhead for mineral buildup. Soak it in vinegar overnight, then scrub it clean. If that doesn’t help, inspect the pipes for leaks or blockages.
How do I stop my toilet from running?
Open the tank and check the flapper valve. If it’s worn out, replace it. Adjust the float arm if necessary to ensure the water stops at the right level.
What should I do if a pipe bursts?
Immediately turn off the main water supply. Drain the pipes by turning on all faucets. Call a plumber if you’re not comfortable fixing it yourself.