
Home>Create & Decorate>DIY & Crafts>How To Build A Double Fence Gate
DIY & Crafts
How To Build A Double Fence Gate
Published: May 30, 2024

Senior Editor in Create & Decorate, Kathryn combines traditional craftsmanship with contemporary trends. Her background in textile design and commitment to sustainable crafts inspire both content and community.
Learn how to build a double fence gate with our step-by-step DIY guide. Perfect for DIY & Crafts enthusiasts looking to enhance their outdoor space.
(Many of the links in this article redirect to a specific reviewed product. Your purchase of these products through affiliate links helps to generate commission for Twigandthistle.com, at no extra cost. Learn more)
Introduction
Are you looking to add a touch of elegance and functionality to your property? Building a double fence gate can be a great way to enhance the security and aesthetics of your outdoor space. Whether you're a seasoned DIY enthusiast or a novice looking to take on a new project, this guide will walk you through the step-by-step process of constructing a sturdy and stylish double fence gate for your home. So, roll up your sleeves and get ready to dive into the world of DIY home improvement!
Planning and Preparation
Before diving into the construction of your double fence gate, it's crucial to lay the groundwork for a successful project. Here's how to get started:
-
Assess Your Needs: Determine the purpose of your double fence gate. Is it primarily for security, aesthetics, or both? Understanding your specific needs will help you make informed decisions throughout the planning and construction process.
-
Check Local Regulations: Before you begin building, familiarize yourself with any local regulations or codes that may govern the construction of fences and gates in your area. This step will ensure that your project complies with legal requirements.
-
Gather Materials and Tools: Take inventory of the materials and tools you'll need for the project. This may include lumber, hinges, latches, screws, a level, measuring tape, and a saw. Ensuring you have all necessary items on hand will prevent unnecessary delays.
-
Create a Design Plan: Sketch out a design plan for your double fence gate. Consider the dimensions, style, and any additional features you want to incorporate. Having a clear vision of the end product will guide your construction process.
-
Prepare the Work Area: Clear the area where the gate will be installed, removing any obstacles or debris. A clean and organized work area will make the construction process safer and more efficient.
By taking the time to plan and prepare thoroughly, you'll set the stage for a smooth and successful construction process. Now that you've laid the groundwork, it's time to move on to the next phase of building your double fence gate.
Measuring and Marking
Accurate measurements are the cornerstone of a well-constructed double fence gate. Here's how to tackle the crucial steps of measuring and marking:
-
Measure the Opening: Begin by measuring the width of the opening where the double fence gate will be installed. Take precise measurements at the top, middle, and bottom of the opening to account for any variations in the terrain.
-
Determine the Height: Decide on the desired height of your double fence gate. Whether you're aiming for added security or a specific aesthetic, make sure to measure and mark the height consistently across the gate frame.
-
Mark the Lumber: Using a pencil and a straight edge, mark the measurements on the lumber that will form the frame of the gate. Double-check your markings to ensure accuracy before cutting the lumber.
-
Account for Clearances: When marking the placement of hinges and latches on the gate frame, consider the necessary clearances for smooth operation. Properly positioning these components will prevent any issues with the functionality of the gate.
-
Double-Check Everything: Before making any cuts or permanent markings, take a moment to review all measurements and marks. Ensuring accuracy at this stage will save you time and frustration later in the construction process.
By meticulously measuring and marking the components of your double fence gate, you'll lay the foundation for a precise and well-fitted final product. With this crucial step completed, you're ready to move on to the next phase of building your double fence gate.
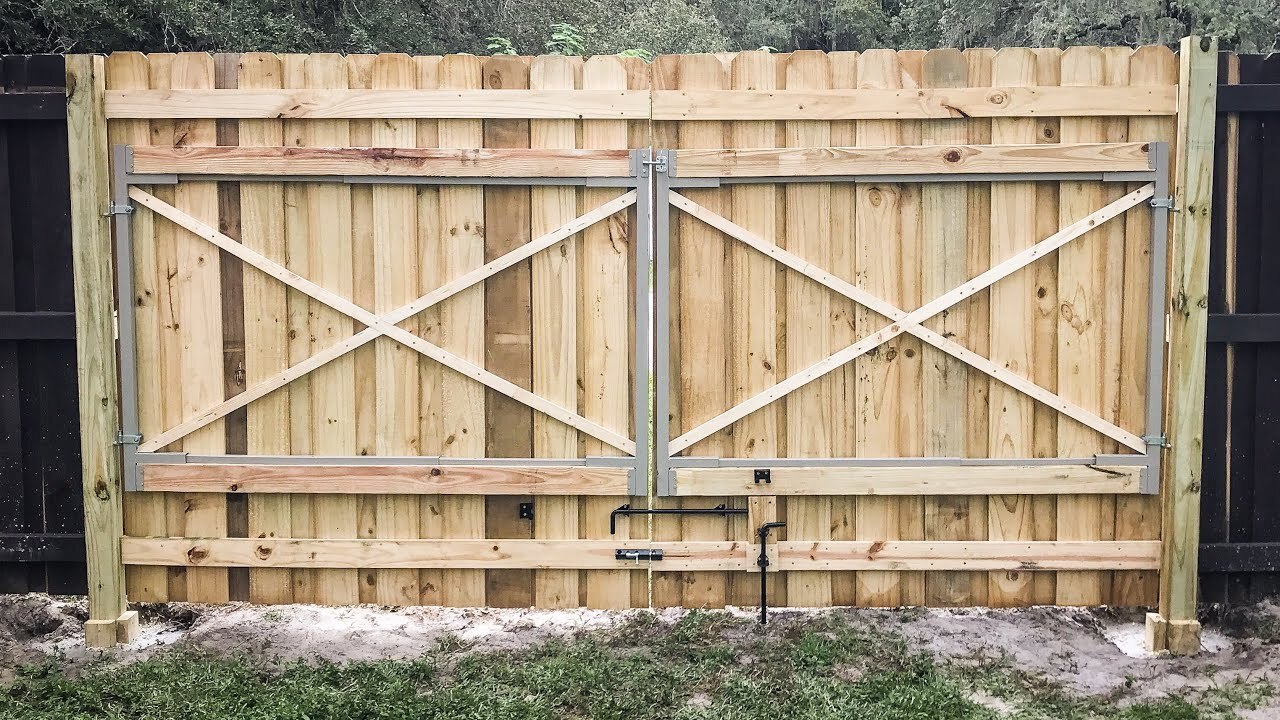
Building the Gate Frame
With precise measurements and markings in hand, it's time to dive into the construction of the gate frame. Follow these steps to build a sturdy and reliable frame for your double fence gate:
-
Cut the Lumber: Using a saw, carefully cut the lumber according to the marked measurements. Take your time to ensure clean and accurate cuts, as they will directly impact the structural integrity of the gate frame.
-
Assemble the Frame: Lay out the cut pieces of lumber to form the rectangular frame of the gate. Use a square to ensure that the corners are perfectly 90 degrees, which is essential for a well-aligned and stable frame.
-
Secure the Joints: Once the frame is assembled, use screws or nails to secure the joints. Pre-drilling pilot holes can prevent the wood from splitting and ensure a secure connection between the pieces of lumber.
-
Add Cross Braces (If Needed): Depending on the size and design of your double fence gate, you may need to add cross braces to the frame for additional support. Measure and cut the braces to fit diagonally across the frame, then secure them in place.
-
Check for Squareness: Before proceeding, double-check that the frame is perfectly square. This can be done by measuring the diagonals of the frame – if they are equal, the frame is square. Making adjustments at this stage will prevent issues during the installation of the gate.
-
Apply Wood Preservative (Optional): To enhance the longevity of the gate frame, consider applying a wood preservative or sealant. This extra step can protect the lumber from moisture, rot, and insect damage, especially if your gate will be exposed to the elements.
By following these steps, you'll construct a robust and well-crafted frame for your double fence gate. With the frame in place, you're now ready to move on to the next phase of the construction process.
Attaching Hinges and Latches
Attaching hinges and latches is a critical step in the construction of your double fence gate, as it directly impacts the functionality and security of the gate. Follow these steps to ensure that your hinges and latches are installed correctly:
-
Position the Hinges: Begin by positioning the hinges on the gate frame. For a double gate, you will typically install two hinges on the inside of each gate, with one hinge near the top and the other near the bottom. Use a level to ensure that the hinges are aligned vertically and horizontally.
-
Mark the Screw Holes: Once the hinges are positioned, mark the locations of the screw holes on the gate frame. This will ensure that the hinges are attached in the correct position and that the gate will swing smoothly.
-
Pre-Drill the Holes: Before attaching the hinges, pre-drill pilot holes for the screws. This will prevent the wood from splitting and make it easier to drive the screws into place.
-
Attach the Hinges: With the pilot holes drilled, secure the hinges to the gate frame using screws. Make sure the hinges are firmly attached and that the movement is smooth and unhindered.
-
Install the Latch: Once the hinges are in place, it's time to install the latch. Position the latch on the gate frame opposite the hinges, ensuring that it aligns with the corresponding component on the other gate. Mark the screw holes and pre-drill them before attaching the latch securely.
-
Test the Operation: After attaching the hinges and latch, test the operation of the gate. Open and close it several times to ensure that it swings freely and that the latch engages properly. Make any necessary adjustments to the hinges or latch to ensure smooth operation.
-
Add a Drop Rod (Optional): If your double fence gate is designed to be secured at the center, consider adding a drop rod to one of the gates. This additional hardware will provide stability and security when the gate is closed.
By following these steps, you'll ensure that the hinges and latches are securely and correctly attached to your double fence gate. With these components in place, your gate will be ready for installation and use.
Installing the Gate
With the gate frame constructed and the hinges and latches securely attached, it's time to proceed with the installation of your double fence gate. Follow these steps to ensure a smooth and successful installation process:
-
Prepare the Opening: Begin by ensuring that the opening where the gate will be installed is clean and free of any obstructions. If necessary, make any adjustments to the surrounding fence or posts to accommodate the gate.
-
Position the Gate: With the help of a friend or family member, position the gate in the opening. Use shims or wedges to hold the gate in place at the desired height and ensure that it is level and plumb.
-
Attach the Hinges to the Post: Starting with one gate, attach the hinges to the corresponding post using screws. Ensure that the hinges are aligned with the ones on the gate and that they allow the gate to swing freely.
-
Secure the Gate: Once the hinges are attached to the post, secure the gate in place by driving screws through the hinges and into the gate post. Double-check the alignment and operation of the gate before fully securing it in place.
-
Repeat for the Second Gate: If you're installing a double fence gate, repeat the above steps for the second gate. Ensure that both gates are aligned and level with each other to allow for smooth operation.
-
Test the Operation: After both gates are installed, test the operation of the double fence gate. Open and close it several times to ensure that both gates swing freely and that they close securely with the latch.
-
Make Adjustments: If necessary, make any final adjustments to the gate's position, hinges, or latch to ensure that it operates smoothly and securely. This may include tightening or loosening screws, adding shims, or adjusting the latch mechanism.
By following these steps, you'll successfully install your double fence gate, completing the construction process and adding both functionality and visual appeal to your property. With the gate in place, you can now enjoy the added security and convenience that it provides.
Adding Finishing Touches
After the successful installation of your double fence gate, it's time to add the finishing touches that will enhance its appearance and functionality. Here are the essential steps to complete your project with finesse:
-
Apply a Protective Finish: Consider applying a protective finish to the gate to safeguard it against the elements. A coat of weather-resistant paint or stain can prolong the life of the wood and add a polished look to your gate.
-
Add Decorative Elements: If you want to elevate the aesthetic appeal of your double fence gate, consider adding decorative elements such as ornamental hinges, finials, or custom metalwork. These embellishments can infuse personality and style into your gate, making it a standout feature of your property.
-
Install Gate Stops: To prevent damage to your gate and surrounding structures, install gate stops at the open and closed positions. These simple yet effective devices will protect your gate from slamming shut and provide a cushioned stop when fully open.
-
Adjust the Latch Mechanism: Fine-tune the latch mechanism to ensure a secure and reliable closure. Proper adjustment will prevent the gate from sagging or becoming misaligned over time, maintaining its functionality for years to come.
-
Inspect and Secure Hardware: Take the time to inspect all hardware, including hinges, latches, and screws, to ensure they are securely fastened. Tighten any loose hardware and replace any worn components to maintain the integrity of your gate.
-
Landscaping and Lighting: Consider landscaping around the gate to integrate it seamlessly into your outdoor space. Additionally, adding lighting near the gate can enhance its visibility and security, especially during the evening hours.
By adding these finishing touches, you'll not only enhance the visual appeal of your double fence gate but also ensure its long-term durability and functionality. With these final details attended to, step back and admire the impressive addition to your property that you've created through your DIY efforts.