
Home>Create & Decorate>DIY & Crafts>How To Build A Crossbuck Fence
DIY & Crafts
How To Build A Crossbuck Fence
Published: May 30, 2024

Content Creator specializing in woodworking and interior transformations. Caegan's guides motivate readers to undertake their own projects, while his custom furniture adds a personal touch.
Learn how to build a beautiful crossbuck fence with our step-by-step DIY guide. Perfect for DIY & Crafts enthusiasts looking to enhance their outdoor space.
(Many of the links in this article redirect to a specific reviewed product. Your purchase of these products through affiliate links helps to generate commission for Twigandthistle.com, at no extra cost. Learn more)
Introduction
So, you've decided to spruce up your property with a charming crossbuck fence. Whether you're looking to add a touch of rustic charm or create a boundary for your property, a crossbuck fence can be a great addition to your home. In this guide, we'll walk you through the step-by-step process of building your own crossbuck fence, from choosing the right materials to adding the finishing touches. Let's roll up our sleeves and get started!
Choosing the Right Materials
When it comes to building a sturdy and visually appealing crossbuck fence, selecting the right materials is crucial. Here's what you'll need:
1. Wood
Opt for durable, weather-resistant wood such as cedar or redwood. These types of wood not only offer natural beauty but also stand the test of time, requiring minimal maintenance.
2. Fence Posts
Choose pressure-treated wooden posts to ensure longevity and resistance to rot and decay. The posts should be long enough to provide sufficient support for the fence.
3. Crossbuck Panels
For the classic crossbuck design, you'll need sturdy wooden boards to create the distinctive "X" pattern. Ensure the boards are of uniform size and free from defects to achieve a polished look.
4. Fasteners
Select galvanized or stainless steel nails and screws to secure the components of the fence. These materials are corrosion-resistant, ensuring the longevity of your crossbuck fence.
5. Concrete
To anchor the fence posts securely, you'll need concrete for setting them in place. Opt for quick-setting concrete for efficient installation.
By choosing high-quality materials, you can ensure that your crossbuck fence not only looks great but also withstands the elements for years to come.
Setting the Posts
-
Mark the Layout: Begin by marking the layout of your fence using stakes and string. This will help you visualize the placement of the posts and ensure a straight and uniform installation.
-
Dig the Holes: Using a post hole digger, excavate holes for the fence posts. The depth of the holes should be approximately one-third of the length of the posts, allowing for sufficient stability.
-
Add Gravel: Pour a layer of gravel into the bottom of each hole. This will facilitate drainage and prevent the posts from sitting directly in water, which can lead to rot over time.
-
Set the Posts: With the help of a friend, carefully place the posts into the holes. Use a level to ensure that each post is perfectly vertical. For added stability, consider bracing the posts with temporary supports until the concrete sets.
-
Pour Concrete: Once the posts are in position, it's time to pour the concrete. Prepare the concrete mix according to the manufacturer's instructions and fill the holes around the posts. Tamp the concrete to remove air pockets and ensure a solid foundation.
-
Check for Alignment: Before the concrete sets, double-check the alignment and verticality of each post. Any adjustments should be made at this stage to avoid issues during the next steps of the installation.
-
Allow to Cure: Allow the concrete to cure as per the recommended time frame provided by the manufacturer. This typically ranges from 24 to 48 hours, during which time the posts should remain undisturbed.
By following these steps, you can ensure that the posts of your crossbuck fence are securely anchored, providing the foundation for a durable and visually appealing structure.
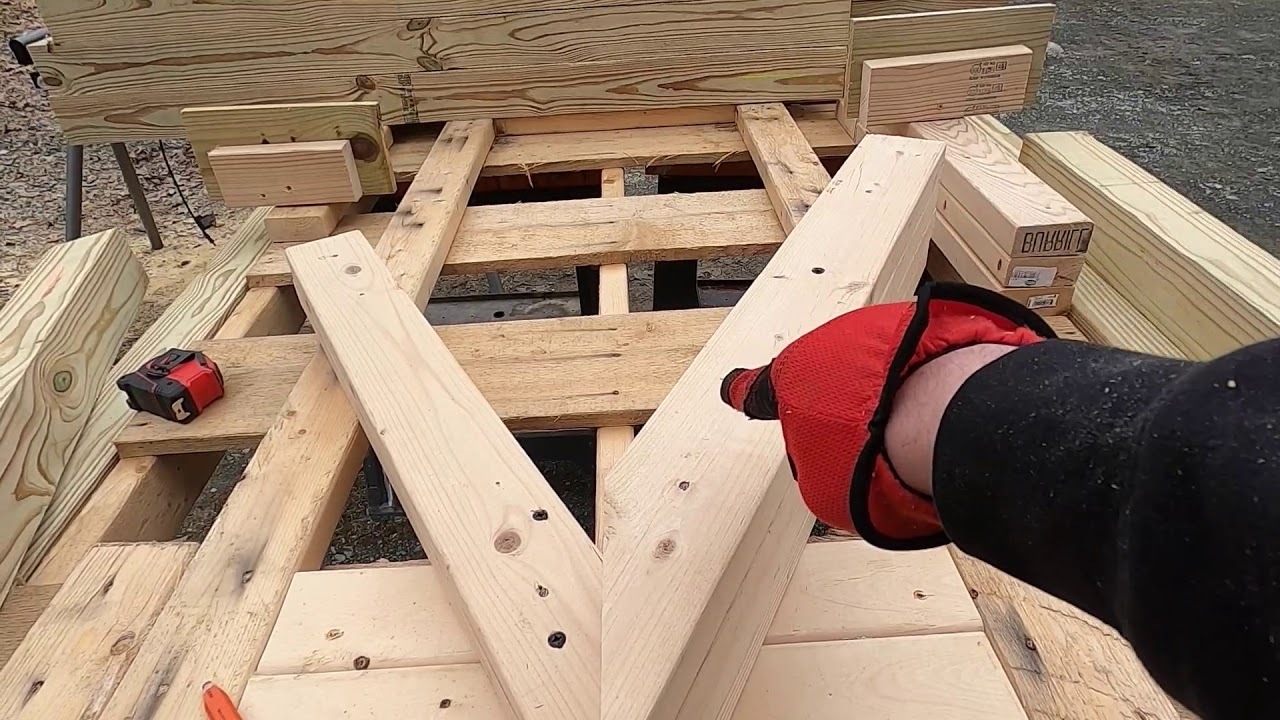
Installing the Crossbucks
-
Measure and Mark: Begin by measuring the length of each fence section where the crossbucks will be installed. Mark the positions where the crossbucks will intersect with the horizontal rails. Use a pencil and a measuring tape to ensure accuracy.
-
Cut the Crossbuck Boards: Using a saw, carefully cut the wooden boards to the appropriate length for the crossbucks. Ensure that the ends are cut at the correct angle to form a seamless "X" pattern when installed.
-
Position the Crossbucks: Place the cut boards in position on the fence, forming the "X" pattern. Use clamps to hold the boards in place temporarily while you make any necessary adjustments.
-
Secure the Crossbucks: Once satisfied with the positioning, use galvanized or stainless steel screws to secure the crossbucks to the horizontal rails. Ensure that the screws are driven in firmly to prevent any movement.
-
Check for Alignment: After installing each crossbuck, step back and inspect the alignment and spacing. Make any adjustments as needed to maintain a uniform and visually appealing appearance.
-
Repeat the Process: Continue measuring, cutting, and installing the crossbucks for each section of the fence. Take your time to ensure that each "X" pattern is consistent and well-aligned with the overall design.
-
Finishing Touches: Once all the crossbucks are in place, inspect the entire fence for any protruding screws or rough edges. Sand down any rough areas and ensure that the surface is smooth and splinter-free.
By following these steps, you can effectively install the crossbucks on your fence, adding a touch of timeless charm and character to your property.
Adding the Finishing Touches
-
Stain or Paint: Consider applying a coat of wood stain or paint to enhance the appearance of your crossbuck fence. Choose a color that complements the overall aesthetic of your property and provides protection against the elements.
-
Seal the Wood: To prolong the lifespan of your fence, apply a wood sealer to protect it from moisture, UV rays, and general wear and tear. This step will help maintain the natural beauty of the wood while preventing decay.
-
Add Post Caps: Install decorative post caps on the top of each fence post to add a polished and elegant touch. Post caps not only enhance the visual appeal but also protect the end grain of the posts from water infiltration.
-
Trim Overhanging Boards: If any of the crossbuck boards extend beyond the horizontal rails, use a saw to trim them to a uniform length. This step will ensure a neat and cohesive appearance for your fence.
-
Gate Installation: If your crossbuck fence includes a gate, ensure that it is properly installed and functions smoothly. Check the hinges, latch, and alignment to guarantee ease of use and security.
-
Landscaping: Consider landscaping around the perimeter of the fence to complement its charm. Planting shrubs, flowers, or adding mulch can enhance the overall appeal of your property and the newly installed crossbuck fence.
-
Regular Maintenance: Establish a routine for maintaining your crossbuck fence. This may include periodic cleaning, inspecting for any loose components, and addressing any signs of wear or damage promptly.
By adding these finishing touches, you can elevate the visual impact of your crossbuck fence and ensure its longevity, contributing to the overall beauty and functionality of your property.
Conclusion
Congratulations! You've successfully learned how to build a stunning crossbuck fence that adds both charm and functionality to your property. By carefully selecting high-quality materials, setting the posts securely, installing the crossbucks with precision, and adding the finishing touches, you've created a timeless and durable structure. Whether you're looking to enhance the aesthetic appeal of your home, create a boundary for your property, or add a touch of rustic elegance, your new crossbuck fence is sure to make a lasting impression. With regular maintenance and care, your beautifully crafted fence will stand the test of time, providing both visual delight and practical value for years to come. Now, step back and admire your handiwork – you've built a crossbuck fence to be proud of!