
Home>Create & Decorate>DIY & Crafts>DIY Whelping Box: Step-by-Step Guide To Building A Safe Haven For Your Puppies
DIY & Crafts
DIY Whelping Box: Step-by-Step Guide To Building A Safe Haven For Your Puppies
Published: June 9, 2024

Content Creator specializing in woodworking and interior transformations. Caegan's guides motivate readers to undertake their own projects, while his custom furniture adds a personal touch.
Discover how to create a secure and comfortable whelping box for your puppies with our step-by-step DIY guide. Perfect for DIY & Crafts enthusiasts!
(Many of the links in this article redirect to a specific reviewed product. Your purchase of these products through affiliate links helps to generate commission for Twigandthistle.com, at no extra cost. Learn more)
Introduction
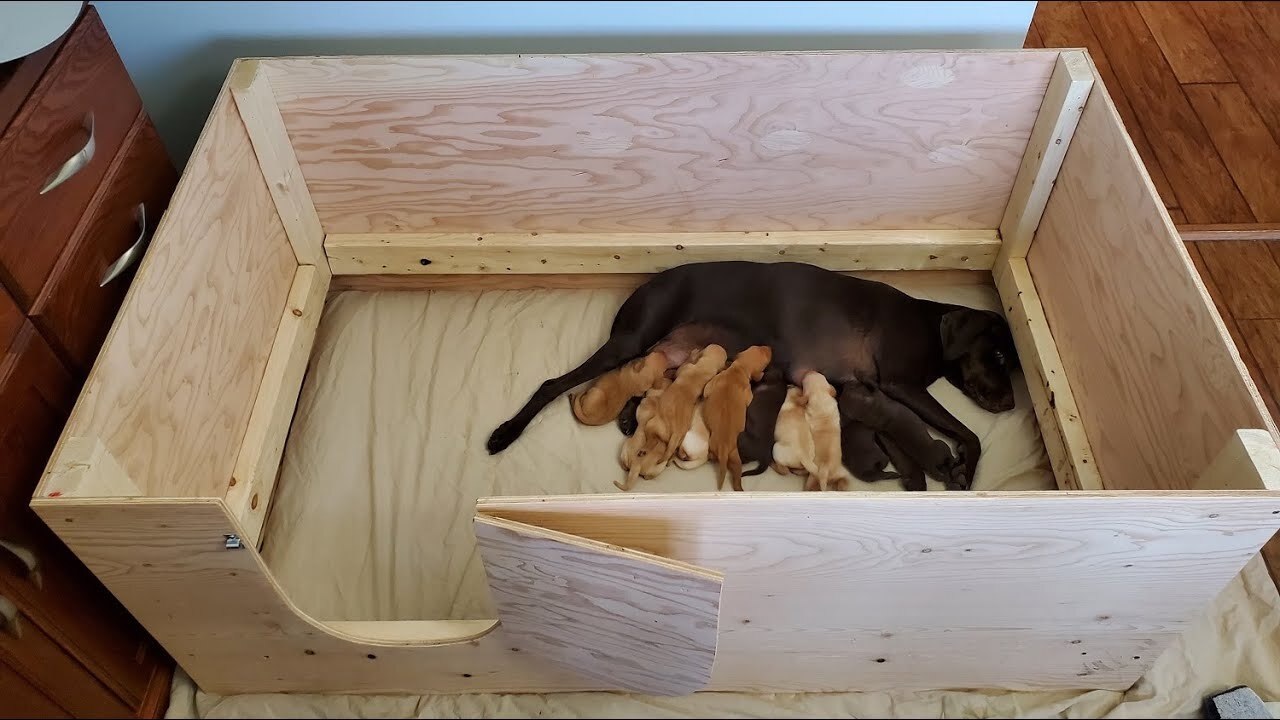
Are you expecting a litter of adorable puppies soon? If so, you'll want to ensure that the mother and her puppies have a safe and comfortable space to rest and grow. One way to provide this is by building a DIY whelping box. In this step-by-step guide, we'll walk you through the process of creating a secure and cozy haven for your furry friends. Whether you're a seasoned DIY enthusiast or a first-time builder, this guide will equip you with the knowledge and skills to construct a whelping box that meets the needs of both the mother and her puppies. Let's get started!
Choosing the Right Materials
When it comes to building a DIY whelping box, selecting the right materials is crucial for creating a safe and comfortable environment for the mother and her puppies. Here's what you'll need:
1. Plywood: Opt for sturdy plywood to construct the walls of the whelping box. The thickness of the plywood will depend on the size of the box you plan to build, but 1/2-inch or 3/4-inch plywood is commonly used for this purpose.
2. Screws and Nails: Ensure you have an ample supply of screws and nails to secure the plywood pieces together. Using the appropriate fasteners will help reinforce the structure of the whelping box.
3. Washable Liner: Choose a washable liner, such as vinyl or linoleum, to cover the floor of the whelping box. This will make cleaning up after the puppies much easier and more hygienic.
4. Heat Lamp or Heating Pad: Depending on the climate and the needs of the puppies, you may want to include a heat source in the whelping box. A heat lamp or heating pad can help keep the puppies warm during their early days.
5. Safety Rails: Consider adding safety rails to the whelping box to prevent the mother from accidentally crushing her puppies. These can be made from wood or PVC piping and should be positioned around the interior perimeter of the box.
By carefully selecting these materials, you can ensure that your DIY whelping box is not only durable and secure but also provides a nurturing space for the mother and her puppies.
Measuring and Cutting the Pieces
Before diving into the construction of the whelping box, it's essential to take precise measurements and cut the plywood pieces to the correct dimensions. Here's a step-by-step guide to help you through this crucial phase:
-
Measure the Dimensions: Begin by determining the size of the whelping box you want to build. Consider the breed of the mother dog and the anticipated size of the litter. A general rule of thumb is to provide ample space for the mother to move comfortably while also accommodating the growing puppies. Measure the length, width, and height of the box, keeping in mind that the walls will add to the overall dimensions.
-
Mark the Plywood: Once you have the measurements, use a pencil and a straight edge to mark the dimensions on the plywood sheets. Double-check the markings to ensure accuracy before proceeding to the cutting phase.
-
Use a Circular Saw or Jigsaw: With the plywood sheets securely positioned on a stable surface, carefully cut along the marked lines using a circular saw or jigsaw. It's crucial to maintain straight and precise cuts to ensure that the pieces fit together seamlessly during assembly.
-
Cut Openings if Needed: If you plan to include an entryway for the mother or a removable section for easy cleaning, mark and cut these openings in the appropriate pieces of plywood. Take precise measurements and exercise caution when cutting to maintain the structural integrity of the box.
-
Sand the Edges: After cutting the pieces, use sandpaper to smooth any rough edges or splinters. This step is essential, especially if the whelping box will be used indoors, as it helps prevent any accidental injuries to the mother or puppies.
By meticulously measuring and cutting the plywood pieces, you'll lay a solid foundation for the construction of the whelping box. Accurate dimensions and precise cuts are vital for ensuring that the box comes together seamlessly during the assembly phase.
Assembling the Whelping Box
With the plywood pieces cut to the correct dimensions, it's time to bring the whelping box to life. Follow these steps to assemble the box:
-
Lay Out the Pieces: Begin by laying out all the cut plywood pieces in the designated building area. Take a moment to review the measurements and ensure that each piece aligns with the intended design of the whelping box.
-
Start with the Base: Position the bottom piece of plywood to serve as the base of the whelping box. Use screws and nails to attach the side panels to the base, ensuring that they are securely fastened. A power drill can be handy for this step, making the process more efficient.
-
Build Up the Walls: Once the base and side panels are connected, proceed to attach the remaining pieces of plywood to form the walls of the whelping box. Take care to align the edges and corners accurately, creating a snug and stable enclosure for the mother and her puppies.
-
Secure the Corners: To reinforce the structure, consider adding corner braces to the inside of the box. These braces provide additional support and stability, especially if the whelping box will be used for multiple litters over time.
-
Add the Safety Rails: If you've opted to include safety rails, now is the time to install them. Position the rails along the interior perimeter of the box, ensuring that they are at an appropriate height to prevent the puppies from wandering out while allowing the mother easy access.
-
Attach the Top Panel: Once the walls and safety features are in place, secure the top panel of the whelping box. This panel may be fixed in place or designed to be removable, depending on your preferences and the specific needs of the mother and her puppies.
-
Inspect and Reinforce: After the initial assembly, carefully inspect the whelping box for any loose fittings or sharp edges. Make any necessary adjustments and reinforce the connections to guarantee the structural integrity of the box.
By following these steps, you can ensure that the whelping box is assembled with precision and care, providing a secure and comfortable space for the mother and her puppies.
Adding Comfort and Safety Features
Once the basic structure of the whelping box is in place, it's time to focus on enhancing the comfort and safety of the space for the mother and her puppies. Here are essential features to consider adding:
-
Washable Liner: Line the floor of the whelping box with a washable and waterproof material, such as vinyl or linoleum. This liner not only makes cleaning up after the puppies easier but also provides a hygienic and comfortable surface for the mother and her newborns.
-
Bedding: Introduce soft and washable bedding to create a cozy resting area for the mother and her puppies. Avoid using loose bedding materials that pose a risk of suffocation to the puppies. Instead, opt for blankets or towels that can be easily washed and replaced as needed.
-
Heat Source: Depending on the climate and the needs of the puppies, consider incorporating a heat source into the whelping box. A heating pad or heat lamp can help maintain a warm and comfortable environment, especially for newborn puppies who are still adjusting to regulating their body temperature.
-
Adjustable Rails: If you've installed safety rails in the whelping box, consider making them adjustable to accommodate the growing size of the puppies. As the puppies become more mobile, raising the height of the rails can prevent them from wandering out of the box prematurely.
-
Easy Access: Ensure that the mother can enter and exit the whelping box with ease. If necessary, create a low-entry point or a removable section of the wall to facilitate the mother's movements while keeping the puppies contained.
-
Proper Ventilation: Incorporate ventilation openings or panels into the design of the whelping box to ensure a constant supply of fresh air. Adequate ventilation is essential for maintaining a healthy and comfortable environment for the mother and her puppies.
-
Non-Toxic Paint or Sealant: If you choose to paint or seal the whelping box for aesthetic or protective purposes, use non-toxic and pet-safe products. This precaution ensures that the mother and her puppies are not exposed to harmful chemicals.
By incorporating these comfort and safety features, you can create a nurturing and secure space within the whelping box, promoting the well-being and development of the mother and her precious puppies.
Preparing the Whelping Box for Use
Once the construction and outfitting of the whelping box are complete, it's essential to prepare the space for the arrival of the mother and her puppies. This involves several key steps to ensure that the environment is conducive to the well-being and safety of the newborns.
-
Thorough Cleaning: Before introducing the mother and her puppies to the whelping box, thoroughly clean and sanitize the entire interior. Remove any dust, debris, or remnants from the construction process. Use a pet-safe disinfectant to wipe down all surfaces, including the walls, floor, and safety features. This step helps create a hygienic and welcoming space for the new occupants.
-
Introducing the Mother: Once the whelping box is clean and dry, introduce the mother to the space before the puppies arrive. Allow her to become familiar with the environment, encouraging her to explore and become comfortable with the layout. This familiarization can help reduce the mother's stress and anxiety when she returns to the box with her newborns.
-
Monitoring Temperature: Ensure that the temperature within the whelping box is optimal for the mother and her puppies. If a heat source is being used, such as a heating pad or heat lamp, verify that it is functioning correctly and maintaining a consistent and safe temperature. Use a thermometer to monitor the temperature regularly, making adjustments as needed to keep the environment warm and comfortable.
-
Providing Nourishment: Place a nearby area for food and water for the mother. It's crucial to keep her well-nourished and hydrated, especially during the demanding postpartum period. Having easy access to food and water allows the mother to replenish her energy and care for her puppies effectively.
-
Monitoring and Support: Once the mother and her puppies are in the whelping box, closely monitor their interactions and well-being. Be prepared to provide support and assistance as needed, ensuring that the mother is caring for her puppies appropriately and that the newborns are thriving in their new environment.
-
Establishing a Routine: Establish a routine for cleaning and maintaining the whelping box. Regularly change the bedding, clean the floor liner, and sanitize the interior to uphold a clean and healthy environment for the mother and her puppies. A consistent routine helps promote hygiene and comfort within the whelping box.
By diligently preparing the whelping box for use, you can create a welcoming and secure space for the mother and her puppies, setting the stage for a positive and nurturing experience as they grow and develop.
Conclusion
In conclusion, building a DIY whelping box provides a rewarding opportunity to create a safe and comfortable haven for the mother and her puppies. By carefully selecting the right materials, measuring and cutting the pieces with precision, assembling the box with care, and adding essential comfort and safety features, you can ensure that the whelping box meets the specific needs of the mother and her newborns. Additionally, preparing the whelping box for use involves thorough cleaning, monitoring the temperature, providing nourishment, and establishing a routine for maintenance. Through these efforts, you can create an environment that promotes the well-being and development of the puppies while offering the mother a secure and nurturing space to care for her offspring. Building a DIY whelping box is not only a practical endeavor but also a heartfelt gesture that contributes to the welfare of the beloved canine family members.