
Home>Create & Decorate>DIY & Crafts>DIY Solar Generator: Step-by-Step Guide To Building Your Own Renewable Power Source
DIY & Crafts
DIY Solar Generator: Step-by-Step Guide To Building Your Own Renewable Power Source
Published: June 11, 2024

Senior Editor in Create & Decorate, Kathryn combines traditional craftsmanship with contemporary trends. Her background in textile design and commitment to sustainable crafts inspire both content and community.
Learn how to build your own renewable power source with our step-by-step guide to creating a DIY solar generator. Perfect for DIY & Crafts enthusiasts!
(Many of the links in this article redirect to a specific reviewed product. Your purchase of these products through affiliate links helps to generate commission for Twigandthistle.com, at no extra cost. Learn more)
Introduction
Are you tired of relying solely on the grid for your power needs? Are you looking for a sustainable and eco-friendly way to generate electricity for your home or outdoor adventures? Building your own DIY solar generator could be the perfect solution for you. In this comprehensive guide, we will walk you through the step-by-step process of creating your very own renewable power source. From understanding the basics of solar power to selecting the right components and assembling the generator, we've got you covered. By the end of this article, you'll be well-equipped to harness the power of the sun and create your own energy independence. Let's dive in and explore the exciting world of DIY solar generators!
Understanding Solar Power
Solar power is a renewable energy source that harnesses the energy of the sun to generate electricity. When sunlight hits the solar panels, it excites the electrons in the silicon cells, creating a flow of electricity. This process, known as the photovoltaic effect, is the foundation of solar power generation. The amount of electricity produced depends on the intensity of the sunlight and the efficiency of the solar panels. Understanding the basics of solar power is crucial for building a DIY solar generator, as it allows you to make informed decisions when selecting the components and optimizing the system for maximum efficiency.
Solar power is a clean and sustainable alternative to traditional fossil fuel-based energy sources. By utilizing the abundant energy from the sun, you can reduce your carbon footprint and contribute to a greener planet. Additionally, solar power systems can provide energy independence, allowing you to generate electricity in remote locations or during power outages. With the right knowledge and components, you can tap into the immense potential of solar power and enjoy the benefits of renewable energy for years to come.
Components Needed for DIY Solar Generator
When embarking on the journey of building your own DIY solar generator, it's essential to gather all the necessary components to ensure a successful and efficient system. Here's a breakdown of the key components you'll need:
1. Solar Panels
The heart of your solar generator, solar panels are responsible for converting sunlight into electricity. When selecting solar panels, consider factors such as wattage, efficiency, and durability. Monocrystalline and polycrystalline panels are popular choices for their high efficiency and reliability.
2. Battery
A deep cycle battery is essential for storing the electricity generated by the solar panels. Opt for a high-quality battery with ample capacity to meet your energy storage needs. Lead-acid and lithium-ion batteries are common options, with lithium-ion offering higher energy density and longer lifespan.
3. Charge Controller
To regulate the charging of the battery and prevent overcharging, a charge controller is crucial. MPPT (Maximum Power Point Tracking) controllers are known for their efficiency in maximizing the power output from the solar panels, while PWM (Pulse Width Modulation) controllers offer a cost-effective option for smaller systems.
4. Power Inverter
For converting the DC (direct current) electricity from the battery into AC (alternating current) power suitable for household appliances, a power inverter is necessary. Choose an inverter with the appropriate wattage rating to accommodate your intended electrical loads.
5. Mounting Hardware
To securely install the solar panels, you'll need mounting hardware such as brackets, rails, and fasteners. Ensure that the mounting system is compatible with your chosen solar panels and suitable for the installation location.
6. Wiring and Connectors
High-quality wiring and connectors are essential for safely and efficiently connecting the solar panels, battery, charge controller, and inverter. Use appropriately sized cables and weather-resistant connectors to minimize power loss and ensure reliable connections.
7. Enclosure or Housing
To protect the components from the elements and provide a secure housing for the system, consider an enclosure or housing designed for outdoor use. This will safeguard the equipment from weather conditions and potential damage.
By gathering these essential components, you'll be well-equipped to proceed with the construction of your DIY solar generator. Each component plays a critical role in the functionality and performance of the system, so careful consideration and selection are key to a successful solar power setup.
Step 1: Choosing the Right Solar Panels
When it comes to building a DIY solar generator, selecting the right solar panels is a crucial first step. The efficiency and performance of your solar generator depend heavily on the quality and characteristics of the solar panels you choose. Here are some key factors to consider when choosing the right solar panels for your DIY project:
1. Wattage and Power Output
The wattage of a solar panel indicates the amount of power it can produce under standard test conditions. Higher wattage panels can generate more electricity, making them suitable for applications with higher energy demands. Consider your energy needs and available space to determine the optimal wattage for your solar panels.
2. Efficiency
Solar panel efficiency refers to the ability of the panels to convert sunlight into electricity. Higher efficiency panels can produce more power in limited space and under low light conditions. Monocrystalline panels are known for their high efficiency, making them a popular choice for residential and off-grid solar systems.
3. Durability and Warranty
Investing in durable and long-lasting solar panels is essential for the reliability and longevity of your solar generator. Look for panels with robust construction and a reputable warranty to ensure protection against potential defects or performance issues.
4. Size and Mounting Considerations
The physical dimensions of the solar panels and their compatibility with your installation location are important factors to consider. Assess the available space for mounting the panels and choose sizes that fit the area while maximizing energy production.
5. Environmental Conditions
Consider the environmental factors that may impact the performance of your solar panels, such as temperature variations, humidity, and exposure to elements. Select panels designed to withstand the specific environmental conditions of your installation site, ensuring optimal performance over the long term.
6. Cost and Budget
While quality and performance are paramount, it's important to consider the cost of the solar panels and how they fit into your overall budget for the DIY solar generator project. Balance the upfront cost with the long-term energy savings and durability to make an informed investment decision.
By carefully evaluating these factors and selecting solar panels that align with your energy needs, space constraints, and budget, you can lay a solid foundation for the successful construction of your DIY solar generator. The right solar panels will serve as the primary energy harvesters, converting sunlight into clean and sustainable electricity for your home or outdoor activities.
Step 2: Selecting the Battery and Charge Controller
After choosing the right solar panels for your DIY solar generator, the next critical step is selecting the appropriate battery and charge controller to ensure efficient energy storage and management. Here's a detailed breakdown of the considerations for each component:
Battery Selection
-
Capacity and Voltage: When selecting a battery for your solar generator, consider the capacity, measured in ampere-hours (Ah), and the voltage rating. The capacity determines the amount of energy the battery can store, while the voltage should match the system's requirements.
-
Deep Cycle vs. Lithium-ion: Deep cycle batteries are designed for discharging a large portion of their capacity, making them ideal for solar applications. On the other hand, lithium-ion batteries offer higher energy density, longer lifespan, and lighter weight, albeit at a higher cost.
-
Maintenance and Longevity: Consider the maintenance requirements and lifespan of the battery. Deep cycle lead-acid batteries may require periodic maintenance, while lithium-ion batteries are virtually maintenance-free and have a longer cycle life.
Charge Controller Considerations
-
MPPT vs. PWM: Maximum Power Point Tracking (MPPT) charge controllers are known for their higher efficiency in extracting power from the solar panels, especially in cold or low-light conditions. Pulse Width Modulation (PWM) controllers are cost-effective options for smaller systems with moderate power requirements.
-
System Voltage and Current Rating: Ensure that the charge controller's voltage and current ratings are compatible with the solar panels and battery. Oversizing the charge controller can provide room for future expansion, while undersizing may limit the system's performance.
-
Temperature Compensation and Load Control: Look for charge controllers with temperature compensation features to optimize charging in varying environmental conditions. Additionally, controllers with load control capabilities can directly power DC loads or lighting, enhancing system versatility.
By carefully evaluating these factors and selecting a battery and charge controller that align with your energy storage needs, system voltage, and budget, you can ensure the efficient and reliable operation of your DIY solar generator. The battery and charge controller play integral roles in managing the energy flow from the solar panels to the battery, maximizing the system's performance and longevity.
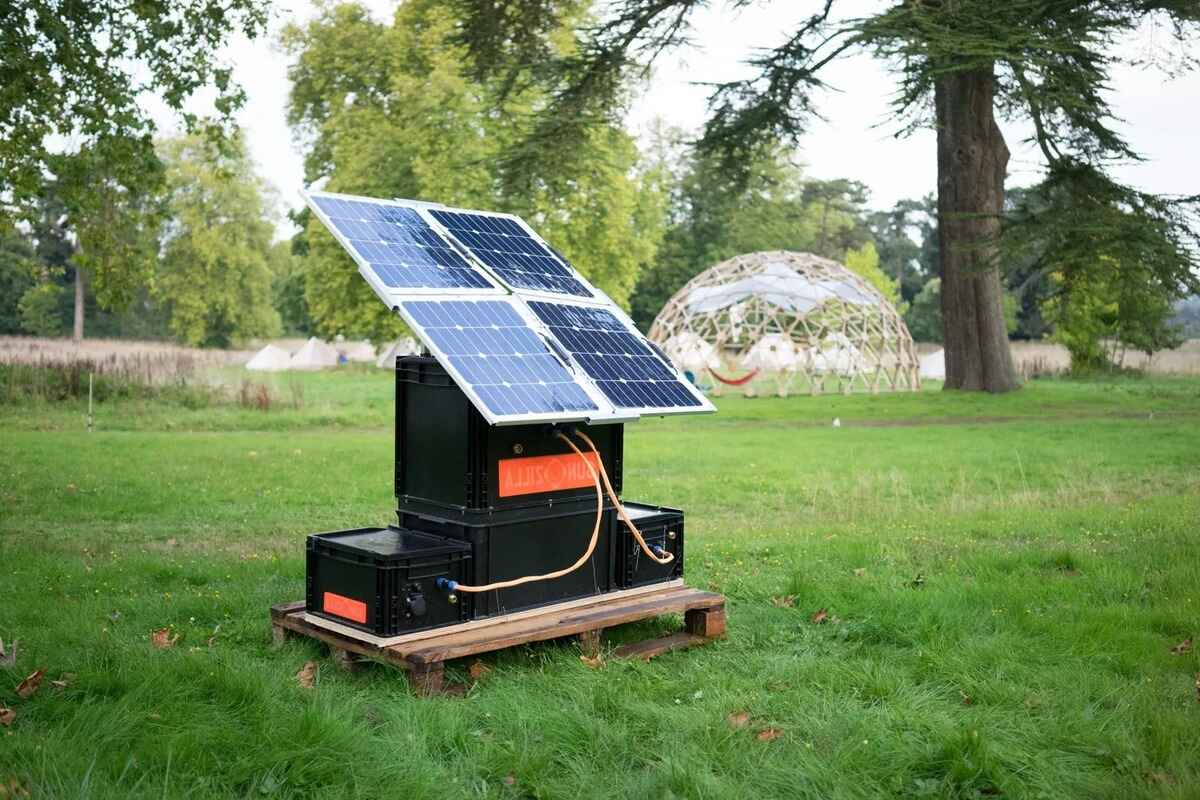
Step 3: Assembling the Solar Generator
Now that you have carefully selected the solar panels, battery, and charge controller for your DIY solar generator, it's time to embark on the exciting process of assembling the components into a functional and efficient system. Here's a step-by-step guide to assembling your solar generator:
-
Mounting the Solar Panels: Begin by securely mounting the solar panels in a location that receives ample sunlight. Ensure that the panels are positioned at the optimal angle for solar exposure, typically facing south in the northern hemisphere. Use the appropriate mounting hardware and follow the manufacturer's guidelines for installation to maximize energy capture.
-
Connecting the Solar Panels: Use high-quality wiring and connectors to establish the electrical connections between the solar panels. Pay close attention to polarity and ensure that the wiring is properly secured and protected from environmental elements. Connect the solar panels to the charge controller according to the manufacturer's specifications.
-
Installing the Battery and Charge Controller: Position the battery and charge controller in a well-ventilated and secure location, preferably near the solar panels to minimize wiring distance. Connect the battery to the charge controller, observing the correct polarity and ensuring a snug and reliable connection. Follow the manufacturer's instructions for mounting and wiring the components.
-
Wiring the Charge Controller and Inverter: Establish the electrical connections between the charge controller and the power inverter. Use appropriately sized cables and connectors to minimize power loss and ensure safe and reliable operation. Verify that the wiring is neatly organized and free from potential hazards such as sharp edges or excessive heat.
-
Grounding and Safety Measures: Implement proper grounding for the solar generator system to mitigate the risk of electrical hazards. Follow local electrical codes and best practices for grounding the components, including the solar panels, charge controller, battery, and inverter. Install appropriate fuses or circuit breakers to protect the system from overcurrent and short circuits.
-
Testing and Commissioning: Once all the components are assembled and wired, perform thorough testing of the solar generator system. Verify the functionality of each component, including the solar panels, charge controller, battery, and inverter. Test the system's performance under varying sunlight conditions and ensure that all electrical connections are secure and operational.
-
Documentation and Maintenance: Keep detailed documentation of the solar generator assembly, including wiring diagrams, component specifications, and maintenance procedures. Establish a regular maintenance schedule to inspect the system, clean the solar panels, and monitor the battery's condition. Proper documentation and maintenance will contribute to the long-term reliability and performance of your DIY solar generator.
By following these steps and exercising diligence in the assembly process, you can create a robust and efficient solar generator that harnesses the power of the sun to provide clean and sustainable electricity for your home or outdoor activities. The assembly phase is a critical stage in realizing the potential of your DIY solar generator, and attention to detail will contribute to the system's overall effectiveness and longevity.
Step 4: Testing and Maintenance
Once the assembly of your DIY solar generator is complete, thorough testing and ongoing maintenance are essential to ensure its optimal performance and longevity. Here's a detailed guide to the testing and maintenance processes for your solar generator:
Testing the System
-
Performance Testing: Verify the performance of the solar panels by measuring the voltage and current output under various sunlight conditions. Use a multimeter to assess the power production and ensure that the panels are generating the expected electricity.
-
Charge Controller Functionality: Test the charge controller's operation by monitoring its charging and discharging processes. Ensure that the controller effectively regulates the flow of energy from the solar panels to the battery, preventing overcharging or deep discharging.
-
Battery Capacity Test: Conduct a capacity test on the battery to determine its actual energy storage capacity. Discharge the battery to a specified level and measure the energy output to validate its rated capacity.
-
Inverter Performance Check: Test the power inverter by connecting various AC loads and verifying the quality of the output power. Ensure that the inverter can handle the intended electrical loads without issues such as voltage fluctuations or harmonic distortion.
-
System Integration Test: Integrate the solar panels, charge controller, battery, and inverter to simulate real-world operation. Verify the seamless interaction of the components and assess the overall system performance.
Ongoing Maintenance
-
Regular Inspections: Schedule routine inspections of the solar generator components to check for any signs of wear, damage, or corrosion. Inspect the wiring, connectors, and mounting hardware for tightness and integrity.
-
Panel Cleaning: Keep the solar panels clean and free from debris to maximize their energy capture efficiency. Regularly remove dirt, dust, and other contaminants that may hinder sunlight absorption.
-
Battery Maintenance: If using lead-acid batteries, perform periodic maintenance tasks such as checking the electrolyte levels, cleaning the terminals, and equalizing the battery cells as recommended by the manufacturer.
-
Charge Controller Monitoring: Monitor the charge controller's operation and settings to ensure that it continues to optimize the charging process and protect the battery from overcharging or deep discharging.
-
Inverter Inspection: Periodically inspect the power inverter for any signs of overheating, unusual noise, or performance issues. Keep the inverter's ventilation pathways clear and free from obstructions.
-
Documentation and Record-Keeping: Maintain detailed records of maintenance activities, test results, and any modifications made to the solar generator. This documentation will aid in troubleshooting and optimizing the system over time.
By conducting thorough testing and implementing a proactive maintenance regimen, you can maximize the efficiency and reliability of your DIY solar generator. Regular monitoring and upkeep will contribute to the long-term performance and sustainability of the system, allowing you to enjoy clean and renewable energy for years to come.
Conclusion
In conclusion, building your own DIY solar generator is a rewarding and empowering endeavor that allows you to harness the abundant energy of the sun and create a sustainable power source for your home or outdoor adventures. By understanding the fundamentals of solar power, carefully selecting the right components, and following the step-by-step assembly process, you can create a reliable and efficient solar generator that provides clean and renewable electricity.
The journey begins with choosing the right solar panels, considering factors such as wattage, efficiency, durability, and cost. Selecting the appropriate battery and charge controller is equally crucial, as they play integral roles in storing and managing the solar-generated energy. Assembling the components with precision and attention to detail ensures the seamless integration and functionality of the solar generator.
Thorough testing and ongoing maintenance are essential for verifying the system's performance and ensuring its long-term reliability. By conducting performance tests, regular inspections, and proactive maintenance tasks, you can maximize the efficiency and longevity of your DIY solar generator.
In the end, the DIY solar generator represents more than just a renewable energy source. It symbolizes self-sufficiency, environmental consciousness, and a commitment to a greener future. With your newfound knowledge and the guidance provided in this comprehensive guide, you are well-equipped to embark on the exciting journey of building your own DIY solar generator and embracing the power of solar energy.