
Home>Create & Decorate>DIY & Crafts>DIY Electric Bike: How To Build Your Own Eco-Friendly Ride
DIY & Crafts
DIY Electric Bike: How To Build Your Own Eco-Friendly Ride
Published: May 30, 2024

Content Creator specializing in woodworking and interior transformations. Caegan's guides motivate readers to undertake their own projects, while his custom furniture adds a personal touch.
Discover how to create your own eco-friendly electric bike with our DIY guide. Get ready to embark on a sustainable and fun crafting adventure!
(Many of the links in this article redirect to a specific reviewed product. Your purchase of these products through affiliate links helps to generate commission for Twigandthistle.com, at no extra cost. Learn more)
Introduction
Are you looking for an exciting and eco-friendly way to get around town? Building your own electric bike might just be the perfect project for you! In this article, we will guide you through the process of creating your very own electric bike, from selecting the right components to putting it all together. Whether you're a seasoned DIY enthusiast or just looking for a fun new project, building your own electric bike can be a rewarding and cost-effective endeavor. So, let's dive in and explore the world of DIY electric bikes!
Benefits of Building Your Own Electric Bike
-
Customization: When you build your own electric bike, you have the freedom to customize it according to your preferences. From choosing the frame and motor to selecting the battery and controller, every aspect of the bike can be tailored to suit your specific needs and style.
-
Cost-Effective: Building your own electric bike can be more cost-effective than purchasing a pre-built one. By sourcing the components yourself and assembling them, you can potentially save a significant amount of money while still achieving a high-quality end result.
-
Eco-Friendly Transportation: By opting for an electric bike, you're choosing a mode of transportation that is environmentally friendly. Building and using an electric bike reduces your carbon footprint and contributes to a cleaner, greener planet.
-
Learning Experience: Building an electric bike provides an excellent opportunity to learn about electric motors, batteries, and controllers. It's a hands-on way to gain knowledge about electric vehicles and sustainable transportation.
-
Personal Satisfaction: The sense of accomplishment that comes from riding a bike that you built yourself is unparalleled. It's a rewarding experience to cruise around on a bike that you put together with your own hands.
-
Health Benefits: While electric bikes provide motorized assistance, they still offer the health benefits of traditional cycling. You can pedal as much or as little as you like, making it a great option for both leisurely rides and more intense workouts.
-
Fun and Adventure: Building your own electric bike is an adventure in itself. It's a fun and engaging project that can bring a sense of excitement and fulfillment to your DIY endeavors.
By considering these benefits, you can see that building your own electric bike is not only a practical and cost-effective choice but also a rewarding and enjoyable experience. So, let's move on to the next steps in creating your DIY electric bike!
Choosing the Right Bike Frame
When it comes to building your own electric bike, selecting the right bike frame is a crucial first step. The frame serves as the foundation of your electric bike, providing structural support and determining the overall look and feel of the finished product. Here are some key factors to consider when choosing the right bike frame for your DIY electric bike:
1. Frame Material
The material of the bike frame plays a significant role in its strength, weight, and durability. Common materials for bike frames include aluminum, steel, carbon fiber, and titanium. Aluminum frames are lightweight and corrosion-resistant, making them a popular choice for electric bikes. Steel frames offer excellent strength and durability, while carbon fiber frames provide a lightweight and stiff option. Consider the trade-offs between weight, strength, and cost when selecting the material for your bike frame.
2. Frame Style and Size
The style and size of the frame should be chosen based on your riding preferences and body measurements. Whether you prefer a traditional diamond frame, a step-through frame, or a compact folding frame, there are various options to suit different riding styles. Additionally, selecting the right frame size that matches your height and riding posture is essential for a comfortable and ergonomic riding experience.
3. Compatibility with Electric Components
When choosing a bike frame, it's important to ensure that it is compatible with the electric components you plan to install. Consider the space available for mounting the battery, controller, and motor. Some frames are specifically designed to accommodate electric bike components, while others may require modifications to fit the necessary hardware.
4. Budget and Aesthetics
Finally, consider your budget and aesthetic preferences when selecting a bike frame. While high-end frames may offer advanced features and a sleek appearance, they often come with a higher price tag. Determine the balance between functionality, style, and cost that aligns with your DIY electric bike project.
By carefully considering these factors, you can choose a bike frame that meets your specific requirements and sets the stage for the successful assembly of your DIY electric bike. Once you've selected the perfect frame, you can move on to the next steps in the electrifying journey of building your own eco-friendly ride.
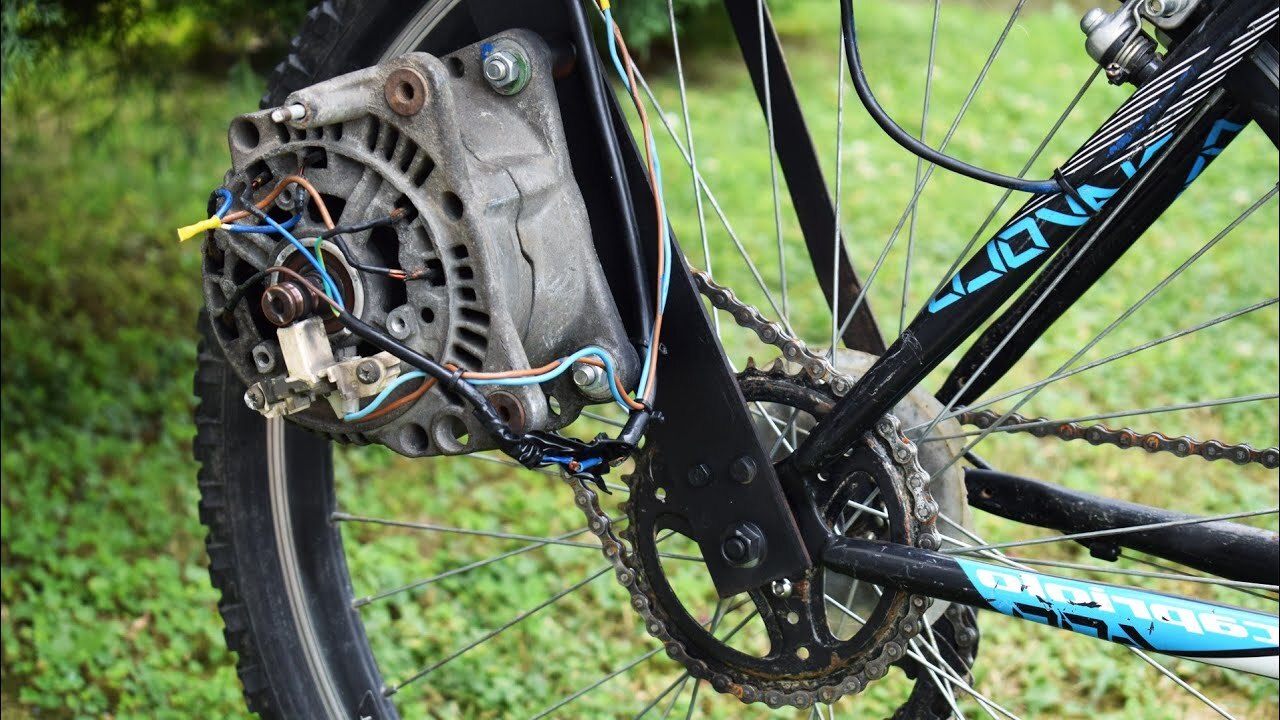
Selecting the Best Electric Motor
When it comes to converting a regular bike into an electric one, the electric motor is the heart of the transformation. Selecting the best electric motor for your DIY electric bike involves considering various factors to ensure optimal performance and efficiency. Here's what you need to know when choosing the right electric motor for your project:
1. Motor Type and Power Rating
Electric bike motors come in different types, including hub motors and mid-drive motors. Hub motors are located in the wheel hub, providing a simpler installation and maintenance process. On the other hand, mid-drive motors are positioned at the bike's crankshaft, offering better weight distribution and a more natural riding feel. Consider the type of motor that aligns with your riding style and preferences.
Additionally, the power rating of the motor determines its output and performance. Higher power ratings result in increased speed and torque, allowing for better acceleration and hill-climbing capabilities. Evaluate your intended usage and terrain to select a motor with the appropriate power rating for your needs.
2. Efficiency and Battery Compatibility
Efficiency is a critical factor when choosing an electric motor for your DIY electric bike. A more efficient motor can extend the range of your electric bike, allowing for longer rides on a single charge. Look for motors with high efficiency ratings to maximize the overall performance and battery life of your electric bike.
Furthermore, ensure that the selected motor is compatible with the battery system you plan to use. Matching the motor's voltage and current requirements with the battery's specifications is essential for seamless integration and optimal functionality.
3. Size and Weight Considerations
The physical dimensions and weight of the electric motor can impact the overall design and handling of your electric bike. Compact and lightweight motors are desirable for maintaining the agility and maneuverability of the bike. Consider the available space for mounting the motor and the impact of its weight on the bike's balance and handling characteristics.
4. Noise and Maintenance
Some electric motors operate with minimal noise, providing a quieter and more enjoyable riding experience. Additionally, consider the maintenance requirements of the motor, including the availability of replacement parts and the ease of servicing. Opt for a motor that offers a balance between performance and low maintenance for a hassle-free riding experience.
By carefully evaluating these factors, you can select the best electric motor for your DIY electric bike, setting the stage for an electrifying and exhilarating ride. Once you've chosen the ideal motor, you can proceed with the next steps in bringing your eco-friendly electric bike to life.
Installing the Battery and Controller
Installing the battery and controller is a pivotal step in the process of building your DIY electric bike. These components are essential for powering the electric motor and controlling its operation, making their proper installation crucial for the overall functionality of the electric bike. Here's a detailed guide on how to install the battery and controller for your electrifying ride:
-
Battery Selection: Begin by selecting a suitable battery for your electric bike. Consider factors such as voltage, capacity, and mounting options. Lithium-ion batteries are commonly used for electric bikes due to their high energy density and lightweight nature. Choose a battery that aligns with the power requirements of your electric motor and fits securely within the designated space on the bike frame.
-
Mounting the Battery: Once you have chosen the battery, carefully mount it onto the bike frame using appropriate mounting brackets or hardware. Ensure that the battery is securely fastened and positioned to maintain the bike's balance and stability. Take into account factors such as weight distribution and accessibility for charging and maintenance when determining the battery placement.
-
Controller Installation: The controller serves as the brain of the electric bike's motor system, regulating the power delivery and ensuring smooth operation. Locate a suitable area on the bike frame to mount the controller, considering factors such as protection from the elements and accessibility for wiring connections. Securely attach the controller using mounting brackets or straps, ensuring that it is positioned in a manner that facilitates efficient heat dissipation.
-
Wiring and Connections: Carefully route the wiring harnesses from the battery and controller, ensuring that they are neatly organized and securely fastened to the bike frame. Make the necessary electrical connections between the battery, controller, and motor, following the manufacturer's guidelines and wiring diagrams. Pay close attention to polarity and insulation to prevent electrical issues and ensure safe operation.
-
Safety Precautions: Prior to finalizing the installation, perform a thorough inspection of the battery and controller connections to verify proper wiring and secure fastenings. Double-check the integrity of the electrical connections and insulation to prevent short circuits or electrical hazards. Adhere to safety guidelines and recommendations provided by the battery and controller manufacturers to mitigate potential risks.
-
Testing and Verification: Once the battery and controller are installed, conduct a comprehensive test of the electric bike's electrical system. Verify the functionality of the motor, throttle, and any display or control interfaces. Test the responsiveness of the motor to ensure smooth acceleration and braking. Additionally, confirm that the battery charging and management systems are operational and monitor for any abnormal behavior.
By following these detailed steps, you can successfully install the battery and controller for your DIY electric bike, bringing you one step closer to experiencing the thrill of your custom-built eco-friendly ride. With the power source and control unit in place, your electric bike is poised to deliver an electrifying and sustainable mode of transportation.
Adding the Finishing Touches
As you near the completion of your DIY electric bike project, adding the finishing touches can elevate the aesthetics, functionality, and overall appeal of your custom-built ride. From fine-tuning the components to personalizing the details, here are the essential steps to perfecting your electric bike:
-
Fine-Tuning the Components: Ensure that all the components of your electric bike, including the motor, battery, and controller, are securely fastened and properly aligned. Conduct a thorough inspection of the electrical and mechanical connections, making any necessary adjustments to optimize the performance and reliability of the bike.
-
Optimizing the Riding Experience: Consider adding accessories such as lights, fenders, and a cargo rack to enhance the practicality and safety of your electric bike. Installing a comfortable saddle, ergonomic grips, and adjustable handlebars can contribute to a more enjoyable and ergonomic riding experience.
-
Customizing the Aesthetics: Personalize the appearance of your electric bike by applying a fresh coat of paint or adding decals and graphics. Express your creativity by customizing the visual design of the bike to reflect your unique style and personality.
-
Safety and Visibility Enhancements: Prioritize safety by equipping your electric bike with reflective elements, such as reflective tape or decals, to enhance visibility during low-light conditions. Installing a bell or horn can also contribute to alerting others of your presence on the road.
-
Functional Additions: Explore the option of integrating additional features, such as a smartphone mount, a bike computer, or a GPS navigation system, to enhance the functionality and convenience of your electric bike. These additions can elevate the versatility and utility of your custom ride.
-
Final Inspection and Test Ride: Before embarking on your inaugural ride, perform a final inspection of the entire electric bike, ensuring that all components are in optimal condition and functioning as intended. Conduct a test ride to evaluate the overall performance, comfort, and handling of the bike, making any final adjustments as needed.
By attending to these finishing touches, you can transform your DIY electric bike into a personalized and fully functional eco-friendly ride that reflects your craftsmanship and attention to detail. With the completion of these steps, your custom-built electric bike is ready to hit the road, offering a sustainable and exhilarating mode of transportation.
Conclusion
In conclusion, building your own electric bike is a rewarding and fulfilling endeavor that offers a range of benefits, including customization, cost-effectiveness, eco-friendliness, and personal satisfaction. By carefully selecting the bike frame, electric motor, battery, and controller, and adding the finishing touches, you can create a unique and eco-friendly ride that aligns with your preferences and style. The process of building a DIY electric bike not only provides a practical mode of transportation but also serves as a learning experience and a source of fun and adventure. Embracing the world of DIY electric bikes opens up opportunities for creativity, sustainability, and hands-on learning, making it a worthwhile and enjoyable pursuit for DIY enthusiasts and eco-conscious individuals alike. With your newly built electric bike, you can embark on eco-friendly journeys while enjoying the satisfaction of riding a custom-built creation.