
Home>Create & Decorate>DIY & Crafts>DIY Creek Bridge: Step-by-Step Guide For Building A Sturdy Crossing
DIY & Crafts
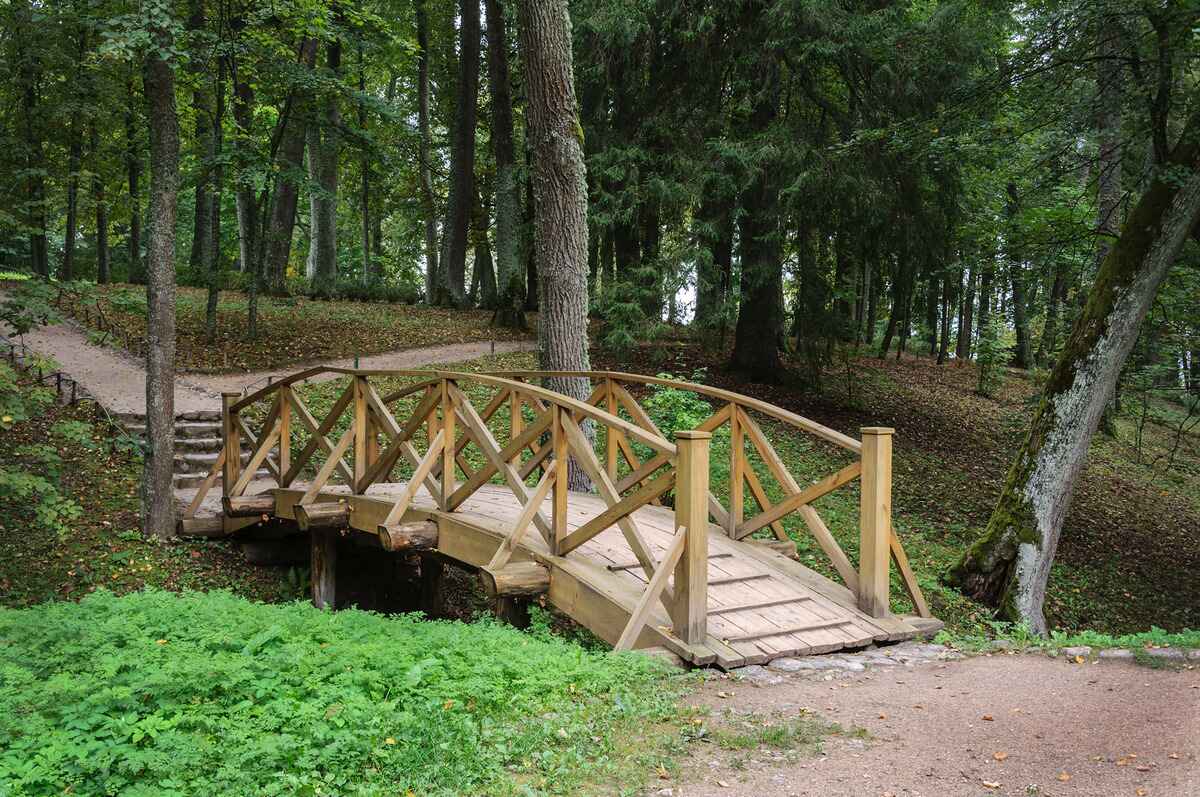
DIY Creek Bridge: Step-by-Step Guide For Building A Sturdy Crossing
Published: June 5, 2024

Senior Editor in Create & Decorate, Kathryn combines traditional craftsmanship with contemporary trends. Her background in textile design and commitment to sustainable crafts inspire both content and community.
Learn how to build a sturdy DIY creek bridge with our step-by-step guide. Perfect for DIY & Crafts enthusiasts looking to create a durable crossing.
(Many of the links in this article redirect to a specific reviewed product. Your purchase of these products through affiliate links helps to generate commission for Twigandthistle.com, at no extra cost. Learn more)
Introduction
Are you looking to add a charming and functional element to your property? Building a DIY creek bridge can be a rewarding project that not only enhances the aesthetics of your outdoor space but also provides a practical solution for crossing over a creek or small stream. In this step-by-step guide, we will walk you through the process of constructing a sturdy and reliable bridge that will withstand the test of time. Whether you're a seasoned DIY enthusiast or a novice looking to take on a new challenge, this guide will equip you with the knowledge and confidence to tackle this project with ease. So, roll up your sleeves and let's get started on creating a beautiful and functional creek bridge for your property!
Planning and Preparation
Before diving into the construction of your DIY creek bridge, thorough planning and preparation are essential for a successful outcome. Here's what you need to do to get started:
-
Assess the Site: Begin by surveying the area where you intend to build the bridge. Take note of the width and depth of the creek, the terrain on both sides, and any potential obstacles that may affect the construction process.
-
Determine Bridge Dimensions: Measure the width of the creek to determine the appropriate length for your bridge. Consider the anticipated foot traffic and the types of vehicles or equipment that may need to cross the bridge to ensure it can support the intended load.
-
Check Local Regulations: Contact your local building authority to inquire about any permits or regulations that may apply to bridge construction on your property. Compliance with local codes and regulations is crucial to ensure the safety and legality of your project.
-
Create a Materials List: Based on your bridge dimensions and design preferences, create a comprehensive list of materials needed for the project. This may include lumber, fasteners, concrete, and any additional components required for the bridge's construction.
-
Gather Necessary Tools: Take inventory of the tools required for the project, such as a circular saw, drill, level, measuring tape, and post hole digger. Ensuring you have all the necessary tools on hand will streamline the construction process and prevent unnecessary delays.
-
Develop a Timeline: Establish a realistic timeline for the project, taking into account factors such as weather conditions, availability of assistance, and any other concurrent projects that may impact the bridge construction.
By thoroughly planning and preparing for the construction of your DIY creek bridge, you'll set the stage for a smooth and efficient building process, ultimately leading to a sturdy and reliable crossing for your property.
Gathering Materials and Tools
When it comes to building a sturdy DIY creek bridge, having the right materials and tools at your disposal is crucial for a successful construction process. Here's a detailed breakdown of the essential materials and tools you'll need to gather before you begin building your bridge:
Materials
-
Lumber: Select high-quality, pressure-treated lumber for the structural components of the bridge, such as the beams, joists, and decking. Ensure that the lumber is suitable for outdoor use and capable of withstanding exposure to the elements.
-
Fasteners: Stock up on galvanized or stainless steel screws, nails, and bolts to secure the various components of the bridge. These corrosion-resistant fasteners will ensure the longevity and stability of your bridge.
-
Concrete: If your bridge design includes concrete footings or piers, acquire the necessary amount of concrete mix to create a solid foundation for the support structure.
-
Gravel and Drainage Pipe: For bridges that require a raised approach or drainage system, gather gravel for backfilling and a suitable drainage pipe to facilitate water flow beneath the bridge.
-
Handrail Materials: If your design incorporates handrails, obtain the appropriate materials such as lumber, metal balusters, or pre-assembled railing sections to ensure safety and compliance with building codes.
-
Waterproofing and Sealant: To protect the wooden components of the bridge from moisture and decay, invest in a high-quality waterproofing sealant or wood preservative.
Tools
-
Circular Saw: A reliable circular saw will be indispensable for cutting lumber to the required dimensions and angles during the construction process.
-
Drill and Bits: A power drill with a set of drill bits will be essential for pre-drilling holes and driving screws or bolts into the bridge components.
-
Level: Ensure you have a sturdy level on hand to maintain the proper alignment and elevation of the bridge elements as you assemble them.
-
Measuring Tape: Accurate measurements are crucial in bridge construction, so a durable measuring tape will be indispensable for ensuring precision throughout the project.
-
Post Hole Digger: If your bridge design includes support posts or footings, a post hole digger will be necessary for excavating the holes to the required depth.
-
Safety Gear: Prioritize safety by equipping yourself with protective gear, including gloves, safety glasses, and hearing protection, especially when operating power tools or handling heavy materials.
By gathering the necessary materials and tools in advance, you'll be well-prepared to embark on the construction of your DIY creek bridge, setting the stage for a smooth and efficient building process.
Site Selection and Preparation
Selecting the ideal site for your DIY creek bridge is a critical first step in the construction process. Here's a detailed breakdown of the site selection and preparation process to ensure a solid foundation for your bridge:
-
Evaluate Terrain and Creek Characteristics: Begin by assessing the terrain on both sides of the creek. Look for areas with relatively level ground to serve as the entry and exit points for the bridge. Additionally, take note of the creek's width, depth, and the nature of its banks to determine the most suitable location for the bridge.
-
Consider Environmental Factors: Take into account the environmental impact of the bridge location. Avoid disrupting natural habitats or causing erosion by choosing a site that minimizes disturbance to the surrounding ecosystem. Additionally, consider factors such as water flow, potential flooding, and the impact of seasonal changes on the creek.
-
Clear Vegetation and Debris: Once the site is selected, clear any vegetation, rocks, or debris from the area where the bridge will be constructed. This will provide a clean and level surface for the foundation and support structure of the bridge.
-
Establish Clear Entry and Exit Points: Define the entry and exit points on both sides of the creek to ensure a smooth transition onto and off the bridge. Clear any obstacles or obstructions that may impede the flow of traffic across the bridge.
-
Mark Out the Bridge Alignment: Use stakes and string to mark out the alignment and dimensions of the bridge. This will serve as a visual guide for the construction process, ensuring that the bridge is positioned accurately and aligns with the intended path across the creek.
-
Prepare the Foundation: If your bridge design requires concrete footings or piers, excavate the designated areas to the required depth and dimensions. Ensure that the foundation is level and properly aligned to support the weight of the bridge and withstand the forces exerted by foot traffic or vehicles.
By carefully selecting and preparing the site for your DIY creek bridge, you'll lay the groundwork for a sturdy and reliable crossing that seamlessly integrates with the natural landscape while providing safe passage across the creek.
Setting the Foundation
The foundation of your DIY creek bridge serves as the bedrock for the entire structure, providing stability and support to withstand the forces exerted by foot traffic, vehicles, and environmental factors. Here's a detailed breakdown of the steps involved in setting a solid foundation for your bridge:
-
Excavate Footing Locations: If your bridge design incorporates concrete footings, begin by excavating the designated locations for the footings. Use a post hole digger or an auger to dig holes to the required depth and diameter, ensuring that the footing dimensions comply with local building codes and regulations.
-
Install Formwork: Once the footing holes are excavated, install formwork to contain the concrete as it is poured. Use sturdy lumber or prefabricated formwork materials to create a mold that defines the shape and dimensions of the footings. Ensure that the formwork is securely braced and aligned to prevent shifting during the concrete pouring process.
-
Pour Concrete: With the formwork in place, mix the concrete according to the manufacturer's instructions, ensuring the proper ratio of cement, aggregate, and water. Carefully pour the concrete into the formwork, filling the footing holes to the desired level. Use a trowel to smooth the surface of the concrete and eliminate any air pockets or voids.
-
Level and Align Footings: As the concrete sets, use a level to ensure that the footings are perfectly horizontal and aligned with the intended position of the bridge supports. Make any necessary adjustments to the formwork or concrete surface to achieve the desired levelness and alignment.
-
Allow for Curing: Once the concrete is poured and leveled, allow it to cure according to the recommended curing time specified by the concrete manufacturer. During the curing process, protect the footings from excessive moisture loss and temperature fluctuations to promote optimal strength and durability.
-
Inspect and Remove Formwork: After the concrete has sufficiently cured, carefully inspect the footings for any signs of damage or imperfections. Once satisfied with the quality of the footings, remove the formwork, taking care not to disturb the newly cured concrete.
By meticulously setting a strong and stable foundation for your DIY creek bridge, you'll establish a reliable base that forms the backbone of the entire structure, ensuring its longevity and structural integrity for years to come.
Building the Support Structure
With the foundation in place, the next crucial phase in constructing your DIY creek bridge is building the support structure. This component provides the framework for the bridge, bearing the weight of the decking and facilitating safe passage across the creek. Here's a detailed breakdown of the steps involved in building the support structure:
-
Cutting and Assembling Beams and Joists: Begin by cutting the lumber to the required dimensions for the beams and joists, ensuring precision in the measurements. Use a circular saw to make clean and accurate cuts, and then assemble the beams and joists according to the bridge design, taking care to maintain proper alignment and spacing.
-
Positioning Support Posts or Piers: If your bridge design incorporates support posts or piers, position them on the footings in alignment with the layout of the bridge. Use a level to ensure that the posts are plumb and securely anchored to the footings, providing a stable foundation for the support structure.
-
Attaching Beams and Joists: Secure the beams and joists to the support posts or piers using appropriate fasteners, such as galvanized or stainless steel bolts. Ensure that the connections are strong and secure, providing a rigid framework that can withstand the anticipated loads and forces exerted on the bridge.
-
Bracing and Cross-Bracing: To enhance the stability and rigidity of the support structure, add diagonal bracing and cross-bracing as needed. These additional supports will help distribute the load evenly and prevent lateral movement, contributing to the overall strength of the bridge.
-
Decking Support and Attachment: Once the primary support structure is in place, prepare for the installation of the decking by ensuring that the framework is capable of supporting the decking material. Attach additional joists or reinforcement as necessary to accommodate the decking and provide a secure attachment point.
-
Inspect for Alignment and Levelness: Throughout the assembly process, regularly check the alignment and levelness of the support structure to ensure that it conforms to the intended design. Make any adjustments as needed to maintain the structural integrity and uniformity of the bridge framework.
By meticulously building the support structure of your DIY creek bridge, you'll establish a robust and reliable framework that forms the backbone of the entire bridge, laying the groundwork for the final stages of decking installation and finishing touches.
Installing the Decking
After completing the construction of the support structure, the next crucial step in building your DIY creek bridge is installing the decking. The decking serves as the surface for crossing the bridge, providing a stable and secure pathway across the creek. Here's a detailed breakdown of the steps involved in installing the decking:
-
Selecting Decking Material: Choose a durable and weather-resistant decking material suitable for outdoor use. Common options include pressure-treated lumber, composite decking, or hardwood planks. Consider factors such as durability, maintenance requirements, and aesthetic appeal when selecting the decking material for your bridge.
-
Cutting and Fitting Decking Boards: Measure and cut the decking boards to the required length, ensuring a precise fit on the bridge framework. Use a circular saw or a miter saw to achieve clean and accurate cuts, and test-fit the boards to ensure they align evenly and provide full coverage across the bridge width.
-
Securing Decking Boards: Once the decking boards are cut to size, secure them to the bridge framework using appropriate fasteners, such as screws or nails. Ensure that the boards are evenly spaced and aligned, creating a uniform and level surface for walking or driving across the bridge.
-
Preventing Water Accumulation: To prevent water accumulation and promote drainage on the bridge surface, consider incorporating spacing between the decking boards or using a design that facilitates water runoff. This will help maintain the integrity of the decking material and prevent moisture-related issues over time.
-
Sealing and Waterproofing: Apply a high-quality waterproofing sealant or wood preservative to the decking boards to protect them from moisture, UV exposure, and decay. Ensure that the entire surface of the decking is adequately sealed to prolong its lifespan and maintain its appearance.
-
Adding Non-Slip Surface (Optional): For enhanced safety, especially in areas prone to wet conditions, consider adding a non-slip surface treatment to the decking. This can be achieved through the application of non-slip coatings or the use of specialized non-slip decking materials to improve traction and reduce the risk of slips and falls.
-
Regular Maintenance: Establish a routine maintenance schedule for the decking to ensure its longevity and structural integrity. This may include periodic cleaning, inspection for signs of wear or damage, and reapplication of sealant as needed to protect the decking from the elements.
By meticulously installing the decking on your DIY creek bridge, you'll create a functional and visually appealing pathway that enhances the overall aesthetic of your property while providing a safe and reliable crossing over the creek.
Adding Handrails and Finishing Touches
Once the decking is securely in place, the next step in completing your DIY creek bridge is adding handrails and attending to the finishing touches. These elements not only contribute to the safety and functionality of the bridge but also add aesthetic appeal to the overall structure. Here's a detailed breakdown of the steps involved in adding handrails and completing the finishing touches:
-
Selecting Handrail Materials: Choose suitable materials for the handrails, such as lumber, metal balusters, or pre-assembled railing sections. Consider the design and style of the bridge, ensuring that the handrail materials complement the overall aesthetic while meeting safety requirements.
-
Measuring and Cutting Handrail Components: Measure and cut the handrail components to the required lengths, taking into account the dimensions of the bridge and the desired height of the handrails. Use a saw to achieve precise cuts, ensuring that the handrail sections fit seamlessly along the length of the bridge.
-
Securing Handrail Posts: Install sturdy posts at appropriate intervals along the bridge, ensuring that they are securely anchored to the framework. Use fasteners and bracing to reinforce the connection between the posts and the bridge structure, providing a stable foundation for the handrails.
-
Attaching Handrail Sections: Secure the handrail sections to the posts using suitable fasteners, ensuring that the connections are strong and capable of withstanding the forces exerted on the handrails. Verify that the handrails are level and aligned, providing a consistent and secure barrier along the edges of the bridge.
-
Applying Finishing Treatments: Apply a protective finish or paint to the handrails to enhance their durability and resistance to weathering. Choose a finish that complements the overall design of the bridge while providing long-lasting protection against moisture, UV exposure, and wear.
-
Adding Decorative Elements (Optional): Consider incorporating decorative elements, such as post caps, finials, or ornamental accents, to add a touch of elegance to the handrails and enhance the visual appeal of the bridge. These decorative features can elevate the aesthetic impact of the bridge while serving as functional embellishments.
-
Final Inspection and Testing: Once the handrails are in place, conduct a thorough inspection of the entire bridge structure, paying close attention to the handrail connections, alignment, and overall integrity. Test the handrails for stability and load-bearing capacity to ensure that they provide a safe and secure boundary for bridge users.
By meticulously adding handrails and attending to the finishing touches, you'll complete the construction of your DIY creek bridge, creating a fully functional and visually appealing crossing that enhances the overall landscape while providing a safe and reliable pathway across the creek.
Conclusion
Congratulations on completing the construction of your DIY creek bridge! By following this step-by-step guide, you've successfully transformed your property with a sturdy and reliable crossing that not only enhances the aesthetics of your outdoor space but also provides a practical solution for traversing over a creek or small stream. Your meticulous planning, careful site selection, and precise construction have culminated in the creation of a beautiful and functional bridge that will stand the test of time.
As you admire the finished bridge, take pride in the craftsmanship and dedication you've invested in this project. Your DIY creek bridge not only adds value to your property but also serves as a testament to your ingenuity and determination. Whether it's for leisurely strolls, accessing remote areas of your property, or simply enjoying the picturesque view, your new bridge will undoubtedly become a cherished feature of your landscape.
As with any outdoor structure, regular maintenance and upkeep will be essential to preserve the beauty and functionality of your bridge. Establish a maintenance schedule to inspect for signs of wear, apply protective treatments as needed, and ensure that the bridge remains safe and structurally sound for years to come. By caring for your bridge, you'll continue to enjoy its benefits and aesthetic appeal for the long term.
We hope this guide has empowered you to take on this rewarding DIY project with confidence and enthusiasm. Your new creek bridge is a testament to your creativity and determination, and it stands as a testament to the power of DIY home improvement. Now, take a moment to bask in the satisfaction of a job well done and enjoy the fruits of your labor as you traverse your newly constructed bridge.