
Home>Outdoors & Camping>BBQ & Grill>DIY Grill Station: How To Build Your Own Outdoor Cooking Area
BBQ & Grill
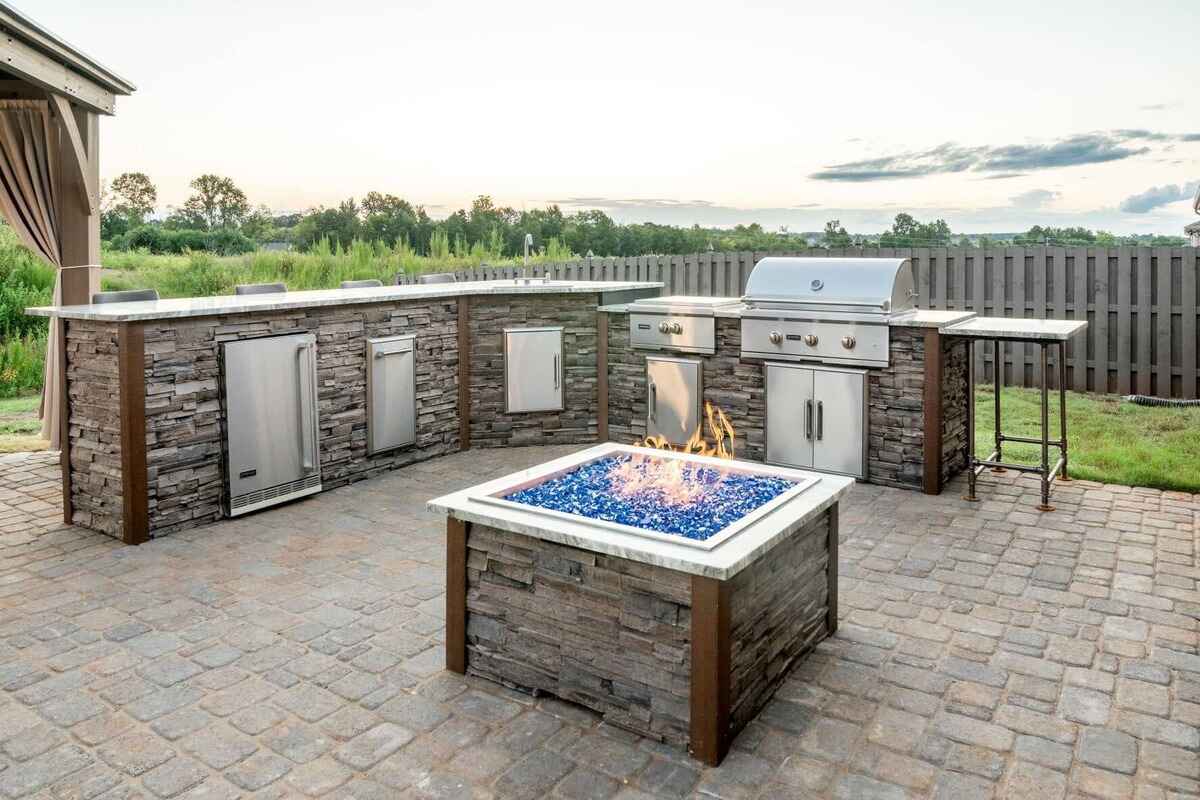
DIY Grill Station: How To Build Your Own Outdoor Cooking Area
Published: June 17, 2024

Content Creator for Outdoors & Camping, Sophie turns any yard into a sustainable paradise. Her dedication to DIY outdoor projects and volunteer work in community gardens shares joy and knowledge.
Learn how to create your own BBQ and grill station with our DIY guide. Build the perfect outdoor cooking area for all your grilling needs.
(Many of the links in this article redirect to a specific reviewed product. Your purchase of these products through affiliate links helps to generate commission for Twigandthistle.com, at no extra cost. Learn more)
Introduction
Are you tired of constantly running back and forth between your kitchen and the backyard while hosting a barbecue? It might be time to consider building your own DIY grill station. Having an outdoor cooking area can not only make your grilling experience more convenient but also add value to your home. In this article, we will guide you through the process of creating your very own grill station from start to finish. Whether you're a seasoned DIY enthusiast or a beginner, we've got you covered with all the essential tips and tricks to help you get started on this exciting project. So, grab your tools and let's dive in!
Planning Your DIY Grill Station
Before you start hammering and sawing, it's crucial to have a solid plan in place for your DIY grill station. Here are some essential steps to consider during the planning phase:
-
Assess Your Needs: Think about how you will use the grill station. Will it be primarily for hosting large gatherings, or do you need a smaller setup for everyday use?
-
Set a Budget: Determine how much you're willing to invest in this project. This will help you make decisions about materials and features.
-
Design Considerations: Sketch out a rough design of your grill station. Consider the layout, size, and any additional features you want to incorporate, such as storage space or a built-in sink.
-
Check Local Regulations: Before you start building, check with your local authorities to ensure you comply with any building codes or regulations regarding outdoor structures.
-
Gather Inspiration: Look for inspiration online or in home improvement magazines to gather ideas for your grill station's design and features.
By taking the time to plan your DIY grill station thoroughly, you'll set yourself up for a smoother building process and a more satisfying end result.
Choosing the Right Location
When it comes to building your DIY grill station, choosing the right location is crucial. Here are some key factors to consider when selecting the perfect spot for your outdoor cooking area:
-
Proximity to the Kitchen: Ideally, your grill station should be located close to your kitchen for easy access to utensils, ingredients, and other cooking essentials. This proximity will also make it more convenient for you to transport food to and from the grill.
-
Ventilation: Ensure that the location you choose provides adequate ventilation for the grill. Grilling produces smoke and fumes, so it's important to position the station in an area where the smoke can dissipate easily without causing discomfort.
-
Safety: Safety should be a top priority when choosing the location for your grill station. Keep the area away from any flammable materials, such as overhanging branches or wooden structures, to minimize the risk of fire hazards.
-
Entertaining Space: Consider the layout of your outdoor space and how the grill station will fit into the overall flow of your backyard. If you frequently host gatherings, you may want to position the grill station in an area that allows for easy interaction with your guests.
-
Shade and Shelter: While it's enjoyable to grill outdoors, having some form of shade or shelter near the grill station can provide relief from the sun or shelter from unexpected rain showers. This could be in the form of a pergola, umbrella, or even positioning the station near an existing structure.
By carefully considering these factors, you can select a location that not only meets your practical needs but also enhances the overall functionality and enjoyment of your DIY grill station.
Gathering Materials and Tools
Gathering the right materials and tools is a crucial step in the process of building your DIY grill station. Here's a comprehensive list of what you'll need to get started:
Materials
- Lumber: Purchase pressure-treated or weather-resistant lumber for the frame and structural components of the grill station. Cedar or redwood are popular choices for outdoor projects due to their natural resistance to decay and insects.
- Countertop Material: Choose a durable and weather-resistant material for the countertops, such as granite, stainless steel, or concrete. Ensure that the material can withstand exposure to heat and outdoor elements.
- Fasteners: Stock up on galvanized or stainless steel screws, nails, and other fasteners that are suitable for outdoor use. These will help secure the various components of the grill station.
- Hardware: Invest in hinges, handles, brackets, and other hardware necessary for assembling the grill station and adding functional features like doors and shelves.
- Masonry Materials: If you plan to incorporate a built-in grill or create a masonry base, gather the necessary materials such as concrete blocks, mortar, and fire bricks.
Tools
- Measuring Tools: Ensure you have a tape measure, level, and square for accurate measurements and straight cuts.
- Cutting Tools: A circular saw or miter saw will be essential for cutting lumber to the desired lengths. A jigsaw may also be useful for more intricate cuts.
- Drill and Bits: A power drill with a variety of drill bits and screwdriver attachments will be indispensable for assembling the components and attaching hardware.
- Work Surface: Set up a sturdy workbench or sawhorses to provide a stable surface for cutting and assembling materials.
- Safety Gear: Don't forget safety equipment such as goggles, gloves, and a dust mask to protect yourself during the construction process.
By ensuring you have all the necessary materials and tools on hand, you'll be well-prepared to tackle the construction of your DIY grill station with confidence and efficiency.
Building the Base Structure
The base structure forms the foundation of your DIY grill station, providing stability and support for the countertops, grill, and other features. Here's a step-by-step guide to building the base structure:
-
Prepare the Site: Begin by clearing the chosen location and ensuring the ground is level. Use a shovel and a level to remove any debris and create a flat, even surface for the base.
-
Lay the Foundation: If you're building a masonry base, start by laying the first course of concrete blocks or bricks. Use a level to ensure the blocks are evenly positioned and securely in place. Mortar can be used to bond the blocks together.
-
Frame the Base: For a wooden base, construct a frame using pressure-treated lumber. Cut the lumber to the appropriate lengths and assemble the frame according to your design specifications. Use galvanized screws or nails to secure the frame together.
-
Add Support Beams: Install additional support beams within the frame to provide extra stability for the countertops and appliances. These beams will help distribute the weight evenly and prevent sagging over time.
-
Check for Level: Use a level to ensure that the base structure is perfectly level in all directions. Adjust the placement of the blocks or frame as needed to achieve a level surface.
-
Secure the Base: Once the base structure is in place and level, anchor it to the ground using stakes or anchors to prevent shifting or movement.
-
Consider Storage Space: If you plan to incorporate storage cabinets or shelves into the base structure, this is the ideal stage to build and install them. Ensure they are securely attached to the frame and provide easy access to the storage area.
By following these steps, you'll establish a sturdy and reliable base structure for your DIY grill station, setting the stage for the next phases of construction.
Adding Countertops and Shelves
Once the base structure is in place, it's time to focus on adding countertops and shelves to your DIY grill station. These elements not only enhance the functionality of the station but also provide space for food preparation and storage. Here's a detailed guide on how to incorporate countertops and shelves into your outdoor cooking area:
-
Selecting Countertop Material: Choose a durable and weather-resistant material for the countertops, such as granite, stainless steel, or concrete. Ensure that the material can withstand exposure to heat and outdoor elements. Consider the size and shape of the countertops based on your cooking needs and available space.
-
Cutting and Installing Countertops: Measure and cut the chosen countertop material to fit the dimensions of the base structure. Use a circular saw or specialized cutting tools designed for the specific material. Once cut, carefully place the countertops on the base structure, ensuring a snug and secure fit.
-
Securing the Countertops: Use appropriate fasteners and adhesives to secure the countertops to the base structure. Depending on the material, you may need to use brackets, screws, or construction adhesive to ensure the countertops are firmly attached and level.
-
Adding Shelves and Storage: If you plan to incorporate shelves into your grill station, consider the height and spacing based on the items you intend to store. Utilize weather-resistant materials for the shelves, such as pressure-treated lumber or stainless steel. Install the shelves securely, ensuring they can support the weight of grilling accessories, utensils, and other items.
-
Creating Workspaces: Designate specific areas of the countertops for different tasks, such as food preparation, serving, and placing cooking utensils. Consider adding a drop-down leaf or an extended section to create additional workspace when needed.
-
Finishing Touches: Once the countertops and shelves are in place, apply a weather-resistant sealant to protect the surfaces from moisture and outdoor elements. This will help prolong the lifespan of the materials and maintain the appearance of your grill station.
By following these steps, you can seamlessly integrate countertops and shelves into your DIY grill station, creating a functional and organized outdoor cooking area that meets your specific needs and enhances your grilling experience.
Installing the Grill and Other Appliances
Once the base structure and countertops are in place, the next crucial step is to install the grill and any other appliances you plan to incorporate into your DIY grill station. Here's a detailed guide on how to seamlessly integrate these essential components into your outdoor cooking area:
-
Selecting the Grill: Choose a grill that suits your cooking preferences and fits within the available space. Whether it's a gas grill, charcoal grill, or a hybrid model, ensure that it meets your functional requirements and complements the design of your grill station.
-
Positioning the Grill: Determine the ideal placement for the grill within the station. Consider factors such as ventilation, proximity to the countertops, and accessibility for refueling or maintenance. Ensure there is ample space around the grill for safe operation and maneuvering.
-
Securing the Grill: Once the position is finalized, secure the grill to the base structure using appropriate fasteners or brackets. This will prevent the grill from shifting or tipping during use and ensure a stable and safe cooking environment.
-
Connecting Gas Lines (if applicable): If you're installing a gas grill, carefully connect the gas line to the grill according to the manufacturer's instructions. Ensure that the connections are secure and leak-free to guarantee safe and efficient operation.
-
Incorporating Other Appliances: If you plan to include additional appliances such as a side burner, smoker, or outdoor refrigerator, carefully integrate them into the design. Ensure that these appliances are positioned to optimize workflow and convenience during cooking.
-
Electrical Considerations: For electric appliances or accessories, ensure that there is access to a nearby power source and that all electrical connections are made in compliance with safety standards and local building codes.
-
Testing and Calibration: Once the grill and other appliances are installed, perform a thorough test to ensure they are functioning correctly. Check for proper ignition, heat distribution, and any specific features unique to each appliance. Calibrate the settings as needed to achieve optimal performance.
By following these steps, you can effectively install the grill and other appliances into your DIY grill station, creating a fully functional outdoor cooking area that caters to your culinary needs and enhances your outdoor entertaining experience.
Adding Finishing Touches
Adding the finishing touches to your DIY grill station is the final step that brings the entire project together, enhancing both its functionality and visual appeal. Here's a detailed guide on how to add those essential finishing touches to your outdoor cooking area:
-
Weatherproofing: Apply a weather-resistant sealant to all exposed wood surfaces, including the base structure and any wooden components. This will protect the wood from moisture, UV exposure, and other outdoor elements, extending its lifespan and maintaining its appearance over time.
-
Decorative Accents: Consider incorporating decorative elements such as stone veneer, tile accents, or outdoor-rated decorative panels to enhance the aesthetic appeal of your grill station. These accents can add a personalized touch and complement the overall design of your outdoor space.
-
Lighting: Install outdoor lighting to illuminate the grill station, making it functional and inviting even after the sun sets. Options include overhead lighting, task lighting for food preparation areas, and ambient lighting to create a welcoming atmosphere for outdoor gatherings.
-
Accessorizing: Add functional and decorative accessories to the grill station, such as hooks for hanging utensils, towel racks, and spice racks. These accessories not only enhance the convenience of the cooking area but also contribute to its organization and efficiency.
-
Personalization: Consider personalizing the grill station with custom features that reflect your unique style and preferences. This could include custom signage, engraved stone or metal accents, or even a built-in herb garden or planter boxes to add a touch of greenery to the space.
-
Maintenance Considerations: Implement a maintenance plan for your grill station, including regular cleaning, inspection of gas lines (if applicable), and upkeep of any outdoor appliances. This will help preserve the functionality and appearance of the station for years to come.
By paying attention to these finishing touches, you can elevate your DIY grill station from a practical outdoor cooking area to a visually appealing and fully equipped space that enhances your outdoor living experience.
Conclusion
In conclusion, building your own DIY grill station can be a rewarding and practical project that adds both functionality and value to your outdoor space. By carefully planning the layout, selecting the right materials, and incorporating essential features such as countertops, shelves, and appliances, you can create a customized outdoor cooking area that meets your specific needs and enhances your grilling experience. Adding the finishing touches, such as weatherproofing, decorative accents, lighting, and personalized elements, can elevate the aesthetic appeal and functionality of the grill station. Whether you're a seasoned DIY enthusiast or a beginner, following the step-by-step process outlined in this guide will help you create a stylish and efficient outdoor cooking area that becomes the centerpiece of your outdoor entertaining and culinary adventures. So, roll up your sleeves, gather your tools, and get ready to enjoy the satisfaction of cooking in your very own DIY grill station.