
Home>Organize & Storage>Closet Organization>How to Build a French Cleat Closet System
Closet Organization
How to Build a French Cleat Closet System
Published: September 3, 2024
Learn how to build a French cleat closet system with our step-by-step guide. Maximize your storage space and keep your closet organized with this versatile solution.
(Many of the links in this article redirect to a specific reviewed product. Your purchase of these products through affiliate links helps to generate commission for Twigandthistle.com, at no extra cost. Learn more)
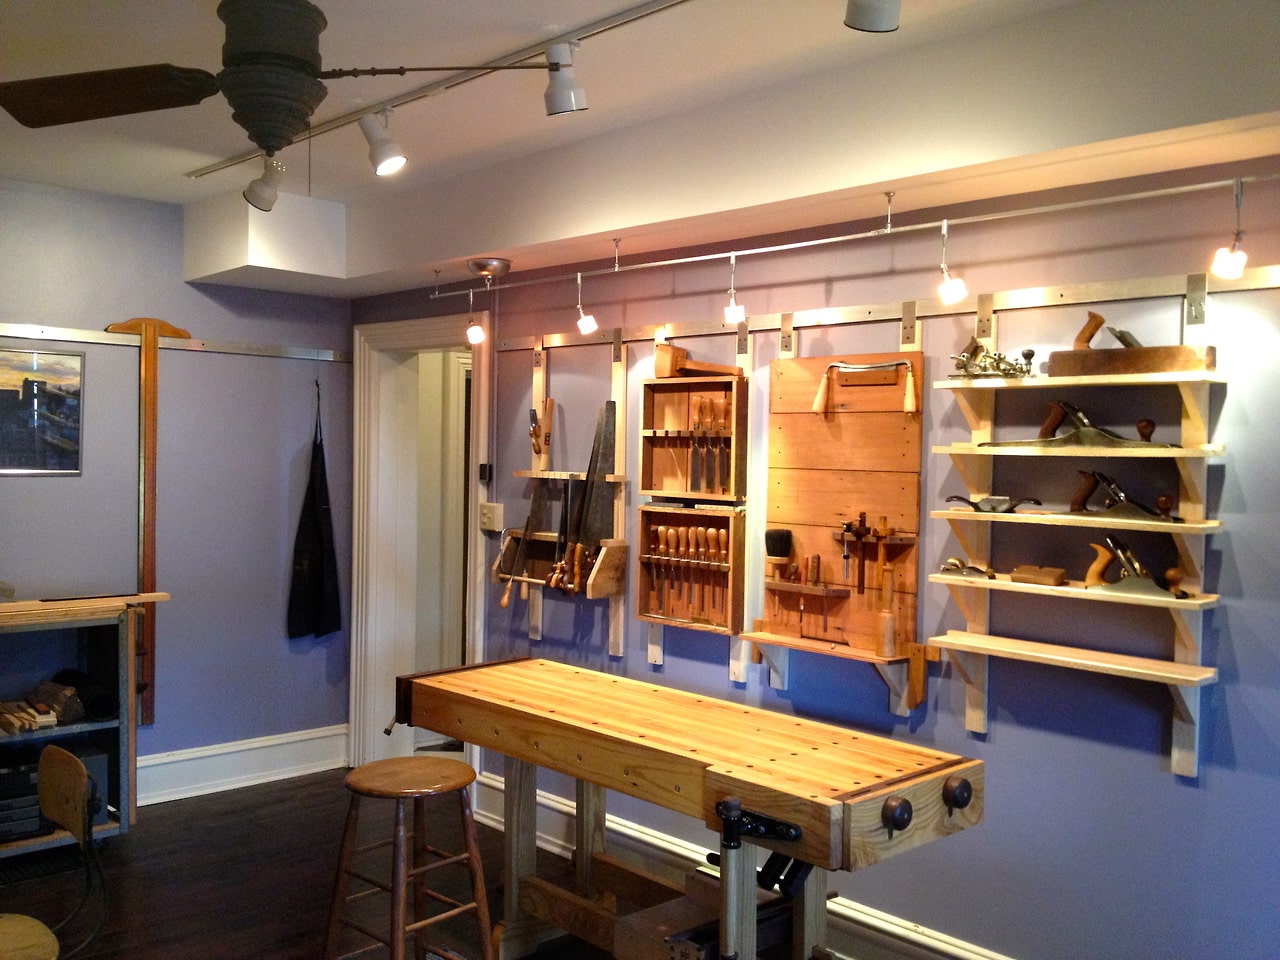
Building a French cleat closet system can transform your storage space while offering flexibility and customization. This do-it-yourself project involves creating a series of interlocking wooden strips that mount to your wall, allowing shelves, hooks, or cabinets to be easily rearranged. It's an ideal solution for those wanting a versatile and sturdy setup. With some basic tools and materials, you can craft a functional and stylish closet system that adapts to your needs. Follow this guide to learn the steps needed to create your own French cleat closet system and improve your home organization.
Getting Ready for Your Project
Measure Your Space: Use a tape measure to get the dimensions of your closet. Write down the width, height, and depth.
Gather Materials: You'll need plywood, screws, a saw, a drill, a level, and sandpaper. Make sure everything is ready before starting.
Safety Gear: Wear safety glasses, gloves, and a dust mask. These protect your eyes, hands, and lungs from debris.
Clear the Area: Remove all items from the closet. This gives you a clean workspace and prevents accidents.
Mark Studs: Use a stud finder to locate wall studs. Mark them with a pencil. This ensures your cleats are securely attached.
Cut Plywood: Cut the plywood into strips for the cleats. Each strip should be 45 degrees on one edge. Sand the edges to smooth them out.
Pre-Drill Holes: Pre-drill holes in the cleats. This makes it easier to screw them into the wall without splitting the wood.
Set Up Workspace: Lay out all tools and materials within easy reach. This keeps you organized and efficient.
Check Level: Use a level to ensure your cleats are straight. This prevents your shelves from being crooked.
Plan Layout: Sketch a layout of where you want shelves and hooks. This helps you visualize the final product and make adjustments before drilling.
What You Need: Materials and Tools
Materials Needed:
- Plywood: Used for the cleats and shelves. Choose a sturdy type like birch or oak.
- Wood Screws: Secure the cleats to the wall and the shelves to the cleats.
- Wood Glue: Adds extra strength to the joints.
- Wall Anchors: Provide additional support if attaching cleats to drywall.
- Paint or Stain: Finish the wood for a polished look.
- Sandpaper: Smooths the edges and surfaces of the wood.
Tools Needed:
- Tape Measure: Ensures accurate measurements for cutting and placement.
- Circular Saw: Cuts the plywood into cleats and shelves.
- Drill: Makes holes for screws and wall anchors.
- Level: Ensures cleats are straight and even.
- Stud Finder: Locates wall studs for secure mounting.
- Clamps: Holds wood pieces together while the glue dries.
- Paintbrush or Roller: Applies paint or stain to the wood.
- Screwdriver: Tightens screws into the wood and wall anchors.
Skill Level and Time Commitment
Skill Level: Intermediate
Time Required: 6-8 hours
- Measure and Plan: 1 hour
- Cutting Cleats and Shelves: 2 hours
- Sanding and Finishing: 1 hour
- Mounting Cleats: 1 hour
- Installing Shelves and Accessories: 1-2 hours
Instructions: Step-by-Step Guide
Gather Materials and Tools
- Plywood sheets
- Circular saw or table saw
- Measuring tape
- Level
- Drill and screws
- Wood glue
- Sandpaper
- Stud finder
- Paint or stain (optional)
Measure and Plan
- Measure the closet space.
- Plan the layout for shelves, hooks, and other storage.
Cut Plywood
- Cut plywood into strips for cleats (typically 3-4 inches wide).
- Cut a 45-degree angle along one edge of each strip.
Prepare Wall Cleats
- Find wall studs using a stud finder.
- Cut wall cleats to fit between studs.
- Sand edges to smooth any rough spots.
Install Wall Cleats
- Attach wall cleats to studs using screws.
- Ensure cleats are level and evenly spaced.
Create Shelves and Accessories
- Cut plywood for shelves and other storage pieces.
- Attach matching cleats to the back of each piece.
Assemble and Attach
- Apply wood glue to cleats on shelves and accessories.
- Secure with screws.
- Sand and finish with paint or stain if desired.
Mount Shelves and Accessories
- Hang shelves and accessories on wall cleats.
- Adjust as needed for stability and alignment.
Organize Closet
- Arrange items on shelves and hooks.
- Adjust placement for optimal storage.
Helpful Tips and Tricks
Measure Twice, Cut Once: Always double-check measurements before cutting. This saves time and materials.
Use Quality Plywood: Choose 3/4-inch plywood for strength. It holds weight better and lasts longer.
Pre-Drill Holes: Prevent wood from splitting by pre-drilling holes for screws.
Level Everything: Use a level to ensure cleats are straight. This keeps shelves and hooks from tilting.
Sand Edges: Smooth edges with sandpaper to avoid splinters and give a polished look.
Paint or Stain Before Installation: Finish the wood before mounting. It’s easier and looks more professional.
Use Studs: Secure cleats to wall studs for maximum support. Use a stud finder to locate them.
Spacing: Keep cleats about 12 inches apart vertically. This provides flexibility for hanging items.
Common Mistakes to Avoid:
Skipping Studs: Attaching cleats to drywall alone can cause them to fall. Always use studs.
Incorrect Measurements: Misjudging space can lead to gaps or overcrowding. Measure carefully.
Overloading: Don’t hang too much weight on one cleat. Distribute weight evenly.
Alternatives:
Metal Cleats: Use metal cleats for a modern look and added strength.
Ready-Made Kits: Purchase pre-made French cleat systems if you prefer not to cut wood yourself.
Adhesive Strips: For lighter items, use heavy-duty adhesive strips instead of screws.
Estimating the Cost
Plywood: $50-$70 per sheet (you'll need about 2-3 sheets)
French cleats: $20-$30 for a pack of 10
Wood screws: $5-$10 per box
Wall anchors: $10-$15 per pack
Stud finder: $10-$20
Level: $10-$15
Circular saw: $50-$100 (if you don't already have one)
Measuring tape: $5-$10
Sandpaper: $5-$10
Paint or stain: $20-$30
Brushes or rollers: $5-$10
Safety gear (gloves, goggles): $10-$20
Total cost: $200-$350
Budget-friendly alternatives:
- Use MDF instead of plywood: $30-$40 per sheet
- Borrow tools from friends or family
- Buy second-hand tools from thrift stores or online marketplaces
- Use leftover paint or stain from previous projects
Different Ways to Customize
Materials: Instead of using plywood, try solid wood like oak or pine for a more rustic look. MDF can be a budget-friendly option. For a modern touch, consider metal cleats.
Colors: Paint the cleats and shelves in contrasting colors for a bold look. Use stain to highlight the natural wood grain. For a sleek, modern style, go with neutral tones like white, gray, or black.
Styles: Add decorative molding to the edges of the shelves for a classic look. Use floating shelves for a minimalist design. Incorporate glass shelves for a contemporary feel.
Accessories: Install hooks or pegs on the cleats for hanging items. Add baskets or bins for extra storage. Use LED strip lights under the shelves for better visibility.
Configurations: Create a modular system with adjustable shelves. Design a corner unit to maximize space. Combine open shelving with closed cabinets for a mix of display and hidden storage.
Finishes: Use a high-gloss finish for a modern look. Opt for a matte finish for a more subdued style. Apply a distressed finish for a vintage appearance.
Hardware: Choose brushed nickel or chrome hardware for a modern touch. Use antique brass or oil-rubbed bronze for a vintage feel. Consider hidden brackets for a clean, seamless look.
Eco-Friendly Tips
Eco-friendly materials can make a big difference. Reclaimed wood is a great choice. It reduces waste and gives a unique look. Bamboo is another option. It grows quickly and is very strong.
Use non-toxic finishes. Look for water-based stains and paints. They are better for the environment and your health.
Recycling old furniture can provide useful parts. Old shelves or drawers can be repurposed. This saves money and resources.
For the cleats, consider using scrap wood. Many hardware stores have bins of offcuts. These pieces are often sold at a discount.
When cutting wood, try to minimize waste. Plan your cuts carefully. Use leftover pieces for smaller parts or other projects.
Energy-efficient tools can also help. Battery-powered tools with rechargeable batteries are a good choice. They use less energy and reduce waste.
Finally, donate or recycle any leftover materials. Many communities have recycling programs for wood and metal. This keeps them out of landfills.
Your Closet, Your Way
Building a French cleat closet system is a game-changer. It’s flexible, sturdy, and customizable. You can easily rearrange shelves, hooks, and bins to fit your needs. Plus, it’s a fun project that gives you a sense of accomplishment. Remember to measure twice, cut once, and always use quality materials. Don’t rush the process; take your time to ensure everything fits perfectly. Once you’re done, you’ll have a closet that’s not only functional but also looks great. So grab your tools, get creative, and transform your space. Happy building!
What is a French cleat closet system?
A French cleat closet system uses interlocking wooden strips to hang shelves, cabinets, or other storage units. One strip is attached to the wall, and the other to the back of the item you want to hang.
Why should I use a French cleat system for my closet?
It's super versatile and strong. You can easily rearrange your storage without drilling new holes. Plus, it can hold a lot of weight, making it perfect for heavy items.
What materials do I need to build a French cleat closet system?
You'll need plywood or solid wood for the cleats, a saw to cut the wood at a 45-degree angle, screws or nails to attach the cleats, and a level to make sure everything is straight.
How do I install the French cleats on the wall?
First, find the studs in your wall. Attach the cleat to the wall using screws driven into the studs. Make sure the cleat is level before securing it.
Can I paint or stain the French cleats?
Absolutely! You can paint or stain the cleats to match your closet's decor. Just make sure the paint or stain is fully dry before hanging anything.
How much weight can a French cleat system hold?
A properly installed French cleat system can hold hundreds of pounds. The key is to make sure the cleats are securely attached to the wall studs.
Can I use a French cleat system for other rooms?
Yes, it's great for garages, kitchens, or even living rooms. Anywhere you need flexible, strong storage, a French cleat system can work.