
Home>Organize & Storage>Closet Organization>DIY Wardrobe Closet Organization Guide
Closet Organization
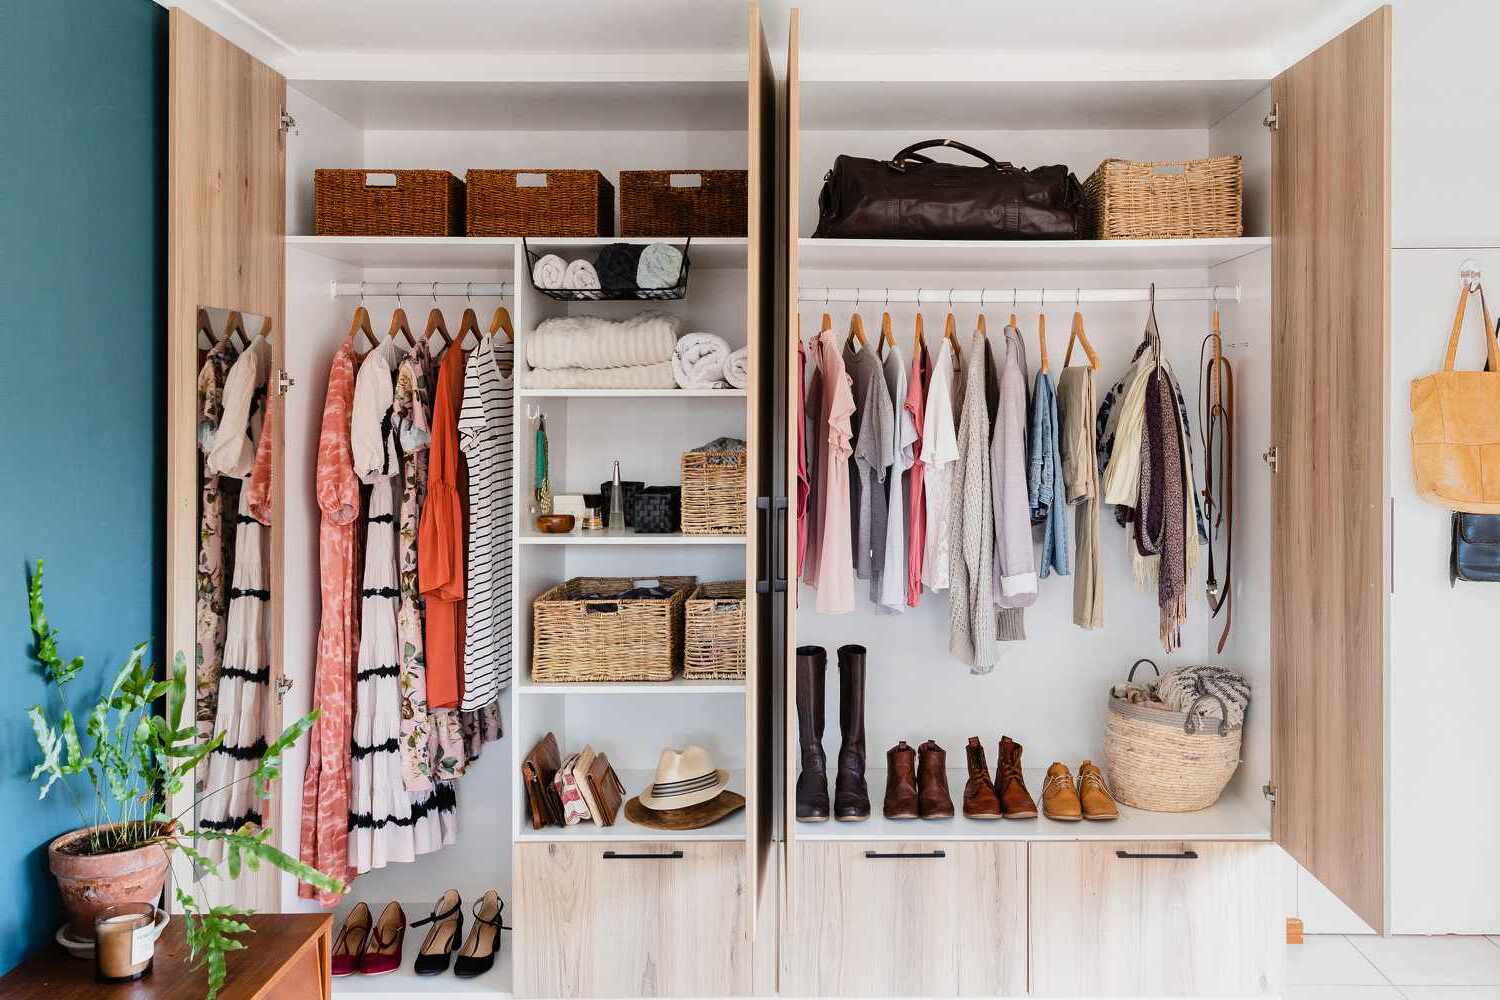
DIY Wardrobe Closet Organization Guide
Published: September 5, 2024
Discover the ultimate DIY wardrobe closet organization guide! Learn tips and tricks to maximize space, declutter, and create a stylish, functional closet.
(Many of the links in this article redirect to a specific reviewed product. Your purchase of these products through affiliate links helps to generate commission for Twigandthistle.com, at no extra cost. Learn more)
Organizing a wardrobe closet can seem like a big job, but with some simple steps, it becomes much easier. This guide will help you transform your cluttered closet into an organized space. By sorting through clothes, adding helpful storage solutions, and creating a system that works for you, finding your favorite outfits each morning will be quick and stress-free. Whether you're dealing with a small space or have a walk-in closet, these tips will help make the most of what you have. Ready to tackle that mess and turn chaos into order? Let’s get started!
Getting Ready for Your Project
Clear Out the Closet: Remove all clothes, shoes, and accessories. This helps see the available space and makes organizing easier.
Sort Items: Divide everything into categories like keep, donate, and discard. This reduces clutter and ensures only necessary items return to the closet.
Clean the Space: Wipe down shelves, vacuum the floor, and dust corners. A clean space makes organizing more effective.
Measure the Closet: Use a tape measure to note dimensions. Knowing the exact size helps in planning the layout and purchasing organizers.
Plan the Layout: Decide where to place shelves, hanging rods, and drawers. Sketch a simple plan to visualize the arrangement.
Gather Supplies: Collect necessary tools like a screwdriver, hammer, and level. Also, get organizers like bins, baskets, and hangers.
Safety First: Wear gloves and safety glasses when using tools. Ensure the workspace is well-lit and free from tripping hazards.
Set Up a Workspace: Create a designated area to work on assembling shelves or other components. Keep tools and supplies within reach.
Install Organizers: Follow the plan to install shelves, rods, and drawers. Use a level to ensure everything is straight.
Return Items: Place clothes and accessories back in the closet according to the new layout. Use bins and baskets to keep smaller items organized.
Gathering Materials and Tools
- Measuring Tape: Essential for measuring the dimensions of your closet space accurately.
- Screwdriver: Needed for assembling shelves, rods, and other hardware.
- Drill: Useful for making holes in the walls to install shelves and rods securely.
- Level: Ensures that shelves and rods are installed straight.
- Stud Finder: Helps locate wall studs to securely anchor heavy items.
- Hammer: Useful for nailing in hooks or other small hardware.
- Shelf Brackets: Supports for installing additional shelves.
- Closet Rods: For hanging clothes. Choose adjustable ones for flexibility.
- Hooks: Great for hanging accessories like belts, scarves, or bags.
- Storage Bins: Ideal for organizing smaller items like socks or underwear.
- Hangers: Different types for various clothing items—pants, shirts, dresses.
- Drawer Organizers: Keep smaller items like jewelry or ties neatly arranged.
- Labels: Helps in identifying the contents of bins and drawers.
- Screws and Nails: Necessary for securing shelves, rods, and hooks.
- Pencil: For marking measurements and placement points.
- Safety Gear: Gloves and safety glasses to protect yourself while working.
- Step Ladder: Helps reach higher areas of the closet safely.
- Vacuum or Broom: Clean up dust and debris after installation.
Skill Level and Time Commitment
Skill Level: Beginner
Time Required: 3-5 hours
- Empty the Closet: 30 minutes
- Sort Items: 1 hour
- Clean the Space: 30 minutes
- Plan the Layout: 30 minutes
- Install Organizers: 1 hour
- Return Items: 1 hour
How to Organize Your Closet Step-by-Step
Empty the Closet
- Take everything out.
- Lay items on the bed or floor.
Sort Items
- Create piles: Keep, Donate, Trash.
- Be honest about what you use.
Clean the Space
- Dust shelves.
- Vacuum or sweep the floor.
Assess Storage Needs
- Look at what you have.
- Decide if you need more bins, shelves, or hangers.
Install Organizational Tools
- Add shelves or rods if needed.
- Place bins or baskets for smaller items.
Group Similar Items
- Hang clothes by type: shirts, pants, dresses.
- Fold sweaters and place on shelves.
Use Vertical Space
- Hang hooks for bags or scarves.
- Stack bins for shoes or accessories.
Label Everything
- Use labels on bins and shelves.
- Helps keep things in place.
Return Items to Closet
- Put back only what you need.
- Keep it organized by category.
Maintain Regularly
- Spend 10 minutes each week tidying up.
- Donate items you no longer need.
Helpful Tips and Tricks
Use vertical space: Install shelves or hanging organizers to maximize storage.
Group similar items: Keep shirts together, pants together, etc. This makes finding things easier.
Use clear bins: Transparent bins help you see what's inside without opening them.
Label everything: Labels make it easy to know where things go.
Add hooks: Hooks on doors or walls can hold bags, scarves, or hats.
Rotate seasonal clothes: Store off-season clothes in bins or on higher shelves.
Use drawer dividers: Dividers keep small items like socks or underwear organized.
Common mistakes to avoid:
Overloading shelves: Too much weight can cause shelves to sag or break.
Ignoring vertical space: Not using the full height of your closet wastes potential storage.
Not purging regularly: Keep only what you need. Donate or discard items you no longer use.
Alternatives for materials or methods:
Instead of wooden shelves, use wire shelving. It's lighter and allows air circulation.
Instead of plastic bins, try fabric bins. They are flexible and can fit into tight spaces.
Instead of permanent hooks, use removable adhesive hooks. They can be repositioned easily.
Instead of traditional hangers, use slim velvet hangers. They save space and prevent clothes from slipping.
Estimating the Cost
Shelving Units: $50-$100 each. You might need 2-3 units.
Hanging Rods: $10-$20 each. Plan for 2-4 rods.
Storage Bins: $5-$15 each. Estimate needing 6-10 bins.
Drawer Units: $30-$60 each. One or two units should suffice.
Hooks: $1-$5 each. Around 10 hooks will be useful.
Shoe Racks: $20-$40 each. One or two racks should be enough.
Labels: $5-$10 for a pack. One pack should be plenty.
Tools: Basic tools like a screwdriver, hammer, and measuring tape. If you don't own these, budget around $30-$50.
Total Cost: Roughly $200-$500, depending on choices and quantities.
Budget-Friendly Alternatives:
- Use cardboard boxes instead of storage bins.
- Repurpose old furniture for shelving.
- DIY hanging rods using PVC pipes.
- Create labels from paper and tape.
- Use command hooks instead of traditional hooks.
Different Ways to Customize
Alternative Materials: Use wooden crates for a rustic look, or wire baskets for a modern touch. PVC pipes can create lightweight, customizable shelving. Fabric bins offer a soft, colorful option.
Colors: Paint shelves and bins in bold colors like red, blue, or green for a vibrant feel. For a more tranquil vibe, choose pastel shades like mint, lavender, or peach. Neutral tones like white, gray, or beige provide a clean, classic look.
Styles: For a minimalist style, use sleek, simple lines and monochromatic colors. A vintage style can be achieved with distressed wood and antique hardware. Industrial style might include metal pipes and dark wood. For a bohemian touch, incorporate woven baskets, colorful fabrics, and eclectic decor.
Additional Features: Add LED strip lights under shelves for better visibility. Install a pull-out shoe rack for easy access. Use pegboards on the inside of doors for hanging accessories. Add a full-length mirror on one door for convenience.
Eco-Friendly Organization Tips
Repurpose old boxes for storage. Shoe boxes or gift boxes can hold accessories, socks, or small items. Use wooden crates instead of plastic bins. They add a rustic touch and are biodegradable. Install shelves made from reclaimed wood. This reduces waste and gives your closet a unique look. Hang clothes on bamboo hangers. Bamboo grows quickly and is more sustainable than plastic. Create drawer dividers from cardboard. Cut and fold pieces to fit inside drawers, keeping items organized. Use fabric scraps to make drawer liners or small storage bags. This keeps things tidy and reuses materials you might otherwise throw away. Opt for metal hooks over plastic ones. Metal is more durable and recyclable. Label storage bins with recycled paper tags. This helps you find items easily and reduces the need for new materials. Paint or stain wood with eco-friendly products. Look for non-toxic, water-based options. Donate or swap items you no longer need. This keeps them out of landfills and helps others.
Your Closet, Your Way
Organizing your wardrobe closet doesn't have to be a chore. Start by decluttering. Get rid of clothes you no longer wear. Use storage bins for seasonal items. Shelves and hangers keep things tidy. Label everything so you know where stuff goes. Drawer dividers help with smaller items like socks and accessories. Hooks on the back of doors can hold bags or scarves. Lighting makes a big difference. Add some LED lights if your closet is dark. Shoe racks keep your footwear in order. Remember, the goal is to make your closet work for you. Personalize it to fit your style and needs. With a bit of effort, you'll have a space that's both functional and pleasing to the eye. Happy organizing!
How can I maximize space in my wardrobe closet?
Use vertical space by adding shelves or hanging organizers. Stackable bins and drawer dividers help keep things tidy. Hooks on doors can hold accessories.
What’s the best way to organize clothes by season?
Store off-season clothes in vacuum-sealed bags or bins under the bed. Rotate your wardrobe every few months to keep only current-season items accessible.
How do I keep my shoes organized?
Use shoe racks, over-the-door organizers, or clear boxes. Label boxes if they’re not see-through. Keep frequently worn shoes at eye level for easy access.
Any tips for organizing accessories like belts and scarves?
Hang belts on a belt rack or hooks. Scarves can go on a scarf hanger or in a drawer with dividers. Use small bins for jewelry and other small items.
What should I do with clothes I don’t wear often?
Consider donating or selling them. If you’re unsure, try the hanger trick: hang all clothes with hangers facing one way. After wearing an item, turn the hanger. After six months, donate clothes still facing the original way.
How can I keep my closet smelling fresh?
Use sachets, cedar blocks, or air fresheners. Keep a small box of baking soda to absorb odors. Regularly clean your closet to prevent musty smells.
What’s the best way to fold and store sweaters?
Fold sweaters to avoid stretching. Store them on shelves or in drawers. Use shelf dividers to keep stacks neat and prevent toppling.