
Home>Home & Furniture>Roof>Revitalize Your Roof with DIY Rejuvenation Spray
Roof
Revitalize Your Roof with DIY Rejuvenation Spray
Published: August 20, 2024
Discover how to revitalize your roof with a DIY rejuvenation spray. Learn step-by-step instructions, benefits, and tips to extend your roof's lifespan and enhance curb appeal.
(Many of the links in this article redirect to a specific reviewed product. Your purchase of these products through affiliate links helps to generate commission for Twigandthistle.com, at no extra cost. Learn more)
Is your roof looking a bit worn out? Want to breathe new life into those shingles without calling in the pros? DIY rejuvenation spray might be just what you need. This easy-to-use solution can make your roof look nearly new again, extending its lifespan and saving you money. You don’t need to be a home improvement expert to achieve professional results. With just a few tools and some simple steps, your roof will thank you. Ready to roll up your sleeves? Let’s dive into how you can revitalize those tired shingles yourself.
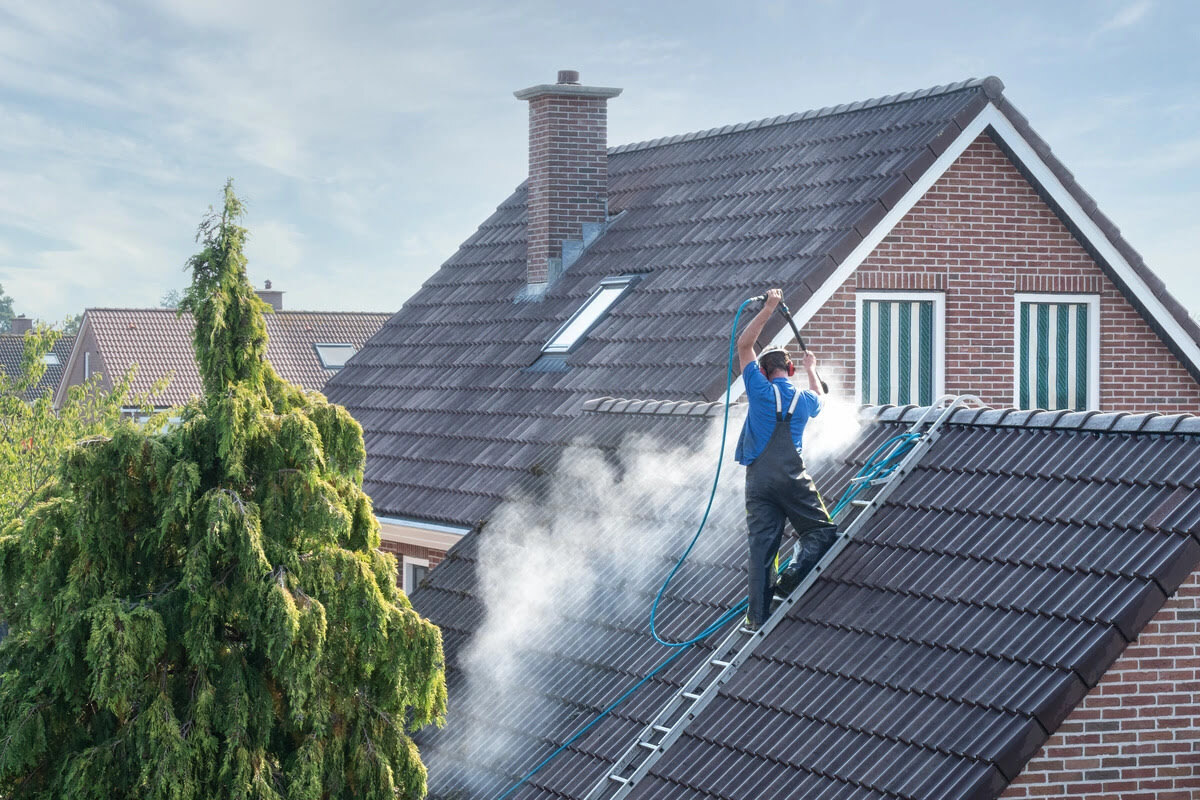
Getting Ready for the Project
Inspect the Roof: Check for any damage like missing shingles, cracks, or leaks. Fix these issues before applying the spray.
Clean the Roof: Remove debris, dirt, and moss. Use a broom or leaf blower, then wash with a garden hose and mild detergent.
Gather Supplies: You’ll need rejuvenation spray, a sprayer, safety goggles, gloves, and a ladder.
Check the Weather: Ensure a clear, dry day for application. Rain can wash away the spray before it sets.
Set Up Workspace: Clear the area around the house. Ensure the ladder is stable on flat ground.
Wear Safety Gear: Put on safety goggles and gloves to protect your eyes and hands from chemicals.
Mix the Spray: Follow the instructions on the rejuvenation spray bottle for proper mixing.
Test the Spray: Apply a small amount on a hidden area to ensure it doesn’t damage the roof material.
Apply the Spray: Start from the top and work your way down, ensuring even coverage. Avoid oversaturation.
Let it Dry: Allow the spray to dry completely before walking on the roof or exposing it to rain.
What You Need: Materials and Tools
Rejuvenation Spray: Specially formulated to restore the flexibility and waterproofing of your roof shingles.
Garden Sprayer: A pump sprayer with a long wand to evenly apply the rejuvenation spray across the roof.
Ladder: A sturdy ladder to safely reach your roof. Make sure it’s tall enough and stable.
Safety Harness: Essential for preventing falls. Attach it securely to a strong anchor point on the roof.
Gloves: Protect your hands from chemicals and rough surfaces.
Goggles: Shield your eyes from spray mist and debris.
Pressure Washer: Clean the roof thoroughly before applying the spray. Removes dirt, moss, and algae.
Roof Cleaner: Use a roof-specific cleaner to help break down stubborn grime and organic growth.
Scrub Brush: For scrubbing tough spots that the pressure washer can’t handle.
Buckets: Useful for mixing cleaning solutions and carrying water.
Hose: Connect to the pressure washer or use for rinsing off the roof cleaner.
Extension Cord: If your pressure washer or other tools need power and the outlet is far away.
Work Boots: Non-slip boots to ensure good traction on the roof.
Weatherproof Clothing: Wear clothes that can handle getting wet and dirty.
Tarp: Protect plants and other areas around your house from overspray and runoff.
Measuring Tape: Measure the roof area to ensure you have enough rejuvenation spray.
Mixing Stick: Stir the rejuvenation spray if it needs to be mixed before use.
Sealant: For patching any small cracks or holes before applying the rejuvenation spray.
Skill Level and Time Commitment
Skill Level: Intermediate
Time Required:
- Preparation: 1-2 hours
- Application: 3-4 hours
- Drying Time: 24 hours
Total Time: Approximately 1-2 days
How to Apply the Rejuvenation Spray
Gather Materials:
- Roof rejuvenation spray
- Garden sprayer
- Ladder
- Safety gear (gloves, goggles)
- Hose with water supply
Inspect the Roof:
- Check for any damage or loose shingles.
- Repair any issues before applying the spray.
Clean the Roof:
- Use a hose to wash off dirt and debris.
- Allow the roof to dry completely.
Prepare the Spray:
- Follow the instructions on the rejuvenation spray bottle.
- Pour the solution into the garden sprayer.
Apply the Spray:
- Put on safety gear.
- Climb the ladder carefully.
- Spray the solution evenly across the roof, starting from the top and working your way down.
Let It Dry:
- Allow the spray to dry as per the product instructions.
- Avoid walking on the roof until it is completely dry.
Inspect the Results:
- Check the roof for even coverage.
- Reapply if necessary for any missed spots.
Clean Up:
- Rinse the garden sprayer thoroughly.
- Store any leftover spray safely.
Regular Maintenance:
- Inspect the roof periodically.
- Reapply the rejuvenation spray as needed to maintain the roof’s condition.
Helpful Tips and Tricks
Clean the Roof First: Before applying any spray, make sure the roof is clean. Use a broom or leaf blower to remove debris. A clean surface ensures better adhesion.
Choose the Right Day: Apply the spray on a dry, mild day. Avoid very hot or cold days. This helps the spray to dry evenly.
Use a Garden Sprayer: A garden sprayer provides even coverage. Make sure to test it with water first to ensure it works properly.
Wear Safety Gear: Always wear gloves, goggles, and a mask. Safety first!
Work in Sections: Divide the roof into sections. This makes the job more manageable and ensures even application.
Overlap Each Pass: When spraying, overlap each pass slightly. This prevents missed spots and ensures full coverage.
Check the Weather Forecast: Ensure no rain is expected for at least 24 hours after application. This gives the spray time to set properly.
Common Mistakes to Avoid:
- Skipping Cleaning: Not cleaning the roof can lead to poor adhesion.
- Ignoring Safety Gear: Always wear protective gear to avoid inhaling fumes or getting chemicals on your skin.
- Rushing the Job: Take your time to ensure even coverage. Rushing can lead to missed spots.
Alternatives for Materials or Methods:
- Eco-Friendly Sprays: Consider using eco-friendly rejuvenation sprays. They are better for the environment and safer for you.
- Professional Help: If the roof is too high or steep, consider hiring a professional. Safety is more important than saving money.
- Manual Application: If a sprayer is not available, use a paint roller. It takes longer but can still provide good coverage.
Estimating the Cost
Roof rejuvenation spray costs about $30 per gallon. For a standard roof, you might need around 5 gallons, totaling $150.
Pressure washer rental costs roughly $50 per day. If you don't own one, this is a must.
Safety gear like gloves, goggles, and a mask will cost about $20.
Ladder rental or purchase can vary. Renting might be around $30 per day, while buying one could be $100.
Cleaning solution for pre-washing the roof costs about $15.
Brushes and scrubbers for applying the solution and spray cost around $10.
Total estimated cost: $275 if renting tools, $325 if buying a ladder.
Budget-friendly alternatives:
- Borrow a pressure washer or ladder from a friend or neighbor.
- Use household cleaning solutions instead of buying new ones.
- Look for sales or discounts on rejuvenation spray and safety gear.
Different Ways to Customize
Alternative Materials: Instead of using a standard rejuvenation spray, try a silicone-based spray for better water resistance. Acrylic sprays can offer a more eco-friendly option. For a natural approach, consider a linseed oil-based spray.
Colors: Choose a spray that matches your home’s exterior. Gray and charcoal work well for modern homes. Terracotta or red can give a classic look. For a unique touch, try green or blue.
Styles: If your roof has a metal finish, use a spray designed for metal surfaces. For shingle roofs, pick a spray that enhances the texture. Tile roofs can benefit from a spray that adds a glossy finish. To add character, consider a matte finish for a rustic look or a high-gloss finish for a sleek, modern appearance.
Eco-Friendly Tips
Eco-friendly materials can make a big difference. Use biodegradable cleaning agents instead of harsh chemicals. These are safer for the environment and your health.
Recycled materials are another great option. For example, use a recycled plastic spray bottle for your rejuvenation spray. This reduces waste and gives new life to old materials.
Natural oils like linseed or tung oil can be used to seal and protect your roof. They are less harmful than synthetic alternatives and provide a durable finish.
Solar-powered sprayers can help you save energy. These sprayers use sunlight to power the pump, reducing your carbon footprint.
Rainwater can be collected and used for mixing your rejuvenation spray. This conserves water and makes use of a natural resource.
Reusable cloths or brushes for application can cut down on waste. Instead of disposable options, choose tools that can be cleaned and used again.
Local materials can also be more sustainable. Buying from local suppliers reduces transportation emissions and supports your community.
By incorporating these eco-friendly methods and materials, you can rejuvenate your roof while being kind to the planet.
Your Roof's New Best Friend
Using DIY rejuvenation spray can breathe new life into your roof. This simple, cost-effective method helps extend the lifespan of your shingles, saving you money on costly repairs. Plus, it’s a great way to maintain your home’s curb appeal. Just remember to follow the instructions carefully, ensuring even application and proper safety measures. With a little effort, you can protect your roof from the elements, prevent leaks, and keep it looking fresh. So grab your spray, get up there, and give your roof the TLC it deserves. Happy DIY-ing!
How does the DIY rejuvenation spray work?
The spray penetrates your roof shingles, restoring their flexibility and waterproofing properties. It helps extend the lifespan of your roof by sealing small cracks and preventing further damage.
What materials do I need to make the spray?
You'll need water, vegetable oil, liquid dish soap, and a garden sprayer. These ingredients create a simple yet effective solution for your roof.
How often should I apply the spray?
Apply the spray once a year. This routine maintenance keeps your roof in good shape and prevents costly repairs.
Can I use the spray on any type of roof?
The spray works best on asphalt shingles. If you have a different type of roof, check with a professional before using the spray.
Is the spray safe for the environment?
Yes, the ingredients are non-toxic and biodegradable. They won't harm your plants or pollute the environment.
How long does it take to see results?
You'll notice improvements within a few days. The shingles will look refreshed and feel more flexible.
Do I need any special equipment to apply the spray?
Just a garden sprayer. It's easy to use and helps you apply the solution evenly across your roof.