
Home>Home & Furniture>Roof>How to DIY Flat Roof Waterproofing
Roof
How to DIY Flat Roof Waterproofing
Published: August 20, 2024
Learn how to DIY flat roof waterproofing with our step-by-step guide. Ensure your roof stays leak-free and durable with expert tips and cost-effective solutions.
(Many of the links in this article redirect to a specific reviewed product. Your purchase of these products through affiliate links helps to generate commission for Twigandthistle.com, at no extra cost. Learn more)
Waterproofing a flat roof might sound tricky, but with the right steps, anyone can do it. You don't need to be a pro to ensure your roof stays dry and lasts longer. This guide will walk you through the essentials: gathering materials, prepping the surface, and applying the waterproof coating. With some patience and effort, you can protect your home from leaks and water damage. It's all about taking your time and following each step carefully. Let's get started on making your flat roof watertight and worry-free!
Getting Ready for the Project
Inspect the Roof: Check for any damage, cracks, or leaks. Fix these issues before waterproofing.
Clean the Surface: Remove dirt, debris, and old roofing material. Use a broom or pressure washer.
Safety Gear: Wear gloves, safety goggles, and non-slip shoes. Use a harness if the roof is steep.
Weather Check: Ensure no rain is forecasted for at least 24 hours. Dry conditions are essential.
Gather Materials: Get waterproofing membrane, primer, brushes, rollers, and a utility knife.
Set Up Workspace: Lay out tools and materials within easy reach. Ensure the area is well-ventilated.
Apply Primer: Coat the roof with primer using a roller. Let it dry completely.
Measure and Cut Membrane: Measure the roof dimensions. Cut the waterproofing membrane to fit.
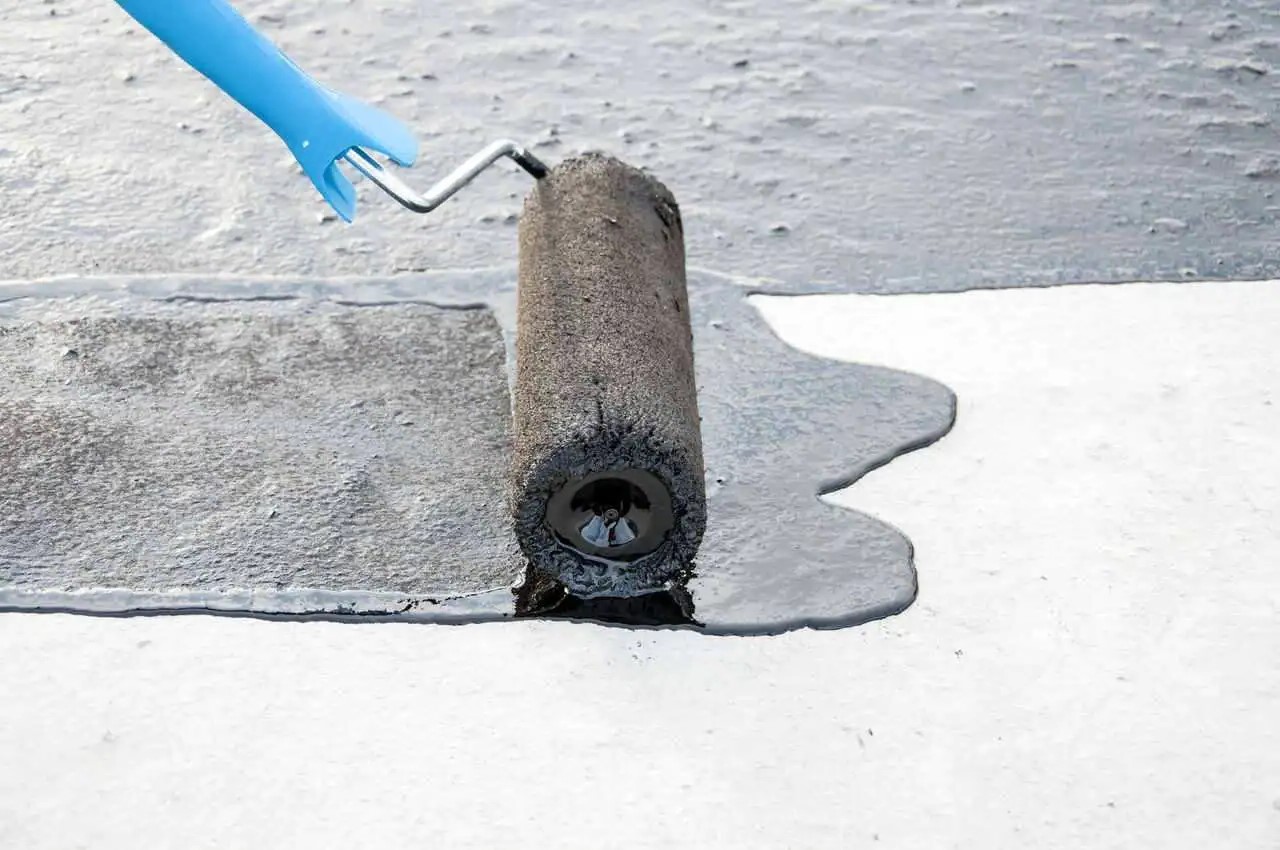
Apply Membrane: Start at one edge, unroll the membrane, and press it down. Smooth out air bubbles.
Seal Edges: Use a roller to press down edges and seams. Ensure a tight seal to prevent leaks.
Final Inspection: Check for any missed spots or air bubbles. Fix them immediately.
Essential Materials and Tools
- Roofing Membrane: A waterproof layer that covers the roof, preventing water from seeping through.
- Primer: Prepares the roof surface for the membrane, ensuring better adhesion.
- Roof Sealant: Fills gaps and seals edges to prevent leaks.
- Roofing Nails: Secures the membrane to the roof.
- Roofing Tape: Seals seams and overlaps in the membrane.
- Utility Knife: Cuts the membrane and tape to the required size.
- Measuring Tape: Ensures accurate measurements for cutting materials.
- Paint Roller: Applies primer evenly across the roof.
- Brush: Used for applying sealant in small or hard-to-reach areas.
- Caulking Gun: Dispenses sealant smoothly and evenly.
- Protective Gloves: Protects hands from chemicals and sharp edges.
- Safety Goggles: Shields eyes from debris and chemicals.
- Ladder: Provides safe access to the roof.
- Broom: Cleans the roof surface before applying materials.
- Bucket: Holds water or cleaning solution for surface preparation.
Required Skills and Time
Skill Level: Intermediate
Estimated Time Required: 1-2 days
- Preparation and Cleaning: 2-4 hours
- Repairing Damages: 3-5 hours
- Applying Primer: 1-2 hours (including drying time)
- Applying Waterproof Membrane: 4-6 hours
- Final Inspection: 1 hour
Detailed Step-by-Step Guide
Inspect the Roof
- Check for any damage, cracks, or leaks.
- Clean the surface thoroughly, removing debris, dirt, and old sealant.
Repair Damages
- Patch any holes or cracks with roofing cement.
- Allow repairs to dry completely.
Clean the Roof
- Use a pressure washer or a stiff brush with soapy water.
- Rinse thoroughly and let it dry.
Apply Primer
- Use a roller or brush to apply a coat of primer.
- Let the primer dry according to the manufacturer’s instructions.
Lay Down Waterproof Membrane
- Measure and cut the membrane to fit the roof.
- Lay it out flat, ensuring no wrinkles or bubbles.
Secure the Membrane
- Use adhesive to secure the membrane to the roof.
- Press down firmly to ensure a good bond.
Seal the Edges
- Apply roofing tape or sealant around the edges of the membrane.
- Make sure all seams are covered and sealed.
Apply Top Coat
- Use a roller to apply a waterproof top coat over the membrane.
- Allow it to dry completely.
Inspect Your Work
- Check for any missed spots or areas needing extra sealant.
- Make any necessary touch-ups.
Regular Maintenance
- Inspect the roof periodically for any signs of wear or damage.
- Reapply sealant as needed to maintain waterproofing.
Helpful Tips and Tricks
Clean the Roof Thoroughly: Remove debris, dirt, and old coatings. A clean surface ensures better adhesion for waterproofing materials.
Check for Damage: Inspect for cracks, blisters, or weak spots. Repair these areas before applying any waterproofing solution.
Use a Primer: Apply a primer to help the waterproofing material stick better. This step is often skipped but makes a big difference.
Choose the Right Waterproofing Material: Options include liquid rubber, bitumen, or EPDM membranes. Liquid rubber is easy to apply, while EPDM is durable but requires more skill.
Apply in Layers: Multiple thin layers work better than one thick layer. Allow each layer to dry before adding the next.
Seal the Edges: Pay extra attention to edges and seams. Use additional sealant or tape to ensure these areas are watertight.
Check the Weather: Avoid applying waterproofing materials in wet or extremely hot conditions. Ideal weather is dry and mild.
Common Mistakes to Avoid:
- Skipping surface preparation.
- Using incompatible materials.
- Ignoring manufacturer instructions.
- Applying too thick a layer at once.
Alternatives for Materials or Methods:
- Liquid Rubber: Easy to apply with a brush or roller.
- Bitumen Sheets: Durable but requires heating for application.
- EPDM Membrane: Long-lasting but needs precise installation.
Safety First: Wear gloves, goggles, and a mask to protect yourself from fumes and chemicals.
Estimating the Costs
Materials:
- Waterproofing Membrane: $100-$200 (depends on roof size)
- Primer: $20-$40 per gallon
- Sealant: $10-$30 per tube
- Roofing Tape: $15-$25 per roll
Tools:
- Paint Roller: $10-$20
- Utility Knife: $5-$15
- Caulking Gun: $5-$15
- Measuring Tape: $5-$10
- Brushes: $5-$15
Total Cost: $160-$370
Budget-Friendly Alternatives:
- Use a cheaper waterproofing membrane: $50-$100
- Buy a basic primer: $10-$20 per gallon
- Opt for a generic sealant: $5-$15 per tube
- Use duct tape instead of roofing tape: $5-$10 per roll
Total Cost with Alternatives: $90-$190
Different Approaches and Customizations
Materials: Instead of traditional asphalt-based products, consider using liquid rubber or silicone coatings. These materials provide excellent waterproofing and are easier to apply. EPDM rubber sheets are another durable option.
Colors: Most waterproofing materials come in basic colors like black or gray. For a more aesthetic look, choose white or reflective coatings. These not only look better but also help in reducing heat absorption, keeping your home cooler.
Styles: Add a layer of gravel or decorative stones on top of the waterproofing layer. This not only protects the waterproofing material from UV rays but also adds a stylish touch. Another option is to install green roofing. This involves adding a layer of soil and plants, which can help with insulation and water absorption.
Application Methods: For a smoother finish, use a spray-on application method instead of a brush or roller. This ensures an even coat and reduces the chances of missed spots. If you prefer a more hands-on approach, self-adhesive waterproofing membranes are easy to install and require minimal tools.
Additional Features: Integrate drainage systems like scuppers or gutters to ensure water doesn't pool on the roof. Adding insulation boards under the waterproofing layer can improve energy efficiency. Consider installing solar panels on top of the waterproofed roof for added functionality and energy savings.
Eco-Friendly Tips
Eco-friendly materials can make a big difference. Recycled rubber is a great option for waterproofing. It’s durable and made from old tires. Green roofs are another choice. They use plants to absorb rainwater and provide insulation. Soy-based sealants are also good. They are less toxic and work well.
Methods matter too. Reusing old materials like wood or metal can save money and reduce waste. Solar reflective coatings can keep your roof cool and lower energy bills. Rainwater harvesting systems can be installed to collect and reuse water.
Preparation is key. Clean the roof using eco-friendly cleaners. Check for any damage and fix it with recycled materials. Apply a primer made from natural ingredients to help the waterproofing stick better.
Application should be done carefully. Use a brush or roller to apply the waterproofing material evenly. Make sure to cover all seams and edges. Let it dry completely before adding another layer.
Maintenance is important. Check your roof regularly for any signs of wear. Patch up small areas with leftover materials. Keep the roof clean to ensure it lasts longer.
Your Roof's Ready for Anything
You've got the know-how to tackle flat roof waterproofing. With the right materials and techniques, your roof will stand up to the elements. Remember, prep work is key. Clean the surface well, fix any cracks, and apply a good primer. When laying down the waterproof membrane, take your time to ensure no bubbles or gaps. Overlapping edges and sealing seams properly will make a huge difference.
Don't forget to check your work. Look for any missed spots or areas that need extra attention. Regular maintenance will keep your roof in top shape. A little effort now saves big headaches later. So, grab your tools, get out there, and make your roof watertight. You've got this!
How do I know if my flat roof needs waterproofing?
Look for signs like leaks, water stains, or mold. If you see puddles after rain, it's time to waterproof.
What materials do I need for waterproofing a flat roof?
You'll need roof sealant, a roller, a brush, and cleaning supplies. Some folks also use primer for better adhesion.
Can I waterproof my flat roof by myself?
Absolutely! With the right tools and instructions, you can save money and do it yourself. Just follow the steps carefully.
How long does the waterproofing process take?
It usually takes a weekend. Cleaning and prepping might take a day, and applying the sealant another day. Drying time varies.
How often should I reapply waterproofing?
Typically, every 5-10 years. Check your roof yearly for any signs of wear or damage to stay ahead of problems.
What’s the best time of year to waterproof a flat roof?
Spring or early summer is ideal. You want dry, warm weather so the sealant cures properly.
Are there eco-friendly waterproofing options?
Yes, there are eco-friendly sealants made from non-toxic materials. Look for products labeled as green or environmentally safe.