
Home>Home & Furniture>Roof>How to Build Solar Panel Roof Mounts
Roof
How to Build Solar Panel Roof Mounts
Published: August 22, 2024
Learn how to build solar panel roof mounts with our step-by-step guide. Optimize your roof for solar energy and ensure a secure, efficient installation.
(Many of the links in this article redirect to a specific reviewed product. Your purchase of these products through affiliate links helps to generate commission for Twigandthistle.com, at no extra cost. Learn more)
Harnessing solar energy can be a great way to save on electricity bills and help the environment. Building your own solar panel roof mounts might seem challenging, but with some basic tools and a bit of patience, it's a task within reach. This guide will walk you through the essential steps to create sturdy, effective mounts for your solar panels. Whether you're a DIY enthusiast or just looking to dip your toes into renewable energy, this project can be both rewarding and educational. Let's get started and make your home a bit greener!
Getting Ready for the Project
Research Local Regulations: Check local building codes and permits required for installing solar panels. Some areas have specific rules you must follow.
Safety Gear: Wear safety goggles, gloves, and a hard hat. Use a harness if working on a steep roof.
Tools and Materials: Gather solar panels, mounting brackets, rails, screws, a drill, a measuring tape, and a level.
Inspect the Roof: Ensure the roof is in good condition. Repair any damage before starting the installation.
Measure and Mark: Use the measuring tape to mark where the mounts will go. Make sure they are evenly spaced and aligned.
Set Up Workspace: Clear the area around the roof. Keep tools and materials within easy reach but secure them to prevent falling.
Weather Check: Choose a day with good weather. Avoid working in rain or high winds for safety.
Plan Electrical Connections: Decide where the inverter and other electrical components will go. Ensure they are easily accessible.
Read Instructions: Go through the manual for your specific solar panel kit. Follow any special instructions provided.
Test Equipment: Check that all tools and materials are in working order before starting the installation.
Materials and Tools Needed
- Solar Panels: These convert sunlight into electricity. Choose panels that fit your energy needs.
- Mounting Rails: Long metal bars that hold the panels in place. They attach to the roof and provide a stable base.
- Mounting Brackets: Connect the rails to the roof. They ensure the panels stay secure even in strong winds.
- Roof Flashing: Metal pieces that prevent water from leaking into your roof where the brackets are installed.
- Bolts and Screws: Fasteners that hold everything together. Make sure they are weather-resistant.
- Wrenches and Screwdrivers: Tools for tightening bolts and screws. Essential for assembling the mounts.
- Drill: Used to make holes in the roof for the mounting brackets. A power drill speeds up the process.
- Measuring Tape: Ensures accurate placement of the panels and brackets. Helps keep everything aligned.
- Level: Ensures the panels are installed flat and even. This maximizes their efficiency.
- Safety Gear: Includes gloves, safety glasses, and a harness. Protects you while working on the roof.
- Sealant: Used to waterproof the areas around the brackets and flashing. Keeps your roof leak-free.
- Wire Cutters and Strippers: Tools for preparing the electrical connections. Necessary for connecting the panels to your home’s power system.
- Multimeter: Measures electrical current, voltage, and resistance. Ensures your system is working correctly.
- Conduit: Protects the electrical wires running from the panels to your home. Keeps them safe from weather and damage.
Skill Level and Time Required
Skill Level: Advanced
Time Required: 2-3 days
- Planning and Measuring: 4-6 hours
- Gathering Materials: 2-3 hours
- Installing Roof Mounts: 8-10 hours
- Mounting Solar Panels: 6-8 hours
- Wiring and Connections: 4-6 hours
Step-by-Step Instructions
Gather Materials
- Solar panels
- Roof mounts
- Rails
- Screws and bolts
- Drill
- Measuring tape
- Wrench
- Ladder
- Safety gear (gloves, helmet)
Measure Roof Space
- Use measuring tape to find the area where panels will go.
- Ensure enough space for all panels.
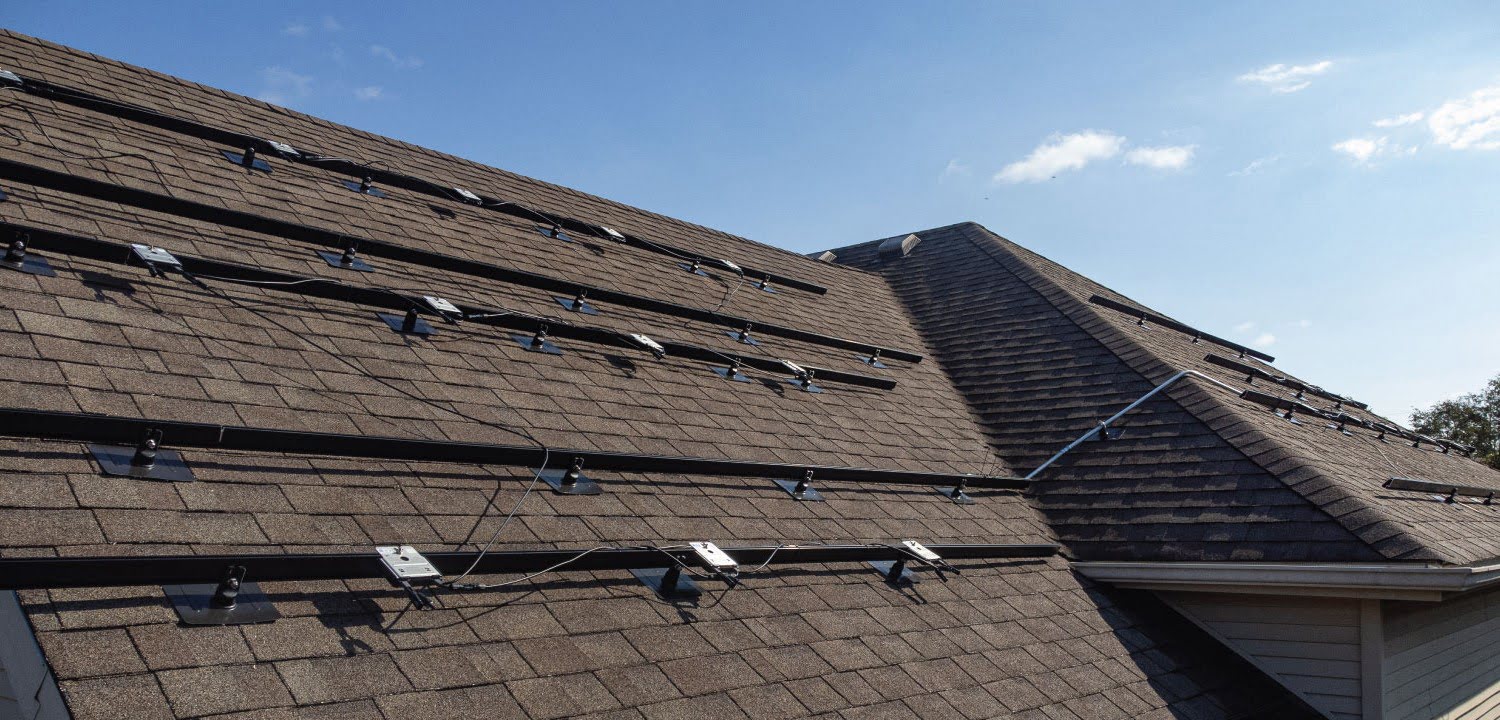
Install Roof Mounts
- Mark spots for mounts based on panel size.
- Drill holes at marked spots.
- Secure mounts with screws and bolts.
Attach Rails to Mounts
- Place rails on mounts.
- Use bolts to secure rails tightly.
Position Solar Panels
- Lift panels onto rails.
- Align panels properly.
Secure Panels to Rails
- Use bolts to attach panels to rails.
- Ensure panels are firmly in place.
Connect Electrical Components
- Follow manufacturer instructions for wiring.
- Ensure all connections are secure.
Test System
- Check if panels are generating power.
- Ensure everything is working correctly.
Inspect Installation
- Double-check all bolts and screws.
- Ensure everything is secure and safe.
Tips and Tricks
Measure twice, cut once. Always double-check measurements before cutting materials to avoid waste and ensure accuracy.
Use a chalk line to mark where the mounts will go. This helps keep everything straight and aligned.
Pre-drill holes in the mounts and roof. This makes it easier to screw in bolts and reduces the risk of splitting the wood or damaging the roof.
Seal all holes with a waterproof sealant. This prevents leaks and protects your roof from water damage.
Use stainless steel hardware. Stainless steel resists rust and corrosion, ensuring your mounts last longer.
Install flashing around the mounts. Flashing helps direct water away from the mounts, reducing the risk of leaks.
Common mistakes to avoid:
Skipping the sealant. Not sealing holes can lead to leaks and water damage.
Incorrect spacing. Ensure mounts are spaced correctly to support the weight of the solar panels.
Using the wrong hardware. Non-stainless steel hardware can rust, weakening the mounts over time.
Alternatives for materials or methods:
Aluminum mounts instead of steel. Aluminum is lighter and resists corrosion.
Rubber gaskets under mounts. These provide extra waterproofing and reduce the risk of leaks.
Adjustable mounts for easier alignment. These can be adjusted after installation to ensure the panels are perfectly aligned.
Cost Estimation
Solar panels: $100-$300 each, depending on size and efficiency.
Mounting brackets: $50-$100 for a set, depending on material and design.
Rails: $100-$200 for a set, depending on length and material.
Bolts and screws: $20-$50 for a pack, depending on quantity and quality.
Flashing: $30-$60 for a roll, depending on length and material.
Sealant: $10-$20 per tube, depending on brand and type.
Wiring: $50-$100 for a spool, depending on length and gauge.
Inverter: $200-$500, depending on capacity and type.
Tools:
- Drill: $50-$150, depending on brand and power.
- Wrench set: $20-$50, depending on size and quality.
- Screwdriver set: $10-$30, depending on brand and type.
- Measuring tape: $10-$20, depending on length and quality.
- Level: $10-$30, depending on size and type.
Budget-friendly alternatives:
- Used solar panels: $50-$150 each.
- DIY mounting brackets: $20-$50 for materials.
- Recycled rails: $50-$100 for a set.
- Bulk bolts and screws: $10-$30 for a pack.
- Discounted flashing: $20-$40 for a roll.
- Generic sealant: $5-$15 per tube.
- Second-hand wiring: $30-$70 for a spool.
- Refurbished inverter: $100-$300.
Tools:
- Borrow or rent a drill: $10-$30 per day.
- Second-hand wrench set: $10-$30.
- Basic screwdriver set: $5-$15.
- Borrow a measuring tape: Free.
- Use a smartphone app as a level: Free.
Variations and Customizations
Materials: Instead of using aluminum for the mounts, consider stainless steel for added durability. Wood can be an eco-friendly option, though it may require more maintenance. Composite materials offer a balance between strength and weight.
Colors: Paint the mounts to match your roof. Use black or dark gray for a sleek, modern look. White can reflect heat, keeping the panels cooler. Green or brown blends well with natural surroundings.
Styles: Opt for a low-profile design to minimize wind resistance. Adjustable mounts allow you to change the angle of the panels seasonally. Tilt mounts can maximize sun exposure in areas with less consistent sunlight.
Fasteners: Use stainless steel bolts for rust resistance. Lag screws provide strong anchoring in wooden roofs. Self-tapping screws work well for metal roofs.
Mounting Options: Rail systems offer flexibility for panel placement. Direct mounts attach panels directly to the roof, reducing material costs. Ballasted mounts are ideal for flat roofs, using weight to hold panels in place without penetrating the roof.
Weatherproofing: Add rubber gaskets to prevent leaks. Use UV-resistant sealant to protect against sun damage. Flashing can direct water away from critical areas.
Safety Features: Install grounding lugs to prevent electrical hazards. Use lock washers to keep bolts secure. Safety rails can prevent falls during installation and maintenance.
Aesthetic Touches: Hide wiring with conduit painted to match the roof. Use decorative caps on bolts for a cleaner look. Integrated mounts can blend seamlessly with the roofline.
Sustainability Tips
Use reclaimed wood for the frame. Reclaimed wood is strong and often cheaper than new wood. Recycled metal brackets can hold the panels in place. Metal from old appliances or furniture works well. Eco-friendly paint or sealant protects the wood from weather. Choose non-toxic options to avoid harming the environment.
Natural fiber ropes or straps can secure the panels. Hemp or jute ropes are sturdy and biodegradable. Recycled rubber pads or mats can cushion the panels. Old tires or rubber flooring can be cut to size.
Solar-powered tools can reduce your carbon footprint during construction. Borrow or rent these tools if you don't own them. Rainwater collection systems can provide water for cleaning the panels. Use barrels or tanks to store rainwater.
Upcycled materials like old pipes or beams can add extra support. Check local salvage yards or online marketplaces for these items. Energy-efficient lighting helps you work safely at night. LED lights use less power and last longer.
Compostable packaging for any new materials you buy reduces waste. Look for suppliers who use minimal or eco-friendly packaging. Local sourcing of materials cuts down on transportation emissions. Buy from nearby stores or suppliers when possible.
DIY solar panel mounts save money and reduce waste. Use these tips to make your project eco-friendly and sustainable.
Your Solar Panel Roof Mounts Are Ready
You've got your solar panel roof mounts all set up. Now, your home is ready to harness the power of the sun. Remember, double-check all connections and fastenings to ensure everything's secure. If something feels off, don't hesitate to consult a professional. Regular maintenance will keep your system running smoothly. Clean the panels occasionally to maximize efficiency. With this setup, you're not only saving on electricity bills but also contributing to a greener planet. Enjoy the benefits of your hard work and the renewable energy it brings. Happy DIY-ing!
How do I choose the right solar panels for my roof?
Look at your energy needs, roof size, and budget. Check the efficiency and warranty of the panels. Also, make sure they fit your roof's angle and direction.
What tools do I need to build solar panel roof mounts?
You'll need a drill, wrenches, screws, mounting brackets, and a measuring tape. Safety gear like gloves and goggles is also important.
Can I install solar panels on any type of roof?
Most roofs can handle solar panels, but some materials like slate or clay tiles might need special mounts. Flat roofs may require angled mounts to catch more sunlight.
How do I ensure my solar panel mounts are secure?
Make sure to anchor the mounts to the roof rafters. Use weatherproof screws and sealant to prevent leaks. Double-check all connections for stability.
Do I need a permit to install solar panels?
Yes, most places require a permit. Check with your local government or building authority. They’ll guide you on the necessary steps and inspections.
How do I maintain my solar panel system?
Keep the panels clean and free from debris. Check the mounts and wiring regularly for any signs of wear. A yearly professional inspection is a good idea.
What are the benefits of using solar energy?
Solar energy reduces your electricity bills, lowers your carbon footprint, and can increase your home's value. Plus, you might get tax incentives or rebates.