
Home>Home & Furniture>Roof>How to Build a DIY Bike Roof Rack
Roof
How to Build a DIY Bike Roof Rack
Published: August 18, 2024
Learn how to build a DIY bike roof rack with our step-by-step guide. Save money, customize your rack, and securely transport your bike with ease.
(Many of the links in this article redirect to a specific reviewed product. Your purchase of these products through affiliate links helps to generate commission for Twigandthistle.com, at no extra cost. Learn more)
Building your own bike roof rack offers a fun project and a practical way to transport your bike. You don't need to spend a lot on store-bought racks when making one yourself is both budget-friendly and customizable. Using basic tools and materials, creating a sturdy rack becomes a straightforward process. Whether for weekend adventures or regular commutes, a DIY bike roof rack allows you to secure your bike safely on top of your car. Get ready to learn how to piece together a reliable and unique bike rack that suits your needs.
Getting Ready for the Project
Gather Materials: Collect all necessary materials like wood, screws, brackets, and bike mounts. Make sure everything is within reach before starting.
Safety Gear: Wear safety goggles, gloves, and ear protection. Safety first!
Clear Workspace: Ensure your workspace is clean and free of clutter. A tidy area helps prevent accidents.
Measure Twice, Cut Once: Double-check all measurements to avoid mistakes. Accurate measurements save time and materials.
Pre-Drill Holes: Pre-drill holes for screws to prevent wood from splitting. This makes assembly easier and more secure.
Check Tools: Ensure all tools like drills, saws, and screwdrivers are in good working condition. Faulty tools can cause injuries.
Plan Layout: Sketch a layout of the bike rack. Visualizing the project helps in understanding the steps better.
Secure Workpieces: Use clamps to hold pieces in place while working. This keeps your hands free and reduces the risk of injury.
Ventilation: Work in a well-ventilated area, especially if using adhesives or paints. Proper airflow prevents inhaling harmful fumes.
Test Fit: Before final assembly, test fit all parts. This ensures everything aligns correctly and functions as intended.
Materials and Tools Needed
- Wooden Planks: Strong and durable wood pieces to form the base and supports.
- Metal Brackets: Used to secure the wooden planks together.
- Screws and Bolts: Essential for fastening the parts securely.
- Drill: Needed to make holes for screws and bolts.
- Saw: To cut the wooden planks to the required size.
- Measuring Tape: Ensures accurate measurements for cutting and assembling.
- Sandpaper: Smooths out rough edges on the wood.
- Paint or Varnish: Protects the wood from weather damage.
- Bike Mounts: Holds the bike in place on the rack.
- Wrench: Tightens bolts and nuts.
- Screwdriver: Drives screws into the wood and metal brackets.
- Pencil: Marks measurements on the wood.
- Safety Goggles: Protects eyes while cutting and drilling.
- Gloves: Keeps hands safe from splinters and sharp edges.
- Clamps: Holds pieces together while assembling.
Skill Level and Time Required
Skill Level: Intermediate
Time Required: 4-6 hours
- Gather Materials: 30 minutes
- Measure and Cut Wood: 1 hour
- Assemble Frame: 1.5 hours
- Attach Bike Mounts: 1 hour
- Install on Car Roof: 1 hour
- Test Stability: 30 minutes
Step-by-Step Instructions
Gather Materials:
- 2x4 wooden planks
- Metal brackets
- Screws
- Drill
- Measuring tape
- Saw
- Sandpaper
- Paint or wood sealant (optional)
- Bungee cords or straps
Measure and Cut Wood:
- Measure the width of your car roof.
- Cut two 2x4 planks to match this width.
- Cut two more planks to the length you want the rack to be.
Sand the Wood:
- Sand all edges of the cut planks to remove splinters.
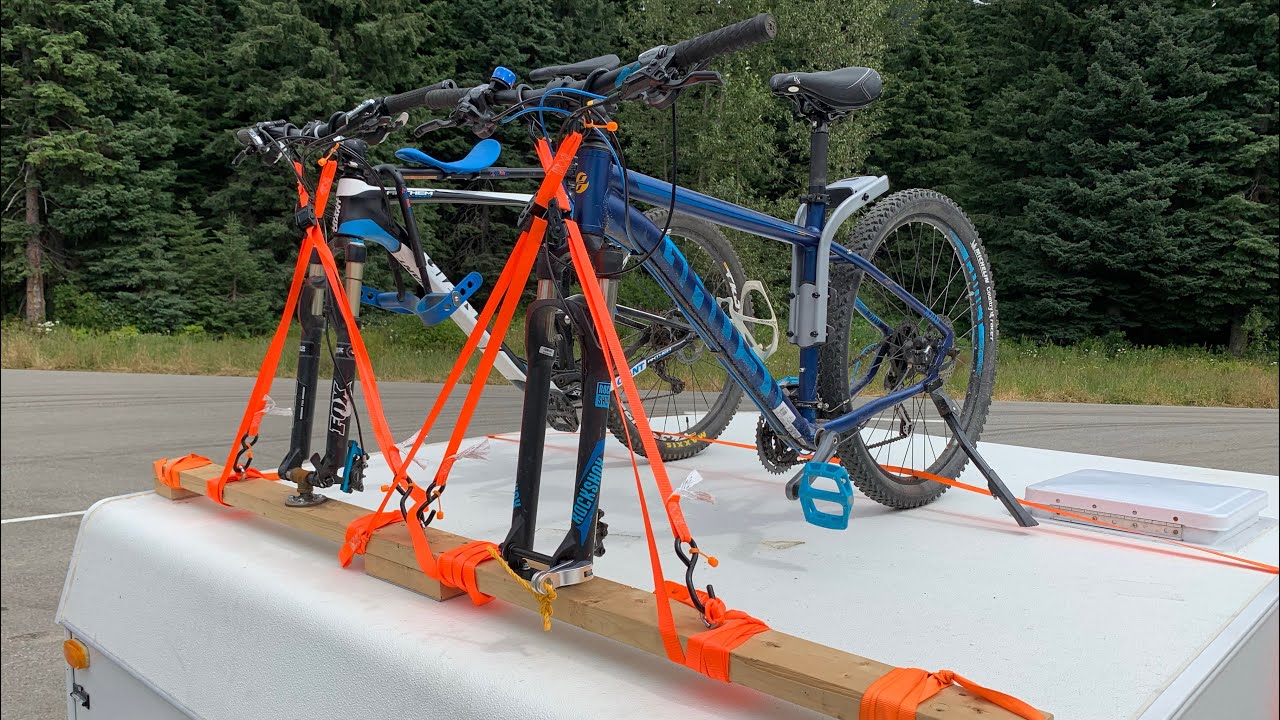
Assemble the Frame:
- Lay the two width planks parallel to each other.
- Place the two length planks on top, forming a rectangle.
- Use metal brackets at each corner to secure the planks together.
- Drill screws through the brackets into the wood.
Attach to Car Roof:
- Place the assembled frame on your car roof.
- Use bungee cords or straps to secure the frame to the car's roof rails or door frames.
Add Bike Mounts:
- Measure the distance between your bike's wheels.
- Cut two small planks to this length.
- Attach these planks perpendicular to the frame where the bike wheels will sit.
- Secure with screws.
Secure the Bike:
- Place the bike on the rack.
- Use additional bungee cords or straps to secure the bike to the rack.
Optional Finishing Touches:
- Paint or seal the wood to protect it from weather.
- Add padding to the bike mounts for extra protection.
Your DIY bike roof rack is now ready for use!
Helpful Tips and Tricks
Measure twice, cut once. Always double-check measurements before cutting materials. This saves time and prevents waste.
Use sturdy materials. Opt for strong wood or metal to ensure the rack can support the bike's weight. Avoid flimsy materials that might break.
Pre-drill holes. This prevents wood from splitting and makes screwing easier.
Sand edges. Smooth out rough edges to avoid scratches on your bike.
Use weather-resistant paint. Protects the rack from rain and sun damage.
Secure the rack properly. Use strong bolts and brackets to attach the rack to the roof. Ensure it’s tightly fastened to avoid accidents.
Test the rack. Before loading your bike, give the rack a good shake to ensure stability.
Common mistakes to avoid:
Overloading the rack. Don’t exceed the weight limit of your materials.
Ignoring roof compatibility. Make sure your roof can handle the rack and bike weight.
Skipping the sealant. Use waterproof sealant on joints to prevent rust and water damage.
Alternatives for materials or methods:
PVC pipes. Lightweight and easy to work with, but not as strong as metal.
Aluminum. Rust-resistant and lighter than steel, though more expensive.
Pre-made brackets. Save time by using pre-made brackets instead of custom ones.
Velcro straps. For securing the bike, consider using heavy-duty Velcro straps instead of bungee cords.
Estimating the Cost
Materials:
- Wood (2x4s or 2x6s): $20-$30
- Metal brackets: $10-$15
- Screws and bolts: $5-$10
- Foam padding: $5-$10
- Straps or bungee cords: $10-$15
Tools:
- Drill: $30-$50 (if you don't have one)
- Saw: $20-$40 (if you don't have one)
- Measuring tape: $5-$10
- Screwdriver: $5-$10
Total Cost: $110-$190
Budget-Friendly Alternatives:
- Use recycled wood or scrap metal: Free or very cheap
- Borrow tools from friends or family: Free
- Buy used tools from thrift stores or online marketplaces: Cheaper than new
Total Cost with Alternatives: $40-$80
Different Variations and Customizations
Materials: Instead of using metal pipes, try PVC pipes. They are lighter and easier to cut. For a more rustic look, use wooden beams. Ensure they are treated to withstand weather conditions.
Colors: Paint the rack to match your car. Use spray paint for a smooth finish. Consider reflective paint for added visibility at night. You can also use vinyl wraps for a more customized design.
Styles: For a sleek, modern look, use aluminum instead of steel. It’s lighter and doesn’t rust. If you prefer a vintage style, use copper pipes. They develop a unique patina over time.
Mounting Options: Instead of permanent mounts, use suction cups for a temporary solution. They are easy to remove and don’t damage the car. For a more secure fit, use U-bolts to attach the rack directly to the car’s roof rails.
Padding: Add foam padding to the bike holders to protect your bike’s frame. Use rubber strips to prevent slipping and add extra grip.
Locking Mechanism: Install a lockable clamp to secure your bike. This adds an extra layer of security. Alternatively, use a cable lock that can be looped through the bike and rack.
Accessories: Attach a toolbox to the rack for carrying repair tools. Add LED lights for better visibility at night. Install a wind deflector to reduce noise and improve aerodynamics.
Eco-Friendly Tips
Reclaimed wood can be used for the base of the rack. Look for old pallets or leftover lumber from other projects. Recycled metal pipes or aluminum can serve as the frame. These materials are sturdy and often available at scrap yards.
For the bike holders, old rubber straps or bungee cords can be repurposed. These will keep the bikes secure without needing new materials. Eco-friendly paint or stain can protect the wood and metal from weather damage.
Use natural oils like linseed oil to treat the wood instead of chemical-based products. This will help preserve the wood while being kind to the environment.
When assembling, opt for recycled screws or bolts. These can often be found at hardware stores that sell reclaimed building materials.
Finally, consider using solar-powered lights if you need illumination for your bike rack. This will reduce energy consumption and make your project even more sustainable.
Ready to Hit the Road
Building your own DIY bike roof rack isn't just about saving money. It's about customizing your gear to fit your needs. You've learned how to gather materials, measure and cut wood, assemble the frame, and secure your bike. With these steps, you can create a sturdy, reliable rack that makes transporting your bike a breeze. Plus, the satisfaction of building something with your own hands is unbeatable. So, grab your tools, follow the steps, and get ready for your next biking adventure. Happy building!
How much does it cost to build a DIY bike roof rack?
Building a DIY bike roof rack can cost anywhere from $50 to $150, depending on the materials you choose and what tools you already have.
What materials do I need?
You’ll need metal pipes, brackets, screws, nuts, bolts, and padding to protect your bike. Some folks also use wood or PVC pipes.
Do I need special tools?
Basic tools like a drill, wrench, screwdriver, and saw should do the trick. If you’re working with metal, a pipe cutter might come in handy.
How long will it take to build?
It usually takes about 3 to 5 hours to build, depending on your skill level and how complex your design is.
Is it safe to use a DIY bike roof rack?
Yes, as long as you follow proper guidelines and secure everything tightly. Always double-check your work before hitting the road.
Can I customize the rack for different bikes?
Absolutely! You can adjust the dimensions and padding to fit different bike sizes and shapes.
How do I attach the rack to my car?
Most DIY racks attach to the existing roof bars on your car. You’ll need U-bolts or brackets to secure it firmly.