
Home>Home & Furniture>Roof>DIY Dollhouse Roof Ideas Guide
Roof
DIY Dollhouse Roof Ideas Guide
Published: August 22, 2024
Discover creative DIY dollhouse roof ideas! From shingles to thatch, our guide covers materials, techniques, and tips to craft the perfect miniature roof.
(Many of the links in this article redirect to a specific reviewed product. Your purchase of these products through affiliate links helps to generate commission for Twigandthistle.com, at no extra cost. Learn more)
Building a dollhouse can be a fun and rewarding project. One key feature that brings your miniature home to life is the roof. Whether you're a beginner or have more advanced skills, there are many creative ways to design and make roofs for dollhouses. From simple cardboard designs to more intricate shingles and tiles, each method adds its unique touch. This guide will help you explore different materials and techniques, offering ideas to match any style or period of the dollhouse. Get ready to transform your mini home with these exciting DIY dollhouse roof ideas!
Getting Ready for Your Project
Gather Materials: Collect all necessary supplies like cardboard, wood, glue, paint, shingles, and scissors. Make sure everything is within reach.
Safety Gear: Wear safety goggles and gloves to protect your eyes and hands. Keep a first aid kit nearby in case of minor injuries.
Workspace Setup: Choose a well-lit, clutter-free area. Lay down a protective sheet to catch any spills or debris.
Measure and Plan: Use a ruler and pencil to measure the dimensions of the dollhouse roof. Sketch out your design on paper before cutting any materials.
Cutting Materials: Use a sharp utility knife or scissors for precise cuts. Always cut away from your body to avoid accidents.
Dry Fit: Before gluing, place all pieces together to ensure they fit correctly. Adjust as needed.
Ventilation: Work in a well-ventilated area, especially when using glue or paint, to avoid inhaling fumes.
Organize Tools: Keep tools like a hammer, nails, and paintbrushes organized and within easy reach.
Test Stability: Check that the dollhouse structure is stable before adding the roof. Reinforce any weak spots.
Clean Up: After completing the project, clean your workspace and store tools safely. Dispose of any waste materials properly.
Gathering Materials and Tools
- Cardboard or Foam Board: Used as the base for the roof. Sturdy and easy to cut.
- Craft Knife: Essential for cutting cardboard or foam board to the desired shape.
- Ruler: Ensures straight edges and accurate measurements.
- Hot Glue Gun: Quickly bonds materials together. Ideal for attaching roof pieces.
- Pencil: Marks cutting lines and measurements.
- Paint: Adds color and detail to the roof. Acrylic paint works well.
- Paintbrushes: Applies paint evenly. Different sizes help with detailing.
- Sandpaper: Smooths rough edges on cardboard or foam board.
- Scissors: Cuts smaller pieces of material or trims edges.
- Decorative Paper or Fabric: Covers the roof for a unique look. Adds texture and design.
- Tape: Holds pieces together temporarily while glue dries.
- Measuring Tape: Measures larger sections accurately.
- PVA Glue: Provides a strong bond for paper or fabric to the roof base.
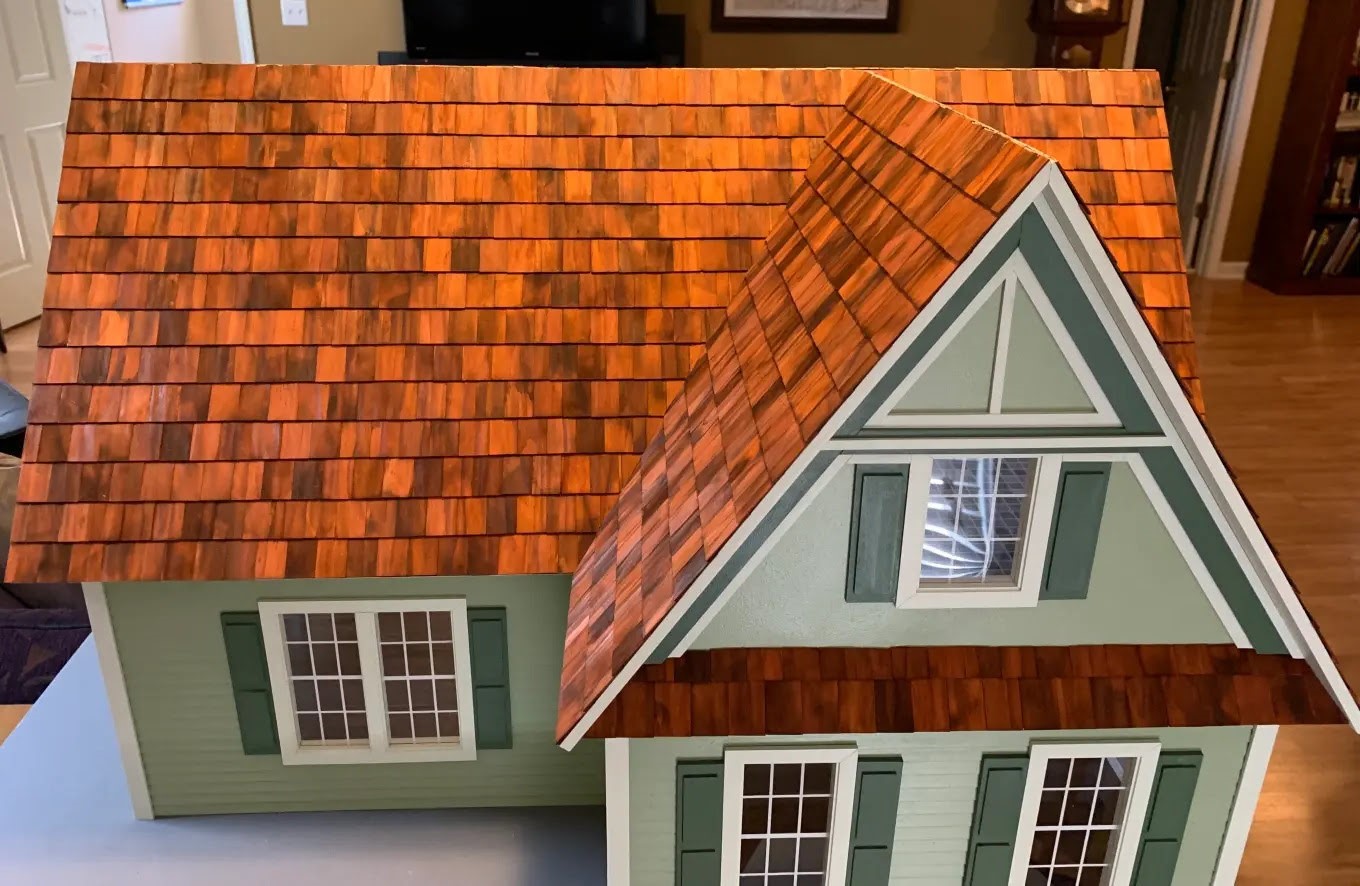
- Roof Shingles or Tiles: Adds realism. Can be made from thin wood, cardboard, or purchased pre-made.
- Tweezers: Handles small pieces or delicate decorations.
- Cutting Mat: Protects surfaces while cutting materials.
- Clamps or Clips: Holds pieces in place while glue sets.
- Pencil Sharpener: Keeps pencils sharp for precise marking.
- Safety Goggles: Protects eyes when cutting or sanding materials.
- Dust Mask: Prevents inhalation of dust from sanding.
Skill Level and Time Commitment
Skill Level: Intermediate
Time Required: 4-6 hours
- Planning and Measuring: 30 minutes
- Cutting Materials: 1 hour
- Assembling Roof Structure: 1.5 hours
- Shingling or Tiling: 1.5 hours
- Painting and Finishing Touches: 1 hour
Detailed Instructions
Gather Materials:
- Cardboard or thin wood sheets
- Craft knife or scissors
- Ruler
- Pencil
- Glue
- Paint or decorative paper
- Small shingles (optional)
Measure the Roof Area:
- Use a ruler to measure the length and width of the dollhouse roof area.
- Write down these measurements.
Cut the Roof Pieces:
- Draw the roof shape on cardboard or wood using the measurements.
- Cut out the pieces with a craft knife or scissors.
Assemble the Roof:
- Apply glue along the edges of the roof pieces.
- Press the pieces together to form the roof shape.
- Hold until the glue sets.
Add Shingles (Optional):
- Cut small rectangles from cardboard or thin wood.
- Glue these rectangles in overlapping rows starting from the bottom edge of the roof.
Decorate the Roof:
- Paint the roof or cover it with decorative paper.
- Allow the paint or glue to dry completely.
Attach the Roof to the Dollhouse:
- Apply glue along the top edges of the dollhouse walls.
- Place the roof on top and press down gently.
- Hold until the glue sets.
Final Touches:
- Check for any loose edges and apply more glue if needed.
- Touch up any paint or decorations as necessary.
Helpful Tips and Tricks
Use lightweight materials like foam board or balsa wood for easy cutting and shaping. Measure twice, cut once to avoid mistakes. Paint before assembly to reach all areas easily. Use hot glue for quick drying and strong bonds.
Common mistakes to avoid: Don't use heavy materials; they can make the dollhouse unstable. Avoid using too much glue; it can seep out and look messy. Don't skip sanding edges; rough edges can make assembly difficult.
Alternatives for materials or methods: Instead of shingles, use textured scrapbook paper for a quick roof. For a thatched look, use raffia or straw glued in layers. If you lack wood, cardboard can be a good substitute for lightweight roofs.
Budgeting for Your Dollhouse Roof
Materials:
- Wooden shingles: $10-$20 per pack (depends on size)
- Cardboard: $5-$10 per sheet
- Popsicle sticks: $3-$5 per pack
- Glue: $3-$7 per bottle
- Paint: $5-$10 per small can
- Sandpaper: $3-$5 per pack
Tools:
- Scissors: $5-$10
- Utility knife: $5-$10
- Ruler: $2-$5
- Paintbrushes: $3-$7 per set
Total Cost: $44-$89
Budget-friendly alternatives:
- Use cereal boxes instead of buying cardboard
- Collect twigs from outside instead of popsicle sticks
- Use leftover paint from other projects
Creative Variations and Customizations
Shingles can be made from popsicle sticks or cardboard. For a rustic look, use wooden coffee stirrers. Paint them in earthy tones like brown or gray.
Metal roofs can be created using aluminum foil or soda cans. Cut and flatten the material, then glue it in place. Paint it with metallic colors for a realistic effect.
Thatched roofs can be made using dried grass, twine, or raffia. Glue these materials in layers for a natural look.
Tile roofs can be crafted from clay or polymer clay. Shape small tiles and bake them. Glue them in rows for a Mediterranean style.
Green roofs can be made using felt or moss. Glue the material to the roof for a garden effect.
Modern roofs can use acrylic sheets or plexiglass for a sleek look. Paint them in neutral colors like black, white, or gray.
Gingerbread-style roofs can be made using foam sheets or cardstock. Cut and decorate with paint or markers for a whimsical touch.
Eco-Friendly Tips
Cardboard: Reuse old cardboard boxes to create a sturdy roof. Cut pieces to fit the roof shape, then paint or decorate.
Wood Scraps: Use leftover wood from other projects. Small pieces can be glued together to form shingles or a solid roof.
Fabric: Repurpose old fabric scraps. Stretch and glue them over a cardboard base for a soft, textured look.
Bottle Caps: Collect and flatten metal bottle caps. Arrange them like shingles for a unique, recycled roof.
Egg Cartons: Cut the individual cups from egg cartons. Paint them and arrange them in rows to mimic roof tiles.
Magazine Pages: Roll up old magazine pages into tight tubes. Glue them side by side for a colorful, eco-friendly roof.
Cereal Boxes: Flatten and cut cereal boxes into shingle shapes. Layer them on the roof for a lightweight, recycled option.
Cork: Save wine corks and slice them into thin discs. Glue these discs in overlapping rows for a rustic roof.
Twigs: Gather small twigs from your yard. Cut them to size and glue them in rows for a natural, woodland look.
Aluminum Foil: Reuse clean aluminum foil. Crumple it slightly for texture, then glue it to the roof for a metallic finish.
Your Dollhouse Roof Awaits
Building a dollhouse roof yourself can be super rewarding. You've got tons of options, from shingles to tiles to thatched roofs. Each style brings its own charm. Don't be afraid to mix materials or try something new. Cardboard, wood, and fabric can all work wonders. Remember, the key is to have fun and let your creativity shine. If you mess up, no biggie—just try again. The more you experiment, the better you'll get. So grab your tools, gather your materials, and start crafting. Your dollhouse will look amazing with a roof that's uniquely yours. Happy building!
How do I choose the right materials for my dollhouse roof?
Consider the scale of your dollhouse. For a realistic look, use wood shingles or clay tiles. Cardboard and foam are lightweight options for beginners.
What's the easiest way to make a shingled roof?
Use pre-cut wooden shingles. Glue them in rows, starting from the bottom and working your way up. Overlap each row slightly for a natural look.
Can I use recycled materials for my dollhouse roof?
Absolutely! Cereal boxes, egg cartons, and old magazines can be cut into shingles or tiles. Just make sure everything is clean and dry before you start.
How do I add texture to a flat roof?
Use sandpaper or a textured roller to create a rough surface. You can also glue on small pebbles or gravel for a more rugged look.
What's the best way to paint a dollhouse roof?
Use acrylic paint for its quick drying time and durability. Apply a base coat, then add highlights and shadows for depth. Seal with a clear varnish to protect your work.
How do I make a thatched roof?
Use dried grass, raffia, or even twine. Glue small bundles onto the roof, starting from the bottom and layering upwards. Trim the ends for a neat finish.
Can I add gutters and downspouts to my dollhouse roof?
Yes! Use thin strips of plastic or metal for gutters. Attach them with glue or tiny nails. For downspouts, use drinking straws or small tubes.