
Home>Home & Furniture>Roof>DIY Archery Target Stand with Roof
Roof
DIY Archery Target Stand with Roof
Published: August 22, 2024
Learn how to build a DIY archery target stand with a roof to protect your targets from the elements. Follow our step-by-step guide for a durable and weather-resistant setup.
(Many of the links in this article redirect to a specific reviewed product. Your purchase of these products through affiliate links helps to generate commission for Twigandthistle.com, at no extra cost. Learn more)
Building your own archery target stand with a roof is both fun and useful. It gives you a sturdy place to practice your shots and helps keep your target dry. You can make it with basic tools and materials found at any hardware store. This project is perfect for anyone wanting a weekend DIY activity. Whether a seasoned archer or just starting out, having your own target stand means more practice time in your backyard. Plus, it’s a great way to learn some woodworking skills. Let’s get started on this exciting project!
Getting Ready for Your Project
Gather Materials: Collect wood, screws, nails, a hammer, a saw, a drill, a measuring tape, and a tarp or roofing material.
Safety Gear: Wear safety glasses, gloves, and ear protection. Ensure a first aid kit is nearby.
Clear Workspace: Find a flat, open area to work. Remove any obstacles or tripping hazards.
Measure and Cut: Measure and mark the wood pieces according to your design. Cut them accurately using the saw.
Pre-Drill Holes: Pre-drill holes where screws or nails will go. This prevents the wood from splitting.
Assemble Frame: Start by assembling the base and sides of the stand. Use screws or nails to secure the joints.
Attach Roof Supports: Fix the roof supports to the top of the frame. Ensure they are sturdy and level.
Install Roof: Place the tarp or roofing material over the supports. Secure it with nails or screws.
Check Stability: Ensure the stand is stable and all parts are securely fastened.
Test: Place the target on the stand and test it with a few arrows to ensure it holds up.
Gathering Materials and Tools
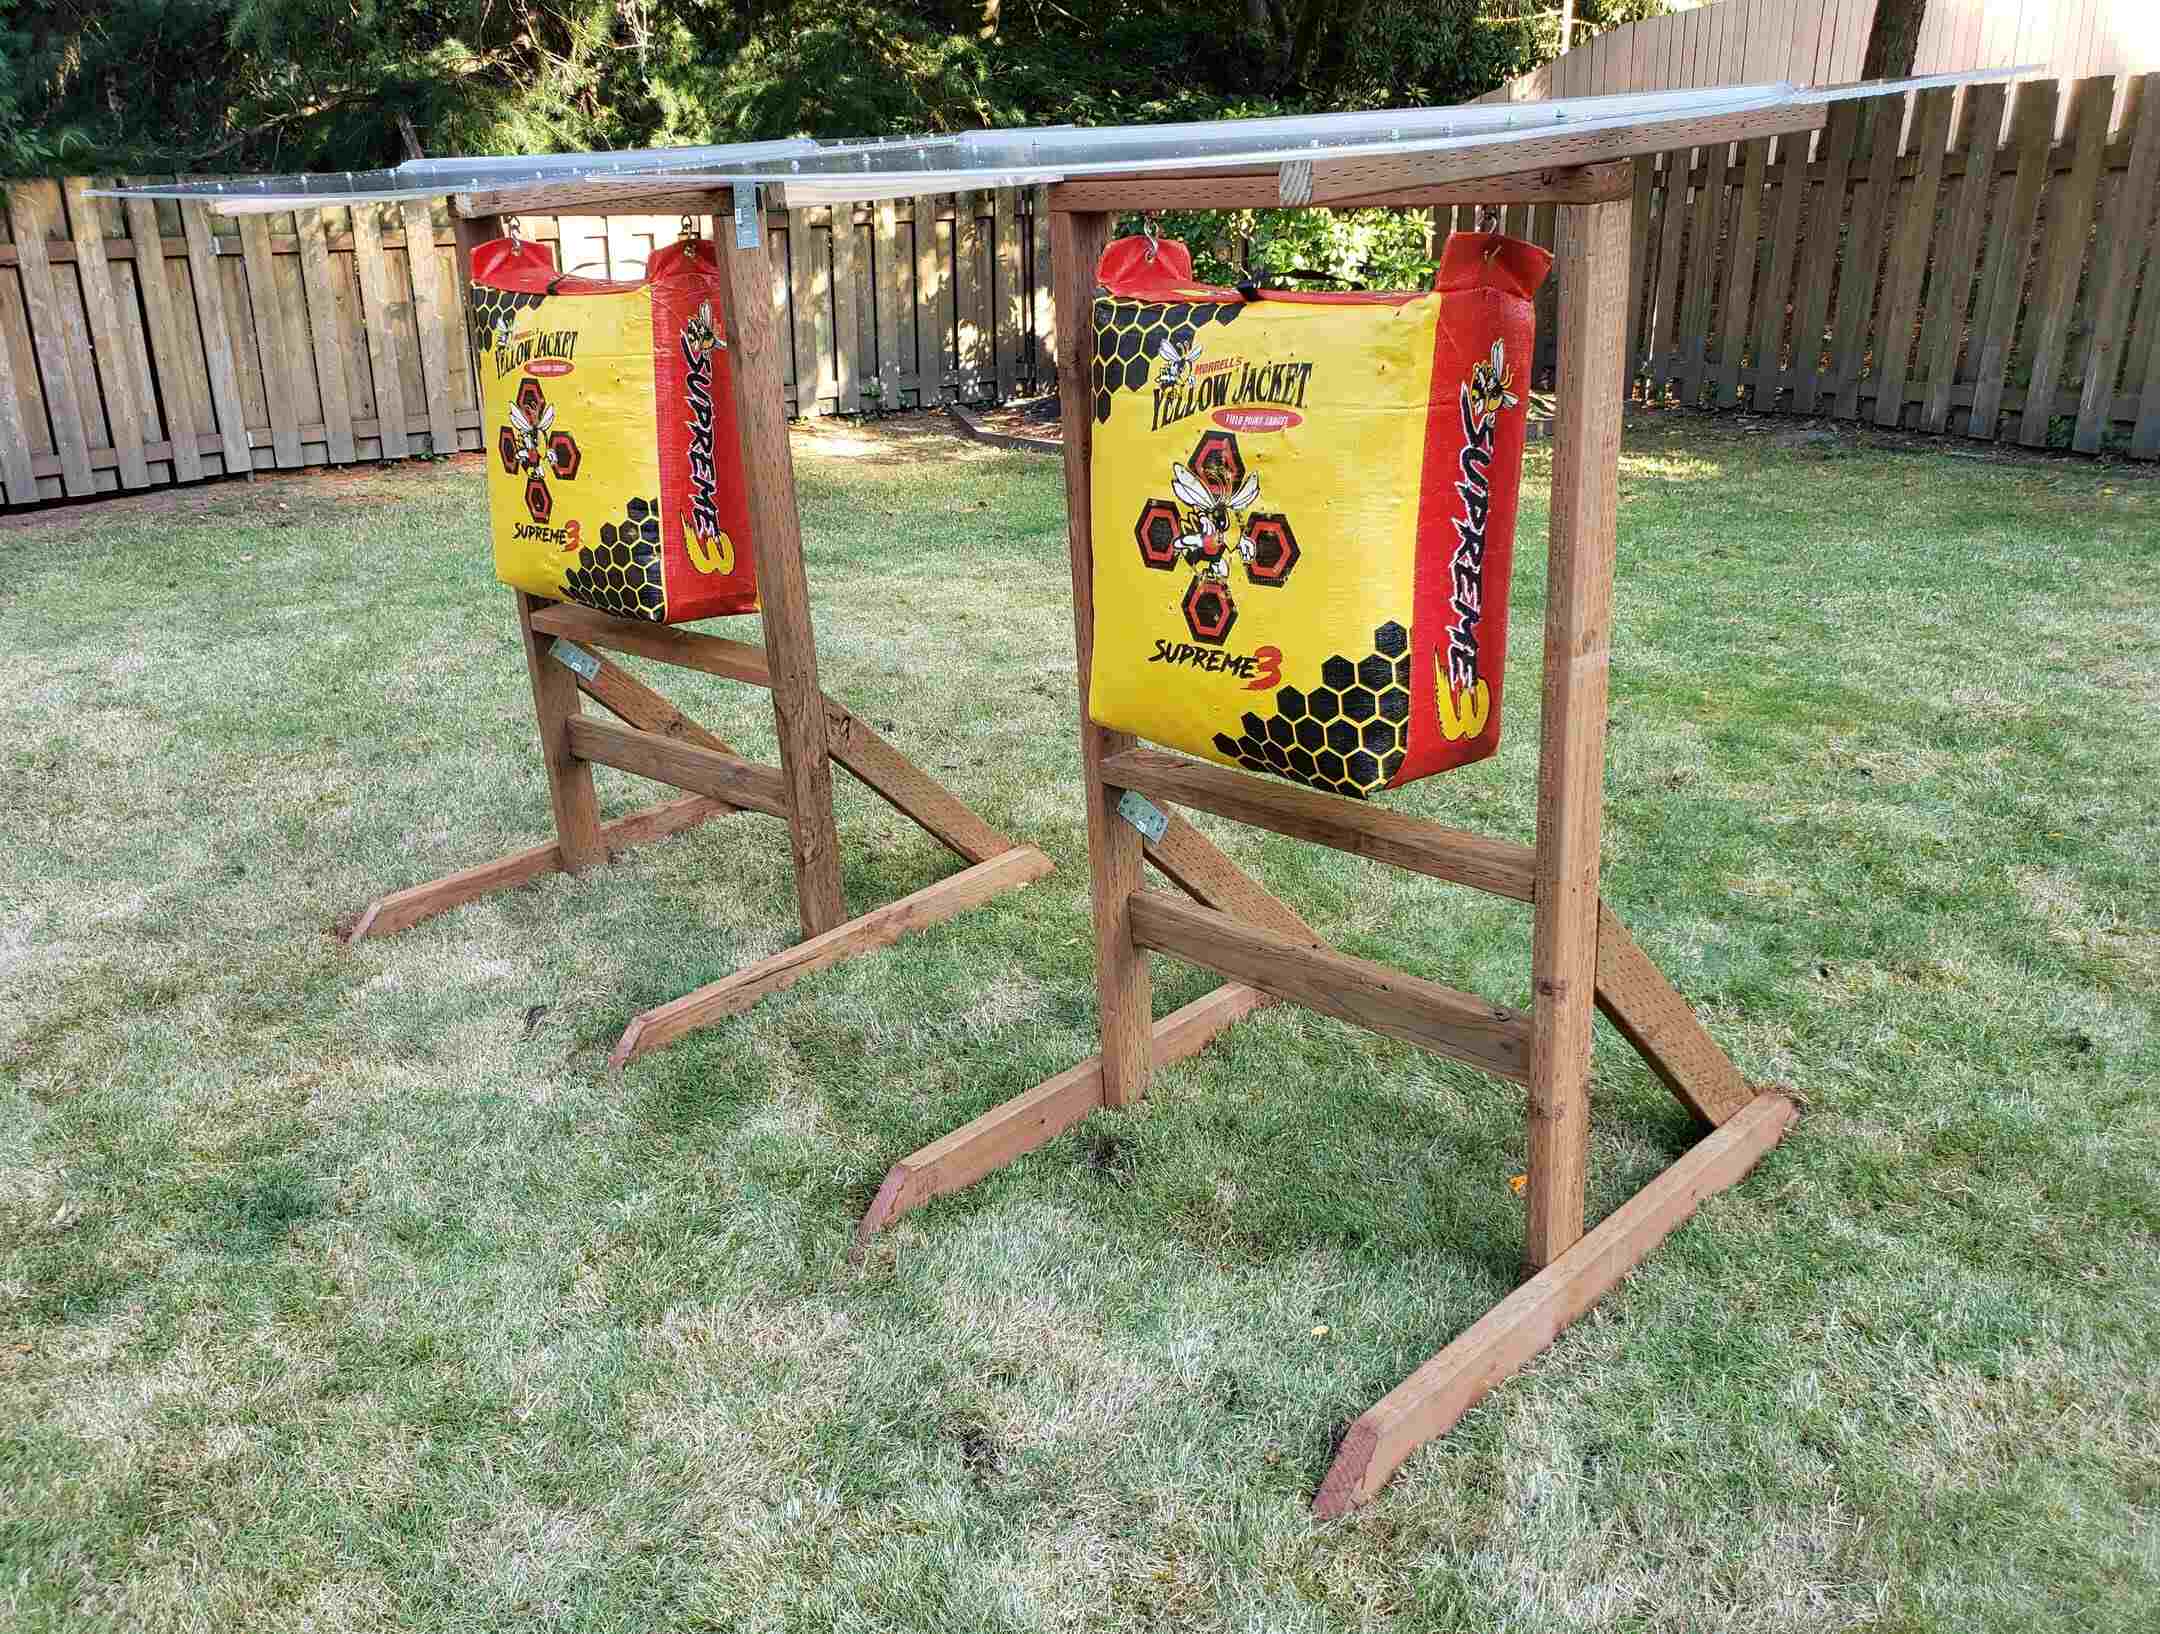
Wooden Boards: Used for the frame and roof. Choose sturdy, weather-resistant wood like cedar or treated pine.
Plywood Sheets: Needed for the roof and back of the target stand. Provides a solid surface to attach the target.
Screws and Nails: Essential for assembling the wooden parts. Make sure to get outdoor-rated screws and nails to prevent rusting.
Saw: A handsaw or circular saw will be needed to cut the wood to the required sizes.
Drill: Used for making pilot holes and driving screws into the wood.
Hammer: Necessary for driving nails into the wood.
Measuring Tape: Ensures accurate measurements for cutting and assembling the wood pieces.
Level: Helps to make sure the stand is straight and stable.
Screwdriver: Needed for tightening screws if a drill is not available.
Sandpaper: Used to smooth out rough edges on the wood.
Paint or Wood Sealant: Protects the wood from weather damage. Choose outdoor paint or sealant.
Roofing Material: Could be shingles, metal sheets, or waterproof tarp to cover the roof.
Brackets and Hinges: Used to attach the roof securely and allow it to open if needed.
Safety Gear: Includes gloves, safety glasses, and ear protection to keep you safe while working.
Pencil: For marking measurements on the wood.
Clamps: Useful for holding pieces of wood together while you work.
Ladder: Needed if the stand is tall, to reach higher parts safely.
Tarpaulin: Optional, but can be used to cover the stand when not in use for extra protection.
Skill Level and Time Commitment
Skill Level: Intermediate
Time Required: 4-6 hours
- Gather Materials: 30 minutes
- Cut Wood Pieces: 1 hour
- Assemble Frame: 1.5 hours
- Attach Roof: 1 hour
- Paint/Stain: 1-2 hours (including drying time)
Building Instructions
Gather Materials:
- Wooden posts (4x4 or 2x4)
- Plywood sheet
- Screws and nails
- Saw
- Drill
- Hammer
- Measuring tape
- Roofing material (corrugated metal or shingles)
- Paint or wood sealant (optional)
Cut the Wood:
- Measure and cut four wooden posts to the desired height for the stand.
- Cut two horizontal beams for the top and bottom of the frame.
- Cut two shorter beams for the sides.
Assemble the Frame:
- Lay out the four posts on the ground.
- Attach the top and bottom beams to the posts using screws or nails.
- Secure the side beams to complete the rectangular frame.
Attach the Plywood:
- Cut the plywood sheet to fit the back of the frame.
- Attach the plywood to the frame using screws or nails.
Build the Roof Frame:
- Cut two additional beams for the roof supports.
- Attach these beams to the top of the frame at an angle to create a sloped roof.
Add Roofing Material:
- Cut the roofing material to fit the roof frame.
- Attach the roofing material using screws or nails.
Secure the Stand:
- Dig four holes in the ground where you want to place the stand.
- Place the posts into the holes.
- Fill the holes with concrete or dirt to secure the stand.
Optional Finishing Touches:
- Paint or seal the wood to protect it from the elements.
- Add any additional hooks or holders for arrows.
Test the Stand:
- Place your archery target on the stand.
- Ensure the stand is stable and secure before use.
Helpful Tips and Tricks
Measure Twice, Cut Once: Always double-check measurements before cutting wood. This saves time and materials.
Use Treated Lumber: Treated wood resists weather damage, making your stand last longer.
Pre-drill Holes: Pre-drilling prevents wood from splitting when you insert screws.
Level Ground: Ensure the ground where you place the stand is level. This keeps the stand stable.
Roof Angle: Angle the roof to allow rainwater to run off. A 15-degree angle works well.
Waterproofing: Apply a waterproof sealant to the wood. This adds extra protection against moisture.
Reinforce Joints: Use metal brackets to reinforce joints. This adds strength to the structure.
Common Mistakes to Avoid:
Skipping Sanding: Sanding smooths rough edges, preventing splinters.
Ignoring Weight: Make sure the stand can support the weight of your target. Overloading can cause it to collapse.
Wrong Fasteners: Use outdoor-rated screws and nails. Indoor fasteners rust quickly outdoors.
Alternatives for Materials or Methods:
PVC Pipes: Use PVC pipes instead of wood for a lightweight, rust-resistant frame.
Tarpaulin Roof: A tarpaulin can replace a wooden roof. It's easier to install and replace.
Concrete Blocks: Use concrete blocks for the base instead of digging holes. This makes the stand portable.
Budgeting Your Project
Lumber: $50-$70 for pressure-treated wood. Screws and Nails: $10-$15. Roofing Material: $20-$30 for corrugated plastic or metal sheets. Paint or Wood Sealant: $10-$20. Saw: $30-$50 if you don't have one. Drill: $40-$60 if needed. Measuring Tape: $5-$10. Sandpaper: $5.
Total Cost: $170-$260.
Budget-Friendly Alternatives: Use reclaimed wood or pallets to save on lumber. Borrow tools from a friend or rent them from a local hardware store. Use tarps instead of roofing sheets.
Personalizing Your Stand
Wood Types: Use cedar for a rustic look, pine for affordability, or oak for durability.
Roof Materials: Try corrugated metal for a modern touch, shingles for a classic feel, or polycarbonate sheets for a lightweight option.
Colors: Paint the stand in camouflage for blending into nature, bright colors for visibility, or stain the wood to highlight its natural beauty.
Styles: Build a simple A-frame for easy assembly, a lean-to style for space-saving, or a gazebo-style roof for extra protection.
Target Mounting: Use hooks for easy target changes, bungee cords for flexibility, or shelves to hold multiple targets.
Base Options: Add wheels for mobility, stakes for stability on soft ground, or sandbags for weight and sturdiness.
Accessories: Include a shelf for storing arrows, a hook for hanging a bow, or a cup holder for convenience during practice.
Eco-Friendly Building Tips
Use reclaimed wood from old furniture or pallets for the frame. This reduces waste and gives the stand a rustic look. For the roof, try corrugated metal sheets from a previous project or an old shed. These sheets are durable and provide excellent protection against rain.
Consider using natural stains or eco-friendly paint to treat the wood. These options are less harmful to the environment compared to traditional paints. Recycled rubber mats can be used for the base to prevent the stand from slipping and to absorb impact.
For the target itself, use old carpet pieces or recycled foam. These materials can be layered to create a sturdy, reusable target. Secure the target with reused bungee cords or old straps.
When assembling, opt for screws and nails from previous projects. This not only saves money but also reduces the need for new materials. If you need to buy new hardware, look for recycled metal options.
Lastly, ensure the stand is portable by adding wheels from an old cart or lawnmower. This makes it easy to move and store, extending its lifespan.
Ready, Aim, Build!
Building your own archery target stand with a roof isn't just a fun project, it's practical too. You've learned how to gather materials, measure and cut wood, assemble the frame, and add a roof for weather protection. This DIY project saves money and lets you customize the stand to fit your needs. Plus, it's a great way to spend time outdoors and improve your archery skills. So grab your tools, follow the steps, and enjoy the satisfaction of creating something useful with your own hands. Happy shooting!
How do I build a sturdy archery target stand?
Use pressure-treated wood for the frame. Cut four legs, two crossbars, and two support beams. Attach the legs to the crossbars with screws. Add the support beams diagonally for extra stability.
What materials do I need for the roof?
You'll need corrugated metal sheets or polycarbonate panels. Secure them with screws and washers to the top frame of the stand. Make sure the roof has a slight angle for water runoff.
How high should the target stand be?
A good height is around 48 inches. This allows for easy target placement and retrieval without too much bending or stretching.
Can I make the stand portable?
Yes, add wheels to the bottom of the legs. Use locking casters so the stand stays in place when you're shooting.
How do I protect the wood from weather?
Apply a waterproof sealant or paint to all wooden parts. This helps prevent rot and extends the life of your stand.
What kind of screws should I use?
Use galvanized screws. They resist rust and are strong enough to hold the structure together.
How do I ensure the roof doesn't blow away?
Secure the roof panels with roofing screws that have rubber washers. These create a tight seal and keep the panels in place during windy conditions.