
Home>Home & Furniture>Living Room>Simple Canvas Painting Ideas for Living Room
Living Room
Simple Canvas Painting Ideas for Living Room
Published: August 5, 2024
Discover simple canvas painting ideas to transform your living room. From abstract designs to nature-inspired art, find inspiration to elevate your home decor effortlessly.
(Many of the links in this article redirect to a specific reviewed product. Your purchase of these products through affiliate links helps to generate commission for Twigandthistle.com, at no extra cost. Learn more)
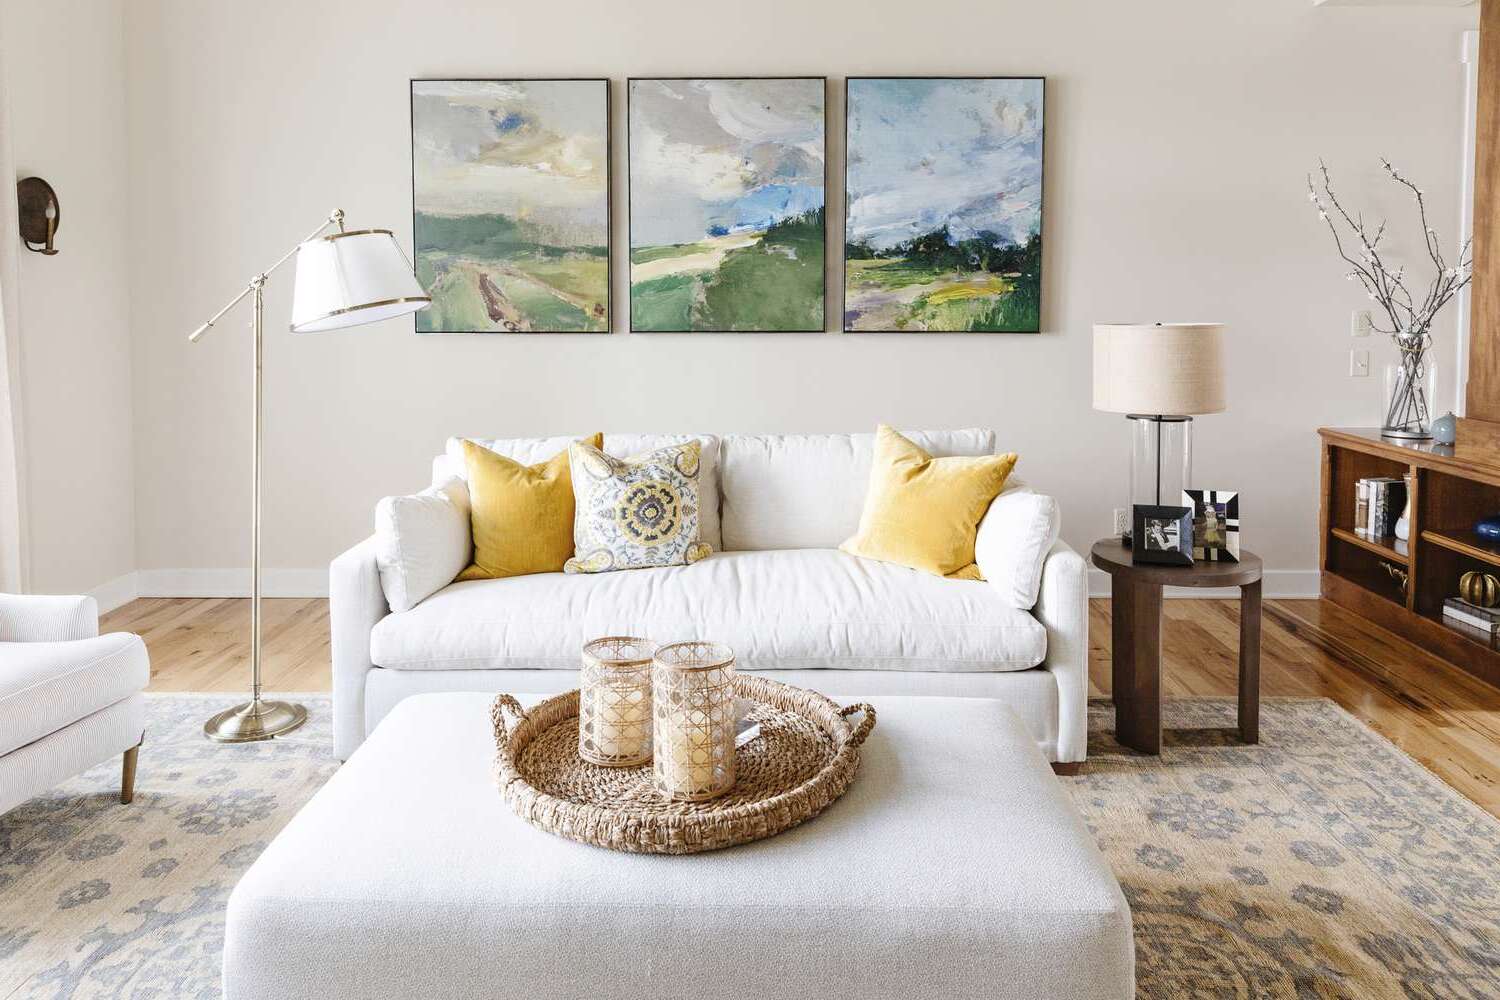
Brightening up a living room with simple canvas paintings can make a huge difference. Creating your artwork adds personality, warmth, and style to any space. Even if you're not the most talented artist, there are easy ideas anyone can try. From abstract designs to nature scenes, the possibilities are endless. Painting on canvas is a fun and affordable way to refresh a room's look. Plus, it's a great way to spend an afternoon, either alone or with family. Ready to get creative? Let's dive into some simple painting ideas for your living room.
Getting Ready for Your Canvas Painting
Gather Materials: Get canvas, acrylic paints, brushes, palette, water cup, and paper towels.
Choose a Design: Decide on a simple design or pattern. Look for inspiration online or sketch your own.
Set Up Workspace: Find a well-lit area with a flat surface. Cover the surface with newspaper or plastic to protect from paint spills.
Wear Protective Gear: Put on an old shirt or apron. Use gloves if you want to keep your hands clean.
Prepare Canvas: If needed, prime the canvas with gesso. Let it dry completely before starting.
Organize Paints: Squeeze small amounts of paint onto the palette. Keep colors separate to avoid mixing.
Safety Tips: Ensure good ventilation. Keep water and paper towels nearby to clean brushes and spills.
Test Brushes: Dip brushes in water and test on scrap paper to ensure they work well.
Plan Your Steps: Outline the order in which you will paint different parts of the design. Start with background colors, then move to details.
Stay Hydrated: Keep a water bottle nearby to stay hydrated while you work.
Gathering Supplies for Your Art Project
- Canvas: The surface where you will create your artwork. Choose a size that fits your living room space.
- Acrylic Paints: Versatile and quick-drying paints available in many colors. Perfect for beginners and experienced artists.
- Paintbrushes: Different sizes and shapes for various techniques. Flat brushes for broad strokes, round brushes for details.
- Palette: A flat surface for mixing paints. Can be plastic, wood, or even a disposable paper plate.
- Easel: Holds the canvas upright while you paint. Helps maintain a comfortable posture.
- Water Cup: For rinsing brushes between colors. Keeps your colors from getting muddy.
- Paper Towels: Useful for drying brushes and cleaning up spills. Also handy for blotting excess paint.
- Painter’s Tape: Creates clean lines and sections on your canvas. Helps with geometric designs.
- Apron or Old Clothes: Protects your clothing from paint splatters. Painting can get messy.
- Pencil and Eraser: For sketching your design before painting. Helps plan your composition.
- Varnish: Seals and protects your finished painting. Adds a glossy or matte finish.
- Drop Cloth: Protects your floor or table from paint spills. Keeps your workspace clean.
Skill Level and Time Commitment
Skill Level: Beginner
Time Required: 2-4 hours
- Choose a Design: Pick a simple design like abstract shapes or a silhouette.
- Gather Supplies: Canvas, acrylic paints, brushes, and a palette.
- Prepare the Canvas: Apply a base coat and let it dry.
- Sketch the Design: Lightly draw your design with a pencil.
- Paint: Fill in your design with colors, allowing each layer to dry.
- Add Details: Use smaller brushes for finer details.
- Drying Time: Let the painting dry completely before hanging.
Step-by-Step Guide to Painting
Gather Supplies
- Canvas
- Acrylic paints
- Brushes (various sizes)
- Palette
- Water cup
- Paper towels
Prepare Workspace
- Cover table with old newspaper or plastic sheet
- Set up easel or lay canvas flat
Choose a Design
- Simple geometric shapes
- Abstract patterns
- Nature scenes (trees, flowers)
Sketch Outline
- Lightly draw design on canvas with pencil
Select Colors
- Pick a color scheme (complementary or monochromatic)
- Squeeze small amounts of paint onto palette
Start Painting
- Begin with background colors
- Use larger brushes for broad areas
- Let each layer dry before adding details
Add Details
- Switch to smaller brushes
- Paint finer details and outlines
- Blend colors for shading effects
Final Touches
- Check for any missed spots
- Add highlights or shadows for depth
Dry and Display
- Allow painting to dry completely
- Hang on wall or place on shelf
Helpful Tips and Tricks
Choose the Right Canvas Size: Pick a canvas that fits your wall space. Too big or too small can look awkward.
Use Quality Paints: Invest in good acrylic or oil paints. Cheap paints can fade quickly.
Start with a Sketch: Lightly sketch your design with a pencil before painting. This helps avoid mistakes.
Layer Your Colors: Apply paint in layers. Start with the background, then add details on top.
Blend Colors Smoothly: Use a damp brush to blend colors. This creates a smooth transition between shades.
Add Texture: Use different brush strokes or add materials like sand for texture.
Seal Your Painting: Once dry, apply a clear sealant to protect your work.
Common Mistakes to Avoid:
Skipping Primer: Always prime your canvas. It helps the paint stick better.
Overloading the Brush: Too much paint on the brush can cause drips and uneven coverage.
Ignoring Drying Time: Let each layer dry before adding another to avoid smudging.
Using Too Much Water: Diluting paint with too much water can make colors look washed out.
Alternatives for Materials or Methods:
Canvas Boards: Use canvas boards instead of stretched canvas for a more rigid surface.
Watercolor Pencils: Try watercolor pencils for a different effect. They can be blended with water.
Sponges: Use sponges instead of brushes for a unique texture.
Spray Paint: For a modern look, use spray paint. It covers large areas quickly and evenly.
Estimating the Cost of Your Painting
Canvas: A basic 16x20 inch canvas costs around $10. Acrylic Paints: A set of 12 colors costs about $15. Brushes: A set of various sizes costs around $10. Palette: A simple plastic palette costs about $5. Easel: A tabletop easel costs around $20.
Total cost: $60
Budget-friendly alternatives:
- Canvas: Use canvas panels instead, costing around $5.
- Acrylic Paints: Buy primary colors (red, blue, yellow, black, white) for about $8.
- Brushes: Get a basic set for $5.
- Palette: Use a paper plate or old plastic container for free.
- Easel: Skip the easel and work on a flat surface.
Total cost with alternatives: $18
Creative Variations and Customizations
Alternative materials can add texture and depth. Instead of traditional canvas, try wood panels or burlap for a rustic look. Metal sheets can give a modern, industrial feel.
Colors can change the mood of the room. Use pastels for a soft, calming effect. Bold, bright colors can make the space lively and energetic. Monochrome schemes offer a sleek, sophisticated vibe.
Styles can reflect personal taste. Abstract designs allow for creativity and freedom. Geometric patterns provide a clean, structured look. Nature-inspired themes bring a touch of the outdoors inside.
Techniques like acrylic pouring create unique, fluid designs. Stenciling offers precise, repeatable patterns. Mixed media can combine paint with other materials like fabric or paper for added interest.
Frames can also be customized. Floating frames give a modern touch. Ornate frames add a classic, elegant feel. DIY frames made from reclaimed wood can add a personal touch.
Eco-Friendly Painting Tips
Reusing old canvases can be a great start. If you have old paintings you no longer like, paint over them with a base coat. This gives you a fresh surface without buying new materials.
Use eco-friendly paints. Look for non-toxic, water-based paints. These are better for your health and the environment.
Repurpose materials for texture. Old fabric scraps, dried leaves, or even sand can add interesting elements to your painting. Attach them with eco-friendly glue.
Choose sustainable brushes. Opt for brushes made from natural fibers and handles from bamboo or recycled plastic.
DIY frames from reclaimed wood. Old pallets or scrap wood can be turned into beautiful, rustic frames.
Natural dyes can be an alternative to traditional paints. Create your own colors using items like beet juice, turmeric, or coffee.
Upcycle old magazines. Cut out interesting shapes or colors to create a collage effect on your canvas.
Energy-efficient lighting. When working on your painting, use LED lights to save energy.
Recycled paper for sketching ideas. Instead of new sketchbooks, use the blank sides of old papers or notebooks.
Eco-friendly varnish. Protect your finished artwork with a varnish that has low VOCs (volatile organic compounds).
Your Living Room Awaits
You've got all the tools and ideas to transform your living room with simple canvas paintings. Whether you go for abstract designs, nature scenes, or geometric patterns, each piece will add a personal touch to your space. Don't be afraid to experiment with colors and textures. Remember, the goal is to create a space that feels uniquely yours. If you make a mistake, just paint over it and try again. The beauty of DIY is in the process, not just the final product. So grab your brushes, pick up some canvas, and let your creativity flow. Your living room will thank you for the fresh, vibrant look. Now, get painting and enjoy the transformation!
What are some easy canvas painting ideas for beginners?
Try abstract art, geometric shapes, or simple landscapes. You can also paint silhouettes or minimalist designs. These don’t need advanced skills but look great.
What materials do I need for canvas painting?
You’ll need canvas, acrylic or oil paints, brushes, a palette, and some water or paint thinner. Don’t forget a drop cloth to protect your floor!
How do I choose colors for my living room canvas painting?
Pick colors that match or complement your living room decor. Use a color wheel to find harmonious combinations. Neutral tones work well for a calm vibe, while bold colors can make a statement.
Can I use stencils for canvas painting?
Absolutely! Stencils are great for creating precise shapes and patterns. They’re perfect for beginners who want a clean look without freehand drawing.
How do I hang my canvas painting?
Use picture hooks or nails. Make sure to measure and mark the wall before hanging. For a gallery wall, arrange your paintings on the floor first to find the best layout.
What size canvas should I use for my living room?
It depends on your wall space. Large canvases make a bold statement, while smaller ones can be grouped together. Measure your wall and choose a size that fits well.
How do I protect my finished canvas painting?
Apply a varnish to seal and protect your painting. This helps prevent dust and UV damage. Make sure the paint is completely dry before varnishing.