
Home>Home & Furniture>Living Room>How to Build a Stylish DIY Coffee Table
Living Room
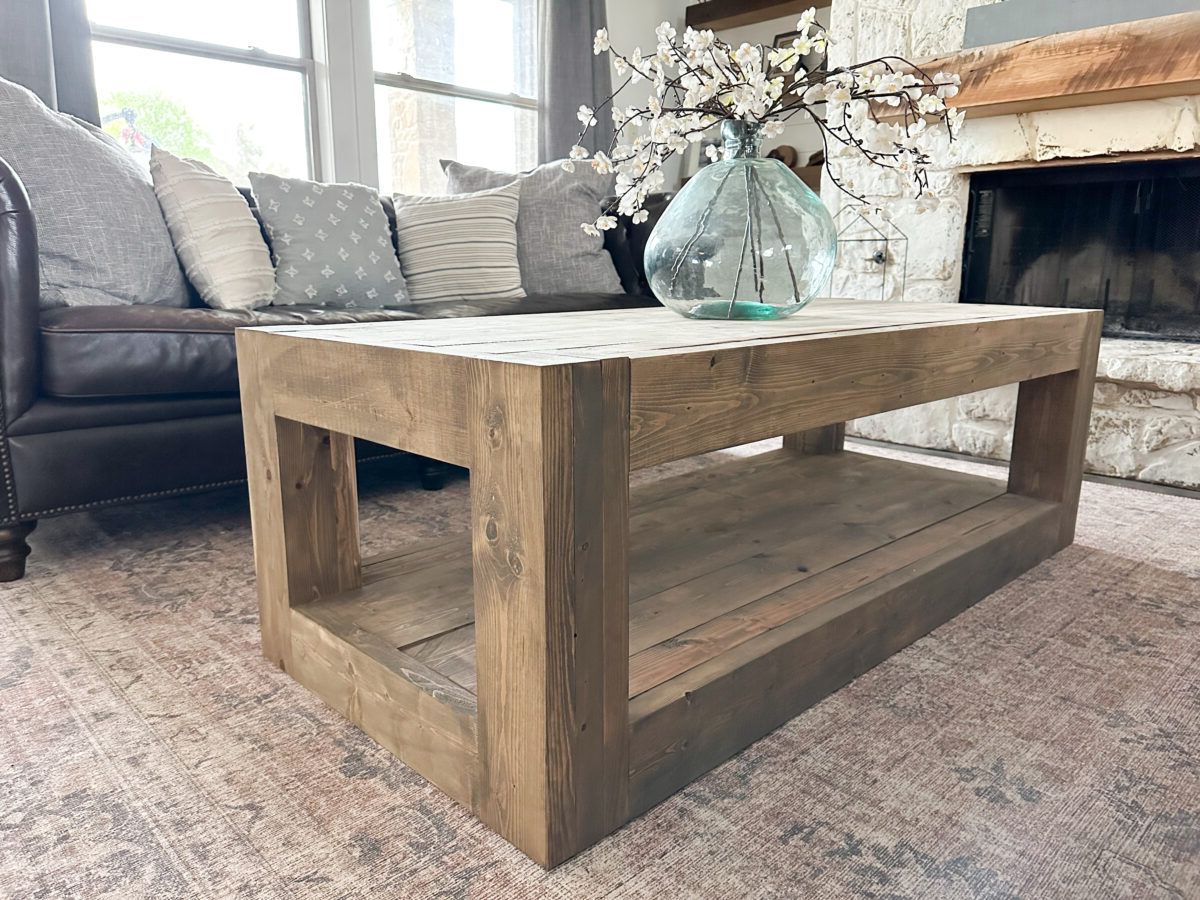
How to Build a Stylish DIY Coffee Table
Published: August 5, 2024
Learn how to build a stylish DIY coffee table with our step-by-step guide. Perfect for beginners, this project will add a unique touch to your living room decor.
(Many of the links in this article redirect to a specific reviewed product. Your purchase of these products through affiliate links helps to generate commission for Twigandthistle.com, at no extra cost. Learn more)
Building your own coffee table is a fun and rewarding project. It adds a personal touch to your living space and gives you a sense of accomplishment. Even if you haven't done much DIY before, making a stylish coffee table can be pretty simple with the right tools and some patience. You'll use wood, screws, and a few other materials to create something unique. Plus, you get to customize the table to fit your space perfectly. Ready to roll up your sleeves and get started? Let's dive into this exciting project!
Getting Ready for Your Project
Gather Materials: Collect wood, screws, nails, sandpaper, wood glue, paint or stain, and a saw. Make sure everything is within reach.
Safety Gear: Wear safety goggles, gloves, and a dust mask to protect yourself from wood dust and sharp tools.
Clear Workspace: Ensure your workspace is clean and free of clutter. A tidy area helps prevent accidents.
Measure and Cut: Measure the wood pieces according to your design. Use a saw to cut them to the correct size. Double-check measurements to avoid mistakes.
Sand Wood: Smooth the edges and surfaces of the wood with sandpaper. This helps the paint or stain adhere better and prevents splinters.
Pre-Drill Holes: Pre-drill holes for screws to avoid splitting the wood. This step makes assembly easier and more precise.
Dry Fit: Assemble the pieces without glue or screws to ensure everything fits together properly. Adjust as needed.
Prepare for Painting: Lay down a drop cloth or old newspapers to protect your floor. Set up a well-ventilated area for painting or staining.
Organize Tools: Keep all tools like screwdrivers, hammers, and clamps within easy reach. This saves time and keeps the process smooth.
Plan for Breaks: Have water and snacks nearby. Taking breaks helps maintain focus and energy.
Gathering Materials and Tools
Materials:
- Wood Planks: For the tabletop and legs. Choose hardwood like oak or maple for durability.
- Wood Screws: To secure the planks together.
- Wood Glue: Adds extra strength to joints.
- Sandpaper: Smooths rough edges and surfaces.
- Wood Stain or Paint: Adds color and protects the wood.
- Polyurethane Finish: Seals and protects the wood surface.
- Table Legs: Optional if you prefer pre-made legs.
Tools:
- Tape Measure: Ensures accurate measurements.
- Saw: Cuts wood planks to size. A circular saw or handsaw works well.
- Drill: Makes holes for screws and drives them in.
- Screwdriver: Tightens screws securely.
- Clamps: Holds pieces together while glue dries.
- Paintbrushes or Rags: Applies stain, paint, and finish.
- Sanding Block or Electric Sander: Speeds up the sanding process.
These materials and tools will help you create a sturdy, stylish coffee table.
Skill Level and Time Commitment
Skill Level: Intermediate
Time Required: 6-8 hours
- Gather Materials: 1 hour
- Cut Wood Pieces: 1-2 hours
- Assemble Frame: 1 hour
- Attach Tabletop: 1 hour
- Sand and Finish: 2-3 hours
Detailed Step-by-Step Guide
Gather Materials:
- Wooden boards (for the tabletop and legs)
- Screws
- Wood glue
- Sandpaper
- Wood stain or paint
- Brushes
- Measuring tape
- Saw
- Drill
Measure and Cut:
- Measure the desired size for the tabletop.
- Cut the wooden boards to match these measurements.
- Cut four legs to the same length.
Sand the Wood:
- Use sandpaper to smooth all surfaces of the wooden pieces.
- Ensure edges are rounded to avoid splinters.
Assemble the Tabletop:
- Arrange the boards side by side.
- Apply wood glue between each board.
- Clamp them together until the glue dries.
Attach the Legs:
- Position the legs at each corner of the tabletop.
- Drill pilot holes to prevent the wood from splitting.
- Secure the legs with screws.
Reinforce the Structure:
- Add cross supports between the legs for extra stability.
- Use wood glue and screws to secure these supports.
Stain or Paint:
- Apply wood stain or paint to the entire table.
- Allow it to dry completely.
- Apply a second coat if needed for a richer color.
Final Sanding:
- Lightly sand the table after the stain or paint dries.
- This ensures a smooth finish.
Protective Finish:
- Apply a clear protective finish to seal the wood.
- Let it dry thoroughly before using the table.
Helpful Tips and Tricks
Measure twice, cut once. Always double-check measurements before cutting wood. This saves time and materials.
Use a level. Ensure your table is even. Uneven legs or surfaces can cause wobbling.
Sand the wood. Smooth out rough edges to avoid splinters and give a polished look.
Pre-drill holes. Prevent wood from splitting by drilling pilot holes before inserting screws.
Use wood glue. Strengthen joints by applying wood glue before screwing pieces together.
Seal the wood. Protect your table from spills and stains by applying a sealant or varnish.
Choose the right wood. Pine is affordable and easy to work with, while oak is durable and has a beautiful grain.
Common mistakes to avoid:
Skipping the sanding step. This can result in a rough, unfinished look.
Not using a level. Leads to an uneven table that wobbles.
Using the wrong screws. Ensure screws are the right length to avoid poking through the wood.
Alternatives for materials or methods:
Pallet wood. Reclaimed pallet wood can be a cost-effective and eco-friendly option.
Hairpin legs. Instead of building wooden legs, use metal hairpin legs for a modern look.
Stain instead of paint. Staining wood can highlight its natural beauty, while paint offers a variety of colors.
Estimating the Cost
Materials:
- Wood planks (for the tabletop and legs): $50-$100
- Wood screws: $5-$10
- Wood glue: $5-$10
- Sandpaper: $5-$10
- Wood stain or paint: $10-$20
- Polyurethane finish: $10-$20
Tools:
- Saw (circular or hand saw): $50-$100 (or borrow)
- Drill: $30-$60 (or borrow)
- Screwdriver: $5-$15
- Paintbrushes: $5-$10
- Measuring tape: $5-$10
- Clamps: $10-$20
Total Cost Estimate: $185-$385
Budget-Friendly Alternatives:
- Reclaimed wood: Often free or very cheap
- Borrow tools from friends or family
- Use leftover paint or stain from other projects
- Buy second-hand tools from thrift stores or online marketplaces
Unique Variations and Customizations
Materials: Instead of using traditional wood, try reclaimed wood for a rustic look. Metal legs can add an industrial touch. For a modern twist, use glass for the tabletop.
Colors: Paint the table in bold colors like navy blue or emerald green for a statement piece. For a more subtle look, use neutral tones like white, gray, or beige. You can also stain the wood to enhance its natural grain.
Styles: Add a geometric pattern to the tabletop using tape and paint. Attach hairpin legs for a mid-century modern vibe. For a farmhouse style, use X-shaped supports on the sides.
Storage: Incorporate a shelf underneath for books or magazines. Add drawers to keep remotes and other small items out of sight. Use baskets for a cozy, organized look.
Finishes: Apply a high-gloss finish for a sleek, polished appearance. For a more natural feel, use a matte finish. Distress the wood with sandpaper for a vintage look.
Shapes: Instead of a rectangular table, try a round or oval shape. For a unique design, consider an asymmetrical or live-edge tabletop.
Tops: Use tile or marble for a luxurious touch. A concrete top can give an industrial feel. For a softer look, cover the top with upholstery or fabric.
Legs: Swap out standard legs for turned or carved legs. Use pipe fittings for a steampunk aesthetic. For a minimalist look, opt for simple, straight legs.
Extras: Add casters to make the table mobile. Install LED lights underneath for a modern touch. Attach a lift-top mechanism for added functionality.
Eco-Friendly Tips
Reclaimed wood is a fantastic choice. It gives character and reduces waste. Look for old pallets, barn wood, or even discarded furniture. Sand it down to remove splinters and give it a smooth finish.
Eco-friendly paint or stain can add color without harmful chemicals. Look for brands that are low in VOCs (volatile organic compounds). These are better for your health and the environment.
Recycled metal legs or brackets can add a modern touch. Check scrap yards or online marketplaces for unique pieces. Clean and polish them to make them look new.
Natural sealants like beeswax or linseed oil protect the wood without synthetic chemicals. They’re easy to apply and give a nice, natural finish.
Upcycled materials like old windows or doors can make interesting tabletops. Just make sure they’re sturdy and safe to use.
Sustainable sourcing is key. If buying new wood, look for FSC-certified (Forest Stewardship Council) products. This ensures the wood comes from responsibly managed forests.
Minimalist design uses fewer materials and creates less waste. Simple, clean lines can be very stylish and functional.
Hand tools over power tools save energy and give you more control. A handsaw, hammer, and nails can often do the job just as well.
Local materials reduce the carbon footprint. Check local suppliers or community groups for materials before buying new.
Repurpose old furniture by taking it apart and using the pieces. An old dresser could provide wood for the tabletop, while the drawers could become storage underneath.
Your New Coffee Table Awaits
You've got all the steps to build a stylish DIY coffee table. Gather your materials, follow the instructions, and don't forget to add your personal touch. This project isn't just about creating a piece of furniture; it's about making something that reflects your style and effort. Sure, there might be a few hiccups along the way, but that's part of the fun. Each mistake is a chance to learn and improve. Once finished, you'll have a unique coffee table that you can proudly say you built yourself. So, roll up your sleeves, get your tools ready, and start building. Your living room will thank you.
What materials do I need to build a DIY coffee table?
You'll need wood planks, screws, wood glue, sandpaper, paint or stain, and table legs. A saw, drill, and measuring tape are also essential.
How long will it take to build a coffee table?
It usually takes a weekend. Cutting and assembling might take a day, while sanding and finishing could take another day, depending on drying times.
Can I customize the design?
Absolutely! You can choose different wood types, paint colors, and leg styles. Add personal touches like stencils or decals.
Do I need any special skills?
Basic carpentry skills help, but even beginners can tackle this project. Just follow the steps carefully and take your time.
How much will it cost?
Costs vary based on materials. On average, expect to spend between $50 and $150. Using reclaimed wood or repurposing old furniture can save money.
What if I don't have power tools?
You can use hand tools like a handsaw and screwdriver. It might take longer, but it's definitely doable.
How do I make sure the table is sturdy?
Ensure all joints are tight and use wood glue along with screws. Double-check measurements and use a level to keep everything even.