
Home>Home & Furniture>Kitchen>How to Replace Kitchen Sink
Kitchen
How to Replace Kitchen Sink
Published: July 30, 2024
Learn how to replace your kitchen sink with our step-by-step guide. From removing the old sink to installing the new one, we cover everything you need to know.
(Many of the links in this article redirect to a specific reviewed product. Your purchase of these products through affiliate links helps to generate commission for Twigandthistle.com, at no extra cost. Learn more)
Replacing a kitchen sink might seem challenging, but with some basic tools and a bit of patience, you can handle it yourself. This guide will walk you through the process step-by-step, ensuring you know what to do each stage. Whether you're updating for a fresh look or fixing a worn-out sink, learning to replace it yourself will save you time and money. So grab your toolkit, and let's get started on transforming your kitchen with a new, shiny sink. You'll be surprised at how simple this task can be with the right guidance.
Getting Ready for the Job
Gather Tools and Materials: Get a wrench, plumber's putty, silicone sealant, bucket, sponge, and new sink.
Turn Off Water Supply: Locate and shut off the valves under the sink. Open the faucet to drain any remaining water.
Disconnect Plumbing: Use a wrench to disconnect the water supply lines and drain pipes. Place a bucket underneath to catch any water.
Remove Old Sink: Loosen the clips holding the sink in place. Carefully lift the old sink out.
Clean the Area: Scrape off old sealant and clean the countertop surface with a sponge.
Check the Fit: Place the new sink in the opening to ensure it fits properly. Make adjustments if needed.
Apply Plumber's Putty: Roll plumber's putty into a rope and place it around the edge of the sink opening.
Install New Sink: Lower the new sink into place, pressing down to create a seal with the putty.
Secure Sink: Tighten the clips underneath to hold the sink in place.
Reconnect Plumbing: Attach the water supply lines and drain pipes. Use silicone sealant around the edges for extra protection.
Turn On Water Supply: Open the valves and check for leaks. Tighten connections if necessary.
Safety Tips:
- Wear gloves to protect your hands.
- Use goggles to shield your eyes from debris.
- Ensure the workspace is well-lit and free of clutter.
Gather Your Materials and Tools
- New Sink: The centerpiece of the project. Choose one that fits your countertop cutout.
- Faucet: A new faucet can update the look and function of your sink area.
- Plumber's Putty: Seals the sink drain to prevent leaks.
- Silicone Caulk: Used to seal the edges of the sink to the countertop.
- Pipe Wrench: Essential for loosening and tightening plumbing connections.
- Adjustable Wrench: Useful for various nuts and bolts.
- Basin Wrench: Designed for reaching and tightening faucet nuts.
- Bucket: Catches any water that might spill during the process.
- Plumber's Tape: Ensures a watertight seal on threaded pipe connections.
- Utility Knife: Cuts through old caulk and other materials.
- Screwdriver: Needed for removing and installing screws.
- Pliers: Handy for gripping and turning small parts.
- Tape Measure: Ensures accurate measurements for the new sink and faucet.
- Hacksaw: Cuts through metal pipes if adjustments are needed.
- Cleaning Supplies: Rags and cleaner to tidy up the area before and after installation.
Skill Level and Time Commitment
Skill Level: Intermediate
Time Required: 4-6 hours
- Turn off water supply - 10 minutes
- Disconnect plumbing - 30 minutes
- Remove old sink - 1 hour
- Prepare new sink - 30 minutes
- Install new sink - 1 hour
- Reconnect plumbing - 1 hour
- Test for leaks - 20 minutes
Important Tools:
- Adjustable wrench
- Plumber's putty
- Pipe wrench
- Screwdriver
- Bucket
Materials Needed:
- New sink
- New faucet (optional)
- Plumber's tape
- Silicone sealant
Step-by-Step Guide
Turn Off Water Supply
- Locate the water valves under the sink.
- Turn both hot and cold water valves clockwise to shut off.
Disconnect Water Lines
- Use a wrench to loosen the nuts connecting the water lines to the faucet.
- Place a bucket underneath to catch any water.
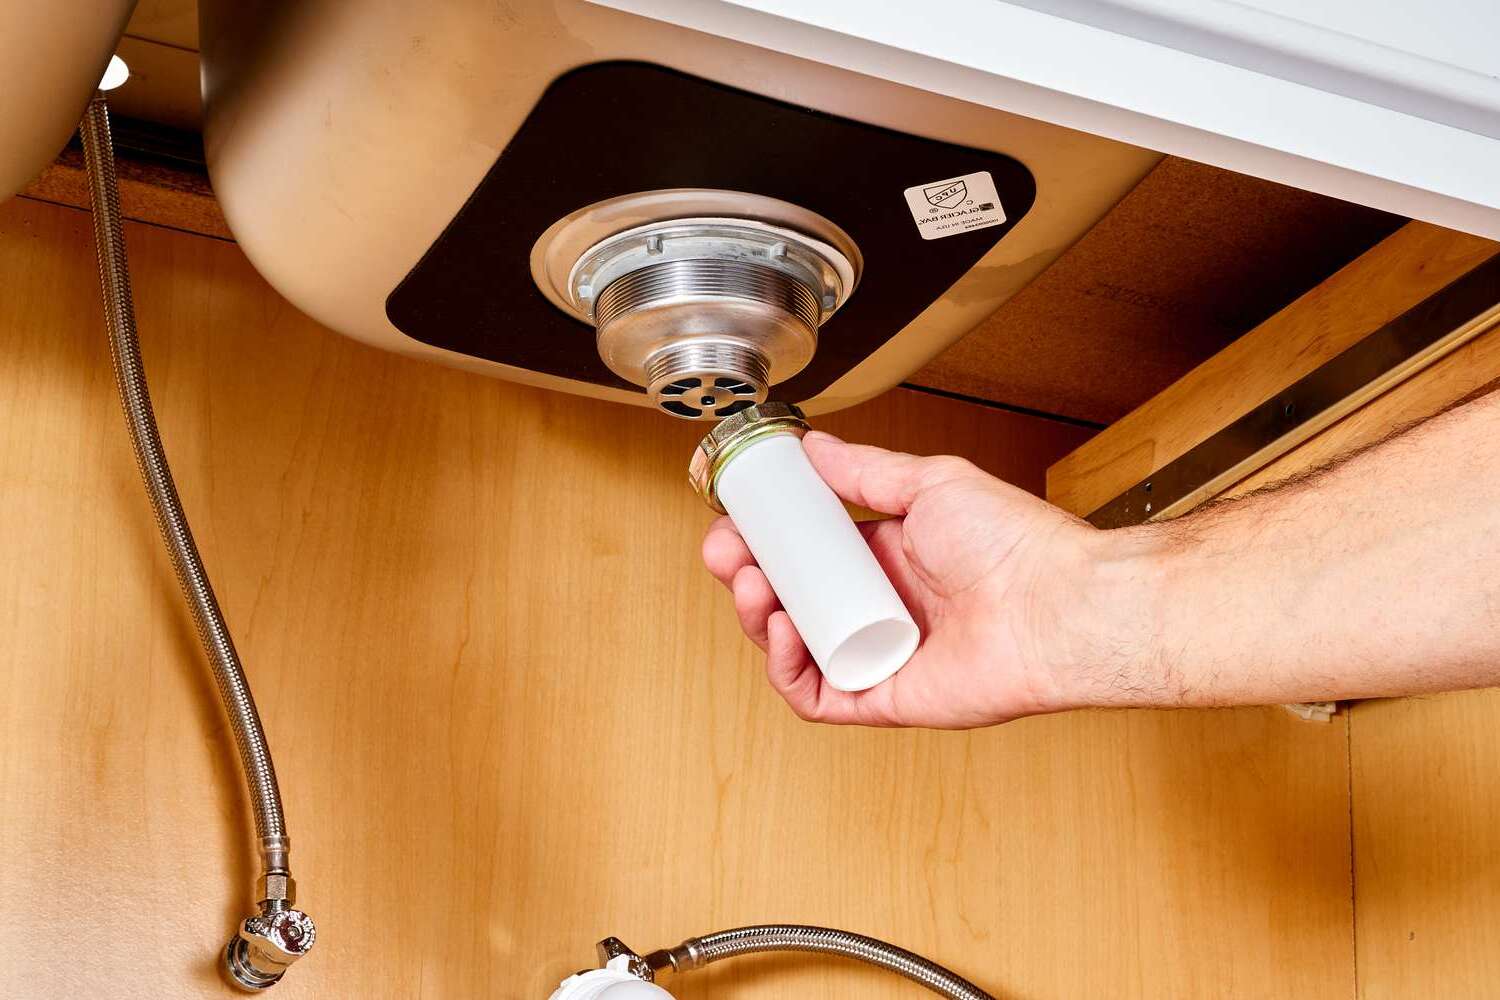
Remove Old Sink
- Use a utility knife to cut through any sealant around the sink.
- Loosen the clips underneath the sink using a screwdriver.
- Lift the old sink out carefully.
Clean Area
- Scrape off old sealant and clean the countertop surface.
- Ensure the area is dry and free of debris.
Install New Sink
- Apply a bead of silicone sealant around the edge of the sink opening.
- Lower the new sink into place, ensuring it fits snugly.
Secure Sink
- Tighten the clips underneath the sink to secure it to the countertop.
- Wipe away any excess sealant.
Reconnect Water Lines
- Attach the water lines to the new faucet.
- Tighten the nuts with a wrench, ensuring a secure fit.
Turn On Water Supply
- Turn the water valves counterclockwise to restore water flow.
- Check for leaks and tighten connections if necessary.
Test the Sink
- Run water to ensure everything is working properly.
- Check for any leaks around the sink and faucet.
Helpful Tips and Tricks
Measure Twice, Cut Once: Ensure accurate measurements of the sink and countertop opening. This avoids gaps or overhangs.
Turn Off Water Supply: Always shut off water valves before starting. This prevents flooding and mess.
Use Plumber’s Putty: Apply around the sink’s edges to create a watertight seal. This prevents leaks.
Support the Sink: Use clamps or a helper to hold the sink in place while securing it. This ensures stability.
Check for Leaks: After installation, run water to check for leaks. Tighten connections if needed.
Common Mistakes to Avoid:
- Skipping Measurements: Leads to improper fit.
- Forgetting to Turn Off Water: Causes flooding.
- Not Using Sealant: Results in leaks.
- Overtightening Connections: Can crack pipes.
Material Alternatives:
- Stainless Steel: Durable and easy to clean.
- Composite Granite: Scratch-resistant and stylish.
- Cast Iron: Heavy but long-lasting.
Method Alternatives:
- Drop-In Sinks: Easier to install, sits on top of the counter.
- Undermount Sinks: Sleeker look, mounted under the counter.
Estimating the Costs
Sink: $100-$300
Faucet: $50-$200
Plumber's Putty: $5
Silicone Sealant: $5-$10
Pipe Wrench: $10-$20
Basin Wrench: $10-$20
Adjustable Pliers: $10-$15
Bucket: $5
Teflon Tape: $1-$2
PVC Pipes and Fittings: $10-$20
Total Cost: $206-$597
Budget-Friendly Alternatives:
Sink: $50-$100
Faucet: $20-$50
Pipe Wrench: Borrow from a friend or neighbor
Bucket: Use an old one from home
Total Cost with Alternatives: $121-$272
Different Approaches and Customizations
Materials: Instead of a stainless steel sink, consider using porcelain, granite composite, or copper. Each material offers a different look and feel. Porcelain gives a classic, clean appearance. Granite composite is durable and modern. Copper adds a rustic, warm touch.
Colors: Stainless steel sinks are typically silver, but other materials come in various colors. Porcelain sinks can be white, black, or even colorful. Granite composite sinks often come in shades like black, gray, or beige. Copper sinks develop a unique patina over time, changing color naturally.
Styles: Choose between different sink styles. Undermount sinks are installed below the countertop, creating a seamless look. Drop-in sinks are easier to install and have a visible rim. Farmhouse sinks have a deep basin and an exposed front, adding a vintage charm. Double-bowl sinks offer two separate sections, useful for multitasking.
Faucets: Upgrade the faucet to match the new sink. Consider a pull-down or pull-out faucet for added flexibility. Touchless faucets add convenience and a modern touch. Choose finishes like brushed nickel, chrome, or oil-rubbed bronze to complement the sink material.
Accessories: Add accessories like a built-in soap dispenser, cutting board, or sink grid. These can enhance functionality and keep the sink area organized. A strainer basket can help prevent clogs and make cleaning easier.
Countertops: If replacing the sink, consider updating the countertops too. Materials like quartz, granite, or butcher block can give the kitchen a fresh look. Ensure the new sink fits well with the chosen countertop material.
Backsplash: Update the backsplash to match the new sink and countertop. Options include tile, glass, or stainless steel. A new backsplash can tie the whole kitchen together and add a stylish touch.
Lighting: Improve the lighting around the sink area. Install under-cabinet lights or a pendant light above the sink. Good lighting makes tasks easier and enhances the kitchen's overall ambiance.
Eco-Friendly Tips
Reusing or recycling materials can make replacing a kitchen sink more eco-friendly. Start by checking if the old sink can be donated or repurposed. Many community centers or salvage yards accept used sinks.
For the new sink, consider stainless steel or recycled composite materials. Stainless steel is durable and often made from recycled content. Recycled composite sinks use materials like recycled granite or quartz, reducing waste.
Use eco-friendly sealants and adhesives. Look for products labeled low-VOC (volatile organic compounds) to reduce harmful emissions.
When removing the old sink, try to salvage any usable parts like the faucet or plumbing fixtures. These can be reused or donated.
For the countertop, consider reclaimed wood or recycled glass. Both options are sustainable and add a unique look to your kitchen.
Finally, dispose of any waste responsibly. Recycle metal parts and take hazardous materials like old sealants to a proper disposal facility.
Your Kitchen Sink Awaits
Replacing a kitchen sink might seem daunting, but with the right tools and a bit of patience, anyone can do it. Start by gathering all necessary materials like a new sink, plumber’s putty, and a wrench. Turn off the water supply to avoid any messy surprises. Remove the old sink carefully, making sure to disconnect all plumbing lines. Clean the area thoroughly before installing the new sink. Apply plumber’s putty around the edges to ensure a watertight seal. Secure the sink in place, reconnect the plumbing, and turn the water back on. Check for leaks and make any necessary adjustments. With these steps, you’ll have a brand-new kitchen sink installed in no time. Enjoy the satisfaction of a job well done and the fresh look of your updated kitchen. Happy DIY-ing!
How do I know if my kitchen sink needs replacing?
Look for cracks, rust, or persistent leaks. If your sink looks outdated or doesn't match your kitchen's style, it might be time for a change.
What tools will I need to replace my kitchen sink?
You'll need a wrench, screwdriver, plumber's putty, caulk, and a bucket. A putty knife and adjustable pliers can also come in handy.
How long does it take to replace a kitchen sink?
It usually takes about 2-4 hours. If you're new to DIY projects, give yourself some extra time to avoid rushing.
Do I need to turn off the water supply before starting?
Absolutely! Turn off the water supply valves under the sink. This prevents any accidental flooding while you're working.
Can I reuse my old faucet with the new sink?
Yes, you can. Just make sure the mounting holes on the new sink match the old faucet. If not, you might need to drill new holes or get a new faucet.
What should I do if I encounter a problem during installation?
If you hit a snag, don't panic. Check online tutorials or DIY forums for advice. If you're really stuck, calling a professional plumber might be the best option.
How do I ensure a watertight seal around the sink?
Use plumber's putty around the drain and caulk around the edges of the sink. This helps prevent leaks and keeps everything secure.