
Home>Home & Furniture>Kitchen>How to Build Rustic Barnwood Kitchen Cabinets
Kitchen
How to Build Rustic Barnwood Kitchen Cabinets
Published: July 24, 2024
Learn how to build rustic barnwood kitchen cabinets with our step-by-step guide. Transform your kitchen with DIY charm and timeless appeal. Perfect for any rustic home!
(Many of the links in this article redirect to a specific reviewed product. Your purchase of these products through affiliate links helps to generate commission for Twigandthistle.com, at no extra cost. Learn more)
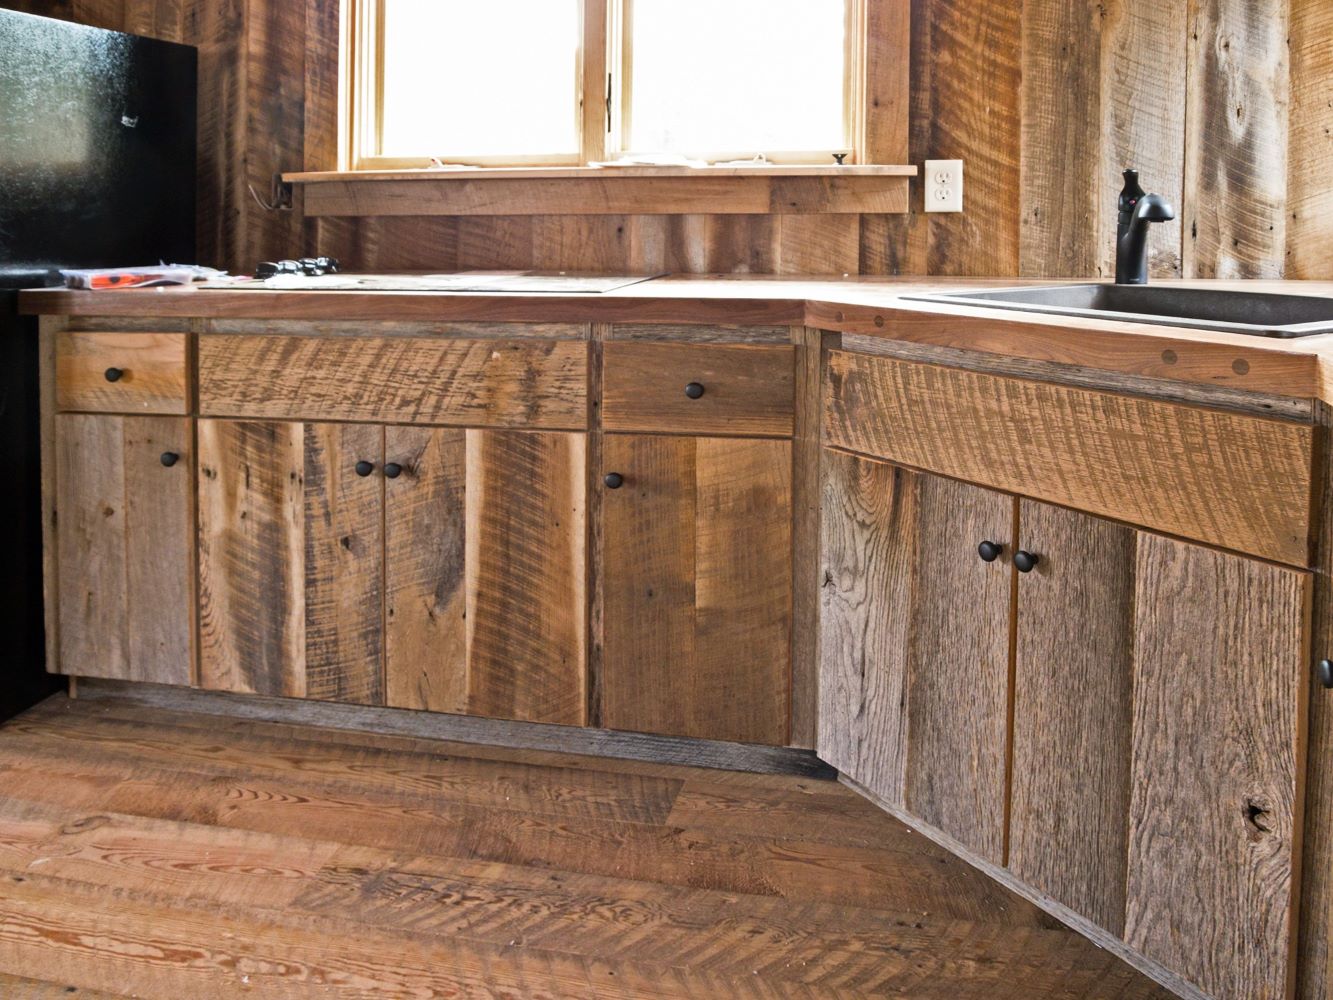
Building rustic barnwood kitchen cabinets can bring a warm, cozy feel to your home. This project lets you recycle old wood while giving your kitchen a unique, personalized look. Whether you're a seasoned DIY enthusiast or just starting out, creating these cabinets is a rewarding task. You'll need some essential tools, a bit of patience, and an eye for design. From selecting the right barnwood to the final touches, every step is a chance to put your own spin on the project. Ready to dive in? Let's get started on this exciting journey.
Getting Ready for Your Project
Gather Materials: Collect barnwood, screws, hinges, handles, and wood glue. Ensure the barnwood is clean and free of pests.
Safety Gear: Wear safety goggles, gloves, and a dust mask. Keep a first aid kit nearby.
Workspace Setup: Choose a well-ventilated area with plenty of light. Lay down a drop cloth to protect the floor.
Tools Ready: Have a saw, drill, measuring tape, level, and clamps at hand. Ensure all tools are in good working condition.
Measure and Plan: Measure your kitchen space. Sketch a plan for the cabinet layout, including dimensions.
Cut Wood: Cut the barnwood to the required sizes. Sand the edges to avoid splinters.
Pre-drill Holes: Pre-drill holes for screws to prevent the wood from splitting.
Assemble Frame: Assemble the cabinet frame using screws and wood glue. Use clamps to hold pieces together while the glue dries.
Install Hinges and Handles: Attach hinges to the doors and then to the frame. Install handles on the doors.
Finish: Apply a wood finish or sealant to protect the barnwood and enhance its rustic look.
Gathering Materials and Tools
Barnwood Planks: These are the main material for the cabinets. They give the rustic look and are sturdy.
Plywood Sheets: Used for the cabinet backs and shelves. They provide extra support and stability.
Wood Screws: Essential for joining the wood pieces together. Make sure to get screws that match the thickness of your wood.
Wood Glue: Adds extra strength to the joints. Helps keep everything in place.
Sandpaper: Smooths out rough edges and surfaces. Makes the wood ready for staining or painting.
Wood Stain or Paint: Gives the barnwood its final look. Choose a stain for a natural look or paint for a different color.
Paint Brushes or Rags: Used to apply the stain or paint. Brushes for detailed work, rags for a more rustic finish.
Measuring Tape: Ensures all pieces are cut to the right size. Accuracy is key.
Circular Saw or Table Saw: Cuts the wood to the needed dimensions. A circular saw is more portable, while a table saw offers more precision.
Drill and Drill Bits: Makes holes for screws and hardware. Different bits for different sizes.
Clamps: Holds pieces together while the glue dries. Keeps everything aligned.
Hinges and Handles: These are the hardware for the doors. Choose ones that match the rustic style.
Level: Ensures everything is straight and even. Important for both looks and function.
Safety Gear: Includes gloves, safety glasses, and a dust mask. Protects you while working.
Chisels: Useful for fine-tuning joints and edges. Helps with detailed work.
Screwdriver: Tightens screws and hardware. A manual one or a power screwdriver works.
Square: Ensures corners are at right angles. Keeps everything aligned.
Pencil: Marks measurements and cutting lines. Essential for planning.
These materials and tools will help you build rustic barnwood kitchen cabinets that are both functional and stylish.
Required Skills and Time
Skill Level: Advanced
Estimated Time Required: 40-60 hours
Important Steps:
- Gather Materials: Reclaimed barnwood, screws, hinges, handles, wood glue, sandpaper, and a saw.
- Measure and Cut: Accurate measurements and precise cuts are crucial.
- Assemble Frames: Use screws and wood glue to build the cabinet frames.
- Attach Doors: Secure the doors with hinges and handles.
- Finish: Sand the wood and apply a protective finish.
Tips:
- Safety Gear: Always wear safety goggles and gloves.
- Patience: Take your time to ensure quality craftsmanship.
- Help: Consider having a friend assist with heavy lifting.
Building Your Rustic Barnwood Kitchen Cabinets
Gather Materials and Tools
- Barnwood (reclaimed wood)
- Measuring tape
- Saw (circular or table)
- Screws and nails
- Drill
- Screwdriver
- Wood glue
- Sandpaper
- Hinges and handles
- Wood finish or sealant
Measure and Cut Wood
- Measure the space for the cabinets.
- Cut barnwood to desired sizes for the cabinet frame, doors, and shelves.
Build the Frame
- Assemble the frame using screws and wood glue.
- Ensure corners are square using a carpenter's square.
Attach the Back Panel
- Cut a piece of barnwood for the back panel.
- Secure it to the frame with screws or nails.
Install Shelves
- Measure and cut wood for shelves.
- Attach shelf supports inside the frame.
- Place shelves on supports and secure with screws.
Build and Attach Doors
- Cut wood for doors.
- Sand edges for a smooth finish.
- Attach hinges to doors, then to the frame.
- Install handles on doors.
Sand and Finish
- Sand all surfaces to remove rough edges.
- Apply wood finish or sealant to protect the wood.
Install Cabinets
- Secure cabinets to the wall using screws.
- Ensure they are level and properly aligned.
Final Touches
- Check all screws and hinges for tightness.
- Clean any dust or debris from the cabinets.
Helpful Tips and Tricks
Measure twice, cut once. Always double-check measurements before cutting barnwood. This saves time and materials.
Use reclaimed wood. Look for old barns, fences, or pallets. Reclaimed wood adds authentic rustic charm.
Sand lightly. Keep the rustic look by sanding just enough to remove splinters but not the character marks.
Seal the wood. Use a clear sealant to protect the wood without changing its appearance. This keeps the rustic look intact.
Pre-drill holes. Barnwood can be brittle. Pre-drilling prevents splitting when screwing pieces together.
Mix wood tones. Combine different shades of barnwood for a more natural, varied look.
Use hidden hinges. Concealed hinges maintain the rustic exterior without modern hardware showing.
Common mistakes to avoid:
Skipping the sealant. Unsealed wood can warp or get damaged by moisture.
Over-sanding. Too much sanding removes the rustic character.
Not acclimating wood. Let barnwood sit in your home for a few days to adjust to humidity and temperature.
Alternatives for materials or methods:
Use faux barnwood. If real barnwood is hard to find, consider faux barnwood panels. They look similar and are easier to work with.
Stain new wood. If reclaimed wood isn't available, use new wood and stain it to mimic the rustic look.
Use plywood backing. For extra stability, use plywood as a backing for barnwood panels. This helps with durability and ease of installation.
Estimating the Costs
Barnwood: $200-$500 depending on the size of your kitchen and quality of wood.
Screws and Nails: $20 for a mixed pack.
Wood Glue: $10 for a bottle.
Sandpaper: $10 for a pack.
Stain or Paint: $30 for a gallon.
Hinges and Handles: $50 for a basic set.
Saw: $100 for a decent circular saw.
Drill: $50 for a basic model.
Measuring Tape: $10.
Clamps: $20 for a set.
Budget-friendly alternatives:
Reclaimed Wood: Often free or very cheap from old barns or pallets.
Basic Screws and Nails: $10 for a smaller pack.
Basic Wood Glue: $5 for a smaller bottle.
Sandpaper: $5 for a smaller pack.
Economy Stain or Paint: $15 for a smaller can.
Basic Hinges and Handles: $30 for a simpler set.
Hand Saw: $20 if you don't mind manual labor.
Manual Screwdriver: $10 if you don't need a drill.
Borrow Tools: Ask friends or family to save on costs.
Personalizing Your Cabinets
Alternative Materials: Instead of barnwood, use reclaimed wood from old furniture or pallets. For a modern twist, try plywood with a rustic finish. Bamboo can offer a sustainable option with a unique look.
Colors: Paint the cabinets in chalk paint for a vintage feel. Use whitewash to keep the wood grain visible while giving a lighter appearance. For a bold look, consider deep navy or forest green.
Styles: Add shaker-style doors for a simple, clean look. Use glass inserts in some cabinet doors to display dishes. Install open shelving instead of upper cabinets for a more airy feel.
Hardware: Swap out standard knobs for iron handles or leather pulls. Use antique brass or copper for a warm, rustic touch. Ceramic knobs with hand-painted designs can add a pop of color.
Finishes: Apply a matte finish for a natural look. Use distressing techniques to give the wood an aged appearance. A glossy finish can add a modern twist to rustic cabinets.
Additional Features: Incorporate built-in wine racks or spice racks. Add under-cabinet lighting for better visibility and ambiance. Install pull-out shelves for easier access to items.
Eco-Friendly Ideas
Reclaimed wood is perfect for rustic barnwood kitchen cabinets. Look for old barns, fences, or pallets. Salvaged wood from construction sites or old furniture can also work well.
Use non-toxic finishes like beeswax or linseed oil to protect the wood. These finishes are safer for your home and the environment.
Recycled hardware such as handles and hinges can add character. Check thrift stores or salvage yards for unique pieces.
Energy-efficient tools like LED work lights and cordless drills with rechargeable batteries can reduce energy consumption during your project.
Natural adhesives like casein or soy-based glues are better for the environment compared to synthetic options.
Insulation made from recycled materials can help make your cabinets more energy-efficient. Look for options like recycled denim or cellulose.
Water-based stains and paints are less harmful than oil-based ones. They emit fewer volatile organic compounds (VOCs), making them a healthier choice.
Upcycling old cabinet doors or drawers can save resources and give your kitchen a unique look. Sand them down and refinish to match your barnwood theme.
Composting sawdust and wood scraps instead of throwing them away can reduce waste. Use them in your garden or compost bin.
Sustainable sourcing of any new wood is crucial. Look for FSC-certified wood to ensure it comes from responsibly managed forests.
Your Rustic Kitchen Awaits
You've got the know-how to build rustic barnwood kitchen cabinets. Gather your materials and tools, and start with a solid plan. Measure twice, cut once. Sand those edges smooth. Assemble your pieces with care, ensuring everything fits snugly. Don't forget to stain or seal the wood to protect it and bring out its natural beauty. Install your cabinets securely, making sure they're level. Add the finishing touches like handles and hinges. Step back and admire your handiwork. You've transformed your kitchen with a touch of rustic charm. Now, enjoy the satisfaction of a job well done and the unique character your new cabinets bring to your home. Happy building!
What tools do I need to build rustic barnwood kitchen cabinets?
You'll need a saw, drill, screwdriver, measuring tape, level, sander, and clamps. A nail gun can also speed things up.
Where can I find barnwood for my cabinets?
Check out reclaimed wood suppliers, salvage yards, or even old barns being torn down. Online marketplaces like Craigslist or Facebook Marketplace can also have good finds.
How do I prep the barnwood before using it?
Clean the wood with a stiff brush to remove dirt and debris. Sand it lightly to smooth out rough spots but keep the rustic look. Treat it with a wood preservative to protect against pests and rot.
What kind of finish should I use?
A clear polyurethane finish works well to protect the wood while keeping its natural look. For a more aged appearance, consider using a stain or wax finish.
How do I ensure the cabinets are sturdy?
Use quality screws and wood glue for assembly. Reinforce corners with brackets or corner blocks. Make sure to attach cabinets securely to wall studs.
Can I mix barnwood with other materials?
Absolutely! Combining barnwood with metal accents or glass doors can create a unique, modern-rustic look. Just make sure the styles complement each other.
How do I maintain barnwood cabinets?
Dust regularly with a soft cloth. Clean spills immediately to prevent stains. Occasionally, reapply a protective finish to keep the wood in good shape.