
Home>Home & Furniture>Kitchen>DIY Teardrop Camper Kitchen Build
Kitchen
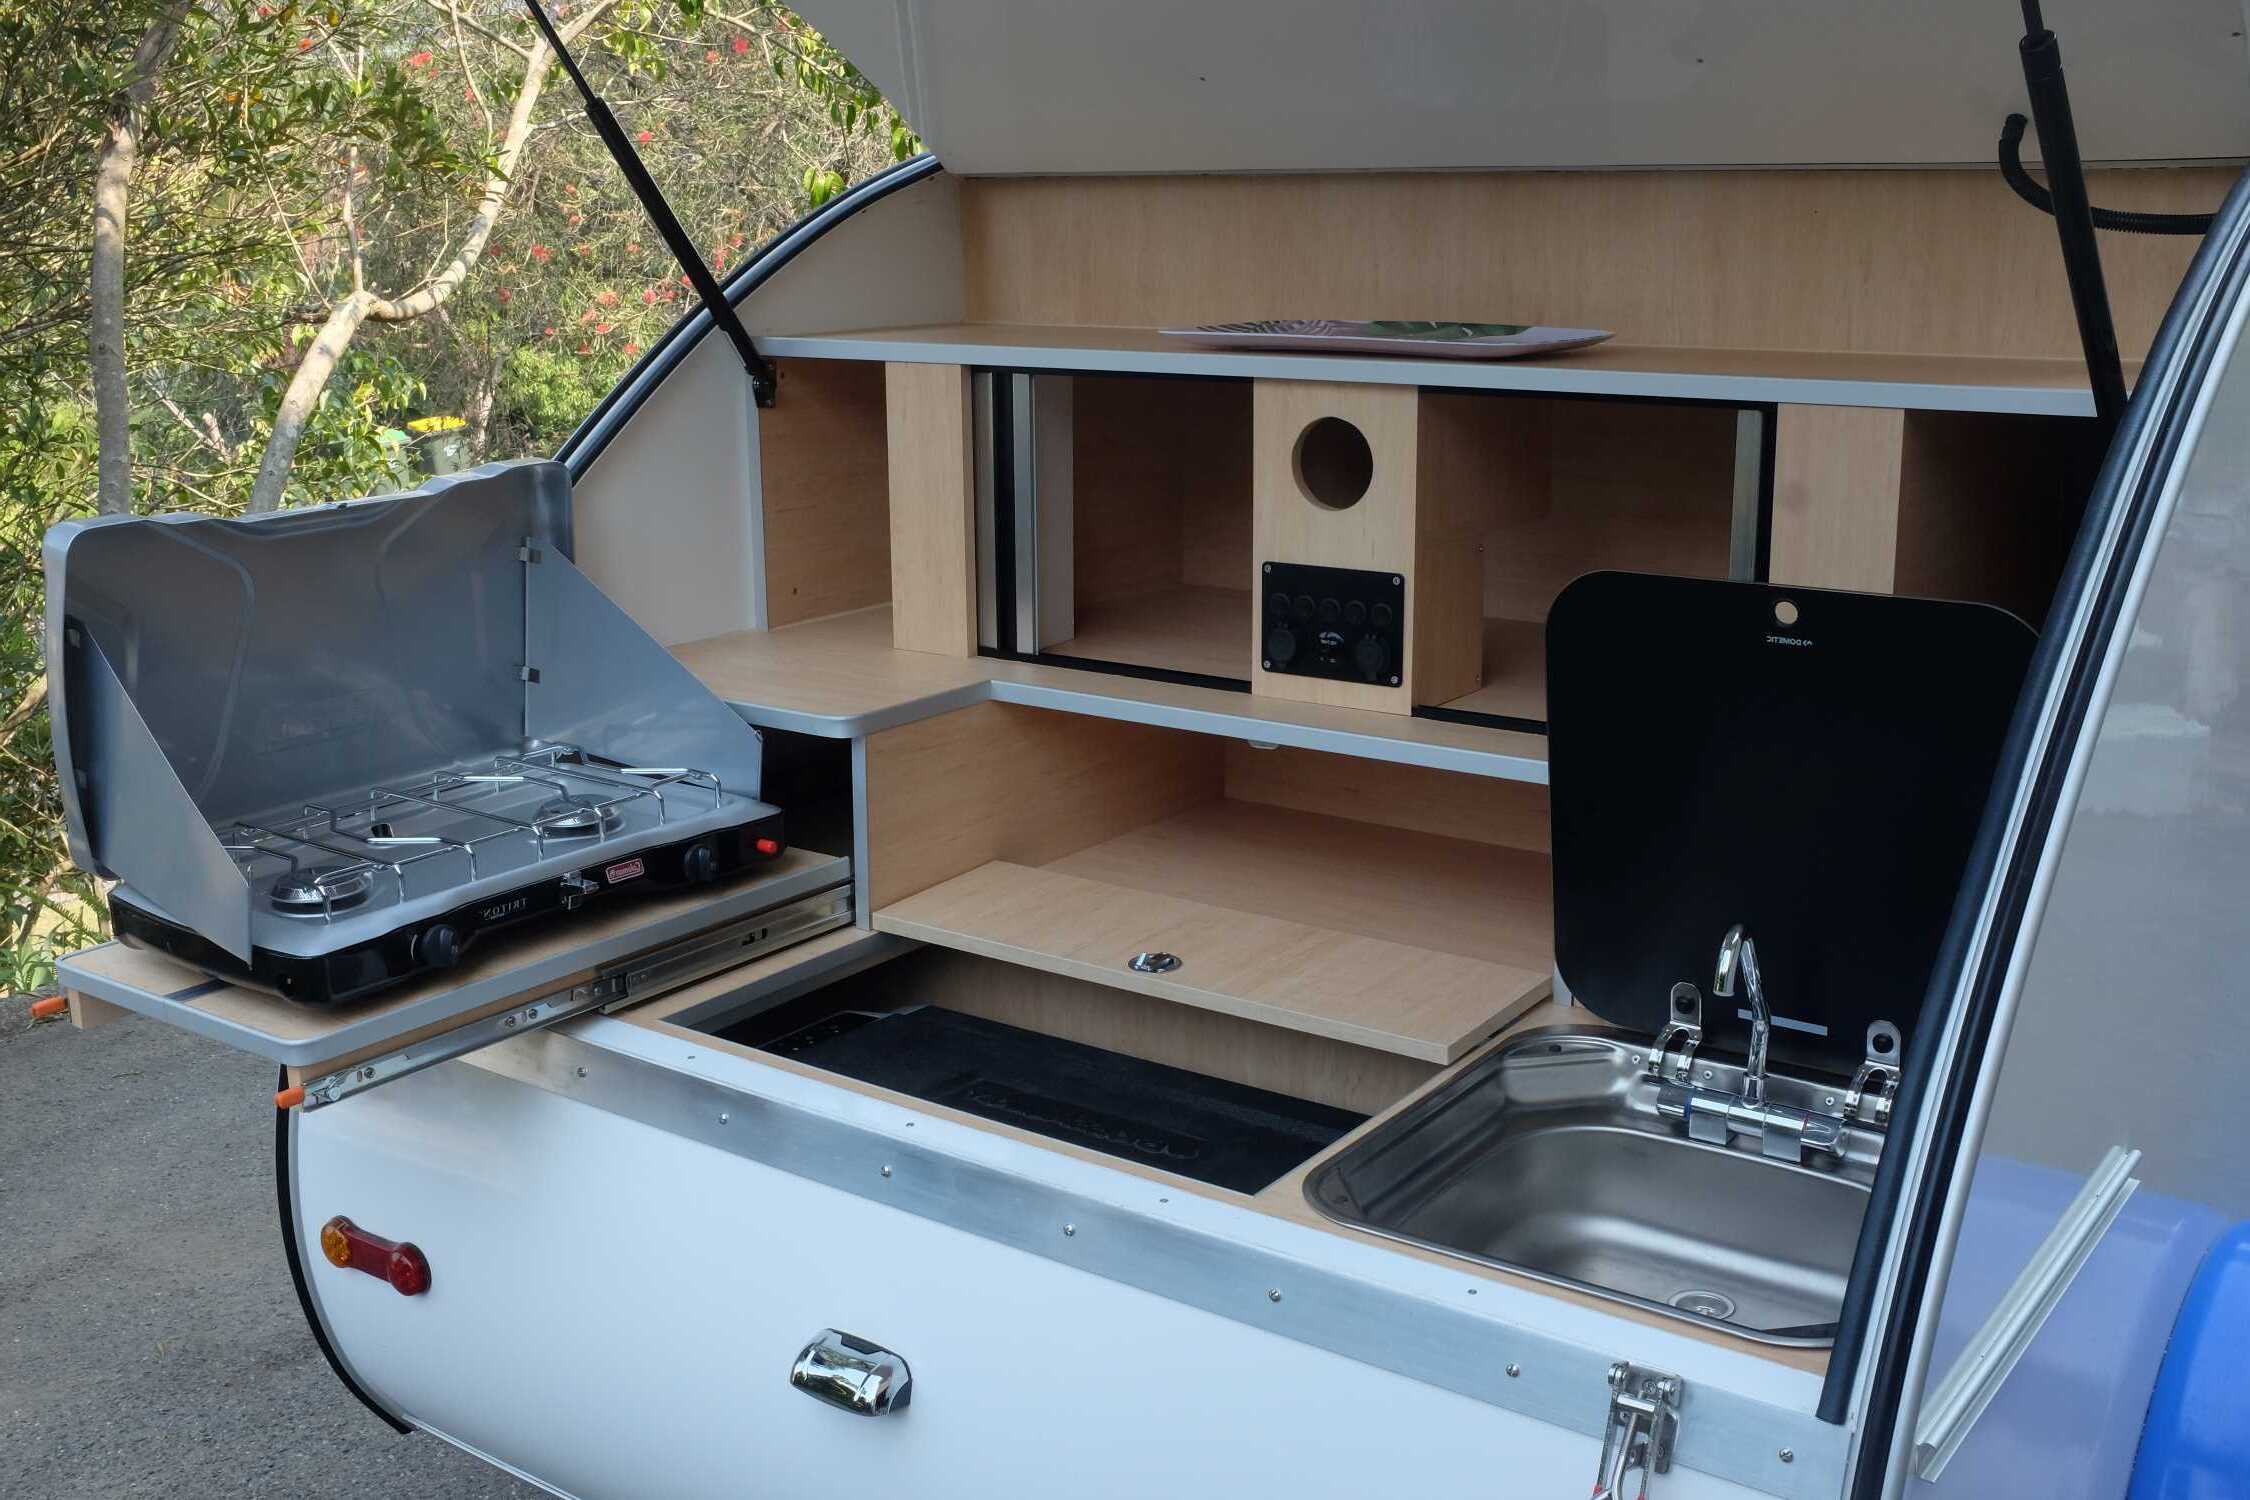
DIY Teardrop Camper Kitchen Build
Published: August 4, 2024
Learn how to build a functional and stylish teardrop camper kitchen with our step-by-step guide. Perfect for DIY enthusiasts looking to enhance their camping experience!
(Many of the links in this article redirect to a specific reviewed product. Your purchase of these products through affiliate links helps to generate commission for Twigandthistle.com, at no extra cost. Learn more)
Building your own teardrop camper kitchen can be an exciting and rewarding project. Imagine having a cozy, compact kitchen that travels with you wherever you go. Whether you’re planning weekend getaways or extended road trips, a DIY teardrop camper kitchen offers convenience and functionality. From selecting materials to customizing storage solutions, this project lets you create a personalized space tailored to your cooking needs. You don’t need to be a master craftsman either; even beginners can tackle this project with the right guidance. Let's get started on your journey to crafting the perfect mobile kitchen!
Getting Ready for Your Build
Gather Materials: Collect all necessary tools and materials like plywood, screws, hinges, a saw, a drill, and a measuring tape.
Plan Layout: Sketch your kitchen layout on paper. Decide where the stove, sink, and storage will go.
Measure Twice: Measure the available space in your teardrop camper. Ensure your design fits perfectly.
Safety Gear: Wear safety goggles, gloves, and a dust mask to protect yourself while cutting and drilling.
Clear Workspace: Set up a clean, clutter-free workspace. Make sure you have enough room to move around and work comfortably.
Cut Wood: Cut the plywood according to your measurements. Double-check dimensions before making any cuts.
Pre-drill Holes: Pre-drill holes for screws to prevent the wood from splitting.
Assemble Frame: Start assembling the frame of your kitchen. Use clamps to hold pieces together while you screw them in place.
Install Components: Attach the stove, sink, and storage units. Make sure everything is securely fastened.
Test Fit: Place the assembled kitchen inside the camper to ensure it fits correctly. Make any necessary adjustments.
Finish Edges: Sand down rough edges and apply a finish to protect the wood from moisture.
Check Stability: Ensure all components are stable and secure. Test drawers and doors to make sure they open and close smoothly.
Gathering Materials and Tools
Materials Needed:
- Plywood: Used for constructing the main structure of the kitchen.
- Screws and Nails: Essential for joining pieces of wood together securely.
- Wood Glue: Provides additional strength to wood joints.
- Hinges: Needed for cabinet doors and foldable surfaces.
- Drawer Slides: Allows drawers to open and close smoothly.
- Countertop Material: Can be laminate, wood, or another durable surface.
- Paint or Stain: Used to finish the wood, protecting it and making it look nice.
- Sealant: Protects wood from moisture and spills.
- Handles and Knobs: For opening drawers and cabinets.
- Butcher Block: Ideal for a cutting surface.
- Sink and Faucet: For washing dishes and food prep.
- Water Container: Stores fresh water for the sink.
- Pump: Moves water from the container to the faucet.
- Propane Stove: For cooking meals.
- Cooler or Mini Fridge: Keeps food and drinks cold.
- Lighting: Ensures visibility when cooking at night.
Tools Needed:
- Tape Measure: For accurate measurements.
- Circular Saw: Cuts large pieces of plywood.
- Jigsaw: Useful for cutting curves and intricate shapes.
- Drill: For making holes and driving screws.
- Screwdriver: Tightens screws.
- Hammer: Drives nails into wood.
- Clamps: Holds pieces together while glue dries.
- Level: Ensures surfaces are even.
- Sander: Smooths rough edges and surfaces.
- Paintbrushes or Rollers: Applies paint or stain.
- Utility Knife: Cuts small materials and trims edges.
- Pliers: Grips and bends materials.
- Wrench Set: Tightens nuts and bolts.
- Safety Gear: Includes gloves, goggles, and ear protection.
These materials and tools will help you build a functional and stylish kitchen for your teardrop camper.
Required Skills and Time Commitment
Skill Level: Intermediate
Time Required: 20-30 hours
- Planning and Design: 3-5 hours
- Gathering Materials: 2-3 hours
- Building the Frame: 5-7 hours
- Installing Cabinets and Shelves: 4-6 hours
- Plumbing and Electrical Work: 3-4 hours
- Finishing Touches: 3-5 hours
Instructions for Building Your Camper Kitchen
Plan Your Design
- Sketch a layout for your kitchen.
- Decide on the placement of the stove, sink, storage, and counter space.
Gather Materials
- Plywood
- Screws
- Hinges
- Drawer slides
- Countertop material
- Sink and faucet
- Stove or cooktop
- Storage containers
Build the Frame
- Measure and cut plywood for the frame.
- Assemble using screws and brackets.
- Ensure the frame fits snugly in the back of your camper.
Install the Countertop
- Cut the countertop material to size.
- Secure it to the frame with screws.
- Cut holes for the sink and stove.
Install the Sink and Stove
- Place the sink in its cutout and secure it.
- Connect the faucet to a water source.
- Install the stove or cooktop in its designated spot.
Add Storage
- Install drawer slides inside the frame.
- Build drawers or shelves using plywood.
- Secure drawers with screws and attach handles.
Finish and Seal
- Sand all surfaces to smooth rough edges.
- Apply a sealant or paint to protect the wood.
- Let it dry completely before use.
Test Everything
- Check the stability of the frame and countertop.
- Ensure the sink and stove function properly.
- Adjust any components as needed.
Helpful Tips and Tricks
Plan your layout carefully. Measure twice, cut once. Use lightweight materials like plywood to keep the camper easy to tow. Modular designs help with flexibility and storage. Install LED lights for energy efficiency. Waterproof all surfaces to prevent damage from spills.
Common mistakes include overloading the kitchen with heavy appliances. Avoid using non-treated wood that can warp or rot. Ensure proper ventilation to avoid moisture buildup. Don't forget to secure all items to prevent movement while driving.
For materials, consider aluminum instead of steel for framing to reduce weight. Use marine-grade plywood for durability. Instead of a built-in stove, a portable camping stove can save space. For countertops, laminate is a budget-friendly alternative to granite or quartz.
Estimating the Cost
Plywood: $50-$100 per sheet (2-3 sheets needed)
Screws and Nails: $20
Hinges and Handles: $30
Countertop Material: $50-$100
Paint or Stain: $20-$40
Sealant: $10-$20
Sink: $50-$100
Faucet: $20-$50
Water Container: $10-$30
Stove: $50-$150
Cooler or Mini Fridge: $50-$200
Lighting: $20-$50
Tools:
- Circular Saw: $50-$100 (or borrow)
- Drill: $30-$60 (or borrow)
- Sander: $20-$50 (or borrow)
- Measuring Tape: $5-$10
- Clamps: $10-$20
Total Estimated Cost: $475-$1,200
Budget-Friendly Alternatives:
- Use reclaimed wood instead of new plywood.
- Opt for a portable camping stove instead of a built-in one.
- Choose a basic cooler over a mini fridge.
- Borrow or rent tools from a friend or local hardware store.
Customizing Your Camper Kitchen
Materials: Instead of plywood, try using bamboo or reclaimed wood for a more eco-friendly option. For countertops, consider butcher block, stainless steel, or quartz instead of laminate.
Colors: Paint the cabinets in bright colors like teal, yellow, or red for a retro look. For a modern feel, use neutral tones like gray, white, or black. Add a pop of color with a vibrant backsplash.
Styles: Go for a rustic look with distressed wood and metal accents. For a sleek, modern style, use clean lines, glossy finishes, and minimalistic hardware. A vintage theme can be achieved with retro appliances and checkerboard flooring.
Storage: Install pull-out shelves or lazy Susans to maximize space. Use magnetic strips for knives and metal utensils. Add hanging racks for pots, pans, and mugs.
Lighting: Use LED strip lights under cabinets for better visibility. Consider solar-powered lights for an eco-friendly option. Add fairy lights for a cozy ambiance.
Appliances: Opt for a portable induction cooktop instead of a traditional stove. Use a compact fridge or a cooler with a built-in battery. A collapsible sink can save space when not in use.
Decor: Add personal touches like framed photos, small plants, or decorative knobs. Use removable wallpaper for an easy-to-change backsplash. Incorporate themed accessories like nautical or camping gear.
Functionality: Install a fold-out table for extra prep space. Use multi-purpose items like a cutting board that fits over the sink. Add a slide-out pantry for easy access to dry goods.
Eco-Friendly Building Tips
Reclaimed wood can be used for cabinets and countertops. It adds character and reduces waste. Bamboo is another great option. It grows quickly and is very strong. For insulation, try sheep wool or recycled denim. Both are natural and effective.
Use low-VOC paints to avoid harmful chemicals. These paints are better for your health and the environment. Recycled glass tiles can make a beautiful backsplash. They come in many colors and styles.
For the sink, consider a repurposed metal basin. It’s unique and eco-friendly. Solar panels can power small appliances. They reduce reliance on non-renewable energy sources.
LED lights are energy-efficient and last longer. They use less power, which is important in a small space. Composting toilets are another sustainable option. They save water and are easy to maintain.
When building, try to reuse materials from other projects. This saves money and reduces waste. Second-hand stores often have useful items. You can find sinks, faucets, and even cabinets.
Natural sealants like beeswax or linseed oil can protect wood surfaces. They are non-toxic and biodegradable. Recycled aluminum can be used for lightweight, durable countertops.
Cork flooring is soft, insulating, and renewable. It’s also easy to install. Hemp fabric can be used for curtains or seat covers. It’s durable and eco-friendly.
By choosing these materials and methods, you can create a beautiful, sustainable teardrop camper kitchen.
Your DIY Adventure Awaits
Building a teardrop camper kitchen is a rewarding project. You've learned how to plan, gather materials, and assemble everything. Now, it's time to enjoy the fruits of your labor. Imagine cooking under the stars, everything you need within arm's reach. Your custom kitchen will make every camping trip more enjoyable. Plus, you get the satisfaction of knowing you built it yourself. Don't forget to maintain it regularly to keep it in top shape. Share your experience with friends and family; you might inspire someone else to start their own DIY journey. Happy camping!
What materials do I need to build a teardrop camper kitchen?
You'll need plywood, screws, hinges, drawer slides, countertop material, and sealant. Don't forget tools like a saw, drill, and measuring tape.
How much space do I need for a teardrop camper kitchen?
Typically, you'll need about 3-4 feet of width and 2-3 feet of depth. It depends on your camper's size and your kitchen's design.
Can I install a sink in my teardrop camper kitchen?
Yes, you can! You'll need a small sink, water pump, and water tanks for fresh and grey water. Make sure to plan for plumbing.
How do I power my teardrop camper kitchen appliances?
Use a 12V battery system or solar panels. You can also use a portable generator for more power-hungry appliances.
What kind of stove should I use?
A portable propane stove works great. It's compact, easy to use, and doesn't require a lot of power.
How do I maximize storage in my teardrop camper kitchen?
Use drawers, shelves, and hanging racks. Think about multi-functional furniture and collapsible items to save space.
Is it possible to add a fridge?
Absolutely! A 12V mini-fridge or a cooler with ice packs can keep your food fresh. Just ensure you have enough power supply.