
Home>Home & Furniture>Kitchen>DIY Rustic Small Farmhouse Kitchen
Kitchen
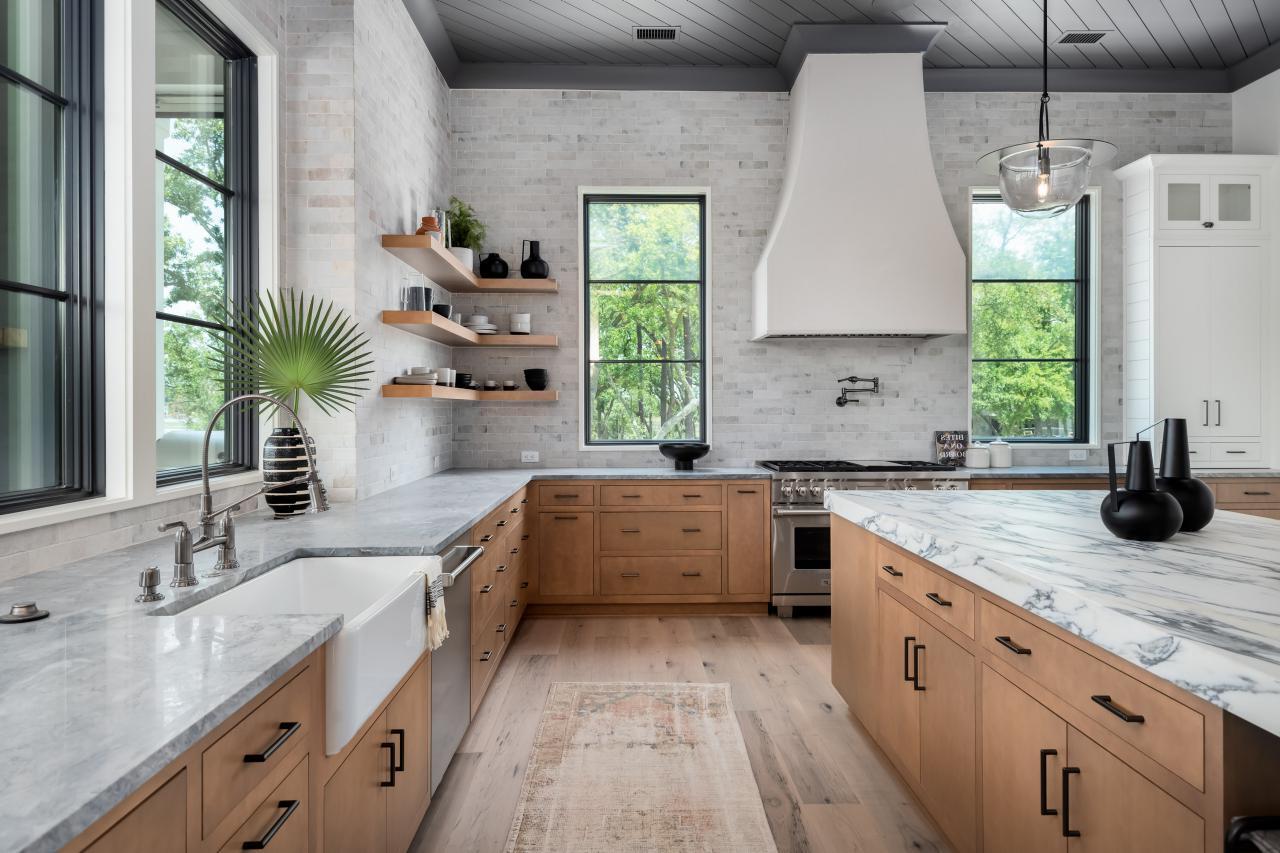
DIY Rustic Small Farmhouse Kitchen
Published: August 2, 2024
Transform your space with a DIY rustic small farmhouse kitchen. Discover design tips, decor ideas, and budget-friendly projects to create a cozy, charming kitchen.
(Many of the links in this article redirect to a specific reviewed product. Your purchase of these products through affiliate links helps to generate commission for Twigandthistle.com, at no extra cost. Learn more)
Welcome to the world of DIY rustic farmhouse kitchens! If you're passionate about creating cozy, charming spaces, this is your spot. Crafting a small farmhouse kitchen doesn't require expert skills, just creativity, a bit of patience, and willingness to get hands dirty. Think about transforming reclaimed wood into shelves, painting cabinets in soft pastels, or adding vintage hardware. This guide helps you turn your kitchen into a warm, inviting haven that feels like home. Whether you live in the countryside or in the city, a rustic farmhouse kitchen brings timeless charm to any space. Let's get started!
Getting Ready for Your Project
Gather Materials: Collect all necessary tools and materials like wood, paint, screws, nails, and sandpaper. Make sure everything is within reach.
Create a Plan: Sketch a layout of the kitchen. Decide where each element will go, such as cabinets, shelves, and countertops.
Clear the Area: Remove all items from the kitchen. This includes appliances, dishes, and any furniture. A clean workspace is safer and more efficient.
Safety Gear: Wear safety goggles, gloves, and a dust mask. Protect yourself from dust, splinters, and fumes.
Ventilation: Ensure proper ventilation. Open windows or use fans to keep the air flowing, especially when painting or sanding.
Check Electrical and Plumbing: Turn off power and water supply if you’ll be working near outlets or pipes. This prevents accidents.
Measure Twice, Cut Once: Double-check all measurements before cutting any materials. This saves time and reduces waste.
Organize Tools: Arrange tools in the order you’ll need them. This minimizes downtime and keeps the project moving smoothly.
Test Paint and Stains: Apply a small amount of paint or stain on a scrap piece of wood. Ensure it’s the right color and finish before applying it to the main surfaces.
Prep Surfaces: Sand down rough edges and clean surfaces before painting or assembling. This ensures a smooth, professional finish.
Lighting: Set up adequate lighting. Good visibility helps you work more accurately and safely.
Emergency Kit: Keep a first aid kit nearby. Accidents can happen, and it’s best to be prepared.
Stay Hydrated: Keep water or a drink nearby. Working on a DIY project can be physically demanding.
Take Breaks: Schedule short breaks to rest and assess your progress. This helps maintain focus and energy.
Gathering Materials and Tools
Materials:
- Wood Planks: Used for countertops, shelves, and cabinets. Choose reclaimed wood for a rustic look.
- Paint: White or pastel shades for walls and cabinets. Chalk paint works well for a vintage feel.
- Stain: Enhances the natural wood grain on countertops and shelves.
- Sealant: Protects wood surfaces from moisture and stains.
- Cabinet Hardware: Handles and knobs in antique or wrought iron styles.
- Backsplash Tiles: Subway tiles or patterned tiles for a farmhouse touch.
- Butcher Block: Ideal for countertops, providing a sturdy and rustic surface.
- Farmhouse Sink: Deep, apron-front sink for a classic farmhouse look.
- Lighting Fixtures: Pendant lights or vintage-style fixtures for overhead lighting.
- Decorative Items: Mason jars, vintage signs, and woven baskets for added charm.
Tools:
- Measuring Tape: Ensures accurate measurements for wood cutting and placement.
- Saw: Circular saw or miter saw for cutting wood planks and butcher block.
- Drill: For installing hardware and assembling cabinets.
- Screwdriver: Necessary for attaching hardware and making adjustments.
- Paintbrushes/Rollers: Used for applying paint and stain to wood surfaces.
- Sandpaper: Smooths rough edges on wood and prepares surfaces for painting or staining.
- Level: Ensures shelves, countertops, and cabinets are even.
- Caulking Gun: Applies sealant around sinks and backsplashes.
- Hammer: Useful for nailing wood pieces together.
- Clamps: Holds wood pieces in place while glue or sealant dries.
Skill Level and Time Commitment
Skill Level: Intermediate
Time Required: Approximately 2-3 weekends
- Planning and Design: 4-6 hours
- Gathering Materials: 4-5 hours
- Demolition (if needed): 6-8 hours
- Installing Cabinets and Shelves: 10-12 hours
- Painting and Finishing: 8-10 hours
- Final Touches and Cleanup: 4-6 hours
Step-by-Step Guide
Plan Your Layout
- Sketch your kitchen layout.
- Decide where to place cabinets, appliances, and countertops.
Gather Materials
- Wood: Reclaimed wood for cabinets and shelves.
- Paint: White or pastel shades.
- Hardware: Rustic handles and knobs.
- Tools: Hammer, nails, screws, saw, paintbrushes.
Prepare the Space
- Clear out the kitchen.
- Clean walls and floors.
Build Cabinets and Shelves
- Measure and cut wood.
- Assemble using nails and screws.
- Sand surfaces for a smooth finish.
Paint and Finish
- Apply primer to wood surfaces.
- Paint with chosen color.
- Let dry completely.
Install Cabinets and Shelves
- Secure cabinets to walls.
- Install shelves above countertops.
Add Countertops
- Measure and cut countertop material.
- Secure to cabinets.
Install Hardware
- Attach handles and knobs to cabinets and drawers.
Decorate
- Add rustic decor items like mason jars, wooden signs, and vintage utensils.
- Place a farmhouse sink if desired.
Final Touches
- Check for any loose screws or nails.
- Clean up any paint spills or dust.
Helpful Tips and Tricks
Use reclaimed wood for shelves and countertops. It adds character and saves money. Install open shelving to display dishes and cookware. This creates a cozy, lived-in feel. Paint cabinets white or a soft pastel to brighten the space. Add vintage hardware like knobs and handles for an authentic touch. Use a farmhouse sink for a classic look and extra functionality. Incorporate natural elements like stone or brick for a rustic vibe. Hang pendant lights with an industrial or vintage design for charm.
Common mistakes to avoid: Don't overdo the rustic elements; balance is key. Avoid using too many dark colors, which can make the space feel small. Skipping proper measurements can lead to poorly fitting shelves or countertops. Using low-quality paint can result in chipping and peeling.
Alternatives: Instead of reclaimed wood, consider butcher block countertops for a similar rustic feel. If open shelving isn't your style, glass-front cabinets offer a compromise. For a budget-friendly option, peel-and-stick backsplash tiles can mimic the look of real stone or brick.
Estimating the Cost
Wood: $200 for reclaimed wood or $100 for plywood.
Paint: $50 for a gallon of white paint.
Cabinet Hardware: $40 for handles and knobs.
Sink: $150 for a farmhouse sink.
Faucet: $70 for a rustic-style faucet.
Countertops: $300 for butcher block or $100 for laminate.
Lighting: $100 for rustic pendant lights.
Backsplash: $50 for subway tiles.
Flooring: $200 for vinyl planks or $100 for peel-and-stick tiles.
Tools: $100 for basic tools like a drill, saw, and sander.
Total Cost: $1,360 for higher-end materials or $810 for budget-friendly options.
Ideas for Variations and Customizations
Wood Choices: Use reclaimed wood for a more authentic look. Pine, oak, or cedar can also work well.
Cabinet Colors: Paint cabinets in soft pastels like mint green or light blue. For a bolder look, try deep navy or forest green.
Countertops: Butcher block countertops add warmth. Concrete countertops give a modern twist.
Backsplash: Subway tiles in white or cream create a classic look. For a unique touch, use patterned tiles or beadboard.
Hardware: Swap out standard knobs for vintage-style handles or wrought iron pulls.
Lighting: Install pendant lights with metal shades. Mason jar lights add a rustic touch.
Flooring: Wide plank wood floors in a distressed finish. Alternatively, use stone tiles for a farmhouse feel.
Open Shelving: Replace upper cabinets with open shelves made from reclaimed wood or metal brackets.
Sink: A farmhouse sink in white porcelain or stainless steel. Apron-front sinks also fit the style.
Decor: Add vintage signs, woven baskets, and ceramic jars. Display fresh herbs in small pots for a homey touch.
Furniture: A wooden farmhouse table with mismatched chairs. Add a bench for extra seating.
Textiles: Use gingham or floral patterns for curtains and tablecloths. Burlap or linen can add texture.
Appliances: Choose retro-style appliances in pastel colors. Stainless steel works for a modern farmhouse look.
Walls: Shiplap walls painted white or light gray. For an accent wall, use reclaimed wood planks.
Ceiling: Exposed wooden beams or beadboard ceilings enhance the rustic feel. Paint them white for a brighter look.
Eco-Friendly Tips
Reclaimed Wood: Use old barn wood or pallets for cabinets, shelves, and countertops. Sand and seal them for a rustic look.
Recycled Metal: Incorporate old metal fixtures or hardware. Think about using vintage handles, knobs, and light fixtures.
Eco-friendly Paint: Choose low-VOC or zero-VOC paints. These are better for the environment and your health.
Natural Stone: Opt for stone countertops or backsplashes. Granite, slate, or soapstone can add a rustic touch.
Bamboo: Use bamboo for flooring or cutting boards. It’s a sustainable and durable material.
Salvaged Items: Visit thrift stores or salvage yards. Find unique pieces like old doors, windows, or sinks.
Energy-efficient Appliances: Choose appliances with an Energy Star rating. They use less energy and save money.
Compostable Materials: Use compostable materials for kitchen waste. Set up a compost bin for food scraps.
LED Lighting: Install LED bulbs. They last longer and use less energy.
Glass Jars: Repurpose glass jars for storage. They’re perfect for spices, grains, and other dry goods.
Fabric: Use organic cotton or linen for curtains, tablecloths, and towels. These materials are eco-friendly and add a cozy touch.
Natural Cleaning Products: Make your own cleaning solutions with vinegar, baking soda, and lemon. They’re effective and non-toxic.
Insulation: Ensure your kitchen is well-insulated. This helps maintain temperature and reduces energy use.
Water-saving Fixtures: Install low-flow faucets and aerators. These reduce water usage without sacrificing performance.
Upcycled Furniture: Refurbish old furniture. A fresh coat of paint or new upholstery can give it new life.
Bringing It All Together
Creating a rustic small farmhouse kitchen isn't just about the aesthetic; it's about the feeling. By using natural materials, vintage finds, and handmade touches, you can craft a space that's both functional and inviting. Remember, the heart of a farmhouse kitchen lies in its simplicity and charm. Don't be afraid to mix old with new or to add your personal touch. Whether it's a handcrafted table, open shelving, or a farmhouse sink, each element should reflect your style and needs. So, roll up your sleeves, gather your tools, and start transforming your kitchen into a cozy farmhouse haven. Happy DIY-ing!
How can I create a rustic look in my small farmhouse kitchen?
Use reclaimed wood for shelves and cabinets. Add vintage hardware like iron handles. Incorporate open shelving to display mason jars and ceramic dishes.
What colors work best for a farmhouse kitchen?
Stick to neutral tones like white, cream, and gray. Add pops of color with soft blues or sage green. These colors keep the space bright and airy.
How do I maximize storage in a small kitchen?
Use vertical space by installing tall cabinets or open shelves. Add hooks for hanging pots and pans. Consider a kitchen island with built-in storage.
What kind of lighting suits a farmhouse kitchen?
Go for pendant lights with metal shades or mason jar lights. Under-cabinet lighting can also add a warm glow. Natural light is always a plus, so keep windows uncluttered.
Can I mix modern elements with rustic decor?
Absolutely! Combine stainless steel appliances with wooden countertops. Use sleek faucets with a farmhouse sink. The mix adds character and keeps the space functional.
What are some budget-friendly ways to update my kitchen?
Paint your cabinets and add new hardware. Use peel-and-stick backsplash tiles. DIY some decor like a chalkboard wall or floating shelves.
How do I choose the right countertops for a farmhouse look?
Butcher block countertops are a classic choice. Quartz or granite with a matte finish can also work. Look for materials that are durable and easy to maintain.
What kind of flooring works best in a farmhouse kitchen?
Wooden floors or wood-look tiles are ideal. Stone tiles can also add a rustic touch. Choose something durable and easy to clean.