
Home>Home & Furniture>Garage & Basement>How to Fix Water Leaking into Basement
Garage & Basement
How to Fix Water Leaking into Basement
Published: August 30, 2024
Learn how to fix water leaking into your basement with our comprehensive guide. Discover effective solutions to keep your basement dry and prevent future leaks.
(Many of the links in this article redirect to a specific reviewed product. Your purchase of these products through affiliate links helps to generate commission for Twigandthistle.com, at no extra cost. Learn more)
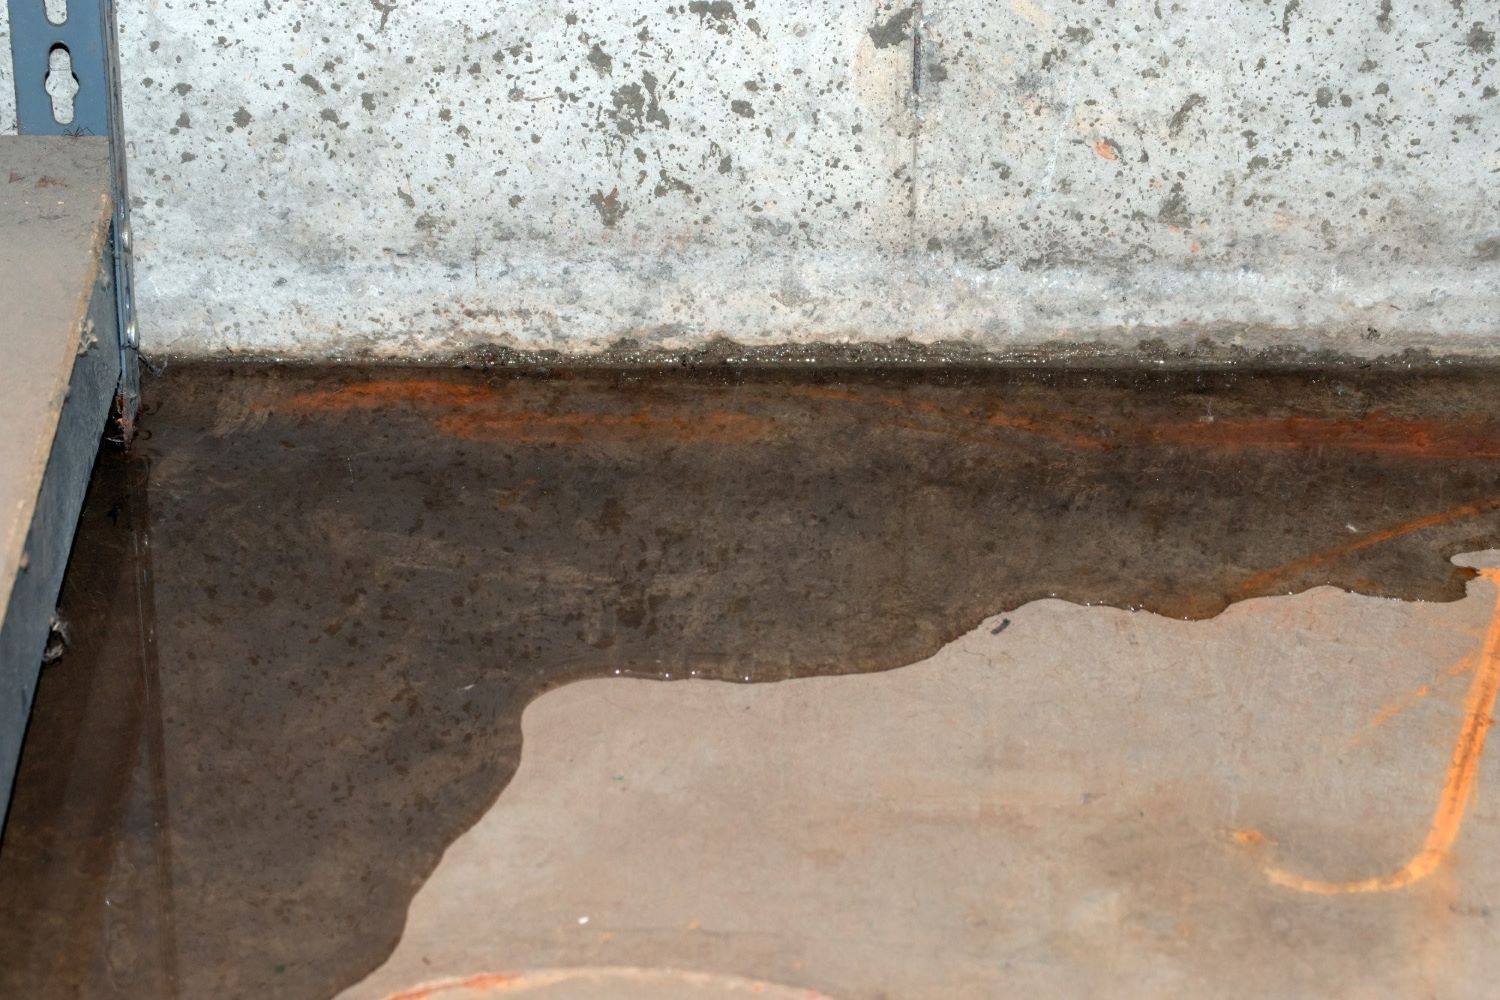
Water leaking into your basement can cause major headaches. From damp smells to potential mold growth, it's crucial to address the issue quickly. Often, the problem comes from poor drainage around your home or cracks in the foundation. Don't worry; you can fix these problems with some basic tools and a bit of elbow grease. This guide will help you understand common causes of basement leaks and show you how to fix them. Soon, you'll have a dry, comfortable space again. Ready to roll up your sleeves? Let's get started!
Getting Ready for the Job
Inspect the Area: Check for cracks in walls or floors. Identify where water enters.
Clear the Space: Move furniture, boxes, and other items away from the affected area. Ensure you have enough room to work.
Gather Tools and Materials: You’ll need a flashlight, waterproof sealant, a trowel, a brush, and a bucket. Having everything ready saves time.
Wear Safety Gear: Put on gloves, safety goggles, and a mask. Protect yourself from dust and chemicals.
Clean the Surface: Remove dirt, mold, and old paint from the area. Use a brush and cleaner to ensure the surface is ready for sealing.
Dry the Area: Use a fan or dehumidifier to dry the space completely. Water can prevent sealant from sticking properly.
Check Weather Forecast: Ensure no rain is expected for a few days. This helps the sealant cure without interference.
Plan for Ventilation: Open windows or use fans to ventilate the basement. Proper airflow helps dry the sealant and reduces fumes.
Prepare for Disposal: Have trash bags ready for debris and old materials. Keep your workspace tidy and safe.
Test Your Tools: Make sure everything works before starting. Check your flashlight, and ensure your sealant isn’t expired.
Gather Your Materials and Tools
- Shovel: Used for digging around the foundation to expose cracks.
- Bucket: Collects debris and water during the repair process.
- Waterproofing Membrane: A barrier applied to the exterior foundation walls to prevent water from seeping in.
- Hydraulic Cement: Seals cracks and holes in the foundation. It expands as it dries, creating a tight seal.
- Wire Brush: Cleans the surface of the foundation before applying sealants or membranes.
- Caulking Gun: Applies waterproof sealant to cracks and joints.
- Waterproof Sealant: Fills small cracks and gaps to prevent water infiltration.
- Trowel: Spreads cement and sealant evenly over surfaces.
- Gravel: Improves drainage around the foundation.
- Drainage Pipe: Redirects water away from the foundation.
- Sump Pump: Removes accumulated water from the basement.
- Safety Gear: Includes gloves, goggles, and a dust mask to protect during the repair process.
- Flashlight: Illuminates dark areas in the basement for better visibility.
- Measuring Tape: Ensures accurate measurements for materials and repairs.
- Plastic Sheeting: Protects areas from debris and water during repairs.
Required Skills and Time Commitment
Skill Level: Intermediate
Time Required: 1-2 days
- Identify the Source: 1-2 hours
- Clean the Area: 1-2 hours
- Seal Cracks: 3-4 hours
- Install a Sump Pump: 4-6 hours
- Apply Waterproof Coating: 3-4 hours
Detailed Steps to Fix the Leak
Identify the Source:
- Inspect basement walls and floors for cracks.
- Check gutters and downspouts for clogs.
- Look for pooling water around the foundation.
Clean Gutters and Downspouts:
- Remove leaves and debris from gutters.
- Ensure downspouts direct water at least 5 feet away from the house.
Seal Cracks:
- Use a wire brush to clean cracks in walls and floors.
- Apply hydraulic cement to seal cracks.
Install a Sump Pump:
- Dig a pit in the lowest part of the basement.
- Place the sump pump in the pit.
- Connect the pump to a discharge pipe leading outside.
Improve Grading:
- Add soil around the foundation to create a slope away from the house.
- Ensure the slope extends at least 10 feet from the foundation.
Apply Waterproofing Paint:
- Clean basement walls thoroughly.
- Apply waterproofing paint with a brush or roller.
Install a French Drain:
- Dig a trench around the perimeter of the basement.
- Lay perforated pipe in the trench.
- Cover the pipe with gravel and soil.
Check for Plumbing Leaks:
- Inspect pipes for leaks or condensation.
- Repair or replace any damaged pipes.
Maintain Regularly:
- Clean gutters and downspouts twice a year.
- Inspect basement walls and floors for new cracks.
- Test the sump pump periodically to ensure it works.
Helpful Tips and Tricks
Seal Cracks: Use hydraulic cement to seal any visible cracks in walls or floors. This material expands as it dries, blocking water effectively.
Improve Drainage: Ensure gutters and downspouts direct water at least 10 feet away from your house. Use downspout extenders if necessary.
Slope Soil: Make sure the soil around your home slopes away from the foundation. This prevents water from pooling near your basement walls.
Install a Sump Pump: A sump pump can remove water that accumulates in a sump basin, keeping your basement dry.
Use Waterproof Paint: Apply waterproof paint to basement walls. This can help seal minor leaks and prevent moisture from seeping through.
Check Window Wells: Ensure window wells have proper covers and drainage. Water can easily enter through basement windows if these are not maintained.
Install a French Drain: A French drain can help redirect water away from your home. This involves digging a trench around the perimeter and filling it with gravel and a perforated pipe.
Dehumidify: Use a dehumidifier to reduce moisture levels in your basement. This can prevent mold growth and other moisture-related issues.
Common Mistakes to Avoid:
Ignoring Small Leaks: Small leaks can become big problems. Address them immediately.
Using the Wrong Sealant: Not all sealants are created equal. Use hydraulic cement for cracks and waterproof paint for walls.
Poor Downspout Placement: Ensure downspouts direct water far enough away from the foundation. Short downspouts can cause water to pool near your home.
Alternatives for Materials or Methods:
Epoxy Injections: For larger cracks, consider using epoxy injections instead of hydraulic cement. This method can provide a stronger seal.
Exterior Waterproofing: If interior methods fail, consider exterior waterproofing. This involves excavating around the foundation and applying a waterproof membrane.
Gravel Trenches: Instead of a full French drain, you can dig gravel trenches to help with water drainage. This is a simpler, less expensive option.
Estimating the Cost
Materials:
- Hydraulic Cement: $20 for a 10 lb. bucket
- Waterproof Sealant: $30 for a 1-gallon can
- Concrete Patch: $15 for a 1-quart container
- Plastic Sheeting: $10 for a 10x25 ft. roll
- Drainage Pipe: $50 for a 10 ft. section
- Gravel: $25 per cubic yard
- Sump Pump: $100 for a basic model
Tools:
- Trowel: $10
- Caulking Gun: $5
- Utility Knife: $5
- Shovel: $15
- Drill: $40
- Buckets: $5 each (need 2)
Total Estimated Cost: Around $350
Budget-Friendly Alternatives:
- Hydraulic Cement: Use regular cement mix, $10 for a 10 lb. bag
- Waterproof Sealant: Use tar, $20 for a 1-gallon can
- Concrete Patch: Use mortar mix, $10 for a 1-quart container
- Plastic Sheeting: Use heavy-duty trash bags, $5 for a pack
- Drainage Pipe: Use PVC pipe, $30 for a 10 ft. section
- Sump Pump: Use a manual pump, $50
Total Estimated Cost with Alternatives: Around $250
Different Approaches and Customizations
Alternative materials can make a big difference. Instead of traditional concrete, try using hydraulic cement. It expands as it dries, filling cracks more effectively. For sealing walls, consider epoxy or polyurethane injections. These materials are flexible and can move with the foundation, preventing future leaks.
Colors can also be customized. Waterproofing paint comes in various shades. Choose a color that matches your basement decor. Light colors can make the space feel brighter and more inviting.
Styles of drainage systems offer another way to customize. French drains are a popular choice, but you could also install a sump pump system. Sump pumps actively remove water, which can be more effective in areas with heavy rainfall.
For a more natural look, use gravel and landscaping fabric around the exterior foundation. This not only helps with drainage but also adds to the aesthetic appeal of your home.
Interior drainage systems can be hidden behind finished walls. This keeps the basement looking clean and modern while still protecting against water damage.
Window well covers can be customized to match your home's exterior. Choose from clear plastic, metal, or even decorative grates. These covers prevent water from pooling around basement windows.
Gutter extensions can be another area for customization. Instead of standard downspouts, use decorative chains or underground drainage pipes. This keeps water away from the foundation and adds a unique touch to your home’s exterior.
Eco-Friendly Solutions
Inspect your basement walls for cracks. Use eco-friendly sealants like soy-based or water-based products to fill them. These sealants are less harmful to the environment compared to traditional ones.
Install a rain barrel to collect rainwater from your gutters. This reduces the amount of water that can seep into your basement. Plus, you can use the collected water for gardening.
Use recycled materials for any necessary repairs. For example, if you need to replace damaged drywall, look for drywall made from recycled content.
Improve drainage around your home by adding a French drain. This can be done using recycled gravel and perforated pipes. French drains help direct water away from your foundation.
Plant native plants around your home. Their deep roots help absorb excess water, reducing the chance of it entering your basement. Native plants are also better for the local ecosystem.
Check your gutters and downspouts. Make sure they are clear of debris and direct water at least 10 feet away from your home. Use recycled materials for any gutter repairs or extensions.
Install a sump pump if you don’t already have one. Look for energy-efficient models to reduce electricity use. A sump pump helps remove water that has already entered your basement.
Insulate your basement walls with eco-friendly insulation like cellulose or recycled denim. This helps keep moisture out and improves energy efficiency.
Use non-toxic mold removers if you find mold. These are safer for you and the environment. Look for products labeled as biodegradable or plant-based.
Consider a green roof if you’re up for a bigger project. Green roofs absorb rainwater, provide insulation, and create a habitat for wildlife. They can significantly reduce the amount of water that reaches your basement.
Keep Your Basement Dry
Fixing water leaks in your basement isn't just about patching cracks. It's about ensuring proper drainage, sealing gaps, and maintaining gutters. Regularly check for cracks in walls and floors. Use waterproof sealants to plug them up. Make sure your gutters and downspouts direct water away from your house. Consider installing a sump pump if you have persistent issues. Don't forget to grade the soil around your home so water flows away, not toward your foundation. Taking these steps can save you from bigger headaches down the road. A dry basement means a healthier home, fewer repairs, and peace of mind. So, roll up your sleeves, grab your tools, and get to work. Your basement will thank you!
How can I tell if water is leaking into my basement?
Look for damp spots, puddles, or musty smells. Check walls and floors for cracks or discoloration. If you see any of these signs, you might have a leak.
What are the common causes of basement leaks?
Poor drainage, cracked walls, and faulty gutters are usual suspects. Sometimes, high water tables or heavy rains can also cause leaks.
How do I fix a small crack in my basement wall?
Clean the crack, then fill it with hydraulic cement or epoxy. These materials expand and seal the crack, keeping water out.
What should I do if my gutters are causing the leak?
Clean your gutters and make sure they’re not clogged. Extend downspouts away from your house to direct water away from the foundation.
Can landscaping help prevent basement leaks?
Yes! Sloping soil away from your house helps water flow away from the foundation. Planting shrubs and grass can also absorb excess water.
Is it necessary to waterproof my basement?
If you have recurring leaks, waterproofing can be a good investment. It involves applying sealants and installing drainage systems to keep water out.
When should I call a professional?
If you’ve tried DIY fixes and still have leaks, or if the problem seems severe, it’s time to call a professional contractor. They can assess the situation and provide a long-term solution.